Chrysler Le Baron, Dodge Dynasty, Plymouth Acclaim. Manual — part 178

(10) Locate feature strip insert at end of bow. Slide
feature strip to the side and separate strip from bow.
Do not damage foam filler strips attached to fourth
bow.
(11) Separate top cover from fourth roof bow.
(12) Remove rivets holding rear window retainer
to fourth roof bow.
(13) Separate retainer from bow.
(14) Mark location of stay pads and rear window
zipper apron to aid installation.
(15) Remove staples holding stay pads to fourth
roof bow.
(16) Remove staples holding rear window zipper
apron to fourth roof bow.
(17) Remove staples holding side stay pads to
fourth roof bow.
(18) Separate fourth roof bow from vehicle.
INSTALLATION
Reverse the preceding operation.
FORWARD ROOF RAIL
REMOVAL
(1) Lower convertible top and remove top header
trim cover.
(2) Remove screws holding pivot bracket to for-
ward roof rail.
(3) Remove bolt, washer and bushing holding cen-
ter link arm to forward roof rail.
(4) Remove bolt, washer and bushing holding con-
trol link arm to forward roof rail.
(5) Separate forward roof rail from frame.
INSTALLATION
Reverse the preceding operation.
ROOF LINKAGE
REMOVAL (FIG. 12)
(1) Disengage top header latches.
(2) Remove bolt, washer and bushing holding bal-
ance link arm to control link.
(3) Remove bolt, washer and bushing holding bal-
ance link arm to rear roof rail behind quarter trim
link.
(4) Separate balance link arm from vehicle.
INSTALLATION
Reverse the preceding operation.
REAR ROOF RAIL
REMOVAL (FIG. 13)
(1) Remove quarter trim panel.
(2) Disengage top latches, do not lower top.
(3) Remove quarter glass and weatherstrip.
(4) Loosen bolts holding rear roof rail main pivot
plate to quarter panel.
(5) Remove clip and clevis pin holding gas assist
cylinder to rear roof rail.
(6) Remove fourth roof bow slat spring.
(7) Remove pivot bolt holding slat to rear roof rail.
(8) Remove pivot bolt holding center link to rear
roof rail.
(9) Remove bolts holding third roof bow to rear
roof rail.
(10) Remove pivot bolt holding rear roof rail to
main pivot bracket.
(11) Separate rear roof rail from roof frame.
INSTALLATION
Reverse the preceding operation.
STATIONARY QUARTER GLASS AND
WEATHERSTRIP
REMOVAL (FIG. 14)
(1) Lower convertible top.
(2) Remove quarter trim panel.
(3) Remove nut holding quarter glass to rear roof
rail.
Fig. 11 Fourth Roof Bow
Fig. 12 Roof Rails and Linkage
Ä
AP/27 CONVERTIBLE
23 - 121
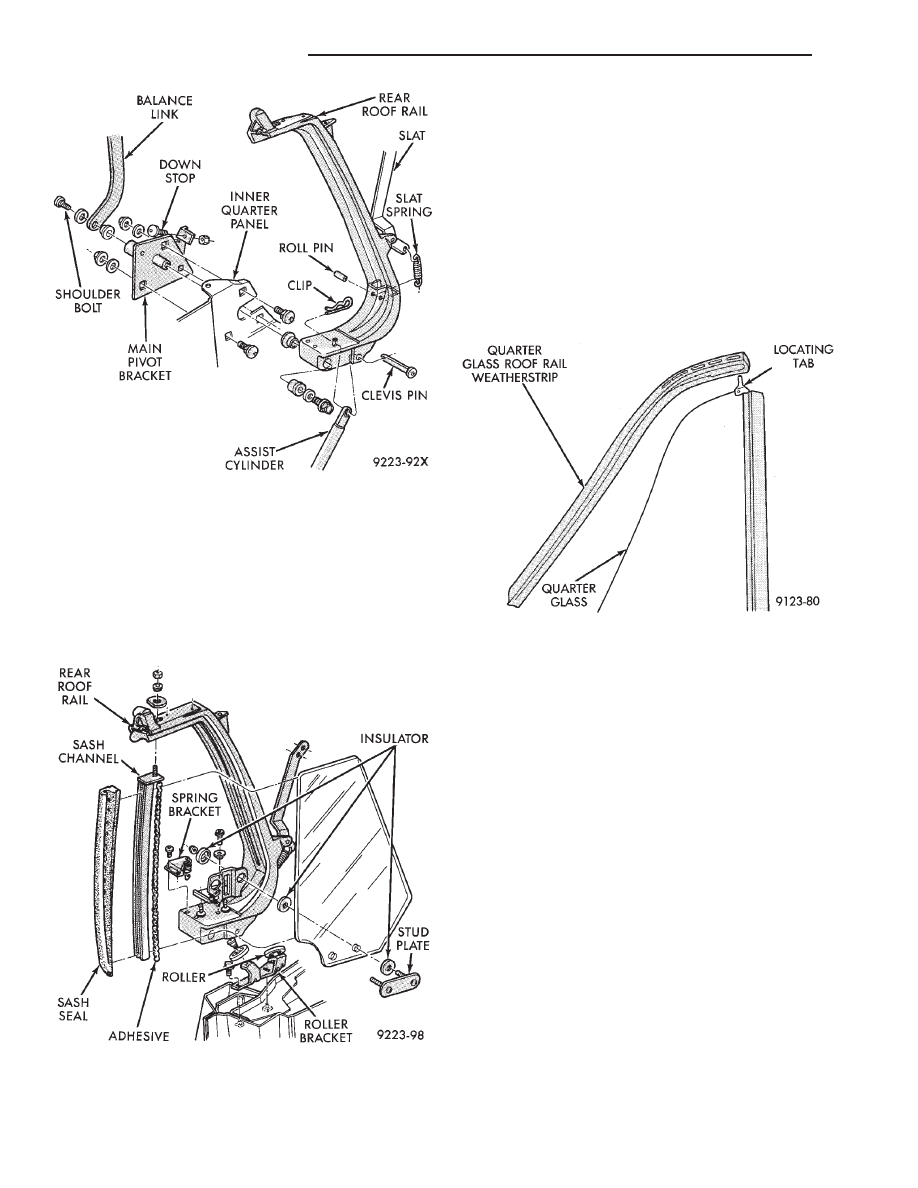
(4) Remove nuts and plastic insulators holding
quarter glass to lower mounting bracket. Separate
mounting stud plate and plastic insulators from
glass.
(5) Slide glass downward to clear upper stud from
top rail.
(6) Separate glass and weatherstrip from convert-
ible top frame.
INSTALLATION
(1) Install roof rail weatherstrip on glass (Fig. 15).
(2) Position glass assembly in convertible top
frame opening.
(3) Install nut and washer to hold upper glass stud
to top rail.
(4) Install lower glass stud plate and plastic insu-
lators through holes at bottom of glass.
(5) Install plastic insulators and nuts to hold glass
and stud plate to spring bracket.
(6) Before tightening nuts at top and bottom of
glass, verify alignment to door glass and top rail
weatherstrip.
(7) Secure all nuts holding glass to vehicle and in-
stall quarter trim panel.
TOP LIFT ASSIST CYLINDER
REMOVAL (FIG. 16)
(1) Remove interior trim as necessary to gain ac-
cess to quarter panel to top frame attachment bolts
and gas cylinder.
(2) With top in up position (not latched). Loosen
top frame to quarter panel reinforcement bolts to al-
low top frame to shift rearward.
(3) Remove clevis pin holding gas cylinder to top
frame.
(4) Remove door ajar switch from B-pillar below
door striker.
(5) Through door ajar switch mounting hole, re-
move bolt holding bottom of gas cylinder to quarter
panel reinforcement.
(6) Separate top lift assist cylinder from vehicle.
INSTALLATION
Reverse the preceding operation.
REAR WINDOW
REMOVAL (FIG. 17)
There are foam strips attached to the outboard cor-
ners of the No. 4 bow on short tacking strips. These
are used to prevent any read-through of the bow. The
Fig. 13 Rear Roof Rail
Fig. 14 Stationary Quarter Glass and Weatherstrip
Fig. 15 Quarter Glass Roof Rail Weatherstrip
23 - 122
AP/27 CONVERTIBLE
Ä
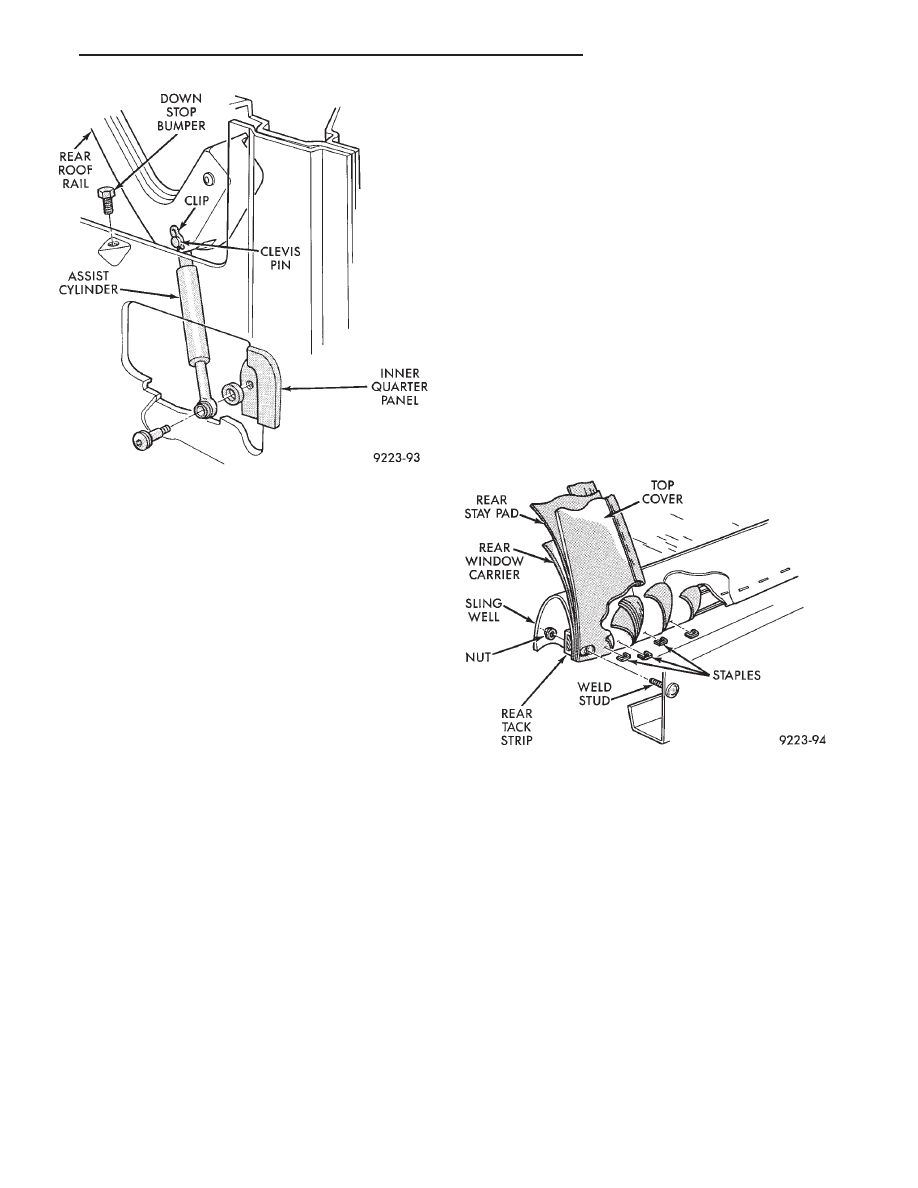
foam is easily damaged and may need replacement.
Inspect them, if they are either loose or missing re-
place them as necessary.
(1) Unlock and raise the trunk lid.
(2) Remove rear seat back.
(3) Apply masking tape to the painted surfaces
around the top of the quarter panels to avoid damage
during tack strip removal.
(4) Remove the nuts and bolts holding top cover
rear tack strip to deck filler panel and quarter pan-
els.
(5) Separate the tack strip from the quarter panel
flanges.
(6) Using a suitable white marking pencil, mark
the edges of top cover on the tack strip to aid instal-
lation.
(7) Remove staples holding top cover to the tack
strip.
(8) Separate top cover from the tack strip.
(9) Using a suitable white marking pencil, mark
the locations of the rear stay pads tack strip to aid
installation.
(10) Remove staples holding lower end of rear stay
pads to tack strip.
(11) Mark location of suspender strap on the tack
strip to aid installation.
(12) Remove staples holding lower end of sus-
pender straps to tack strip.
(13) Slide feature strip from retainer channel on
the fourth roof bow.
(14) Separate top cover from the fourth roof bow
retainer.
(15) Remove rivets holding retainer channel to
fourth roof bow.
(16) Separate retainer channel from fourth roof
bow.
(17) Remove staples holding rear stay pads and
suspender straps to fourth roof bow.
(18) Separate rear stay pads and suspender straps
from the vehicle.
(19) Using a suitable white marking pencil, mark
the edge of the upper rear window on the fourth roof
bow to aid installation.
If the foam filler strips must be replaced, mark the
locations of the filler strips on the fourth roof bow to
aid installation.
(20) Remove staples holding rear window to fourth
roof bow.
(21) Remove staples holding outboard corners of
rear window valance and carrier from rear tack strip.
(22) Separate bottom of rear window from rear tack
strip.
(23) Separate top of rear window from fourth roof
bow.
(24) Separate rear window from vehicle.
INSTALLATION
Cut square holes in lower edge of rear window fab-
ric for mounting studs of rear tack strip. Holes
should be no higher or wider than fastener holes.
Holes should be open ended on the bottom edge. Use
original rear window as a template for marks and
hole locations.
(1) Tape paper to front and back sides of new rear
window without attaching tape to rear window.
(2) Position centerline of upper rear window val-
ance to the centerline of the fourth roof bow.
(3) Staple the rear window to the fourth roof bow
tack strip from center, outward. Install staples at one
inch spacing across the roof bow to allow for staples
to hold on the suspender straps and stay pads.
(4) Install foam filler strip at the ends of the
fourth roof, if replacement is required.
(5) Install side stay pads on fourth roof bow.
(6) staple side stay pads to fourth roof bow.
Fig. 16 Gas Assist Cylinder
Fig. 17 Rear Window
Ä
AP/27 CONVERTIBLE
23 - 123
(7) Install lower portion of rear window in position
on rear tack strip, align to the bottom center mark.
(8) Staple the corners of the rear window valance
and carrier to the rear tack strip. Verify the edges
are even.
(9) Position rear stay pads and suspender straps
over fourth roof bow and over the outboard ends of
the rear window fabric.
(10) Stretch lower end of suspender straps to edge
of rear tack strip.
(11) Staple lower end of suspender straps to rear
tack strip.
(12) Staple lower end of rear stay pad to rear tack
strip.
(13) Position top cover retainer channel on fourth
roof bow.
(14) Rivet top cover retainer channel to fourth roof
bow with aluminum pop-rivets.
(15) Position top cover over the fourth roof bow re-
tainer locating the centerline reference marks.
(16) Slide feature strip insert into the fourth roof
bow retainer channel.
(17) Position top cover on rear tack strip.
(18) Staple top cover to rear tack strip starting
from the outboard corner and stapling inward.
(19) Position rear tack strip over the mounting
studs on inside of quarter panels.
(20) Install nuts and bolts to hold rear tack strip to
the quarter panels an deck panel.
(21) Install rear seat back.
(22) Remove protective materials that was applied
to the body during to removal operation.
TOP COVER
REMOVAL (FIG. 18)
(1) Open rear window and position glass, as flat as
possible, in the drop well.
(2) Lower convertible top.
(3) Remove rear seat cushion and back.
(4) Remove quarter trim panels.
(5) Remove quarter glass assemblies.
(6) Raise top to mid-point.
(7) Remove screws holding cover retainer to top
header. Separate retainer from header.
(8) Separate
top
cover
from
adhesive
on
top
header.
(9) Open trunk lid. Remove screws holding rear
deck filler panel to rear deck below rear window.
Mark screw locations before removal to aid installa-
tion. The rear deck filler panel applies pressure to
top cover to eliminate wrinkles.
(10) From in luggage compartment, remove nuts
and bolts holding lower top tack strip to deck and
quarter panels. Lift sling well upward to gain access
to fasteners.
CAUTION: Do not damage painted surfaces when
separating tack strip from mounting locations.
(11) Separate tack strip from deck and quarter
panels and remove staples holding top cover. Leave
rear window skirt, pads and drop well attached to
tack strip.
(12) Pull top cover from adhesive in quarter glass
weatherstrip channel.
(13) Remove rivets holding top cover roof rail ten-
sion cables to top header. Pull tension cables from
rear of listing pockets on top cover.
(14) Remove screws holding top cover fastener
strip to center roof bows. Separate top cover from
roof bows and pull retainers from listing pockets on
top cover.
(15) Fold top cover so that all material is above
rear roof bow. Slide rear top cover retainer to one
side from rear roof bow channel.
(16) Separate top cover from vehicle.
INSTALLATION
Reverse the preceding operation. Use contact adhe-
sive to secure top cover to header and quarter glass
weatherstrip channels. Fold replacement convertible
top along center line and mark with tailors chalk.
Measure and mark the center line of header, center
bow and tack strip. Install top cover from the center
line out. Do not over stretch top cover when remov-
ing wrinkles. Allow for some shrinkage. Water leak
and wind noise tests should be performed before re-
turning vehicle to use.
SLING-WELL
REMOVAL
(1) Remove rear seat cushion and back.
(2) Remove quarter trim panels.
(3) Remove rear shoulder harness turning loop cov-
ers.
(4) Remove bolts holding shoulder harness turning
loops to seat back support.
(5) Remove seat back support trim cover.
(6) Disengage wire hanger from hole in quarter
panel near front seat belt retractor.
(7) Disengage convertible top header latches.
(8) From in luggage compartment, remove nuts
and bolts holding lower top tack strip to deck and
quarter panels. Lift sling well upward to gain access
to fasteners.
CAUTION: Do not damage painted surfaces when
separating tack strip from mounting locations.
(9) Separate tack strip from deck and quarter pan-
els and remove staples holding sling well and top
cover to tack strip.
(10) Separate sling well from vehicle.
23 - 124
AP/27 CONVERTIBLE
Ä
Нет комментариевНе стесняйтесь поделиться с нами вашим ценным мнением.
Текст