Isuzu KB P190. Manual — part 705
Engine Mechanical – V6
Page 6A1–43
Page 6A1–43
2.13 Coolant in Combustion Chamber
Definition
Excessive white smoke and/or coolant type odour emitted from the exhaust pipe may indicate coolant in the combustion
chamber. Low coolant levels, an inoperative engine cooling fan or a faulty thermostat may lead to an over-temperature
condition which may cause internal engine component damage. A slower than normal cranking speed may indicate
coolant entering the combustion chamber.
1
Remove the spark plugs and inspect for spark plugs saturated by coolant and coolant in the cylinder bore.
2
Inspect by performing a cylinder leakage test, refer to
2.16 Cylinder Leakage Test
. During this test, excessive air
bubbles in the coolant may indicate a faulty head gasket, cracked cylinder head or cracked cylinder block.
3
Inspect by performing a cylinder compression test. Two cylinders side-by-side on the cylinder block, with low
compression, may indicate a failed cylinder head gasket, refer to
2.15 Engine Compression Test
.
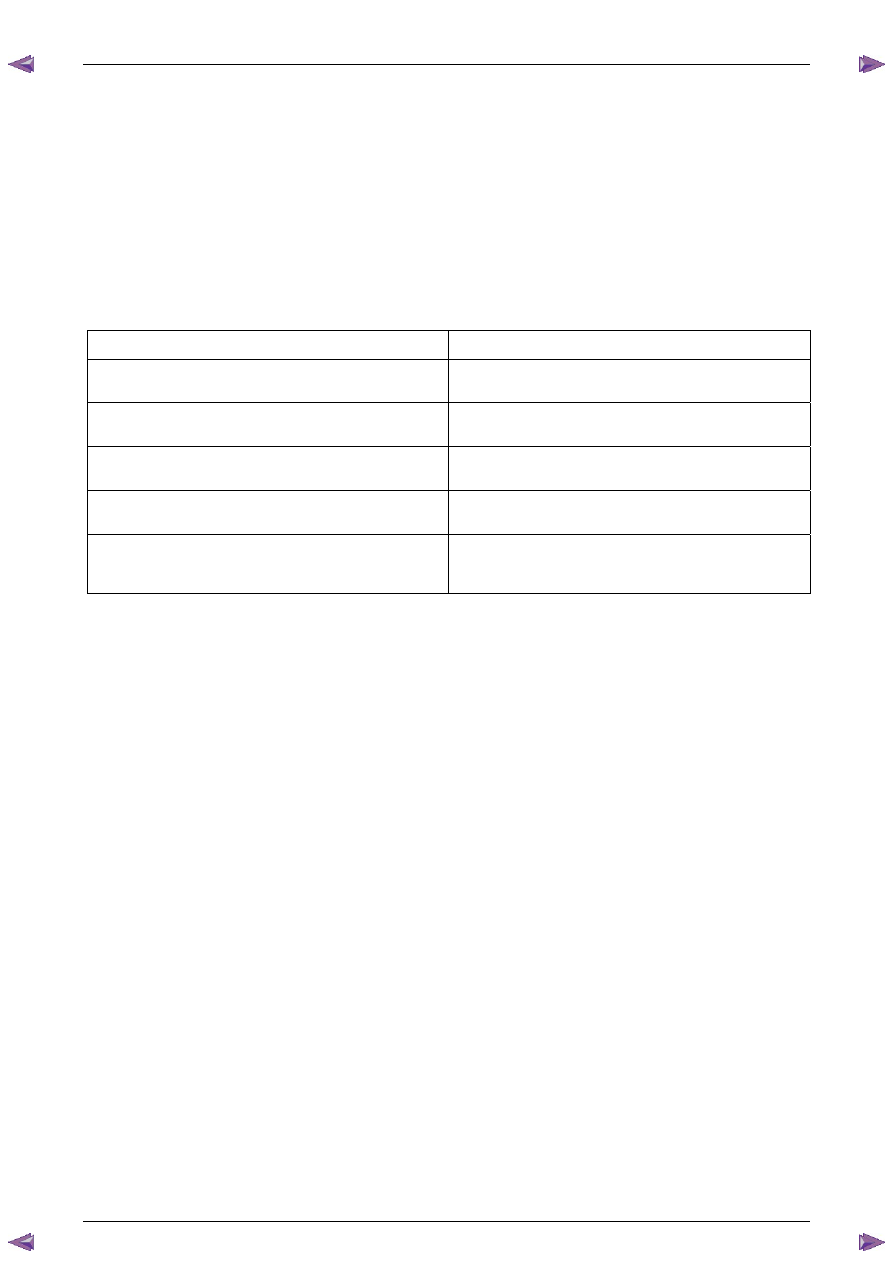
Cause Correction
Cracked intake manifold or faulty gasket.
Replace components as required, refer to 3.10 Intake
Manifold Assembly – Complete.
Faulty cylinder head gasket.
Replace the cylinder head gasket, refer to 3.22 Cylinder
Head Assembly.
Warped cylinder head.
Repair or replace the cylinder heads as required, refer to
3.22 Cylinder Head Assembly.
Cracked cylinder liner or block
Repair or replace the cylinder block and components as
required, refer to 4.7 Cylinder Block.
Cylinder head or cylinder block porosity.
Repair or replace the cylinder block or cylinder heads as
required, refer to 4.7 Cylinder Block or 3.22 Cylinder Head
Assembly.
Engine Mechanical – V6
Page 6A1–44
Page 6A1–44
2.14 Coolant in Engine Oil
Definition
Foamy or discoloured oil or an engine oil overfill condition may indicate coolant entering the engine crankcase. Low
coolant levels, an inoperative engine cooling fan or a faulty thermostat may lead to an over-temperature condition which
may result in engine component damage. Contaminated engine oil and oil filters must be replaced.
1
Inspect the oil for excessive foaming or an overfill condition. Oil diluted by coolant may not correctly lubricate the
crankshaft bearings, resulting in component damage, refer to
2.10 Lower Engine Noise, Regardless of Engine
Speed
.
2
Perform a cylinder leakage test, refer to
2.16 Cylinder Leakage Test
. During this procedure, excessive air bubbles
in the engine coolant may indicate a faulty gasket or damaged component.
3
Perform a cylinder compression test. Two cylinders side-by-side on the cylinder block, with low compression, may
indicate a failed cylinder head gasket, refer to
2.15 Engine Compression Test
.
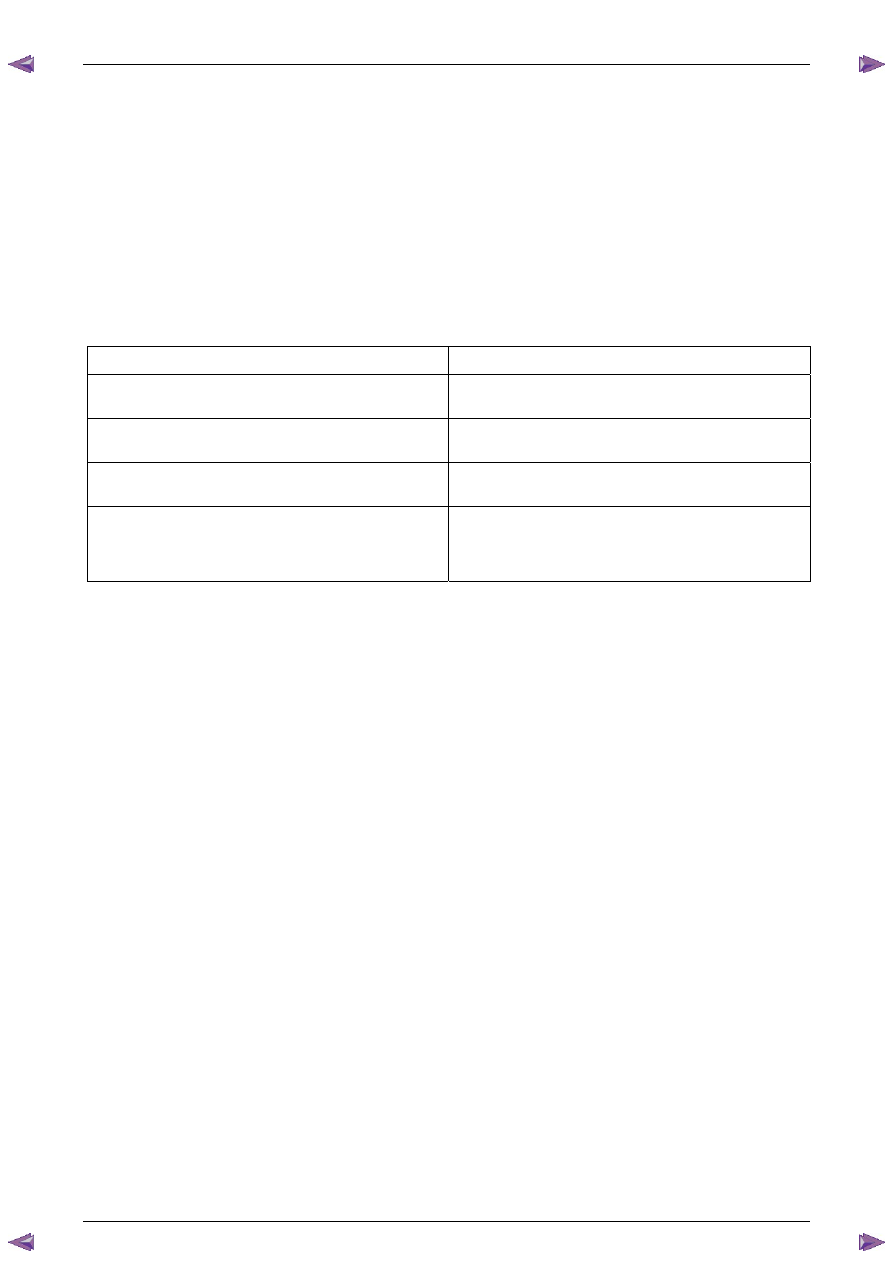
Cause Correction
Faulty cylinder head gasket.
Replace the cylinder head gasket, refer to 3.22 Cylinder
Head Assembly.
Warped cylinder head.
Repair or replace the cylinder heads as required, refer to
3.22 Cylinder Head Assembly.
Cracked cylinder liner or block
Repair or replace the cylinder block and components as
required, refer to 4.7 Cylinder Block.
Cylinder head, cylinder block or intake manifold porosity.
Repair or replace the cylinder block, cylinder heads or
intake manifold components as required, refer to
4.7 Cylinder Block, 3.22 Cylinder Head Assembly or
3.10 Intake Manifold Assembly – Complete.

Engine Mechanical – V6
Page 6A1–45
Page 6A1–45
2.15 Engine Compression Test
A compression pressure test of the engine cylinders determines the condition of the rings, the valves and the head
gasket.
Preliminary Steps
1
Ensure the battery is fully charged.
2
Remove the spark plugs from all cylinders, refer to
Section 6C1-3 Engine Management – V6 – Service Operations
.
N O T E
DTCs will set when the fuel system or the ignition
system is disabled and the engine is cranked.
Disregard DTCs that set under this condition.
3
Disable the fuel system by removing the fuel pump relay, refer to
Section 8A Electrical Body & Chassis
.
4
Start the engine to use any residual fuel from the fuel lines.
4
Disable the ignition coils by removing fuses 34 and 35, refer to
Section 8A Electrical Body & Chassis
.
5
Using Tech 2, command the throttle plate to wide open throttle.
Engine Cylinder Compression Test
1
Install the compression tester to cylinder number 1.
2
While observing the compression tester reading, turn the ignition to the START position for several seconds and
then allow the ignition to return to the ON position.
3
Record the highest compression reading obtained.
4
Repeat the engine compression test for each cylinder.
Test Result Evaluation
Normal engine compression pressure builds quickly and evenly to over 965 kPa. In addition, the lowest reading of an
engine cylinder should not be less than 70 percent of the highest reading. If any cylinder fails the compression test,
adding 15 ml of engine oil to the suspected cylinder may help isolate the following fault condition.
1
A fault condition in the piston rings will produce the following result:
•
A low compression on the first engine cycle
•
The compression tends to build-up with the succeeding engine rotation.
•
The compression improves with the addition of engine oil.
2
A fault condition in an intake or exhaust valve will produce the following result:
•
A low compression on the first engine cycle
•
The compression does not build with the succeeding engine rotation.
•
The compression does not improve with the addition of engine oil.
3
A fault condition in the cylinder head gasket will produce the following result:
•
A low compression on the first engine cycle
•
The compression does not build with the succeeding engine rotation.
•
The compression does not improve with the addition of engine oil.
•
The suspected cylinders are positioned adjacent to each other.
•
The engine oil may be contaminated with engine coolant.
•
The engine coolant may be contaminated with engine oil.
Once the fault has been identified, refer to the relevant service procedure and reinstall the removed components.
Using Tech 2, clear DTCs.

Engine Mechanical – V6
Page 6A1–46
Page 6A1–46
2.16 Cylinder Leakage Test
A leakage test may be performed to measure cylinder/combustion chamber leakage. High cylinder leakage may indicate
one or more of the following:
•
worn or burnt valves,
•
broken valve springs,
•
stuck valve lifters,
•
incorrect valve lash/adjustment,
•
damaged piston,
•
worn piston rings,
•
worn or scored cylinder bore,
•
damaged cylinder head gasket,
•
cracked or damaged cylinder head, or
•
cracked or damaged engine block.
1
Disconnect the battery ground negative cable.
2
Remove the spark plugs from all cylinders, refer to
Section 6C1-3 Engine Management – V6 – Service Operations
.
3
Rotate the crankshaft to place the piston in the cylinder being tested at top dead centre (TDC) of the compression
stroke.
4
Install a commercially available cylinder head leak down tester into the spark plug hole.
N O T E
If required, hold the crankshaft balancer bolt to
prevent the engine from rotating.
5
Apply shop air pressure to the cylinder head leak down tester and adjust according to the manufacturers
instructions.
6
Record the cylinder leakage value. Cylinder leakage that exceeds 25 percent is considered excessive and may
require component service. In excessive leakage situations, inspect for the following conditions:
•
air leakage sounds at the throttle body or air inlet duct that may indicate a worn or burnt intake valve or a
broken valve spring,
•
air leakage sounds at the exhaust system tailpipe that may indicate a worn or burnt exhaust valve or a broken
valve spring,
•
air leakage sounds from the crankcase, oil level indicator tube, or oil fill tube that may indicate worn piston
rings, a damaged piston, a worn or scored cylinder bore, a damaged engine block or a damaged cylinder
head, or
•
air bubbles in the cooling system may indicate a damaged cylinder head or a damaged cylinder head gasket.
7
Perform the leakage test on the remaining cylinders and record the values.
Нет комментариевНе стесняйтесь поделиться с нами вашим ценным мнением.
Текст