Isuzu KB P190. Manual — part 570

6E–110
ENGINE DRIVEABILITY AND EMISSIONS
Fuel System Diagnosis
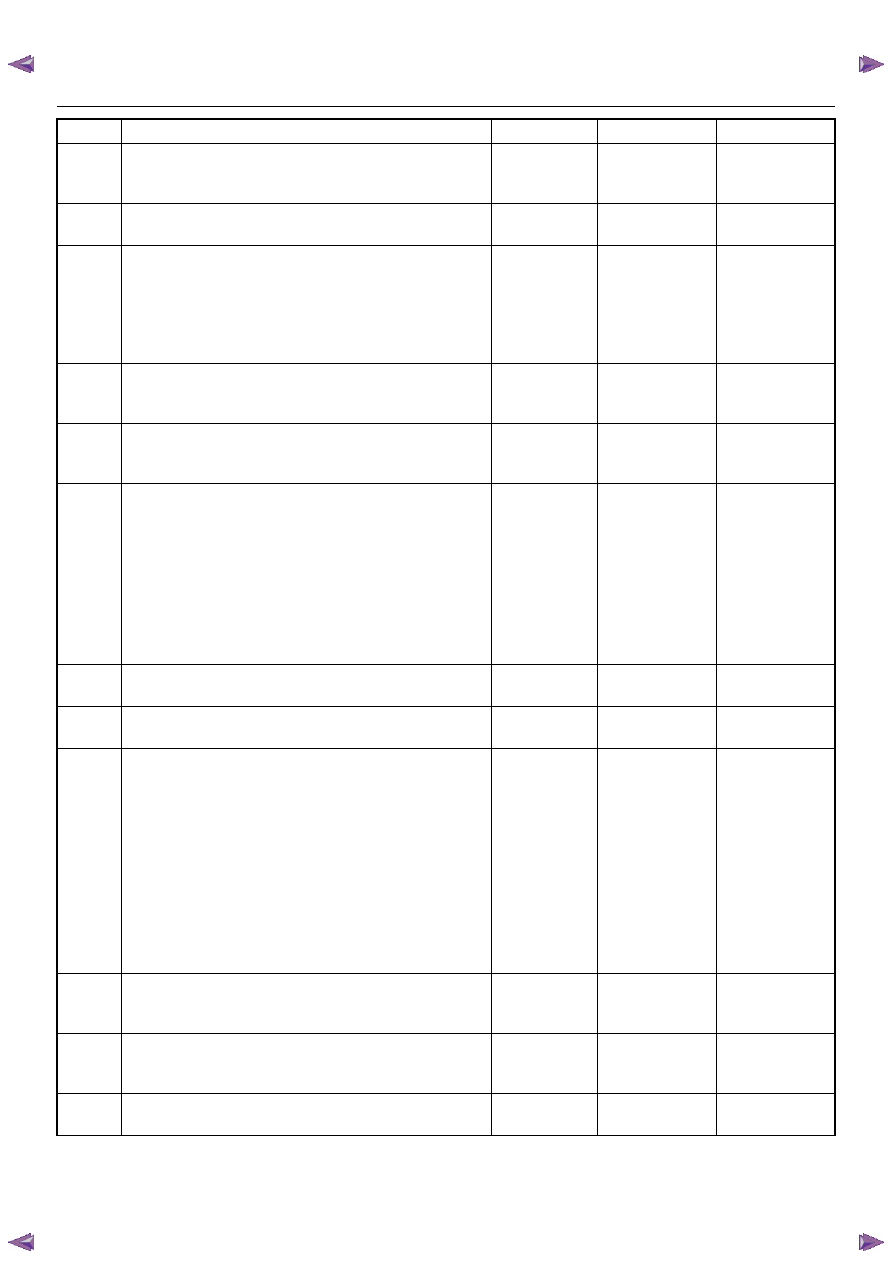
Step
Action
Value(s)
Yes
No
1
Was the “On-Board Diagnostic (OBD) System Check”
performed?
—
Go to Step 2
Go to OBD
System Check
2
1. Turn the ignition OFF.
2. Turn the air conditioning system OFF.
3. Relieve fuel system pressure and install the fuel
pressure gauge.
4. Turn the ignition ON.
NOTE: The fuel pump will run for approximately 2
seconds. Use the Scan Tool to command the fuel
pump ON.
5. Observe the fuel pressure indicated by the fuel
pressure gauge with the fuel pump running.
Is the fuel pressure within the specified limits?
283-376 kPa
(41-55 psi)
Go to Step 3
Go to Step 17
3
Does the fuel pressure indicated by the fuel pressure
gauge remain constant?
NOTE: The fuel pressure will drop when the fuel
pump stops running, then it should stabilize and
remain constant.
—
Go to Step 4
Go to Step 12
4
1. When the vehicle is at normal operating
temperature, turn the ignition ON to build fuel
pressure and observe the measurement on the
gauge.
2. Start the engine and observe the fuel pressure
gauge.
Did the reading drop by the amount specified after the
engine was started?
21-105 kPa
(3-15 psi)
Go to Step 5
Go to Step 9
5
Is fuel pressure dropping off during acceleration,
cruise, or hard cornering?
—
Go to Step 6
Check for
improper fuel
6
Visually and physically inspect the following items for
a restriction:
• The in-line fuel filter.
• The fuel feed line.
Was a restriction found?
—
Verify repair
Go to Step 7
7
Remove the fuel tank and visually and physically
inspect the following items:
• The fuel pump strainer for a restriction.
• The fuel line for a leak.
• Verify that the correct fuel pump is in the vehicle.
Was a problem found in any of these areas?
—
Verify repair
Go to Step 8
8
Replace the fuel pump.
Is the action complete?
—
Verify repair
—
9
1. Disconnect the vacuum hose from the fuel
pressure regulator.
2. With the engine idling, apply 12-14 inches of
vacuum to the fuel pressure regulator.
Does the fuel pressure indicated by the fuel pressure
gauge drop by the amount specified?
21-105 kPa
(3-15 psi)
Go to Step 10
Go to Step 11
ENGINE DRIVEABILITY AND EMISSIONS
6E–111
10
Locate and repair the loss of vacuum to the fuel
pressure regulator.
Is the action complete?
—
Verify repair
—
11
Replace the fuel pressure regulator.
Is the action complete?
—
Verify repair
—
12
1. Run the fuel pump with the Scan Tool.
2. After pressure has built up, turn off the pump and
clamp the supply hose shut with suitable locking
pliers.
Does the fuel pressure indicated by the fuel pressure
gauge remain constant?
—
Go to Step 13
Go to Step 15
13
Visually inspect the fuel supply line and repair any
leaks.
Was a problem found?
—
Verify repair
Go to Step 14
14
Remove the fuel tank and inspect for leaky hose or in-
tank fuel line.
Was a problem found?
—
Verify repair
Go to Step 8
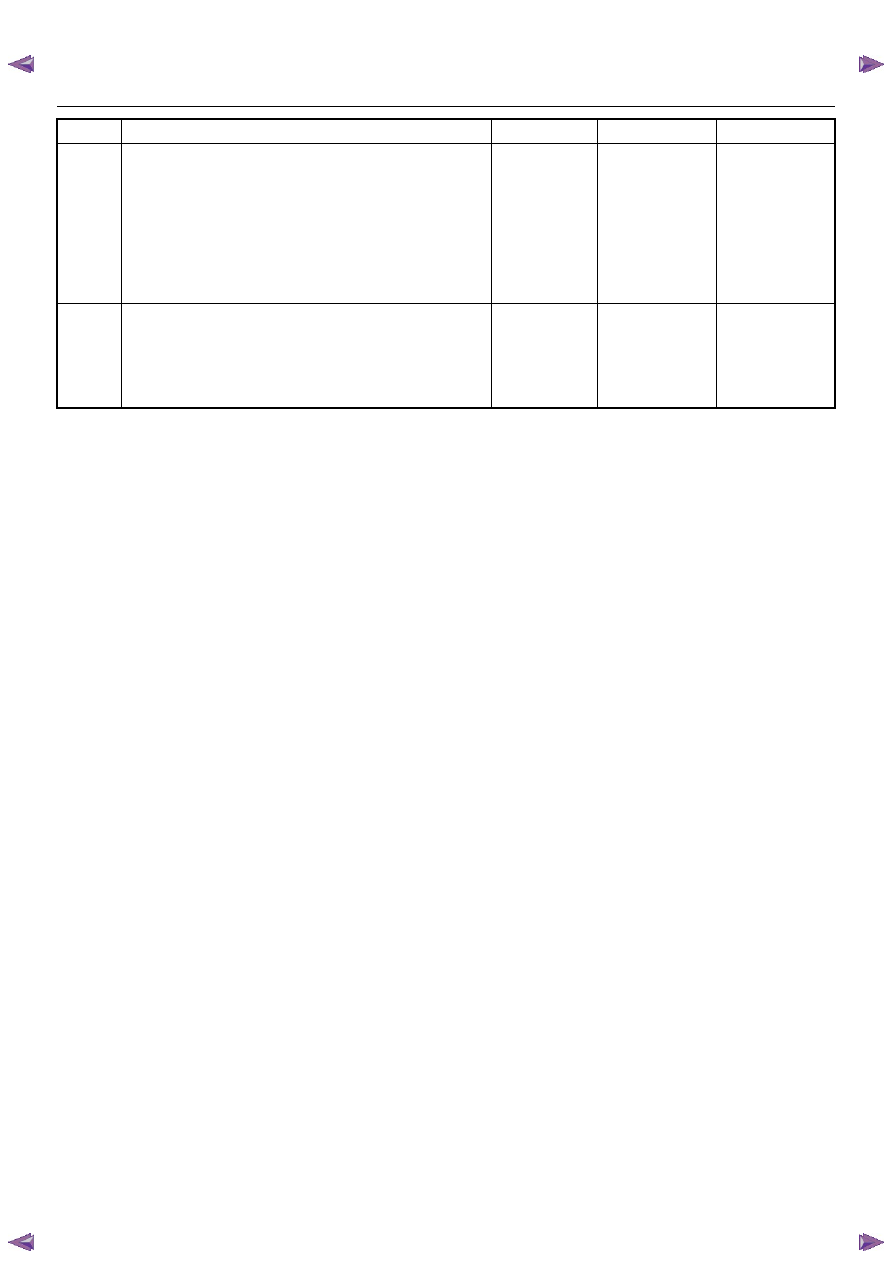
15
1. If the pliers are still clamped to the fuel supply
hose, remove the locking pliers.
2. With suitable locking pliers, clamp the fuel return
line to prevent fuel from returning to the fuel tank.
3. Run the fuel pump with the Scan Tool.
4. After pressure has built up, remove power to the
pump.
Does the fuel pressure indicated by the fuel pressure
gauge remain constant?
—
Go to Step 11
Go to Step 16
16
Locate and replace any leaking fuel injector(s).
Is the action complete?
—
Verify repair
—
17
Is the fuel pressure indicated by the fuel pressure
gauge above the specified limit?
376 kPa
(55 psi)
Go to Step 18
Go to Step 21
18
1. Relieve the fuel pressure. Refer to the Fuel
Pressure Relief.
2. Disconnect the fuel return line from the fuel rail.
3. Attach a length of flexible hose to the fuel rail
return outlet passage.
4. Place the open end of the flexible hose into an
approved gasoline container.
5. Run the fuel pump with the Scan Tool.
6. Observe the fuel pressure indicated by the fuel
pressure gauge with the fuel pump running.
Is the fuel pressure within the specified limits?
290-376 kPa
(42-55 psi)
Go to Step 19
Go to Step 20
19
Locate and correct the restriction in the fuel return
line.
Is the action complete?
—
Verify repair
—
20
Visually and physically inspect the fuel rail outlet
passages for a restriction.
Was a restriction found?
—
Verify repair
Go to Step 11
21
Is the fuel pressure indicated by the fuel pressure
gauge above the specified value?
0 kPa (0 psi)
Go to Step 22
Go to Step 23
Step
Action
Value(s)
Yes
No
6E–112
ENGINE DRIVEABILITY AND EMISSIONS
22
1. Command the fuel pump ON with the Scan Tool.
2. Using suitable pliers which will not damage the
fuel hose, gradually apply pressure with the pliers
to pinch the flexible fuel return hose closed.
376 kPa
(55 psi)
Does the fuel pressure indicated by the fuel pressure
gauge rise above the first specified value?
Caution: Do not let the fuel pressure exceed the
second specified value.
414 kPa
(60 psi)
Go to Step 11
Go to Step 7
23
1. Command the fuel pump ON with the Scan Tool.
2. Remove the fuel filler cap and listen for the sound
of the fuel pump running.
3. Turn the pump off.
Was the fuel pump running?
—
Go to Step 7
Go to Fuel
System
Electrical Test
Chart
Step
Action
Value(s)
Yes
No
ENGINE DRIVEABILITY AND EMISSIONS
6E–113
ECM DIAGNOSTIC TROUBLE CODES (DTC)
Type A
• Emission related.
• Requests illumination of the MIL (Malfunction Indicator Lamp = Check Engine Lamp) of the first trip with a fail.
• Stores a history DTC on the first trip.
• Stores a freeze frame (If empty).
• Stores a fail record.
• Updates the fail record each time the diagnostic test fails.
Type B
• Emission related.
• “Armed” after one trip with fail.
• “Disarmed” after one trip with a pass.
• Requests illumination of the MIL on the second consecutive trip with a fail.
• Store a history DTC on the second consecutive trip with a fail. (The DTC will be armed after the first fail.)
• Stores a freeze frame on the second consecutive trip with a fail (If empty).
• Stores a fail record when the first test fails (not dependent on consecutive trip).
• Updates the fail record each time the diagnostic test fails.
Type D
• Non emission related.
• Does not request illumination of any lamp.
• Stores a history DTC on the first trip.
• Does not store a freeze frame.
• Stores fail record when test fails.
• Updates the fail record each time the diagnostic test fails.
Нет комментариевНе стесняйтесь поделиться с нами вашим ценным мнением.
Текст