Qashqai J11. Seat belt. Service and Repair Manual
SB-1
RESTRAINTS
C
D
E
F
G
I
J
K
L
M
SECTION
SB
A
B
SB
N
O
P
CONTENTS
SEAT BELT
PRECAUTION . . . . . . . . . . . ...
PRECAUTIONS . . . . . . . . . . . . ...
Precaution Necessary for Steering Wheel Rota-
tion After Battery Disconnect . . . . . . . . .....
Precautions for Removing Battery Terminal . . .....
Precaution for Seat Belt Service . . . . . . . ...
Precaution for Work . . . . . . . . . . . . ..
PREPARATION . . . . . . . . . . .
PREPARATION . . . . . . . . . . . . ...
Special Service Tool . . . . . . . . . . . .....
REMOVAL AND INSTALLATION . . . .
FRONT SEAT BELT . . . . . . . . . . .
Exploded View . . . . . . . . . . . . . . ..
SEAT BELT RETRACTOR . . . . . . . . . . .
SEAT BELT RETRACTOR : Removal and Instal-
lation . . . . . . . . . . . . . . . . . . .
SEAT BELT HEIGHT ADJUSTER . . . . . . . ..
SEAT BELT HEIGHT ADJUSTER : Removal and
Installation . . . . . . . . . . . . . . . ....
FRONT SEAT BELT BUCKLE . . . . . . . . ...
FRONT SEAT BELT BUCKLE : Removal and In-
stallation . . . . . . . . . . . . . . . . ...
REAR SEAT BELT . . . . . . . . . . .
Exploded View . . . . . . . . . . . . . . .
SEAT BELT RETRACTOR . . . . . . . . . .
SEAT BELT RETRACTOR : Removal and Instal-
lation . . . . . . . . . . . . . . . . . .
SEAT BELT BUCKLE . . . . . . . . . . . .
SB-2
< PRECAUTION >
PRECAUTIONS
PRECAUTION
PRECAUTIONS
Precaution for Supplemental Restraint System (SRS) "AIR BAG" and "SEAT BELT
PRE-TENSIONER"
INFOID:0000000010505160
The Supplemental Restraint System such as “AIR BAG” and “SEAT BELT PRE-TENSIONER”, used along
with a front seat belt, helps to reduce the risk or severity of injury to the driver and front passenger for certain
types of collision. Information necessary to service the system safely is included in the “SRS AIR BAG” and
“SEAT BELT” of this Service Manual.
WARNING:
Always observe the following items for preventing accidental activation.
• To avoid rendering the SRS inoperative, which could increase the risk of personal injury or death in
the event of a collision that would result in air bag inflation, all maintenance must be performed by
an authorized NISSAN/INFINITI dealer.
• Improper maintenance, including incorrect removal and installation of the SRS, can lead to personal
injury caused by unintentional activation of the system. For removal of Spiral Cable and Air Bag
Module, see “SRS AIR BAG”.
• Never use electrical test equipment on any circuit related to the SRS unless instructed to in this Ser-
vice Manual. SRS wiring harnesses can be identified by yellow and/or orange harnesses or harness
connectors.
PRECAUTIONS WHEN USING POWER TOOLS (AIR OR ELECTRIC) AND HAMMERS
WARNING:
Always observe the following items for preventing accidental activation.
• When working near the Air Bag Diagnosis Sensor Unit or other Air Bag System sensors with the
ignition ON or engine running, never use air or electric power tools or strike near the sensor(s) with
a hammer. Heavy vibration could activate the sensor(s) and deploy the air bag(s), possibly causing
serious injury.
• When using air or electric power tools or hammers, always switch the ignition OFF, disconnect the
battery, and wait at least 3 minutes before performing any service.
Precaution Necessary for Steering Wheel Rotation After Battery Disconnect
INFOID:0000000010505161
CAUTION:
Comply with the following cautions to prevent any error and malfunction.
• Before removing and installing any control units, first turn the ignition power source and accessory
power source to the OFF, then disconnect both battery cables.
• After finishing work, confirm that all control unit connectors are connected properly, then re-connect
both battery cables.
• Always use CONSULT to perform self-diagnosis as a part of each function inspection after finishing
work. If a DTC is detected, perform trouble diagnosis according to self-diagnosis results.
For vehicle with steering lock unit, if the battery is disconnected or discharged, the steering wheel will lock and
cannot be turned.
If turning the steering wheel is required with the battery disconnected or discharged, follow the operation pro-
cedure below before starting the repair operation.
OPERATION PROCEDURE
1.
Connect both battery cables.
NOTE:
Supply power using jumper cables if battery is discharged.
2.
Open driver door.
3.
Turn the ignition switch to the ON position.
(At this time, the steering lock will be released.)
4.
Turn the ignition switch to OFF position with driver door open.
5.
Wait for 3 minutes or longer with driver door open.
NOTE:
• Do not close driver door because the steering wheel locks when driver door is closed.

PRECAUTIONS
SB-3
< PRECAUTION >
C
D
E
F
G
I
J
K
L
M
A
B
SB
N
O
P
• The auto acc function is adapted to this vehicle. For this reason, even when the ignition switch is turned
to OFF position, the accessory power source does not turned OFF and continues to be supplied for a
certain amount of time.
6.
Disconnect both battery cables. The steering lock will remain released with both battery cables discon-
nected and the steering wheel can be turned.
7.
Perform the necessary repair operation.
8.
When the repair work is completed, re-connect both battery cables. With the brake pedal released, turn
the ignition switch from OFF position to ON position, then to LOCK position. (The steering wheel will lock
when the ignition switch is turned to LOCK position.)
9.
Perform self-diagnosis check of all control units using CONSULT.
Precautions for Removing Battery Terminal
INFOID:0000000010505162
• With the adoption of Auto ACC function, ACC power is automatically supplied by operating the intelligent key
or remote keyless entry or by opening/closing the driver side door. In addition, ACC power is supplied even
after the ignition switch is turned to the OFF position, i.e. ACC power is supplied for a certain fixed time.
• When disconnecting the 12V battery terminal, turn off the ACC
power before disconnecting the 12V battery terminal, observing
“How to disconnect 12V battery terminal” described below.
NOTE:
Some ECUs operate for a certain fixed time even after ignition
switch is turned OFF and ignition power supply is stopped. If the
battery terminal is disconnected before ECU stops, accidental DTC
detection or ECU data damage may occur.
• For vehicles with the 2-batteries, be sure to connect the main bat-
tery and the sub battery before turning ON the ignition switch.
NOTE:
If the ignition switch is turned ON with any one of the terminals of
main battery and sub battery disconnected, then DTC may be detected.
• After installing the 12V battery, always check "Self Diagnosis Result" of all ECUs and erase DTC.
NOTE:
The removal of 12V battery may cause a DTC detection error.
HOW TO DISCONNECT 12V BATTERY TERMINAL
Disconnect 12V battery terminal according to instruction described below.
1.
Open the hood.
2.
Turn ignition switch to the ON position.
3.
Turn ignition switch to the OFF position with the driver side door opened.
4.
Get out of the vehicle and close the driver side door.
5.
Wait at least 3 minutes. For vehicle with the engine listed below, remove the battery terminal after a lapse
of the specified time.
CAUTION:
While waiting, never operate the vehicle such as locking, opening, and closing doors. Violation of
this caution results in the activation of ACC power supply according to the Auto ACC function.
6.
Remove 12V battery terminal.
CAUTION:
After installing 12V battery, always check self-diagnosis results of all ECUs and erase DTC.
Precaution for Seat Belt Service
INFOID:0000000010478336
CAUTION:
• Before removing the seat belt pre-tensioner assembly, turn the ignition switch OFF, disconnect both
battery terminals and wait at least three minutes. For approximately three minutes after the battery
SEF289H
D4D engine
: 20 minutes
HRA2DDT
: 12 minutes
K9K engine
: 4 minutes
M9R engine
: 4 minutes
R9M engine
: 4 minutes
V9X engine
: 4 minutes
SB-4
< PRECAUTION >
PRECAUTIONS
terminals have been removed, it is still possible for the air bag and seat belt pre-tensioner to deploy.
Therefore, do not attempt work on any SRS connectors or wires until at least three minutes have
passed.
• After replacing or reinstalling seat belt pre-tensioner assembly or reconnecting seat belt pre-ten-
sioner assembly connector, make sure entire SRS operates properly. Refer to
• Do not disassemble buckle or seat belt assembly.
• Replace anchor bolts if they are deformed or worn out.
• Do not oil tongue or buckle.
• If any component of seat belt assembly is questionable, do not repair. Replace the whole seat belt
assembly.
• If webbing is cut, frayed or damaged, replace seat belt assembly.
• When replacing seat belt assembly, use a genuine NISSAN seat belt assembly.
Precaution for Work
INFOID:0000000010478337
• When removing or disassembling each component, be careful not to damage or deform it. If a component
may be subject to interference, be sure to protect it with a shop cloth.
• When removing (disengaging) components with a screwdriver or similar tool, be sure to wrap the component
with a shop cloth or vinyl tape to protect it.
• Protect the removed parts with a shop cloth and prevent them from being dropped.
• Replace a deformed or damaged clip.
• If a part is specified as a non-reusable part, always replace it with a new one.
• Be sure to tighten bolts and nuts securely to the specified torque.
• After installation is complete, be sure to check that each part works properly.
• Follow the steps below to clean components:
- Water soluble dirt:
• Dip a soft cloth into lukewarm water, wring the water out of the cloth and wipe the dirty area.
• Then rub with a soft, dry cloth.
- Oily dirt:
• Dip a soft cloth into lukewarm water with mild detergent (concentration: within 2 to 3%) and wipe the dirty
area.
• Then dip a cloth into fresh water, wring the water out of the cloth and wipe the detergent off.
• Then rub with a soft, dry cloth.
- Do not use organic solvent such as thinner, benzene, alcohol or gasoline.
- For genuine leather seats, use a genuine leather seat cleaner.
PREPARATION
SB-5
< PREPARATION >
C
D
E
F
G
I
J
K
L
M
A
B
SB
N
O
P
PREPARATION
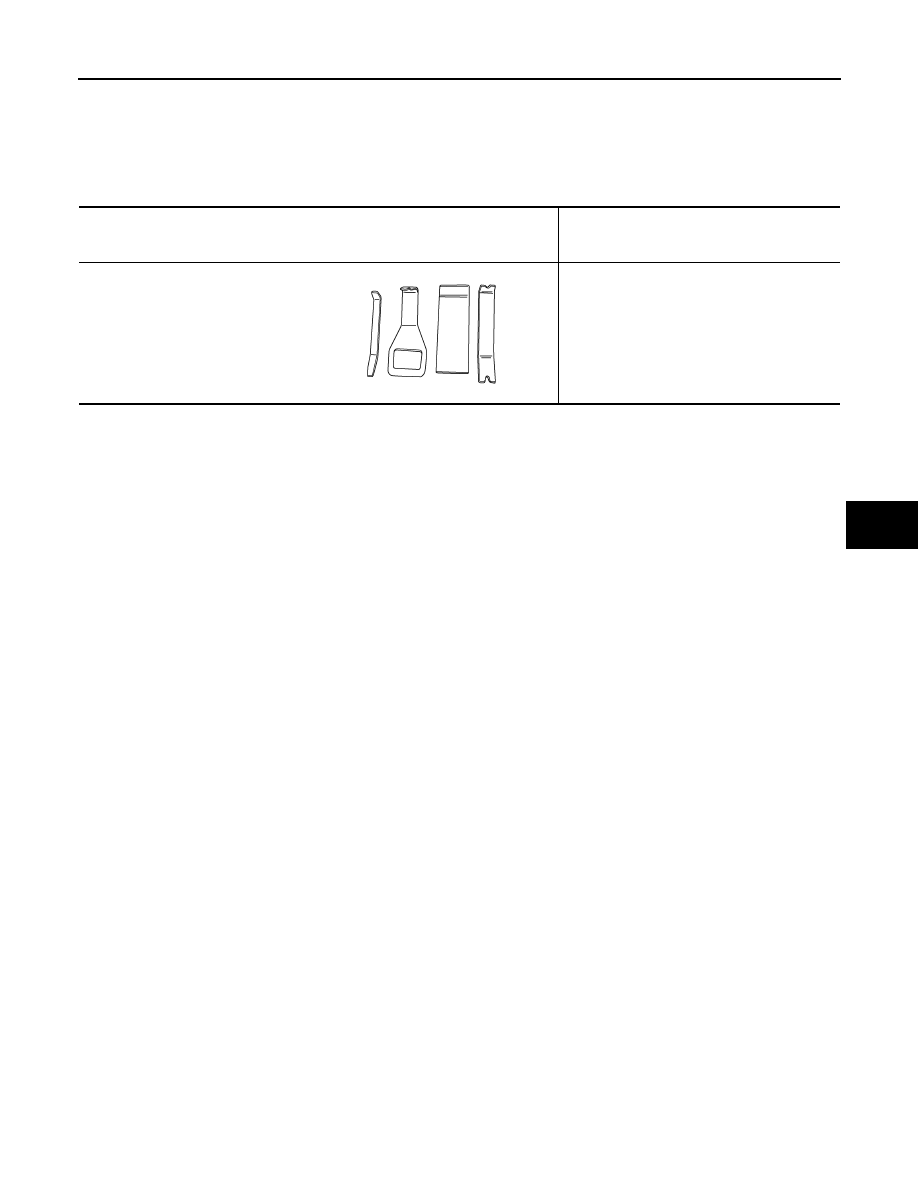
PREPARATION
Special Service Tool
INFOID:0000000010478338
The actual shape of the tools may differ from those illustrated here.
Tool number
(TechMate No.)
Tool name
Description
—
(J-46534)
Trim Tool Set
Removing trim components
AWJIA0483ZZ
SB-6
< REMOVAL AND INSTALLATION >
FRONT SEAT BELT
REMOVAL AND INSTALLATION
FRONT SEAT BELT
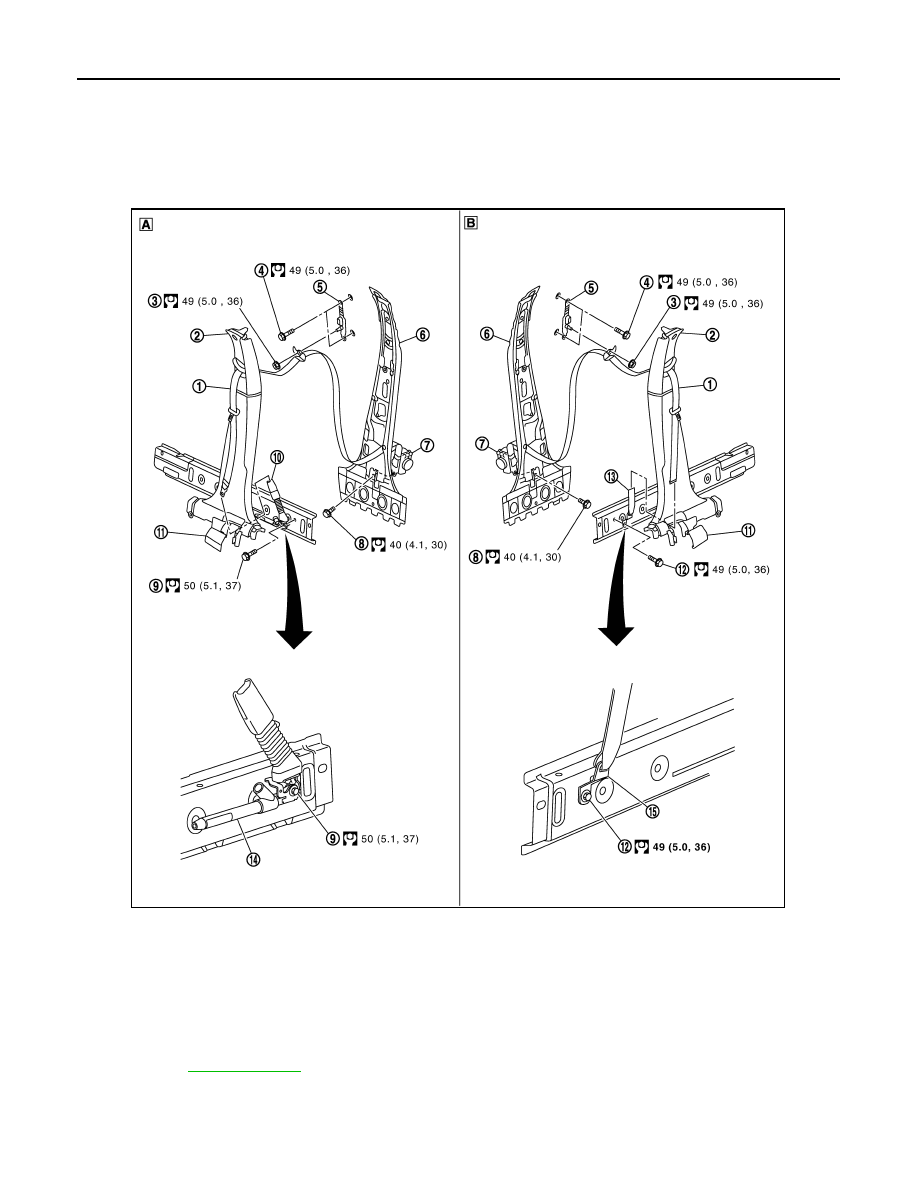
Exploded View
INFOID:0000000010478340
SEAT BELT RETRACTOR
1.
Front seat belt
2.
Center pillar lower and upper
garnish assembly
3.
D-ring anchor fixing nut
4.
Seat belt height adjuster fixing
bolt
5.
Seat belt height adjuster
6.
Center pillar
7.
Seat belt retractor
8.
Seat belt retractor bolt
9.
Seat belt buckle bolt
10. Seat belt buckle
11.
Cover
12. Anchor plate fixing bolt
13. Seat belt label
14. Pre-tensioner
15. Anchor plate
for symbols in the figure
E1HIA0037GB
FRONT SEAT BELT
SB-7
< REMOVAL AND INSTALLATION >
C
D
E
F
G
I
J
K
L
M
A
B
SB
N
O
P
SEAT BELT RETRACTOR : Removal and Installation
INFOID:0000000010478341
REMOVAL
WARNING:
• Before servicing the SRS, turn the ignition switch off, disconnect both battery terminals then wait at
least three minutes.
• Do not drop the seat belt retractor. Always handle it with care.
• Always point pre-tensioner cylinder away from body when handling.
DRIVER SIDE
1.
Remove the center pillar lower and upper garnish. Refer to
.
2.
Remove D-ring anchor fixing nut.
3.
Disconnect seat belt from seat belt buckle.
4.
Remove seat belt buckle bolt.
5.
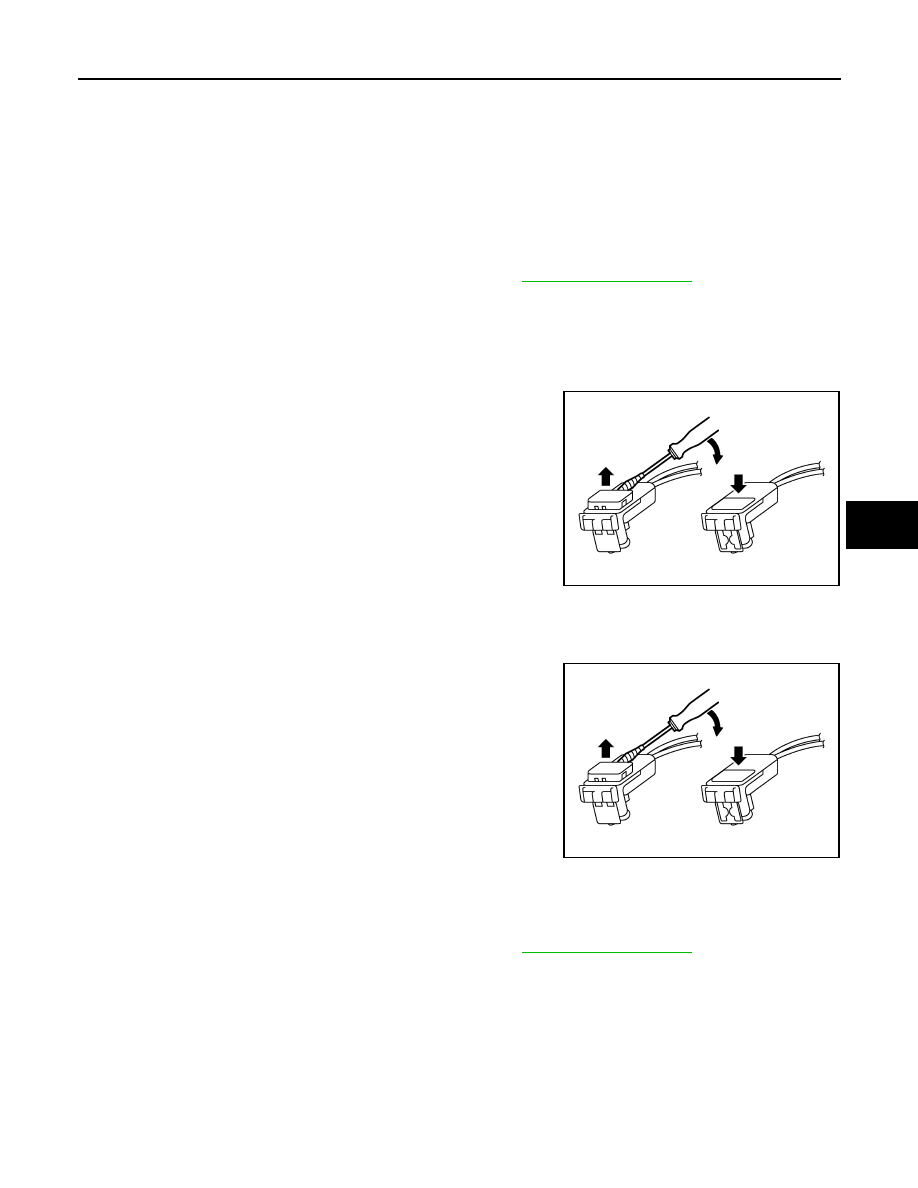
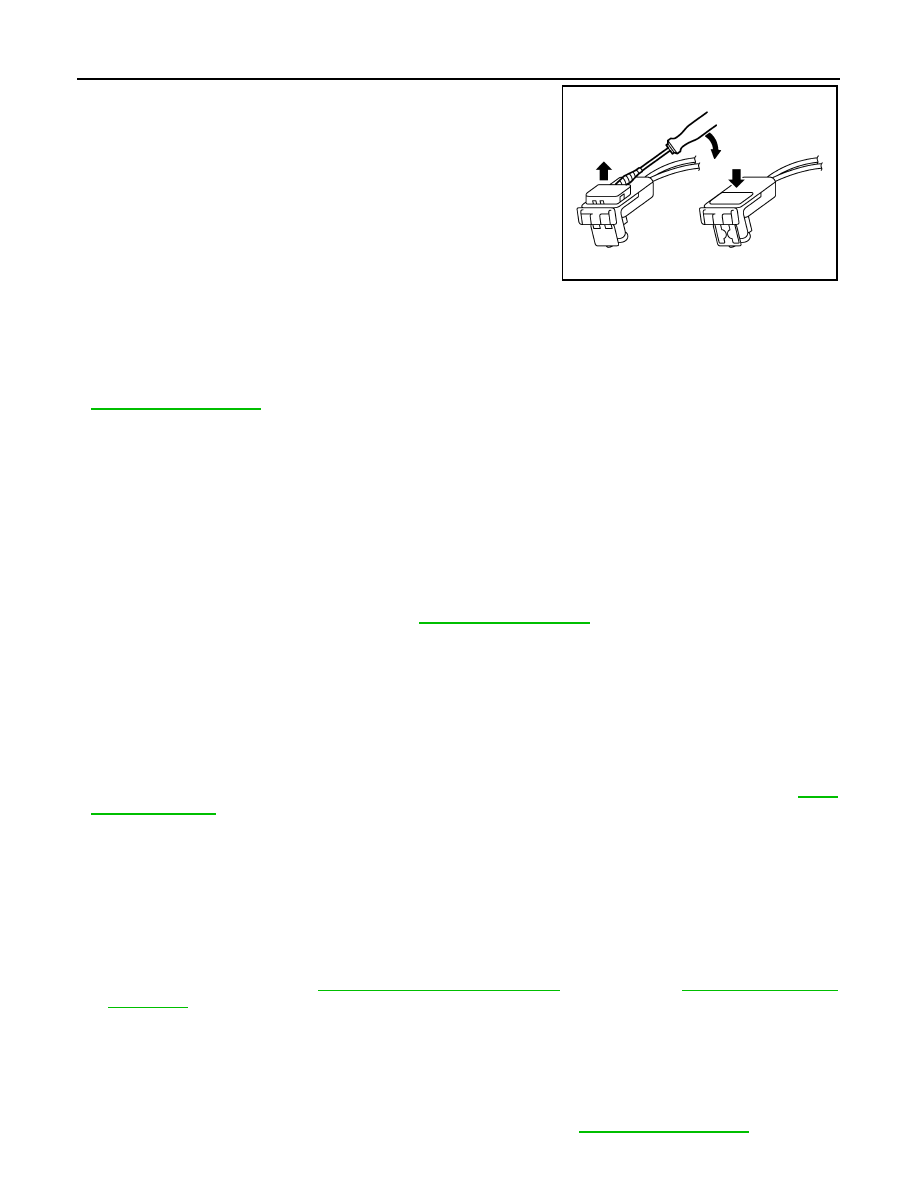
Disconnect pre-tensioner connector and remove seat belt buckle and pretensioner assembly.
CAUTION:
• For removing/installing the shoulder belt pre-tensioner
harness connector, insert a thin screwdriver wrapped in
tape into the notch, then lift the lock and remove the har-
ness connector as shown.
• Install the harness connector with the lock raised, and
push the lock into the harness connector as shown.
• After installing the harness connector, check that the lock
is pushed in securely.
6.
Disconnect the harness connector from the seat belt pre-tensioner.
CAUTION:
• For removing/installing the shoulder belt pre-tensioner
harness connector, insert a thin screwdriver wrapped in
tape into the notch, then lift the lock and remove the har-
ness connector as shown.
• Install the harness connector with the lock raised, and
push the lock into the harness connector as shown.
• After installing the harness connector, check that the lock
is pushed in securely.
7.
Remove seat belt retractor bolt and remove seat belt retractor.
Passenger side
1.
Remove the center pillar lower and upper garnish. Refer to
.
2.
Remove D-ring anchor fixing nut.
3.
Remove anchor plate fixing bolt.
4.
Disconnect the harness connector from the seat belt pre-tensioner.
CAUTION:
PHIA0953J
PHIA0953J
SB-8
< REMOVAL AND INSTALLATION >
FRONT SEAT BELT
• For removing/installing the shoulder belt pre-tensioner
harness connector, insert a thin screwdriver wrapped in
tape into the notch, then lift the lock and remove the har-
ness connector as shown.
• Install the harness connector with the lock raised, and
push the lock into the harness connector as shown.
• After installing the harness connector, check that the lock
is pushed in securely.
5.
Remove seat belt retractor bolt and remove seat belt retractor.
INSTALLATION
Installation is in the reverse order of removal.
CAUTION:
• Tighten the D-ring Anchor bolt, seat belt retractor bolts and seat belt buckle to specification. Refer to
• Make sure that the seat belt height adjuster is locked in the lowest position and is aligned with the
center pillar upper finisher opening during installation.
• Make sure both the D-ring anchor and seat belt height adjuster operate freely.
• Always perform an inspection after repair to make sure the system is functioning correctly.
SEAT BELT HEIGHT ADJUSTER
SEAT BELT HEIGHT ADJUSTER : Removal and Installation
INFOID:0000000010478342
REMOVAL
1.
Remove center pillar upper finisher. Refer to
.
2.
Remove D- ring anchor fixing nut.
3.
Remove seat belt height adjuster.
INSTALLATION
Installation is in the reverse order of removal.
CAUTION:
• Make sure that the seat belt height adjuster is locked in the lowest position and is aligned with the
center pillar upper finisher opening during installation.
• Tighten the D-ring anchor bolt and seat belt height adjuster bolts to specification. Refer to
.
• Make sure both the D-ring anchor and seat belt height adjuster operate freely.
• Always perform an inspection after repair to make sure the system is functioning correctly.
FRONT SEAT BELT BUCKLE
FRONT SEAT BELT BUCKLE : Removal and Installation
INFOID:0000000010478343
REMOVAL
1.
Remove front seat. Refer to
SE-28, "Removal and Installation"
(Driver side) or
(Passenger side).
2.
Disconnect seat belt buckle harness connector.
3.
Remove seat belt buckle anchor bolt and seat belt buckle.
INSTALLATION
Installation is in the reverse order of removal.
CAUTION:
• Tighten the seat belt buckle anchor bolt to specification. Refer to
.
PHIA0953J
FRONT SEAT BELT
SB-9
< REMOVAL AND INSTALLATION >
C
D
E
F
G
I
J
K
L
M
A
B
SB
N
O
P
• Always perform an inspection after repair to make sure the system is functioning correctly.
SB-10
< REMOVAL AND INSTALLATION >
REAR SEAT BELT
REAR SEAT BELT
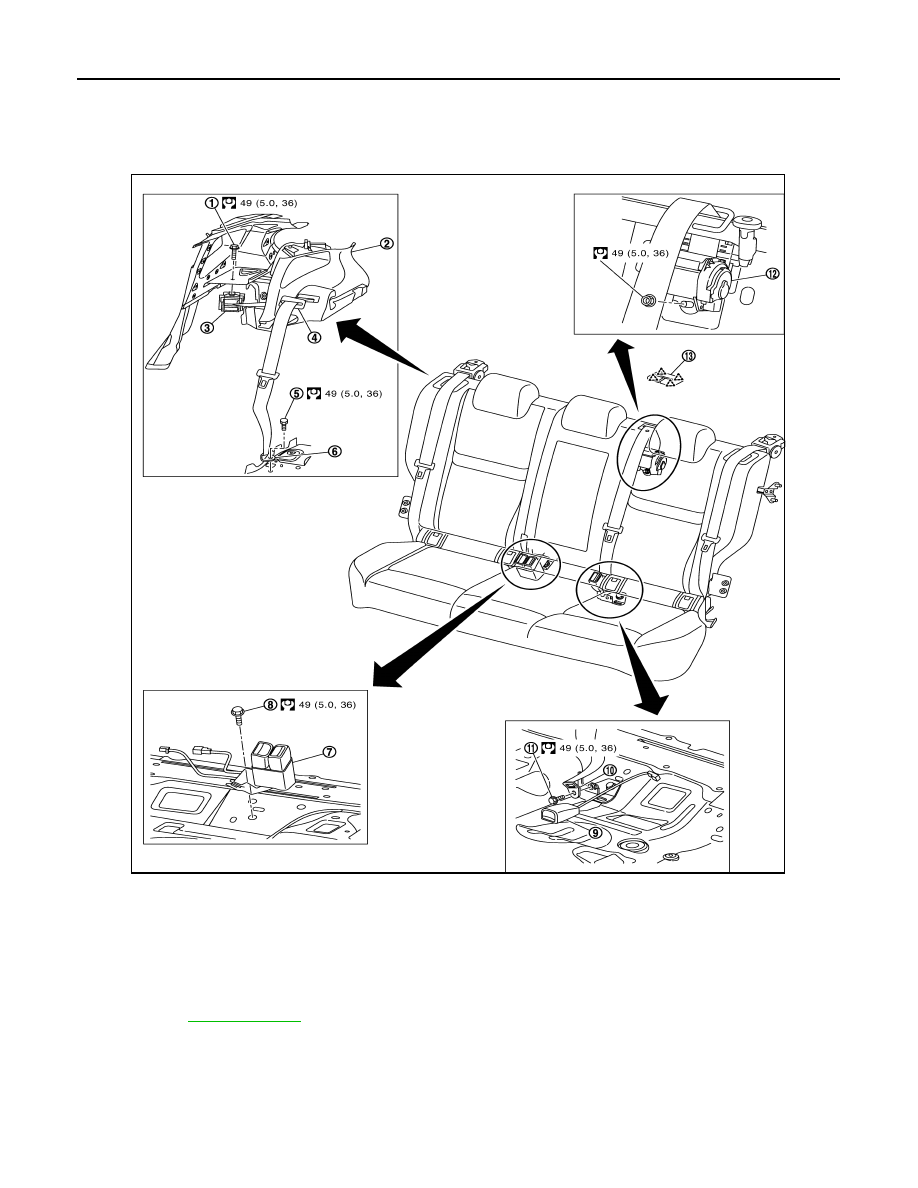
Exploded View
INFOID:0000000010478344
SEAT BELT RETRACTOR
SEAT BELT RETRACTOR : Removal and Installation
INFOID:0000000010478345
SEAT BELT RETRACTOR - (LH/RH)
1.
Outer seat belt retractor bolt
2.
Rear pillar finisher
3.
Outer seat belt retractor
4.
Seat belt finisher
5.
Outer seat belt anchor bolt
6.
Outer seat belt anchor
7.
Seat belt buckle (RH and center) 8.
Seat belt buckle bolt (RH and
center)
9.
Seat belt buckle (LH)
10. Center seat belt anchor
11.
Center seat belt anchor bolt
12. Center seat belt retractor
13. Center seat belt escutcheon
for symbols in the figure.
E1HIA0038GB

REAR SEAT BELT
SB-11
< REMOVAL AND INSTALLATION >
C
D
E
F
G
I
J
K
L
M
A
B
SB
N
O
P
1.
Remove rear pillar finisher. Refer to
2.
Remove seat cushion. Refer to
3.
Remove seat belt outer anchor bolt (A).
4.
Remove seat belt retractor bolt (A) and remove seat belt retrac-
tor (1).
: Front
INSTALLATION
Installation is in the reverse order of removal.
CAUTION:
• Tighten the outer seat belt anchor bolt and seat belt retractor bolt to specification. Refer to
.
• Make sure the outer seat belt anchor operates freely.
• Always perform an inspection after repair to make sure the system is functioning correctly.
SEAT BELT RETRACTOR - (CENTER)
Removal
1.
Remove center seat belt anchor bolt.
2.
Unclip and remove center seat belt escutcheon.
3.
Remove seatback pad and seatback trim (LH). Refer to
SE-35, "SEATBACK : Disassembly and Assem-
4.
Remove seat belt retractor nut (A) and remove seat belt retactor
(1) from rear seatback frame (LH).
INSTALLATION
Installation is in the reverse order of removal.
CAUTION:
• Tighten the center seat belt anchor bolt and seat belt retractor bolt to specification. Refer to
.
• Make sure the center seat belt anchor operates freely.
• Always perform an inspection after repair to make sure the system is functioning correctly.
SEAT BELT BUCKLE
ALHIA0373ZZ
ALHIA0376ZZ
SB-12
< REMOVAL AND INSTALLATION >
REAR SEAT BELT
SEAT BELT BUCKLE : Removal and Installation
INFOID:0000000010478346
SEAT BELT BUCKLE - (LH)
Removal
1.
Remove rear seat cushion. Refer to
SE-34, "Removal and Installation"
.
2.
Disconnect seat belt buckle (LH) connector.
3.
Remove seat belt buckle (LH) anchor bolt and remove seat belt buckle (LH).
Installation
Installation is in the reverse order of removal.
CAUTION:
• Tighten the seat belt buckle anchor bolt to specification. Refer to
• Always perform an inspection after repair to make sure the system is functioning correctly.
SEAT BELT BUCKLE - (CENTER and RH)
Removal
1.
Remove rear seat cushion. Refer to
SE-34, "Removal and Installation"
.
2.
Disconnect seat belt buckle (Center and RH) connector.
3.
Remove seat belt buckle (Center and RH) anchor bolt and remove seat belt buckle (Center and RH).
4.
Separate seat belt buckle center and RH.
Installation
Installation is in the reverse order of removal.
CAUTION:
• Tighten the seat belt buckle anchor bolt to specification. Refer to
• Always perform an inspection after repair to make sure the system is functioning correctly.
Нет комментариевНе стесняйтесь поделиться с нами вашим ценным мнением.
Текст