BYD E6. Service Manual — part 5
BYD e6A AUTO Owner's Manual
Steering Wheel and Rearview Mirror 1-53
Chapter 1
Section 4
Steering Wheel and Rearview Mirror
Steering Wheel Adjustment . . . . . . . . 1-54
Inner Rearview Mirror . . . . . . . . . . . 1-54
Outer Power Rearview Mirrors . . . . . . ... 1-56
-------------------------------------------------------------------------------------------------------------------------------------------------------------
BYD e6A AUTO Owner's Manual
1-54 Steering Wheel and Rearview Mirror
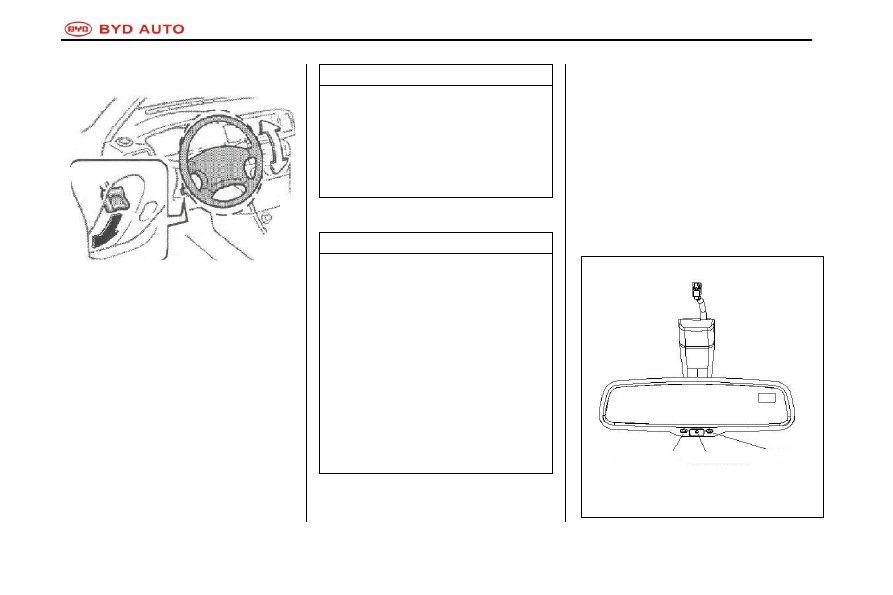
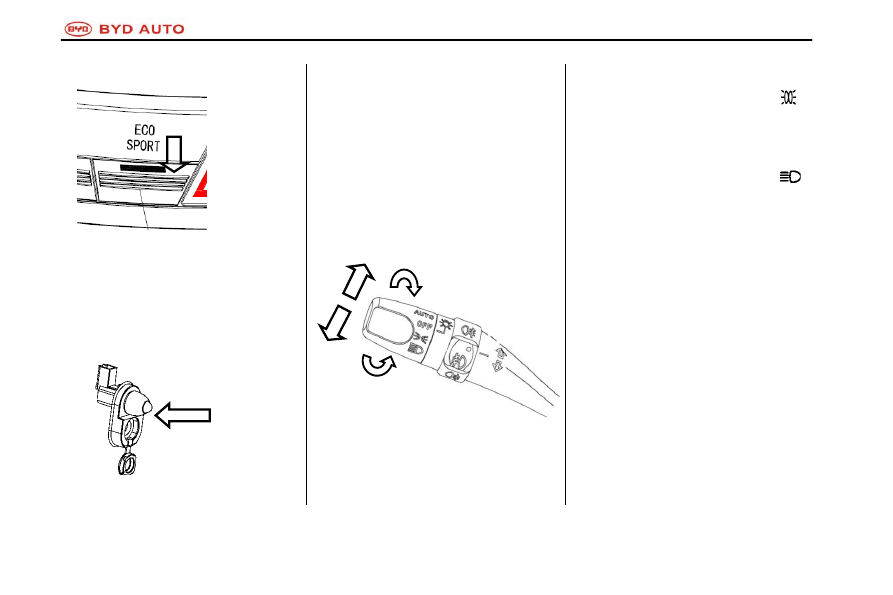
Steering Wheel
To change the angle of steering wheel, hold
the steering wheel and press down the
steering column adjustment handle, then
adjust the steering wheel to the desired angle
and finally release the adjustment handle to
the original position.
Tips
● Do not adjust the steering wheelwhile
driving. It may cause incorrect operation
of the car and result in an accident.
● After adjustment, shake the steering
wheel upward and downward to make
sure it is locked firmly.
Inner rearview mirror
Tips
● Keep the inner and outer rearview
mirrors clean, and adjust them to the
optimum visual angle. The rearview
mirrors should be well adjusted before
driving.
● If the inner rearview mirror is frozen,
don't scratch its surface. Instead, a
spray deicer or other methods should be
used first before adjusting.
● Do not adjust the rearview mirrors while
driving. It may cause incorrect operation
of the car and result in an accident.
Automatic anti-glare function (if provided)
a. In the AUTO mode, the sensor is used to
detect the headlights of the vehicles behind
and reduce the reflection light
automatically.
b. Prevent the sensor from malfunction
Please don't touch or cover the sensor to
ensure it works normally.
c. When the AUTO mode is applied, the
indicator light will be on. The default mode
of the anti-glare rearview mirror is AUTO.
front light sensor
Automatic
anti-glare
switch
Indicator
-------------------------------------------------------------------------------------------------------------------------------------------------------------
BYD e6A AUTO Owner's Manual
Steering Wheel and Rearview Mirror 1-55
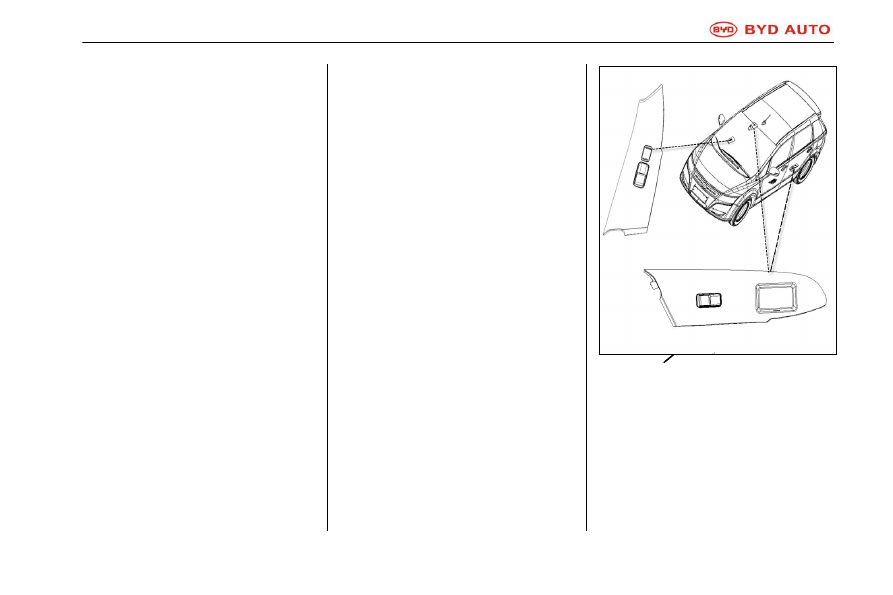
Direction display
An LCD is mounted on the right top of the
inner rearview mirror (as shown in the figure)
to indicate the present direction of vehicle
heading. If the car is used for the first time or
is just overhauled, the direction should be
calibrated.
Inner rearview mirror direction calibration
methods and steps
Please pay attention to the following three
items before direction calibration:
The direction indicatedin the inner rearview
mirror is the direction pointed to by the vehicle
heading, and the display state is called the
normal display state. However, in the state of
calibration, the direction indicated in the inner
rearview mirror just acts as the role of
indication and doesn't represent the direction
of vehicle heading. Then the state is called
the calibration display state;
It is suggested that a clip is used as the
calibration tool;
Before calibration, select an open & smooth
square, a closed-loop block, or an annular
driveway and identify the directions of east,
south, west and north (as shown in the figure).
Calibration steps
Step 1: Start the car. Then a word will appear
in the displaywindowon the top right of inner
rearview mirror. The word may be any one of
east, south, west, north, northwest, southwest,
northeast, and southeast.
Step 2: select the starting position. It may be
east, south, west or north.
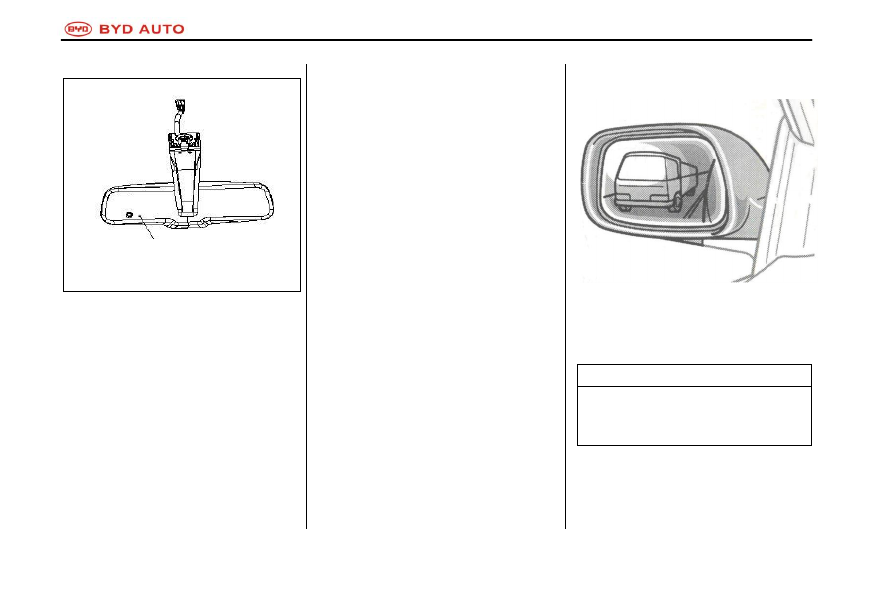
Step 3: press the button "Enter" (as shown in
the figure) on the back of inner rearview
mirror with a clip to enter the direction
calibration display state.
rear light sensor
display window
west
north
east
south
-------------------------------------------------------------------------------------------------------------------------------------------------------------
BYD e6A AUTO Owner's Manual
1-56 Steering Wheel and Rearview Mirror
Then the word "North" will flash twice in the
display window and then stop.
Step 4: drive the car back to the starting point
in two rounds at a low speed (less than
8km/hr) (ensure the motor doesn't stall during
driving. The car may drive clockwise or
counterclockwise).
Step 5: adjust the vehicle heading to point
exactly south. Press the button of "Enter".
Then the word "South" will appear in the
display window. Press the button "Enter"
again. If the word "South" flashes twice and
then stops, the calibration is finished, the
display window will exit the calibration display
state and enter the normal display state.
Otherwise, if the word "West" appears after
the button "Enter" is pressed for the second
time, the motor should be stopped first and
the calibration should be started again from
Step 1. If other words appear, the motor
doesn't have to be stopped and the
calibration can be restarted from Step 2.
Step 6: verification. After the calibration is
finished, drive the car for one round to identify
whether every direction is correct. If incorrect
or inaccurate indication is found, re-start the
calibration from Step 1.
Outer power rearview mirrors
(if equipped)
Adjust the outer rearview mirrors to an angle
where you can just see the side view of the
car.
Tips
Do not adjust rear-view mirror while driving.
It may cause incorrect operation of the car
and result in an accident.
Enter
-------------------------------------------------------------------------------------------------------------------------------------------------------------
BYD e6A AUTO Owner's Manual
Steering Wheel and Rearview Mirror 57
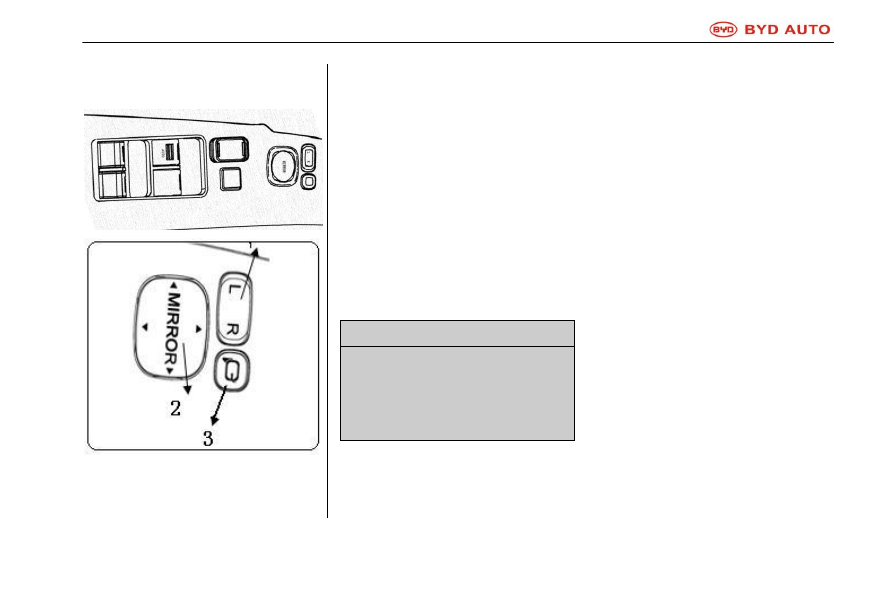
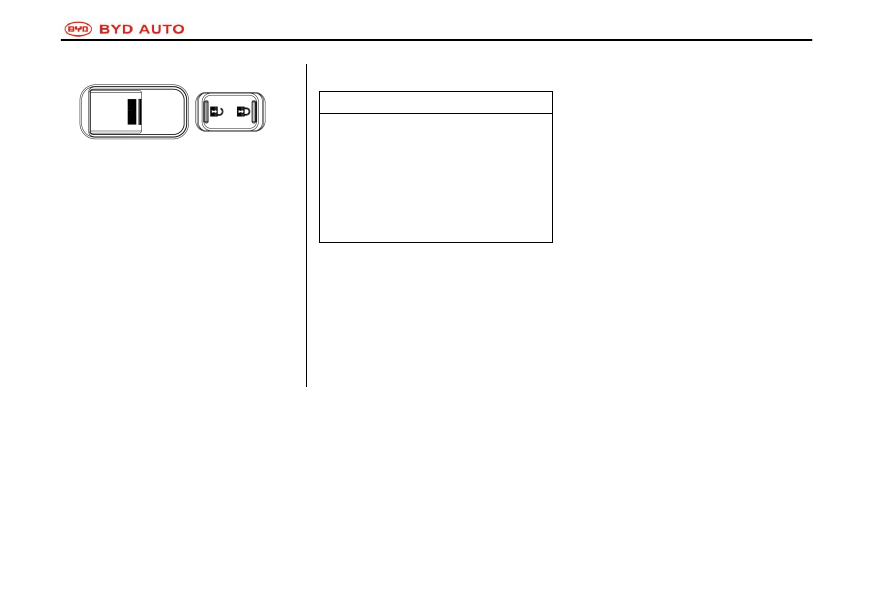
Adjustment of outer power
rearview mirrors
Adjust the outer rear-view mirrors with this
switch.
1. Selection switch-it is used to select the
outer rearview mirror to be adjusted. Press
the switch to "L" (left) or "R" (right).
2. Control switch-it is used to adjust the outer
rearview mirror. Press the switch according
to the required direction.
3. Folding switch-it is used to control the
folding of outer rearview mirrors.
When the key is in the position "ACC" or "ON",
the outer rearview mirrors can be adjusted.
NOTE
If the rear-view mirror is frozen, do not
manipulate the controller or scrape the
surface of the rearview mirror. Use a
spraying deicer to remove the ice on the
surface of the rearview mirror.
-------------------------------------------------------------------------------------------------------------------------------------------------------------
BYD e6A AUTO Owner's Manual
1-58 Steering Wheel and Rearview Mirror
-------------------------------------------------------------------------------------------------------------------------------------------------------------
BYD e6A AUTO Owner's Manual
Switch 1-59
Chapter 1
Section 5
Switch
Front headlight . . . . . . . . . . . . . . 1-60
Instrument switch . . . . . . . . . . . . . 50
Left Combination Switch . . . . . . . . . .. 1-62
Right Combination Switch . . . . . . . . . 1-65
Wiper and Washer . . . . . . . . . . . ... 1-65
Outer Power Rearview Mirror Switch . . . . ... 1-66
Window lifter switch for left front door . . . . .. 1-67
-------------------------------------------------------------------------------------------------------------------------------------------------------------

BYD e6A AUTO Owner's Manual
1-60 Switch
Front headlight
The switch is used to adjust the up/down
beam angle of the front headlights. After the
low beam lights are turned on, the switch can
start to work.
6 gears are provided for the switch. When the
switch is turned upward, the front headlight
beam angle will move upward; when the
switch is turned downward, the angle will
move downward.
vehicle load conditions
Recommended
gear
One person in the driver
seat, and one each in the
driver seat and the front
passenger seat
Gear 0
fully seated
Gear 0.5
fully seated and cargo
loaded
gear 0.5 or
gear 1
driver plus trunk loaded
with the maximum load for
the rear axle
gear 2
1. Mileage change over/reset (ODO/
TRIP) switch
In the ACC gear, every time the switch of
"ODO/TRIP" is pressed, the mileage display
mode in the combination instrument will be
changed once in the following order:
odometer-TRIP A-TRIP B-odometer.
2. Backlight brightness adjustment
switch
In the gear ON, the brightness of the vehicle
backlight can be adjusted by pressing the
button.
a) Daylight mode: before the combination
switch is turned to the position ,
press down the backlight adjustment
button to adjust the backlight brightness of
the combination instrument. Five levels of
brightness (1-5) are provided. Brightness
can be adjusted from level 1 to level 5 in a
circulating way.
Emergency warning light switch
Mileage
changeover
switch
Backlight
brightness
adjustment switch
reversing radar
power switch
Clock adjustment switch
H hour
M minute
R reset
Mode
changeover
switch
-------------------------------------------------------------------------------------------------------------------------------------------------------------

BYD e6A AUTO Owner's Manual
Switch 1-61
b) Night mode: in the gear ACC or ON, when
the combination switch is turned to the
position , press down the backlight
brightness adjustment switch to adjust the
brightness of the combination instrument
and the instrument board synchronously
(including the air conditioner and stereo
panel backlight, steering wheel button
backlight, 1# switch backlight, and the front
headlight adjustment switch backlight).
Five levels of brightness are provided.
Brightness can be adjusted form level 1 to
level 5 in a circulating way.
3. Reversing radar power switch
(optional)
When the switch is pressed down, the
yellowish green indicator light on the switch
will be on, the reversing radar power will be
connected, the display alarm function will be
started, and the vehicle shape indicator light
on the instrument will be on; if the switch is
pressed again, the switch will spring back, the
indicator light will be off, the reversing radar
power will be disconnected, the display alarm
function will be disabled, and the vehicle
shape indicator light will be off.
4. Emergency warning light switch
When something is wrong with the car,
surrounding people may be endangered. In
this event, press down the emergency alarm
light switch. All steering lights of the vehicle
will keep flashing at the frequency of 85 min-1
until the emergency alarm light switch is
pressed again.
5. Clock adjustment switch
In gear ACC or ON:
Press H to adjust the hours displayed in the
clock. The hour number will increase by 1
within 00-23 in a circulating way every time
the button is pressed;
Press M to adjust the minutes displayed in the
clock. The minute number will increase by 1
within 00-59 in a circulating way every time
the button is pressed;
The hours can be set to the adjacent value
rapidly by pressing R. For example, 1:06 is
changed into 1:00, or 1:56 is changed into
2:00 (
≤ 30,current hours will be selected;
otherwise, the next hours will be selected).
-------------------------------------------------------------------------------------------------------------------------------------------------------------
BYD e6A AUTO Owner's Manual
1-62 Switch
6. Mode changeover switch
In gear ON, the car will enter SPORT MODE
by pressing the button and the SPORT
MODE indicator light will be on; when the
switch is in the natural state, the car will be in
the economy mode (ECO MODE).
Door light switch
Each of the four car doors is equipped with a
door light. When the door is opened, the
internal circuit of switch will be connected and
the door light will be on; when the door is
closed, the internal circuit of switch will be
disconnected and the door light will be off
.
Meanwhile, the state will be displayed in the
instrument as well.
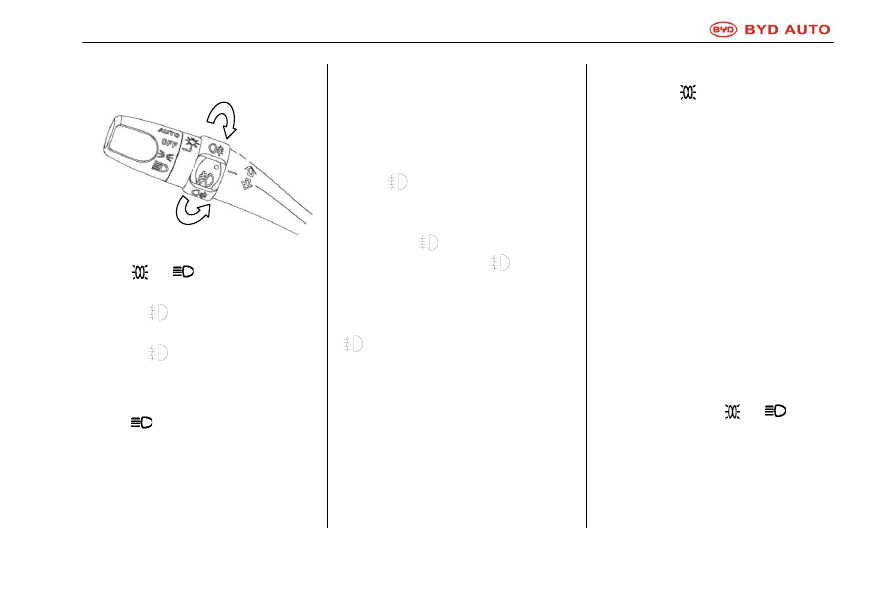
Left combination switch (light
control handle assembly)
Turn the dimmer knob clockwise to "AUTO":
running lights and front headlights will be on
automatically according to the ambient
illumination conditions.
Small light
Turn the dimmer knob anticlockwise to
:
running lights and all backlight lamps of
vehicle will be on.
Low beam light
Turn the dimmer knob anticlockwise to
:
the low beam lights will be on.
High beam light
When the light handle is pushed forward from
its original position (opposite to the side of
steering wheel), the high beam lights will be
on; when the light handle is pulled back, the
lights will be off.
Headlight flashing (low beam
headlight)
When the light handle is pulled back from its
original position (close to the side of steering
wheel), the high beam lights will be on; when
the light handle is released, it will return to the
original position and the lights will be off.
-------------------------------------------------------------------------------------------------------------------------------------------------------------
BYD e6A AUTO Owner's Manual
Switch 1-63
Front and Rear Fog Light
When the vehicle light control switch is in the
position
or
, turn the fog light
switch upward from the position OFF (●) to
the position
, the front fog lights will be
on. When the switch is turned downward from
the position
back to the position OFF (●
), the front fog lights will be off.
When the vehicle light control switch is in the
position
, turn the fog light switch
downward from the position OFF (●), the
rear fog lights will be on and the switch will
return to the position ● automatically. When
the switch is turned downward from the
position OFF (●) again, the rear fog lights will
be off.
After the front fog lights are on, if the rear fog
lights have to be turned on as well, turn the
fog light switch upward by a gear from the
position
, and the rear fog lights will be
on (at this moment, the front fog lights are still
on as well) and the fog light switch will return
to the position
automatically. If the fog
light switch is turned upward
by a gear
again, the rear fog lights will be off (at this
moment, the front fog lights are still on) and
the fog light switch will return to the position
automatically.
a. In the event that the rear fog lights are
turned on and the front fog lights are off,
the rear fog lights will be off when the front
headlights are turned off;
b. When the car light control switch is turned
to the position OFF, both the front and the
rear fog lights will be off. They will be on
again when the control switch is turned to
the position
again.
c. Turn the fog light switch downward to the
position (●), and all the fog lights will be
turned off.
When the combination switch is in the gear
AUTO, the front fog light switch will be turned
on; in this event, if the automatic control
running lights are turned on, the front fog
lights will be on; if the automatic control
running lights are turned off, the front fog
lights will be off.
Automatic light switch-off function
Initiation conditions for the automatic light
switch-off function: when the front headlight
switch is in the position
or
and the
key is retreated from Gear II to Gear I, the
function is initiated.
After the automatic light switch-off function is
initiated, if the two front doors are closed, the
turned-on front headlights, running lights and
-------------------------------------------------------------------------------------------------------------------------------------------------------------

BYD e6A AUTO Owner's Manual
1-64 Switch
front & rear fog lights and high beam lights
will be switched off automatically in 10 s.
After the automatic light switch-off function is
initiated, if either of the two front doors is
opened, the turned-on front headlights,
running lights and front & rear fog lights and
high beam lights will be switched off
automatically in 10 minutes.
After the lights are switched off automatically,
if the light gear state is changed, the lights will
be turned on according to the new state. In
this event, if the automatic light switch-off
function initiation conditions are still satisfied,
the automatic light switch-off function will be
started again.
After the lights are switched off automatically,
if either of the front two doors is opened, the
turned off lights will be turned on
automatically.
Ending of the automatic light switch-off
function: only after the key is engaged in Gear
II, the automatic light switch-off function will
be disabled and the light knobs will work
normally.
With the function of automatic light switch-off,
the lights can be switched off. Moreover, after
the anti-theft function is initiated first and then
be disabled, the turned off lights will be on
again automatically. If the two front doors are
not opened, the lights will be turned off
automatically in 10 s. If the car doors are
opened, the lights will be turned off
automatically in 10 minutes.
Steering light switch
If the steering signal handle is pushed slightly
upward and downward, the steering lights will
flash. The handle will
recover automatically after release. If the
handle is pushed to the uppermost or
lowermost end, the steering lights will keep
flashing even if it is released, but will be off
automatically
after turning is completely
finished.
-------------------------------------------------------------------------------------------------------------------------------------------------------------
BYD e6A AUTO Owner's Manual
Switch 1-65
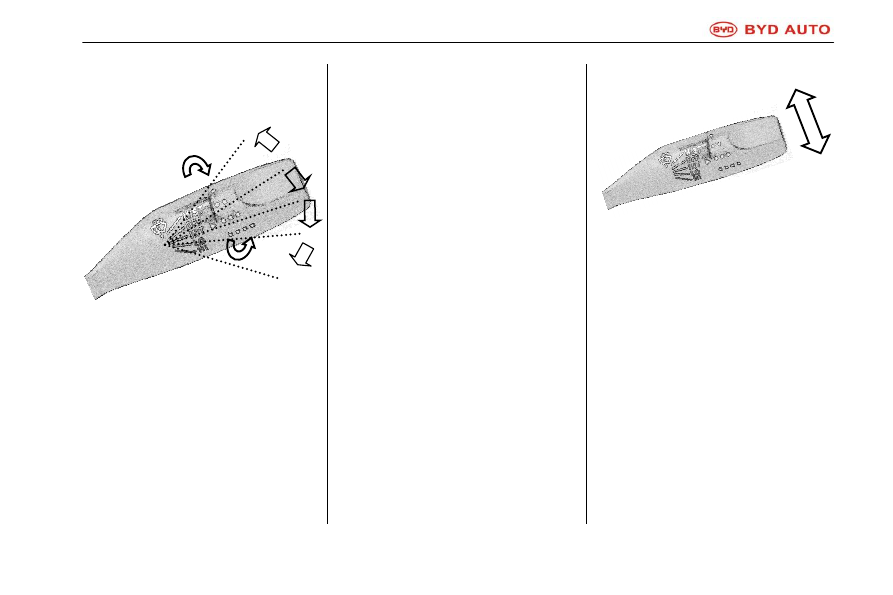
Right combination switch
(
wiper
cleaning control handle assembly)
Configuration 1:
Front wiper
Position 1 (MIST): single wipe mode. The
wiper handle is pushed upward from the
position OFF. By pressing the handle once
and then releasing it, the wiper will wipe once
at low speed and then return to the original
position. By holding the handle for longer (for
over 0.5s), the wiper will start wiping at high
speed until the handle is released.
Position 2 (OFF): stop wiping
Position 3(INT): intermittent gear. The gear is
divided into four grades, whose wiping
frequency is 7s, 5s, 3s and 1s respectively.
a.
Turn the switch knob to gear ●, the
wiper will start wiping at low speed
every 7 s;
b.
Turn the switch knob to gear ●●, the
wiper will start wiping at low speed every
5 s;
c.
Turn the switch knob to gear ●●●, the
wiper will start wiping at low speed every
3 s;
d.
Turn the switch knob to gear ●●●●,
the wiper will start wiping at low speed
every 1s.
Position 4 (LO): wiping at low speed.
Position 5 (HI): wiping at high speed.
Front washer
If the wiper handle is pulled back (close to the
side of steering wheel), the washer will just
spray water and will not wipe water when the
acting time is short (within 0.5s); when the
acting time is long, the washer will keep
spraying water and wiping water at low
speed; moreover, it will wipe water
automatically three times and return to the
original position when the handle is released.
1
2
3
4
5
-------------------------------------------------------------------------------------------------------------------------------------------------------------
BYD e6A AUTO Owner's Manual
1-66 Switch
Configuration 2:
The methods of use for the front wiper
and washer are the same as that for
Configuration 1.
Rear Wiper and Washer
a. By turning the switch knob to the position
"ON", the rear wiper will be started.
b. By turning the switch knob to the position
"OFF", the rear wiper will be stopped.
c. If the switch knob is turned downward
from "ON" to the position
, or upward
from "OFF" to the position
, the rear
wiper and the rear washer will be started
at the same time.
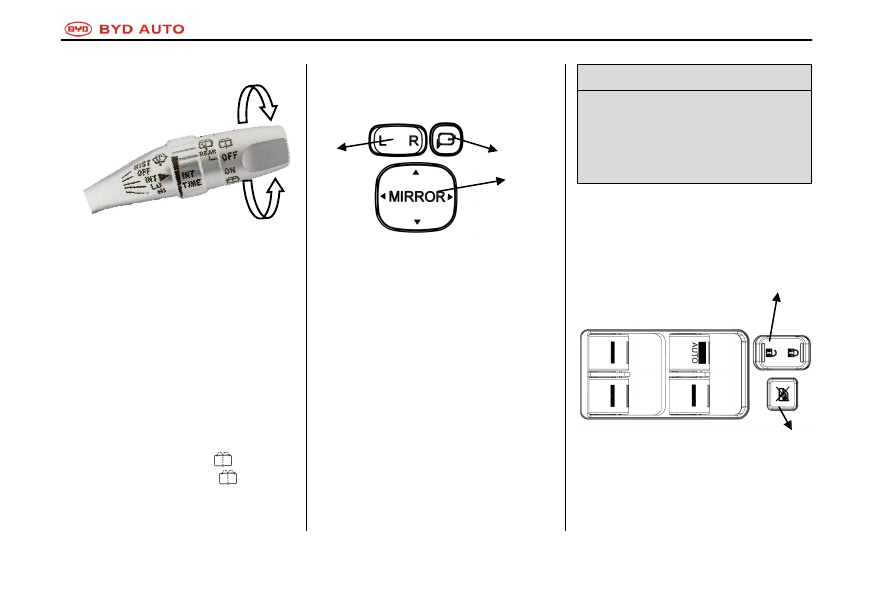
Outer Power Rearview Mirror
Switch
Adjust the outer rear-view mirrors with this
switch.
1. Selection switch - it is used to select which
rear-view mirror shall be adjusted.
Press the switch to "L" (left) or "R" (right).
2. Control switch - it is used to adjust the
outer rearview mirror.
Press switch as per your demand.
3. Folding switch-it is used for folding outer
rearview mirrors.
When the key is in the position "ACC" or "ON",
the outer rearview mirrors can be adjusted.
NOTE
If the rear-view mirror is frozen, do not
manipulate the controller or scrape the
surface of the rearview mirror. Use a
spraying deicer to remove the ice on the
surface of the rearview mirror.
Power windows
The windows can be operated by switches on
each door.
The key should be in the position "ON".
1
3
2
1
2
-------------------------------------------------------------------------------------------------------------------------------------------------------------
BYD e6A AUTO Owner's Manual
Switch 1-67
Window lifter switch for left front
door
Operation of the windows on the driver's
side
There are four buttons at the window control
switch at the driver's side, which control the
window lifters at the left front door, right front
door, left rear door and right rear door
respectively. The control has precedence over
the window lifter switches in the right front door,
the left rear door or the right rear door.
Lifting - pull up the switch gently and the
window will rise by a distance corresponding
to the pulling time. Release the switch and the
window will stay at current position; or keep
pulling and the window will completely close.
Lowering - push down the switch gently and
the window will lower down by a distance
corresponding to the pressing time. Release
the switch and the window will stay at current
position; or keep pressing and the window will
completely open.
Automatic descending of driver's side
window-press the switch (AUTO) completely
and then release it. Then the window will be
completely opened. If the window is to be
stopped midway, just pull the switch upward
slightly and then release it.
a. Door locking switches: Two such
switches are located at the window lifter
switches at the left front door and right
front door respectively. They are used to
lock or unlock all the vehicle doors. The
switch has two positions; press the front
part of the switch to lock the doors, or
press the rear part to unlock the doors.
b. Windows main switch: It is used to
enable or disable the window lifter
switches at the right front door, the left
rear door and the right rear door. When
this switch is pressed, the window lifter
switches at the right front door, the left
rear door and the right rear door will be
disabled.
Rig
h
t
re
a
r p
o
w
e
r wi
n
d
o
w s
wi
tch
Right rear, left rear power window switch
-------------------------------------------------------------------------------------------------------------------------------------------------------------
BYD e6A AUTO Owner's Manual
1-68 Switch
Operation of the windows on passenger's
side
The windows on the passenger's side can be
controlled either by the switches at the
respective doors or by the switch on the
driver's door.
Open: Press the switch.
Close: Pull up the switch.
The windows will not be controlled by the
switches at passenger's side if the window
locking switch at the driver's side is pressed.
Tips
● Please be aware of safety as the power
windows are not provided with
anti-clamping feature.
● Please use the windows locking switch
when there is a child in the vehicle to
prevent any accidental operation of the
power window switch.
-------------------------------------------------------------------------------------------------------------------------------------------------------------
Нет комментариевНе стесняйтесь поделиться с нами вашим ценным мнением.
Текст