Suzuki Grand Vitara JB416 / JB420. Manual — part 8
0B-4 Maintenance and Lubrication:
Repair Instructions
Engine Accessory Drive Belt Inspection
S5JB0A0206001
WARNING
!
All inspection and replacement are to be
performed with ENGINE NOT RUNNING.
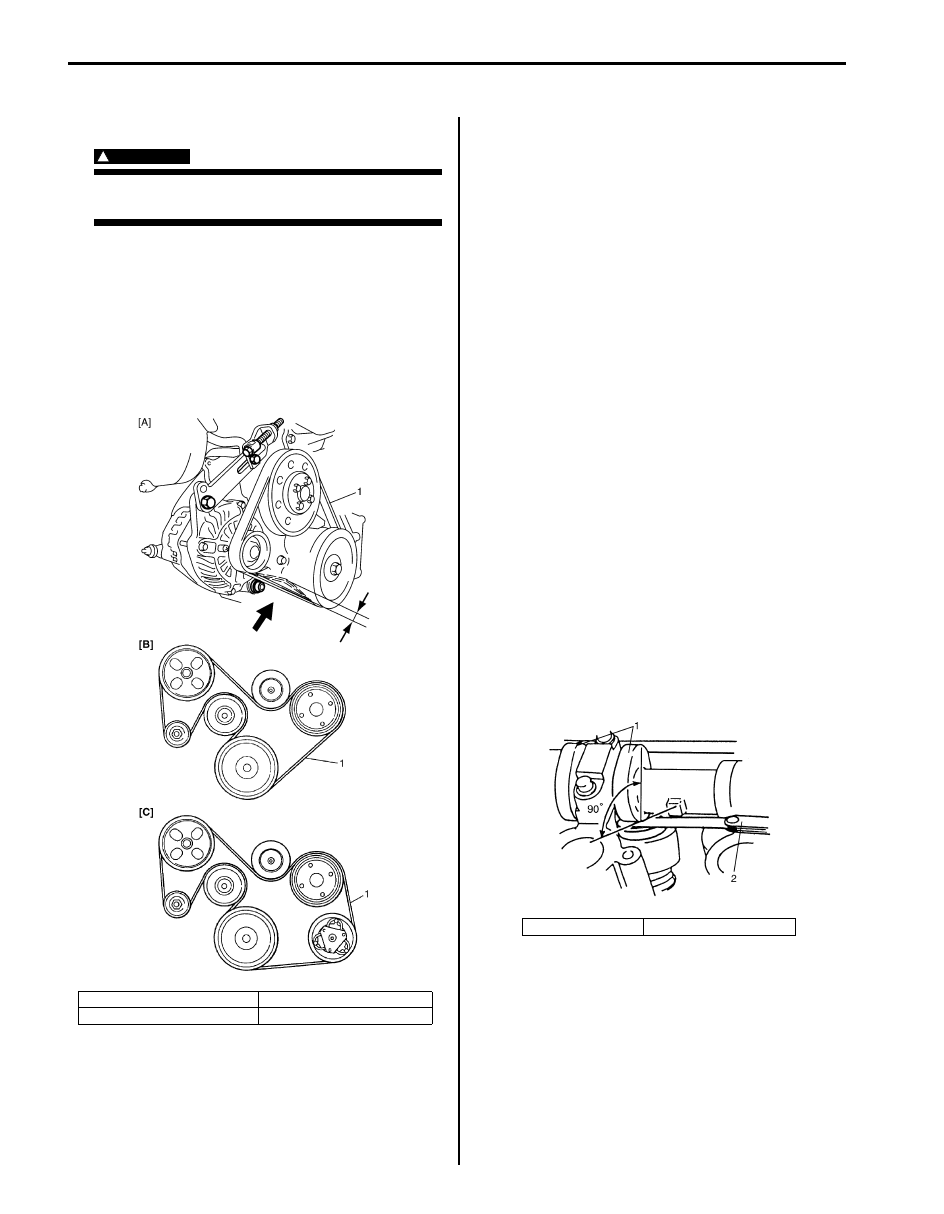
Water Pump and Generator Drive Belt
Inspect belt for cracks, cuts, deformation, wear
cleanliness and tension. If any defect exists, adjust or
replace.
For belt inspection, refer to “Water Pump and Generator
Drive Belt Tension Inspection and Adjustment (For M16
Engine) in Section 1J” or “Water Pump and Generator
Drive Belt On-Vehicle Inspection (For J20 Engine) in
Section 1J”.
Power Steering Pump and A/C Compressor (If
Equipped) Drive Belt (M16 Engine)
Inspect belt for cracks, cuts, deformation, wear
cleanliness and tension. If any defect exists, adjust or
replace.
For inspection, refer to “P/S Pump and A/C Compressor
(If Equipped) Drive Belt Inspection and Adjustment for
M16 Engine Model in Section 6C”.
Engine Accessory Drive Belt Replacement
S5JB0A0206002
Water Pump and Generator Drive Belt
Replace belt referring to “Water Pump and Generator
Drive Belt Removal and Installation (For M16 Engine) in
Section 1J” or “Water Pump and Generator Drive Belt
Removal and Installation (For J20 Engine) in Section
1J”.
Power Steering Pump and A/C Compressor (If
Equipped) Drive Belt (M16 Engine)
Replace belt and then adjust belt tension referring to “P/
S Pump and A/C Compressor (If Equipped) Drive Belt
Removal and Installation for M16 Engine Model in
Section 6C”.
Valve Lash (Clearance) Inspection
S5JB0A0206043
Inspect intake and exhaust valve lash and adjust as
necessary.
Refer to “Valve Lash (Clearance) Inspection: For M16A
Engine with VVT in Section 1D” or “Valve Lash
(Clearance) Inspection: For J20 Engine in Section 1D”
for valve lash inspection and adjustment procedure.
[A]: M16 engine
[C]: J20 engine with A/C
[B]: J20 engine without A/C
I5JB0A020018-01
1. Camshaft
2. Thickness gauge
I2RH0B020003-02
Maintenance and Lubrication: 0B-5
Engine Oil and Filter Change
S5JB0A0206003
WARNING
!
• New and used engine oil can be
hazardous.
Be sure to read “General Precautions in
Section 00” and observe what in written
there.
• Steps 1) – 7) must be performed with
ENGINE NOT RUNNING. For Step 8), be
sure to have adequate ventilation while
engine is running.
Before draining engine oil, check engine for oil leakage.
If any evidence of leakage is found, make sure to correct
defective part before proceeding to the following work.
1) Drain engine oil by removing drain plug.
2) After draining oil, wipe drain plug clean. Reinstall
drain plug.
Tightening torque
Engine oil drain plug (a): 35 N·m (3.5 kgf-m, 25.5
lb-ft)
3) Loosen oil filter by using oil filter wrench (special
tool).
Special tool
(A): 09915–40611
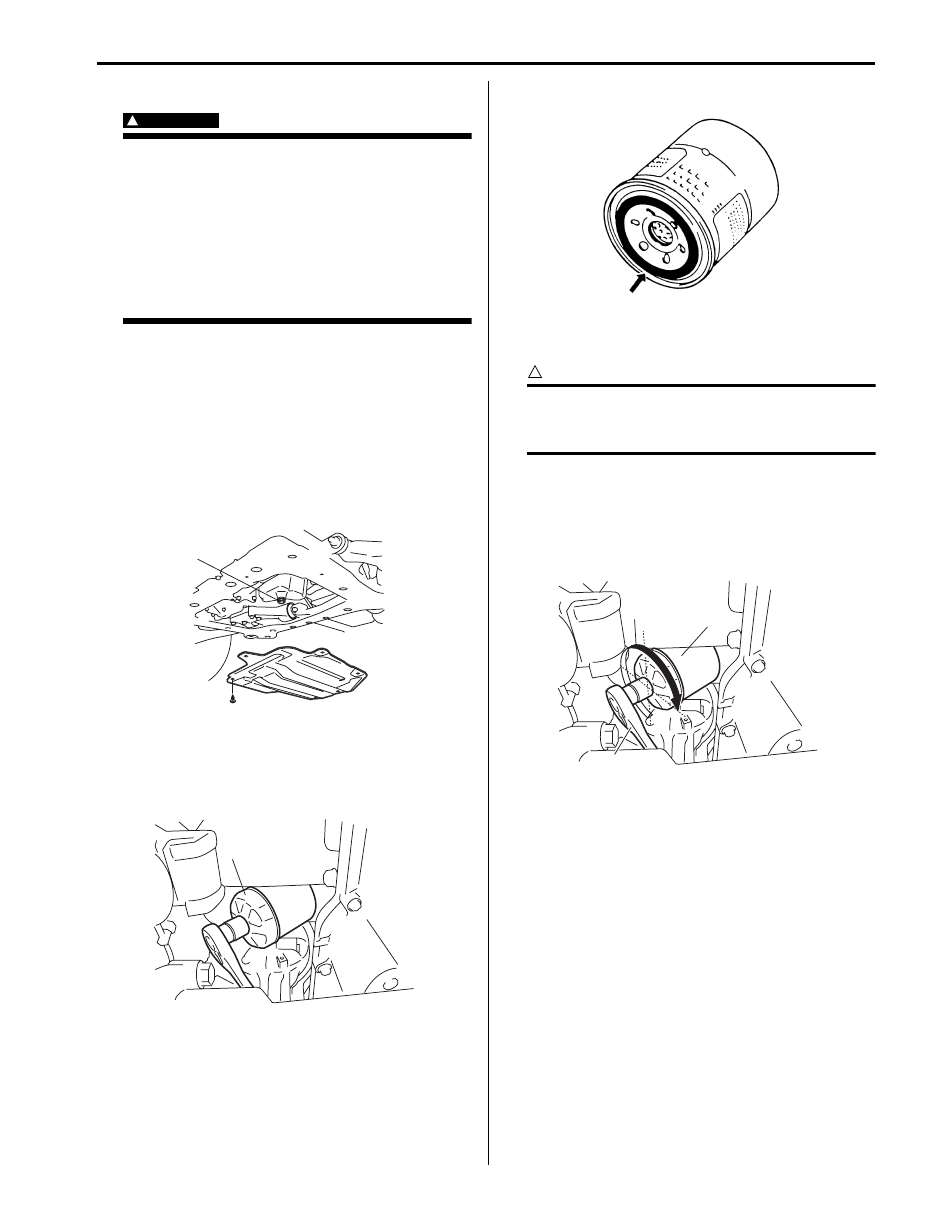
4) Apply engine oil to new oil filter O-ring.
5) Screw new filter on oil filter stand by hand until the
filter O-ring contacts the mounting surface.
CAUTION
!
To tighten oil filter properly, it is important to
accurately identify the position at which filter
O-ring first contacts the mounting surface.
6) Tighten oil filter (1) 3 / 4 turn from the point of contact
with the mounting surface using an oil filter wrench
(2).
Tightening torque
Oil filter (a): 14 N·m (1.4 kgf-m, 10.5 lb-ft)
(a)
I5JB0A020003-01
(A)
I5JB0A020020-01
IYSQ01020009-01
1, (a)
2
3/4
I5JB0A020021-01

0B-6 Maintenance and Lubrication:
7) Replenish oil until oil level is brought to FULL level
mark on dipstick. (oil pan and oil filter capacity). The
filler inlet is at the top of the cylinder head cover.
Use only engine oil of SG, SH, SJ, SL or SM grade.
Select the appropriate oil viscosity according to the
chart [A].
It is highly recommended to use SAE 5W-30 oil.
However, SAE 10W-30 oil is usable for ambient
temperatures above –18
°C (0 °F).
NOTE
Engine oil capacity is specified below.
However, note that the amount of oil required
when actually changing oil may somewhat
differ from the data depending on various
conditions (temperature, viscosity, etc.)
Engine oil specifications (M16 Engine)
Oil pan capacity: About 4.0 liters (8.4 US pt. / 7.0
lmp pt.)
Oil filter capacity: About 0.2 liters (0.4 US pt. / 0.3
lmp pt.)
Others: About 0.3 liters (0.6 US pt. / 0.5 lmp pt.)
Total: About 4.5 liters (9.5 US pt. / 7.9 lmp pt.)
Engine oil specifications (J20 Engine)
Oil pan capacity: About 5.0 liters (10.5 US pt. / 8.8
lmp pt.)
Oil filter capacity : About 0.2 liters (0.4 US pt. /
0.3 lmp pt.)
Others: About 0.3 liters (0.6 US pt. / 0.5 lmp pt.)
Total: About 5.5 liters (11.6 US pt. / 9.6 lmp pt.)
Proper engine oil viscosity chart
8) Check oil filter and drain plug for oil leakage.
9) Start engine and run it for 3 minutes. Stop it and wait
5 minutes before checking oil level. Add oil, as
necessary, to bring oil level to FULL level mark (hole)
(1) on dipstick.
Engine Coolant Change
S5JB0A0206005
WARNING
!
To help avoid danger of being burned, do not
remove radiator cap while engine and
radiator are still hot. Scalding fluid and steam
can be blown out under pressure if cap is
taken off too soon.
Change engine coolant referring to “Cooling System
Flush and Refill in Section 1F”.
C
F
o
o
-30
-22
-20
-4
-10
14
32
50
68
86
104
0
10
20
30
40
5W-30
20W-40, 20W-50
10W-30
15W-40, 15W-50
10W-40, 10W-50
[A]
I4RS0A020002-01
2. Low level mark (hole)
IYSQ01020012-01
Maintenance and Lubrication: 0B-7
Exhaust system Inspection
S5JB0A0206006
WARNING
!
To avoid danger of being burned, do not
touch exhaust system when it is still hot. Any
service on exhaust system should be
performed when it is cool.
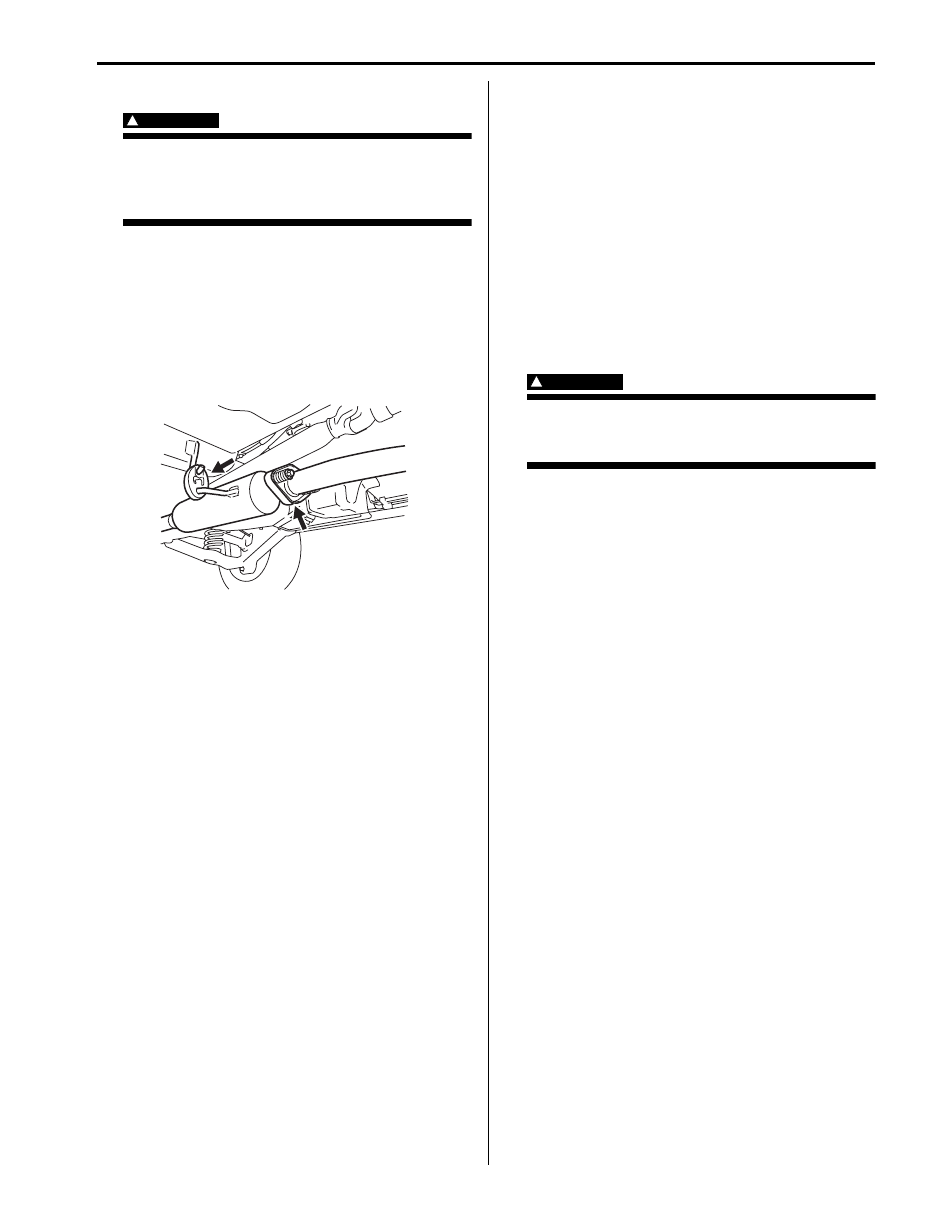
When carrying out periodic maintenance, or the vehicle
is raised for other service, check exhaust system as
follows:
• Check rubber mountings for damage, deterioration,
and out of position.
• Check exhaust system for leakage, loose
connections, dents and damages.
If bolts or nuts are loose, tighten them to specification.
• Check nearby body areas for damaged, missing, or
mispositioned parts, open seams, holes, loose
connections or other defects which could permit
exhaust fumes to seep into the vehicle.
• Make sure that exhaust system components have
enough clearance from the underbody to avoid
overheating and possible damage to the floor carpet.
• Any defects should be fixed at once.
Spark Plugs Replacement
S5JB0A0206010
Replace spark plugs with new ones referring to “Spark
Plug Removal and Installation in Section 1H”.
Air Cleaner Filter Inspection
S5JB0A0206014
Check that filter is not excessively dirty, damaged or oily
and clean filter with compressed air from air outlet side
of filter.
Refer to “Air Cleaner Filter Inspection and Cleaning: For
M16A Engine with VVT in Section 1D” or “Air Cleaner
Filter Inspection and Cleaning: For J20 Engine in
Section 1D”.
Air Cleaner Filter Replacement
S5JB0A0206013
Replace air cleaner filter with new one referring to “Air
Cleaner Filter Removal and Installation: For M16A
Engine with VVT in Section 1D” or “Air Cleaner Filter
Removal and Installation: For J20 Engine in Section 1D”.
Fuel Lines and Connections Inspection
S5JB0A0206016
Visually inspect fuel lines and connections for evidence
of fuel leakage, hose cracking and damage. Make sure
all clamps are secure.
Repair leaky joints, if any.
Replace hoses that are suspected of being cracked.
Fuel Filter Replacement
S5JB0A0206015
WARNING
!
This work must be performed in a well
ventilated area and away from any open
flames (such as gas hot water heaters).
Fuel filter is installed in fuel pump assembly in fuel tank.
Replace fuel filter or fuel pump assembly with new one,
referring to “Fuel Pump Assembly Removal and
Installation in Section 1G”.
Fuel Tank Inspection
S5JB0A0206044
Check fuel tank for damage, cracks, fuel leakage,
corrosion and tank bolts looseness.
If a problem is found, repair or replace.
Crankcase Ventilation Hoses and Connections
Inspection (Vehicle without A/F Sensor)
S5JB0A0206045
Check crankcase ventilation hose and connections for
leaks, cracks or clog. Repair or replace if necessary.
PCV Valve Inspection
S5JB0A0206046
Check crankcase ventilation hose and PCV hose for
leaks, cracks or clog, and PCV valve for stick or clog.
Refer to “PCV Valve Inspection in Section 1B” for PCV
valve checking procedure.
I5JB0A020022-01
Нет комментариевНе стесняйтесь поделиться с нами вашим ценным мнением.
Текст