Suzuki Grand Vitara JB416 / JB420. Manual — part 158
2D-6 Wheels and Tires:
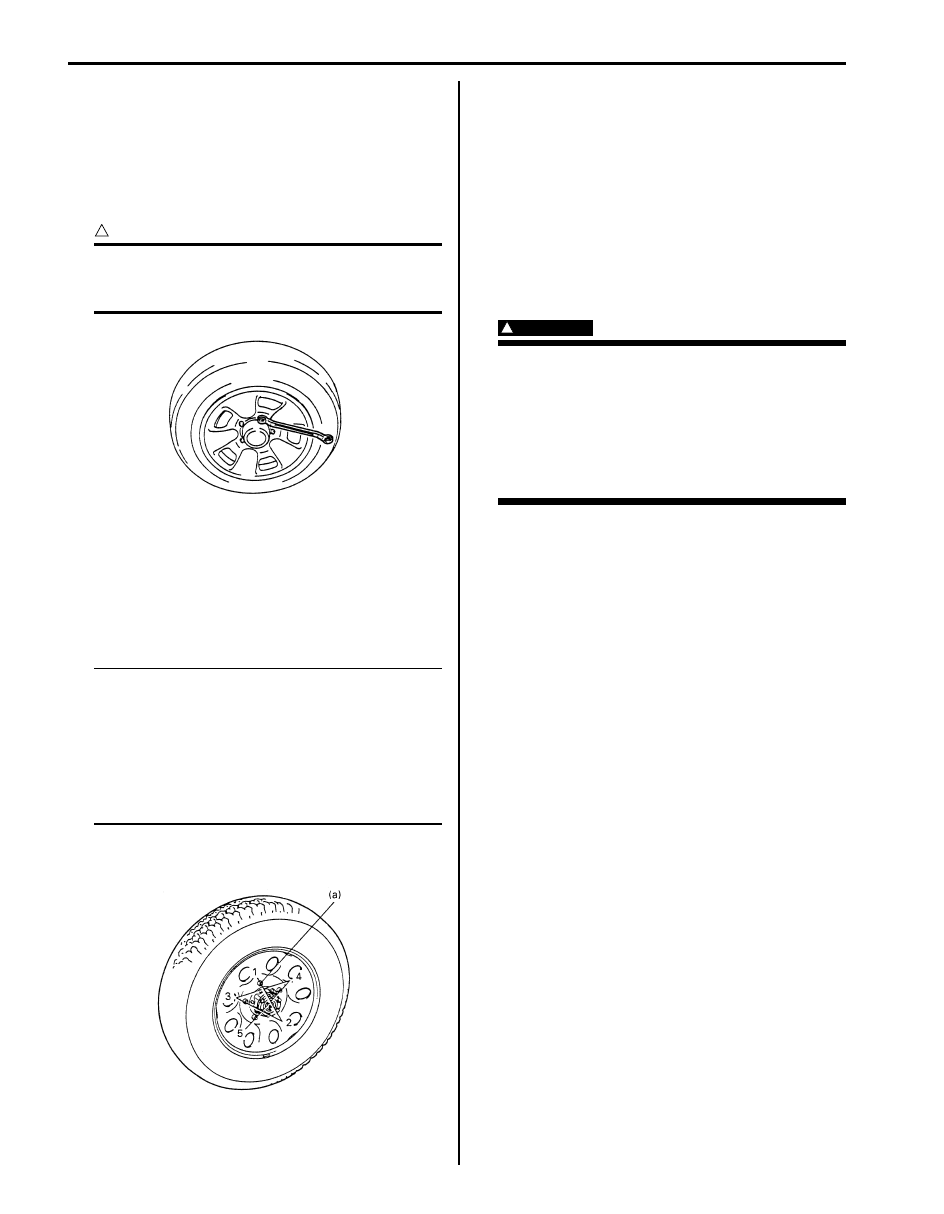
Wheel Removal and Installation
S5JB0A2406003
Removal
1) Loosen wheel nuts by approximately 180
° (half a
rotation).
2) Hoist vehicle.
3) Remove wheel.
CAUTION
!
Never use heat to loosen tight wheel because
application of heat to wheel can shorten life
of wheel and damage wheel bearings.
Installation
For installation, reverse removal procedure, noting the
following.
• Wheel nuts must be tightened in sequence and to
proper torque to avoid bending wheel or brake drum
or brake disc as shown in the figure.
NOTE
Before installing wheels, remove any build-
up of corrosion on wheel mounting surface
and brake disc mounting surface by scraping
and wire brushing. Installing wheels without
good metal-to-metal contact at mounting
surfaces can cause wheel nuts to loosen,
which can later allow a wheel to come off
while vehicle is moving.
Tightening torque
Wheel nut (a): 100 N·m (10.0 kgf-m, 72.5 lb-ft)
Tire Mounting and Dismounting
S5JB0A2406004
Use a tire changing machine to mount or dismount tires.
Follow equipment manufacturer’s instructions. Do not
use hand tools or tire irons alone to change tires as they
may damage tire beads or wheel rim.
Rim bead seats should be cleaned with a wire brush or
coarse steel wool to remove lubricants, old rubber and
light rust. Before mounting or dismounting a tire, bead
area should be well lubricated with approved tire
lubricant.
After mounting, inflate to specified pressure shown on
tire placard so that beads are completely seated.
WARNING
!
Do not stand over tire when inflating. Bead
may break when bead snaps over rim’s safety
hump and cause serious personal injury.
Do not exceed specified pressure when
inflating. If specified pressure will not seat
beads, deflate, re-lubricate and reinflate.
Over inflation may cause bead to break and
cause serious personal injury.
Install valve core and inflate to proper pressure.
Tire Repair
S5JB0A2406005
There are many different materials and techniques on
the market to repair tires. As not all of these work on all
types of tires, tire manufacturers have published detailed
instructions on how and when to repair tires. These
instructions can be obtained from each tire
manufacturer.
IYSQ01240007-01
IYSQ01240008-01

Wheels and Tires: 2D-7
Specifications
Wheels and Tires Specifications
S5JB0A2407001
Tire size
: 225/70R16 102S or 225/65R17 101S
Wheel size
: 16 x 6 1/2 J (for 225/70R16) or 17 x 6 1/2 J (for 225/65R17)
Tightening torque
Wheel nut: 100 N·m (10.0 kgf-m, 72.5 lb-ft)
NOTE
• Tire inflation pressure should be checked when tires are cool.
• Specified tire inflation pressure should be found on tire placard or in owner’s manual which came
with the vehicle.
Tightening Torque Specifications
S5JB0A2407002
Reference:
For the tightening torque of fastener not specified in this section, refer to “Fastener Information in Section 0A”.
Fastening part
Tightening torque
Note
N
⋅m
kgf-m
lb-ft
Wheel nut
100
10.0
72.5
2D-8 Wheels and Tires:
Table of Contents 3- i
3
Section 3
CONTENTS
Driveline / Axle
Precautions . . . . . . . . . . . . .3-1
Precautions. . . . . . . . . . . . . . . . 3-1
Precautions for Driveline / Axle . . . . . . . . 3-1
Drive Shaft / Axle . . . . . . . . . . 3A-1
Front . . . . . . . . . . . . . . . . . . .3A-1
General Description . . . . . . . . . . . .3A-1
Front Drive Shaft Construction. . . . . . . 3A-1
Diagnostic Information and Procedures. . . 3A-1
Front Drive Shaft Symptom Diagnosis. . . . 3A-1
Repair Instructions . . . . . . . . . . . ..3A-2
Front Drive Shaft Boot and Joint Check. . . .. 3A-2
Front Drive Shaft Components . . . . . . ... 3A-2
Front Drive Shaft Assembly Removal and
Installation. . . . . . . . . . . . . . . 3A-3
Front Drive Shaft Disassembly and Assembly . 3A-3
Specifications. . . . . . . . . . . . . ...3A-6
Tightening Torque Specifications. . . . . . 3A-6
Special Tools and Equipment . . . . . . . .3A-6
Recommended Service Material. . . . . . . 3A-6
Special Tool . . . . . . . . . . . . . . 3A-6
Rear . . . . . . . . . . . . . . . . . . ..3A-7
General Description . . . . . . . . . . . .3A-7
Rear Drive Shaft Construction . . . . . . . 3A-7
Repair Instructions . . . . . . . . . . . ..3A-7
Rear Drive Shaft Components . . . . . . . 3A-7
Rear Drive Shaft Assembly Removal and
Installation. . . . . . . . . . . . . . . 3A-8
Rear Drive Shaft Disassembly and Assembly. . 3A-8
Specifications. . . . . . . . . . . . . ...3A-9
Tightening Torque Specifications. . . . . . 3A-9
Special Tools and Equipment . . . . . . . .3A-9
Recommended Service Material. . . . . . . 3A-9
Special Tool . . . . . . . . . . . . . . 3A-9
Differential. . . . . . . . . . . . 3B-1
Front . . . . . . . . . . . . . . . . . . .3B-1
General Description . . . . . . . . . . . .3B-1
Front Differential Construction . . . . . . . 3B-1
Diagnostic Information and Procedures. . . 3B-1
Front Differential Symptom Diagnosis. . . . . 3B-1
Repair Instructions . . . . . . . . . . . ..3B-2
Front Differential Oil Change . . . . . . . .. 3B-2
Front Differential Unit Components. . . . . .3B-3
Front Differential Dismounting and
Remounting. . . . . . . . . . . . . ...3B-3
Front Differential Components . . . . . . . 3B-4
Front Differential Assembly Disassembly and
Reassembly . . . . . . . . . . . . . ..3B-5
Front Differential Inspection . . . . . . . ..3B-17
Specifications. . . . . . . . . . . . . .3B-18
Tightening Torque Specifications. . . . . ..3B-18
Special Tools and Equipment . . . . . . ...3B-18
Recommended Service Material . . . . . ...3B-18
Special Tool . . . . . . . . . . . . . ..3B-19
Rear . . . . . . . . . . . . . . . . . . 3B-21
General Description . . . . . . . . . . ...3B-21
Rear Differential Construction . . . . . . ...3B-21
Diagnostic Information and Procedures. . ..3B-21
Rear Differential Symptom Diagnosis . . . ...3B-21
Repair Instructions . . . . . . . . . . . 3B-21
Rear Differential Oil Change . . . . . . . .3B-21
Rear Differential Unit Components . . . . ...3B-21
Rear Differential Dismounting and
Remounting. . . . . . . . . . . . . .3B-22
Rear Differential Components. . . . . . ...3B-23
Rear Differential Assembly Disassembly and
Reassembly . . . . . . . . . . . . . 3B-24
Rear Differential Inspection. . . . . . . ...3B-36
Specifications. . . . . . . . . . . . . .3B-37
Tightening Torque Specifications. . . . . ..3B-37
Special Tools and Equipment . . . . . . ...3B-37
Recommended Service Material . . . . . ...3B-37
Special Tool . . . . . . . . . . . . . ..3B-38
Transfer . . . . . . . . . . . . . 3C-1
Motor-Shift Type (Transfer with Shift
Actuator) . . . . . . . . . . . . . . . . 3C-1
Precautions. . . . . . . . . . . . . . ...3C-1
Transfer Warning . . . . . . . . . . . . 3C-1
Precautions in Diagnosing Trouble . . . . . .3C-1
General Description . . . . . . . . . . . .3C-2
Transfer Description. . . . . . . . . . . 3C-2
4WD Control System Description. . . . . . 3C-2
Function of 4WD Control System Component . 3C-4
4WD Control System Operation. . . . . . ..3C-4
Нет комментариевНе стесняйтесь поделиться с нами вашим ценным мнением.
Текст