Suzuki Grand Vitara JB416 / JB420. Manual — part 329
8B-112 Air Bag System:
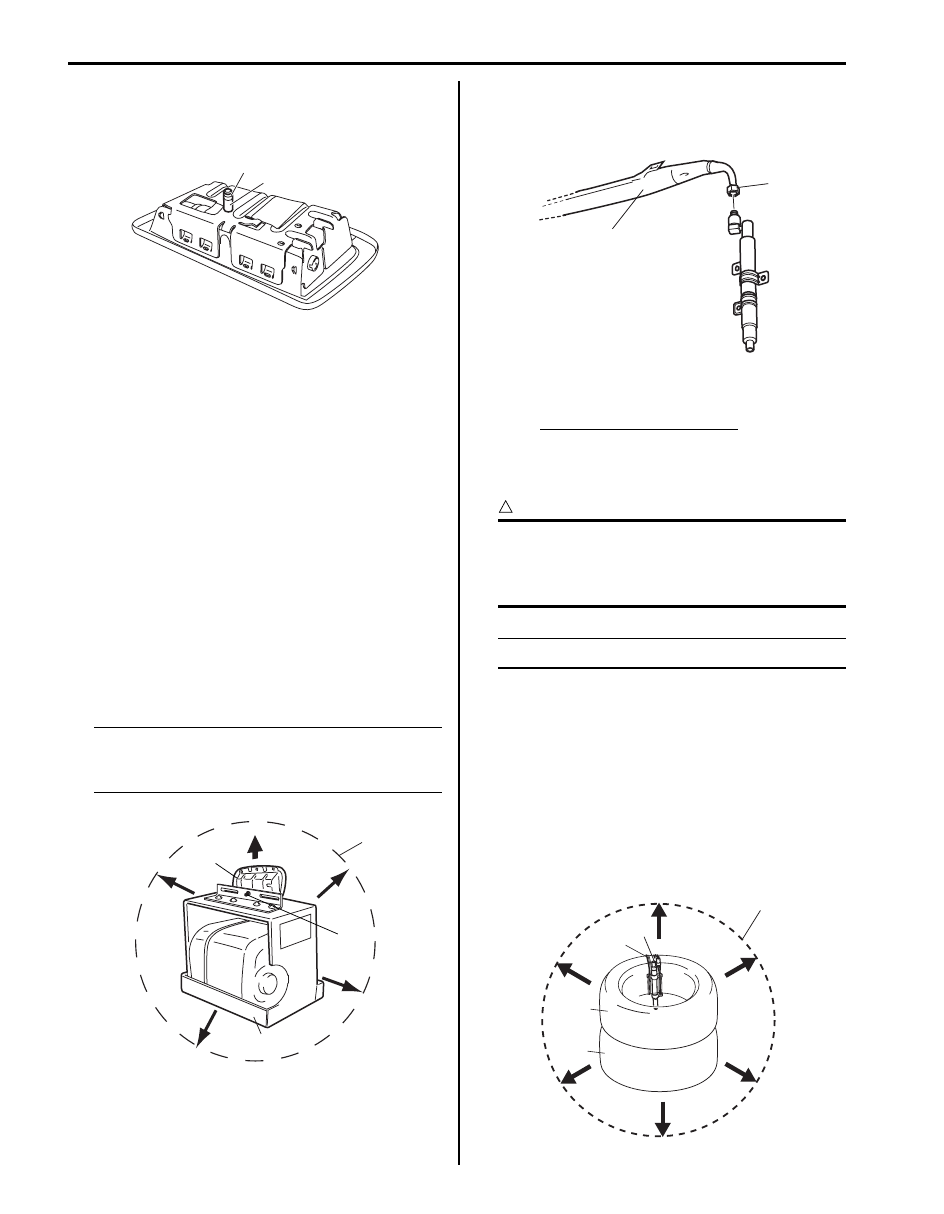
• For side-air bag (inflator) module
a. Remove sleeve (1) and sleeve lock nut (2), if
equipped.
b. Clear space (3) on ground about 185 cm (6 ft)
in diameter where side-air bag (inflator)
module for deployment. Paved, outdoor
location where there is no activity is preferred.
If outdoor location is not available, space on
shop floor where there is no activity and
provide sufficient ventilation. Ensure no loose
or flammable objects are within deployment
area.
c. Place deployment fixture (A) on ground.
Special tool
(A): 09932–75041
d. Fill plastic reservoir in deployment fixture (A)
with water or sand. This is necessary to
provide sufficient stabilization of fixture during
deployment.
e. Attach side-air bag (inflator) module (1) in
deployment fixture using mounting
attachment, sleeve lock nut and washer (2).
NOTE
Make sure that deploying direction faces as
shown in figure against mounting
attachment.
• For side curtain-air bag (inflator) module
a. Loosen nut (1) and remove bag (2) of side
curtain-air bag (inflator) module.
b. Tie side curtain-air bag inflator (1) to tire (3)
with wire harness (2) as shown.
Wire harness specifications
Stripped wire harness section 1.25 mm
2
(0.0019 in.
2
) or more (Stripped wire harness
diameter 1.25 mm (0.05 in.) or more)
CAUTION
!
Make sure that wire harness is tight. It is very
dangerous if looseness in wire harness
results in side curtain-air bag inflator flying
off due to shock from inflator deploying.
NOTE
Wind wire harness (2) around at least 3 times.
c. Clear space (5) on ground about 185 cm (6 ft)
in diameter where side curtain-air bag
(inflator) module (1) is set for deployment.
Paved, outdoor location where there is no
activity is preferred. If outdoor location is not
available, use space on shop floor where
there is no activity and sufficient ventilation is
provided. Ensure no loose or flammable
object exists within activation area.
d. Pile tire with side curtain-air bag (inflator)
module on tire (4).
2
1
I4RS0A820088-01
1
(A)
2
3
I4RS0A820089-01
1
2
I5JB0A820100-01
1
2
3
4
5
I5JB0A820101-01

Air Bag System: 8B-113
• For seat belt pretensioner
a. Cut webbing (1) at tongue plate stopper (3) of
seat belt pretensioner (2) side as shown.
NOTE
Hold seat belt pretensioner (2) vertically in
the same condition as it is installed.
Otherwise, webbing can’t be pulled out.
b. Remove tongue plate (4) and shoulder anchor
(5) from webbing.
c. Tie webbing (1) tightly at 10 cm (3.9 in.) from
cutting edge as shown.
d. Tie seat belt pretensioner (2) with wire
harness (3) to wheel-installed tire (4) as
shown.
Wire harness specifications
Stripped wire harness section 1.25 mm
2
(0.0019 in.
2
) or more (Stripped wire harness
diameter 1.25 mm (0.05 in.) or more)
NOTE
Wind wire harness (3) around at least 3 times.
e. Clear space (5) on ground about 185 cm (6 ft)
in diameter where seat belt pretensioner (2) is
to be activated. Paved, outdoor location where
there is no activity is preferred. If outdoor
location is not available, use space on shop
floor where there is no activity and sufficient
ventilation is provided. Ensure no loose or
flammable object exists within activation area.
f.
Place wheel-installed tire (4) with seat belt
pretensioner (2) on ground in step e.
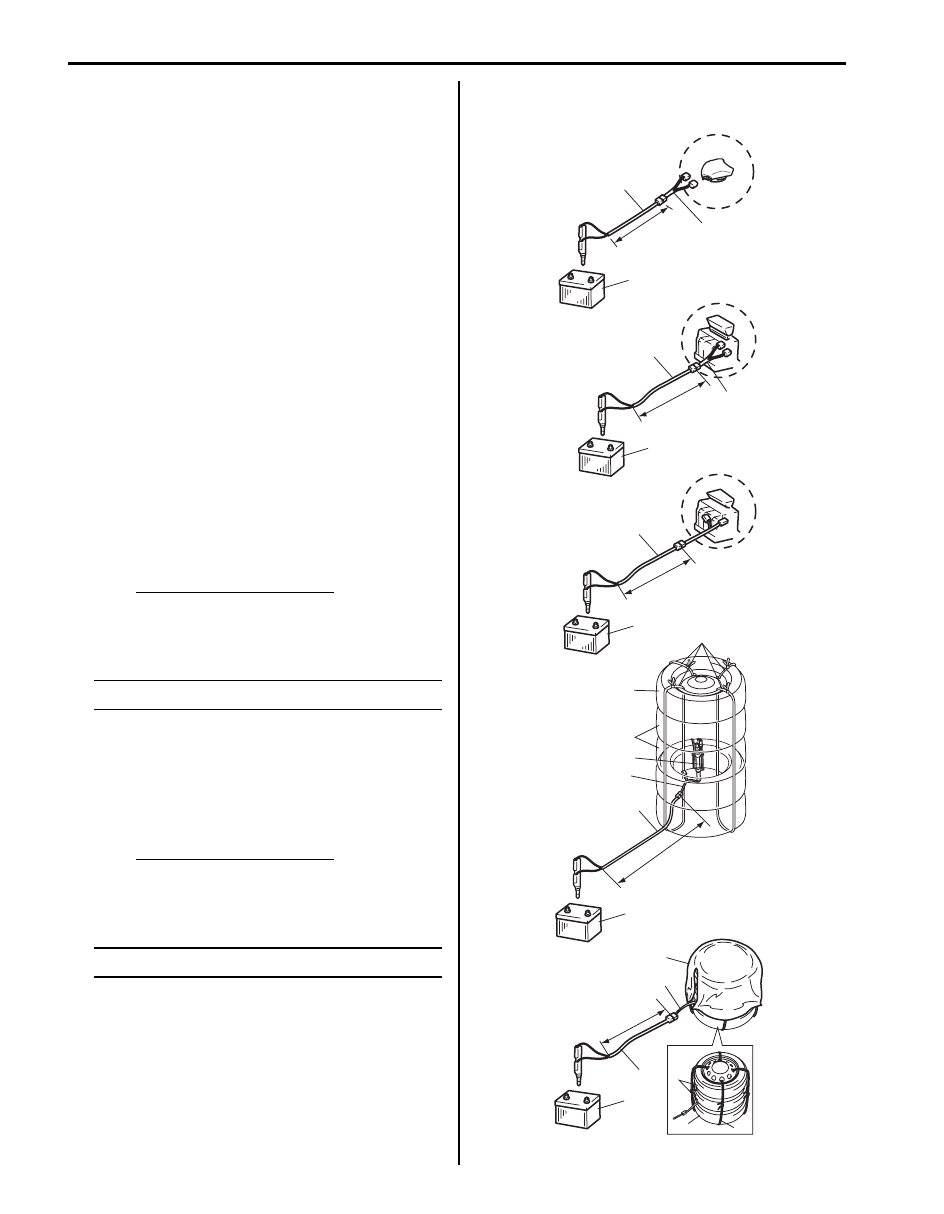
7) Stretch deployment harness (A) from air bag
(inflator) module or seat belt pretensioner to its full
length 10 m (33 ft).
Special tool
(A): 09932–75031
8) Place 12 volts vehicle battery (1) near the shorted
end of deployment harness (A).
9) Check that area around air bag (inflator) module or
seat belt pretensioner is clear of all people and loose
or flammable objects.
3
1
4
5
2
I3JA01820037-01
10 cm (3.9 in.)
1
I4RS0A820104-01
1. Webbing
4
3
3
2
5
I4RS0A820105-01
8B-114 Air Bag System:
10) Connect adapter cable (B) as follows.
Special tool
(B): 09932–76510
• For driver air bag (inflator) module [A]
Check that driver air bag (inflator) module is
placed with its vinyl trim cover facing up, and
connect adapter cable (B) to driver air bag
(inflator) module.
• For passenger air bag (inflator) module [B]
Check that passenger air bag (inflator) module is
firmly and properly secured on deployment fixture
(special tool), and connect adapter cable (B) to
passenger air bag (inflator) module.
• For side-air bag (inflator) module [C]
Verify that side-air bag (inflator) module is firmly
and properly on deployment fixture (special tool),
and connect adapter cable (B) to side-air bag
(inflator) module.
• For side curtain-air bag (inflator) module [D]
a. Connect adapter cable (B) to side curtain-air
bag (inflator) module.
b. Pile 2 tires (2) and wheel-installed tire (3) on
top of tire with side curtain-air bag (inflator)
(4), and tie them with wire harness (5) as
shown.
Wire harness specifications
Stripped wire harness section 1.25 mm
2
(0.0019 in.
2
) or more (Stripped wire harness
diameter 1.25 mm (0.05 in.) or more)
NOTE
Wind wire harness (5) around at least 2 times.
• For seat belt pretensioner [E]
a. Connect adapter cable (B) to seat belt
pretensioner.
b. Pile 2 wheel-installed tires (3) on top of tire
with seat belt pretensioner (6), and tie them
with wire harness (5) as shown.
Wire harness specifications
Stripped wire harness section 1.25 mm
2
(0.0019 in.
2
) or more (Stripped wire harness
diameter 1.25 mm (0.05 in.) or more)
NOTE
Wind wire harness (5) around at least 2 times.
c. Drape blanket (7) over those tires.
11) Connect adapter cable (B) to deployment harness
(A) connector and lock connectors with lock lever.
[A]
10 m (33 ft)
(A)
(B)
1
10 m (33 ft)
(A)
(B)
1
5
3
2
4
(A)
[B]
[C]
[D]
[E]
7
3
6
5
(A)
(B)
1
10 m (33 ft)
10 m (33 ft)
(A)
(B)
1
1
10 m (33 ft)
I5JB0A820102-01
Air Bag System: 8B-115
12) Notify all people in immediate area that you intend to
deploy / activate air bag (inflator) module or seat belt
pretensioner.
NOTE
• When air bag (inflator) module deploys and
seat belt pretensioner activates, rapid gas
expansion will create substantial report.
Wear suitable ear protection. Notify all
people in immediate area that you intend
to deploy air bag (inflator) module or
activate seat belt pretensioner and suitable
ear protection should be worn.
• When driver air bag (inflator) module
deploys, driver air bag (inflator) module
may jump about 30 cm (1 ft) vertically. This
is normal reaction to force of rapid gas
expansion inside of drive air bag (inflator)
module.
• After air bag (inflator) module has been
deployed, surface of air bag (inflator) may
contain powdery residue. This powder
consists primarily of cornstarch (used to
lubricate bag (inflator) as it inflates) and
byproducts of chemical reaction.
WARNING
!
• Do not place deployed air bag (inflator)
module and activated seat belt
pretensioner near any flammable objects.
• Do not apply water, oil, etc. to deployed air
bag (inflator) module and activated seat
belt pretensioner.
• Wait for about 30 minutes before touching
any metal surface of air bag (inflater)
module or seat belt pretensioner module.
Disregarding these precautions may cause
fire or personal injury.
Failure to follow procedures may result in fire
or personal injury.
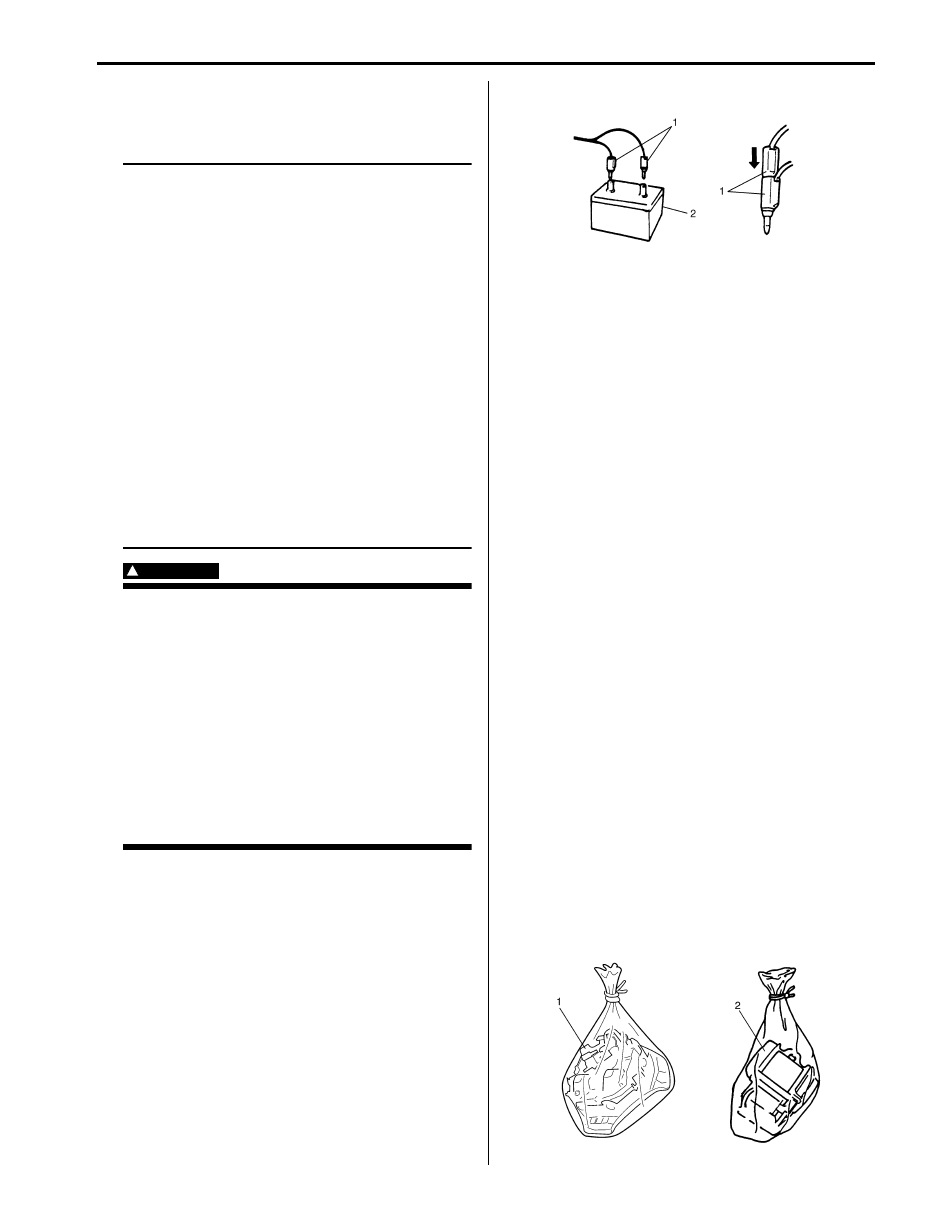
13) Separate two banana plugs (1) on deployment
harness.
14) Connect deployment harness to 12 volts vehicle
battery (2). This will immediately deploy or activate
air bag (inflator) module or seat belt pretensioner.
15) Disconnect deployment harness from 12 volts
vehicle battery (2) and short two deployment
harness leads together by fully seating one banana
plug into the other.
16) In the unlikely event that air bag (inflator) module or
seat belt pretensioner did not deploy / activate after
following these procedures, proceed immediately
with Step 22) through 25). If air bag (inflator) module
or seat belt pretensioner did deploy or activate,
proceed with Steps 18) through 21).
17) Put on pair of shop gloves to protect your hands from
possible irritation and heat when handling deployed
air bag (inflator) module or activated seat belt
pretensioner.
18) Disconnect adapter cable (special tool) from air bag
(inflator) module or seat belt pretensioner as soon as
possible. This will prevent adapter cable (special
tool) from damage due to possible contact with hot
air bag (inflator) module or hot seat belt
pretensioner.
19) Check adapter cable as follows.
• For air bag (inflator) module
Be sure to check air bag (inflator) module adapter
cable (special tool) for damage after deployment
and replace it with new adapter cable (special
tool), if it is damaged.
• For seat belt pretensioner
Be sure to check seat belt pretensioner adapter
cable (special tool) for damage after seat belt
pretensioner is activated. Replace it with spare
connector (special tool) or new adapter, if
necessary.
20) Dispose of deployed air bag (inflator) module (1) or
activated seat belt pretensioner (2) through normal
refuse channels after it has cooled for at least 30
minutes and tightly seal air bag (inflator) module (1)
or seat belt pretensioner (2) in strong vinyl bag.
Refer to “Deployed Air Bag (Inflator) Module and
Activated Seat Belt Pretensioner Disposal” for
details.
I2RH01820069-01
I3JA01820116-01
Нет комментариевНе стесняйтесь поделиться с нами вашим ценным мнением.
Текст