BMW 3 (E46). Manual — part 219

exceed measurement A.
If measurement exceeds
specification, pull lever outward with
fingers until measurement is
correct.
Installation distance: inner door
handle lever to door
Measurement A
less than 8 mm
(0.32 in.)
Insert handle and snap into place.
Note:
Take care that the door handle base
gasket is not deformed when the handle
is installed.
-
Be sure to check unlocking of rotary
latch and outside door handle
overtravel as described above
under
Rotary latch adjustments
.
Door handle inner mechanism,
removing and installing (to
production date 9/2000)
-
Remove door lock and outside door
handle as described earlier.
-
Remove front door tim panel, air
bag, and vapor barrier as described
in
411 Doors
and
721 Airbag
System (SRS)
.
-
Remove outside handle base seals.
Loosen inner handle mounting bolt
(arrow).

-
Working inside door opening, slide
inner handle toward front and
remove.
-
Installation is reverse of removal.
Note:
Inspect mounting bolt and replace if
necessary.
Door handle inner mechanism,
removing and installing (from
production date 9/2000)
-
Remove outside door handle as
described earlier.
-
Remove outside handle base seals.
-
Remove front door tim panel, air
bag, and vapor barrier as described
in
411 Doors
and
721 Airbag
System (SRS)
.
-
Lever out Bowden cable from door
handle with screwdriver.
-
On Sedan or Sport Wagon: Slide
Bowden cable out of guide.
Note:
Foam insulation on bowden cable must
be placed in original position during
reinstallation.
-
On Coupe or Convertible: Remove
inner door guide (plastic) to gain
access to Bowden cable.
Note:

Take care to not damage inner door
guide during removal and installation.
-
Loosen handle mounting bolt.
-
Working inside door opening, slide
inner handle toward front and
remove.
-
Installation is reverse of removal.
Note:
Inspect handle mounting bolt and
replace if necessary.
Bowden cable end must be correctly
fitted in lock actuator.
Door striker, replacing
-
Remove striker plastic cover.
Remove striker top mounting bolt (A).
Screw M8 stud into top bolt hole to
keep striker backing plate from
falling down into B-pillar cavity.
Remove lower bolt (B).
-
Remove and reinstall striker and
gasket while holding on to stud.
Install striker mounting bolts finger-
tight.
Position striker bar approx. 90° to inside
edge of door frame. Leave striker
mounting bolts finger-tight.
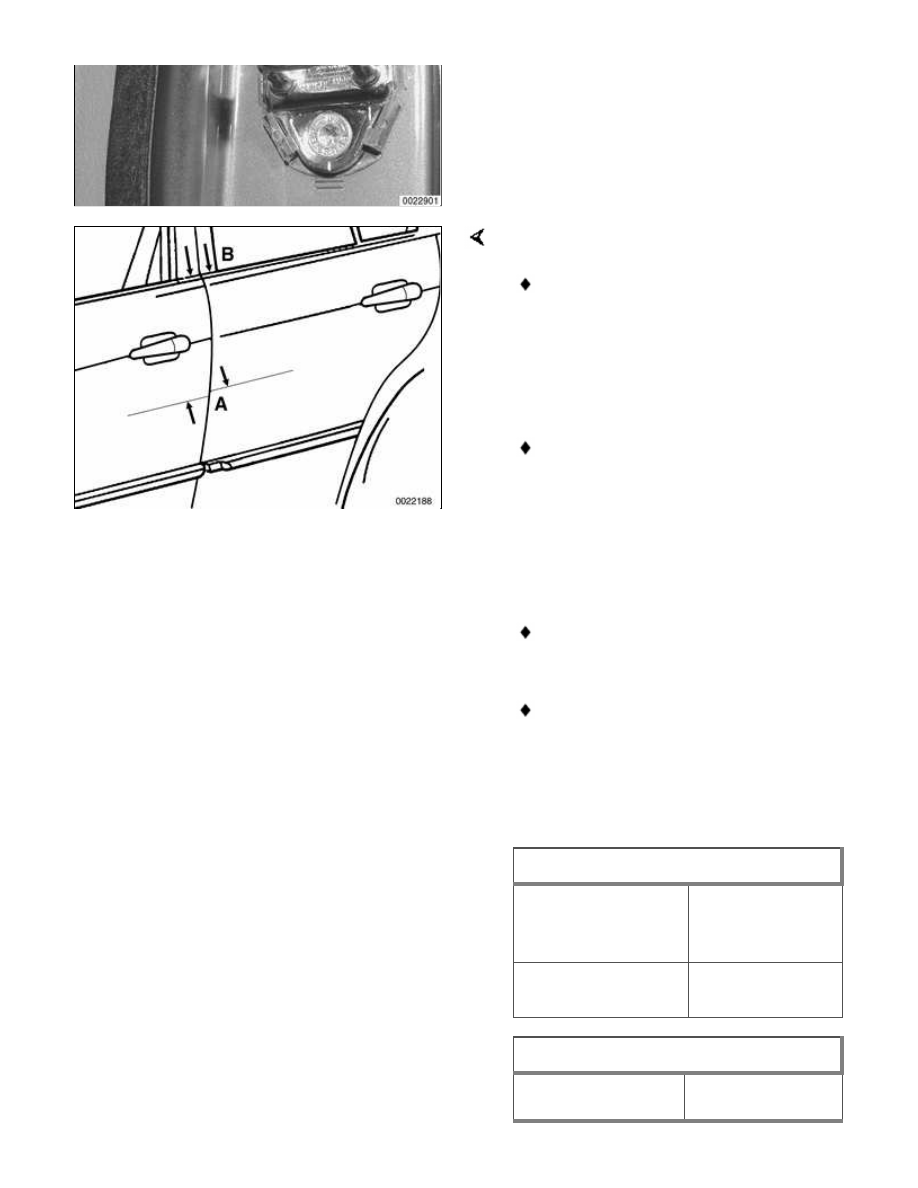
Set position of striker:
When closed, rear edge of front
door must be even with front edge
of rear door (Sedan or Sport
Wagon) or with rear quarter panel
(Coupe or Convertible). Maximum
deviation allowed measured at A.
When closed, shoulder of front door
must be flush to shoulder of rear
door (Sedan or Sport Wagon) or
with top of rear quarter panel
(Coupe or Convertible). No
deviation is allowed at
measurement B.
When door is closed, striker must
not contact lock housing.
With door closed, there must be no
in/out movement of door.
-
Torque striker bolts. Recheck door
alignment. Reinstall plastic cover.
Door striker position
Deviation from
parallelism of
closed door (A)
max. 1 mm (0.04
in.)
Deviation from flush
at door shoulder (B)
0
Tightening torque
Striker plate to
24 Nm (18 ft-lb)
Нет комментариевНе стесняйтесь поделиться с нами вашим ценным мнением.
Текст