BMW 3 (E46). Manual — part 45

113-3
Cylinder Head
Installation
Clean cylinder head and gasket
surfaces of cylinder block and all
timing chain covers.
Remove foreign matter and liquid from
bolt holes.
CAUTION!
Do not use a metal scraper or wire
brush to clean the aluminum cylinder
head or pistons. If necessary, use a
hard wooden or plastic scraper. Also
available are abrasive discs to be
used in conjunction with an electric
drill. Be sure to use the correct disc
for the type of metal being cleaned.
Evaluate cylinder head as shown in
116 Cylinder Head and Valvetrain
.
Note:
If the cylinder head has been
machined, a special 0.3 mm
(0.011 in.) thicker gasket should
be installed. The thicker gasket is
available from an authorized BMW
dealer.
Cylinder head and valve
specifications are covered in
116 Cylinder Head and Valvetrain
.
Lubricate camshafts, camshaft carriers,
bearing caps, hydraulic lifters, friction
washers, splined shafts and spline
hubs with assembly lubricant before
installation.
To assist the technician in cylinder
head installation, the procedure has
been organized as separate

operations. Please be advised that
these individual jobs must be
accomplished in the order in which
they appear.
Cylinder head assembly, installing
Camshafts and valvetrain, installing
VANOS control unit, installing
Cylinder head cover, manifolds,
cooling system, installing
Cylinder head assembly,
installing
Check that two cylinder head locating
aligning sleeves (arrows) are correctly
positioned in block and are not
damaged.
-
Apply permanently elastic sealing
compound 3 Bond® 1209 to joints
with timing belt cover.
-
Place new cylinder head gasket
on cylinder block.
Note:
The word OBEN, printed on the gasket,
should face up. The cylinder head
gasket will fit correctly in only one
orientation.
-
Set cylinder head in position,
guiding primary chain through
cylinder head opening.
CAUTION!
Make sure the crankshaft, which had
been rotated approximately 30°
opposite the direction of engine
rotation from TDC, is still in that
position before lowering the cylinder
head into position. All pistons must
be out of TDC position to prevent
valve/piston interference when the
camshafts are installed.
-
Lightly lubricate new cylinder
head bolts. Install bolts and
washers finger tight. Install
cylinder head-to-lower timing
chain cover bolts finger tight.
Note:
Cylinder head bolts should not be
reused. They are stretch-type bolts
and must always be replaced
whenever loosened.
Check that all washers for the
head bolts are in place before
installing the bolts. Some of the
washers may be staked to the
cylinder head.
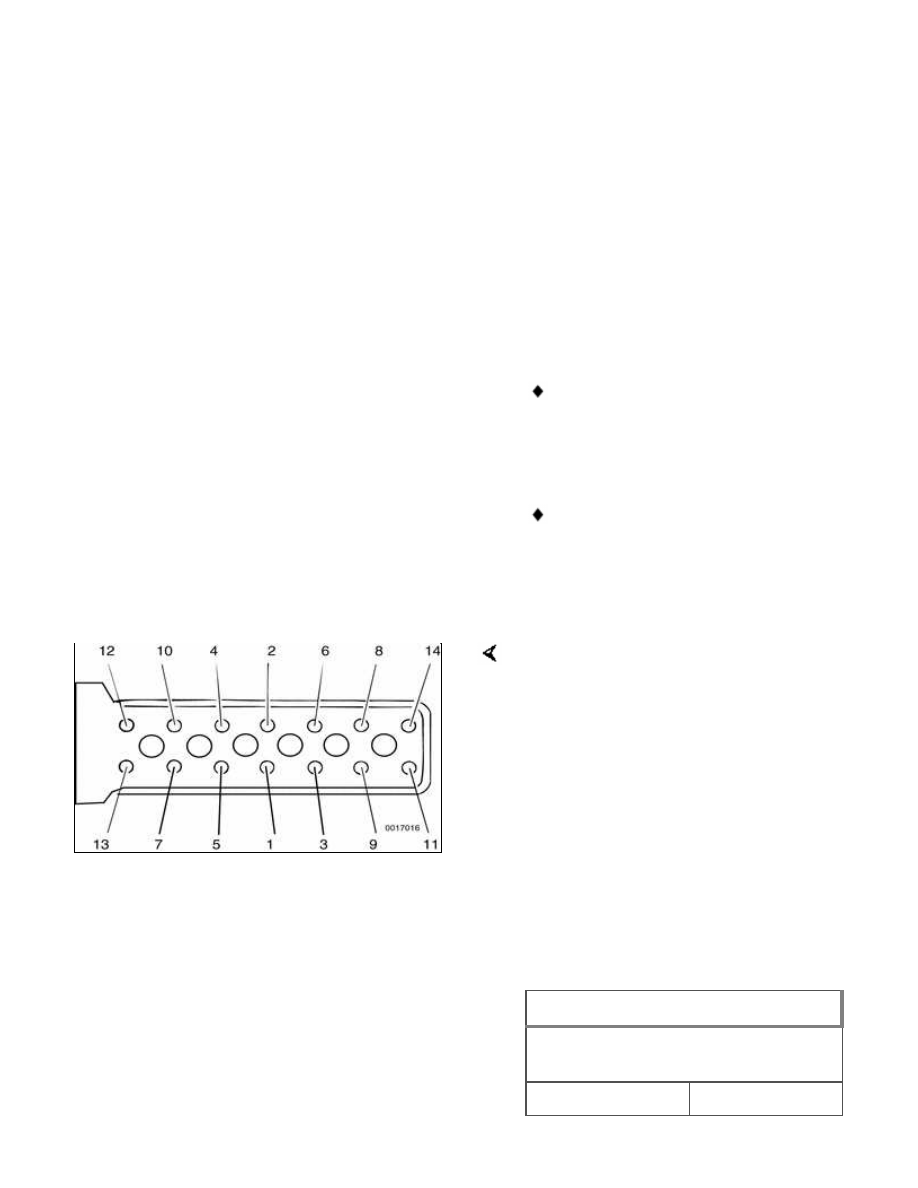
Tighten cylinder head bolts in correct
sequence (1-14).
CAUTION!
The bolts should be tightened in
three stages as listed below. The
final stages require the use of a BMW
special tool 11 2 110 or a suitable
protractor to tighten the bolts to a
specified torque angle.
-
Secure cylinder head bolts by
torquing an additional 90° each for
Stage 2 and 3.
Tightening torques
Cylinder head to engine block
(Torx E12 M10 bolts)
Stage 1
40 Nm (30 ft-lb)

Tightening torques
Stage 2
+90°
Stage 3
+90°
Install intake camshaft position sensor
(arrow).
-
Install exhaust manifolds. See 180
Exhaust System.
Install lower secondary chain guide.
Tighten Torx bolts (arrows) to
specifications. The bolt on the intake
camshaft side is long and extends into
the engine block.
Tightening torque
Secondary chain
guide to cylinder
head
10 Nm (89 in-lb)
Install and tighten cylinder
head-to-lower timing chain cover bolts
(arrows). (Photo shows camshafts in
place)
Camshafts and valvetrain,
installing
CAUTION!
Нет комментариевНе стесняйтесь поделиться с нами вашим ценным мнением.
Текст