BMW 3 (E46). Manual — part 48

Pull out exhaust camshaft splined shaft
to stop.
-
Press down on secondary chain
tensioner and remove tensioner
lock-down tool.
Preload primary chain:
Tighten adjusting screw on BMW
special tool 11 4 220 to specified
torque.
Tightening torque
Primary chain
tensioner preload
0.7 Nm (6 in-lb)
Preload exhaust camshaft spring plate
by pressing on impulse wheel while
tightening mounting nuts (arrows)
finger tight.
Install BMW special tool 11 6 150
(VANOS setup bracket) to front of
cylinder head timing case. Install nuts
(arrows) finger tight, then tighten down
uniformly until special tool is in full
contact with cylinder head.
CAUTION!
Make sure all gasket material is
removed from face of cylinder head.
Clean sealing face and keep free of
oil. If any foreign material is present
on the sealing surface, the camshaft
timing will be incorrect.
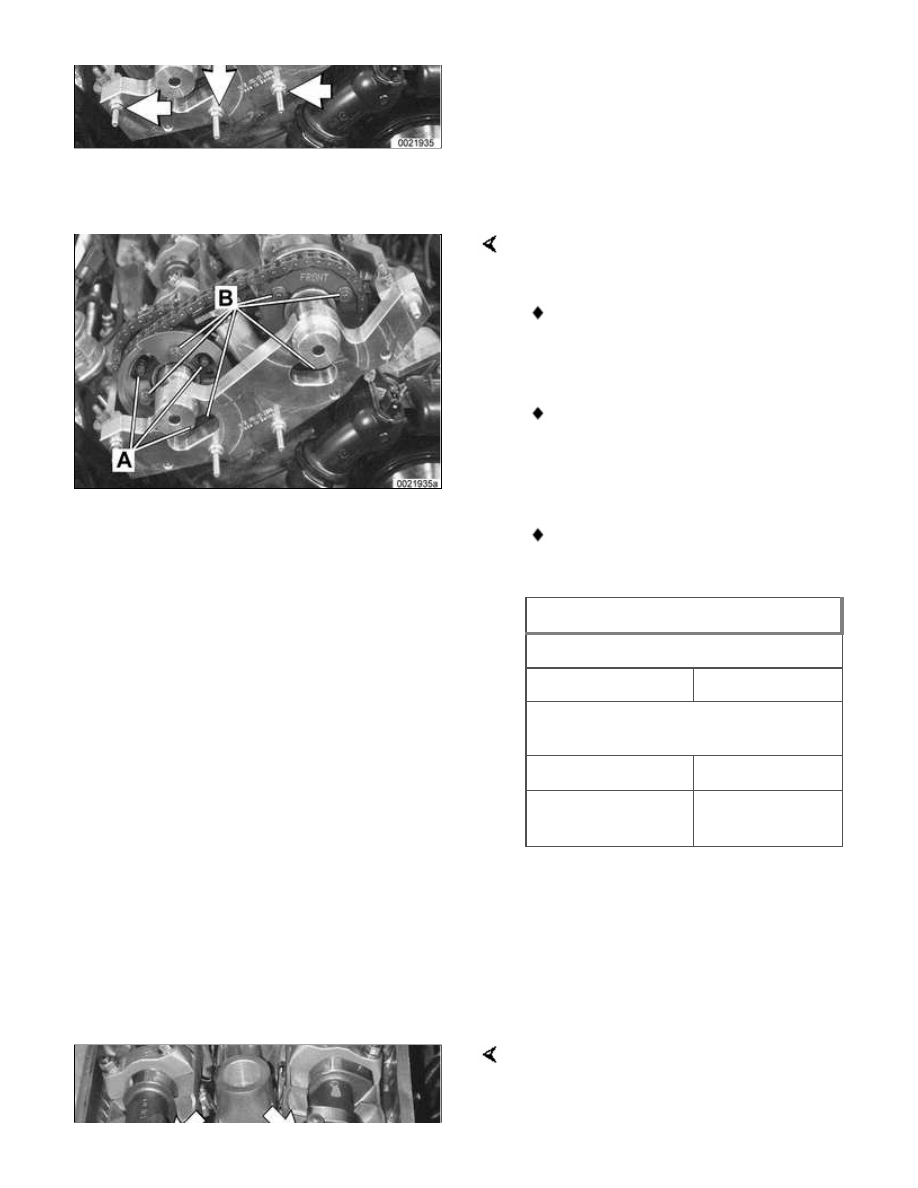
Secure camshaft sprockets and
impulse wheels:
Tighten mounting screws (A) on
exhaust camshaft impulse wheel
to approx. 5 Nm (44 in-lb).
Tighten mounting nuts (B) on
exhaust and intake sprocket
assemblies to approx. 5 Nm (44
in-lb).
Torque down mounting screws (A)
and nuts (B) to final specifications.
Tightening torques
Sprocket assembly to camshaft
initial torque
5 Nm (44 in-lb)
Sprocket assembly wheel to
camshaft
M7 Torx screws (A)
20 Nm (15 ft-lb)
M6 mounting nut
(B)
10 Nm (8 ft-lb)
-
Remove flywheel locking tool from
transmission bellhousing so that
crankshaft is no longer secured.
-
Remove camshaft locking tools
from cylinder head.
Turn engine over twice in direction of
rotation until cylinder 1 intake and
exhaust camshaft lobes (arrows) face

each other.
-
Secure crankshaft in TDC position
with BMW special tool 11 2 300.
Place BMW special tool 11 3 240 over
camshafts and measure clearances.
Note:
If the exhaust side of the tool (A) is
not flush with the head, camshaft
timing is incorrect. Reset camshaft
timing as described in
117
Camshaft Timing Chains
.
Due to flexible sprocket design,
VANOS unit tolerances and play in
the VANOS splines, when the
camshaft timing is set correctly,
the intake side of special tool 11 3
240 (B) may be up to 1 mm (0.04
in) above the surface of the
cylinder head. This is normal.
Reassemble engine. Otherwise,
reset camshaft timing as described
in
117 Camshaft Timing Chains
-
Remove BMW special tool 11 6
150 from front of cylinder head.
VANOS control unit, installing
Clean contact edges of cylinder head
face and VANOS unit and apply a thin
coat of sealing compound
3-Bond®1209 or equivalent to
surfaces.
CAUTION!
Make sure all gasket material is

removed from face of cylinder
head. Clean sealing face and
keep free of oil. If any foreign
material is present on the
sealing surface, the camshaft
timing will be incorrect.
Check locating dowel (A) and
dowel sleeve (B) at top of
cylinder head for damage or
incorrect installation.
-
Replace steel gasket.
-
Install VANOS unit to front of
cylinder head.
Note:
If Double VANOS control unit is being
replaced, be sure to check and adjust
camshaft timing as described in
117
Camshaft Timing Chains
.
-
Reinstall engine support hook.
Tightening torque
VANOS unit to cylinder head
M6 nut
10 Nm (89int-lb)
M7 nut
14 Nm (10 ft-lb)
-
Reconnect electrical harness
connectors to camshaft position
sensors and VANOS solenoid
valves.
Insert and tighten down VANOS
hydraulic piston set screws (arrows) in
splined shafts on intake and exhaust
camshafts.
CAUTION!
Нет комментариевНе стесняйтесь поделиться с нами вашим ценным мнением.
Текст