Jaguar XJ (X350). Manual — part 1270
Parking Aid Sensor (86.62.01)
Removal
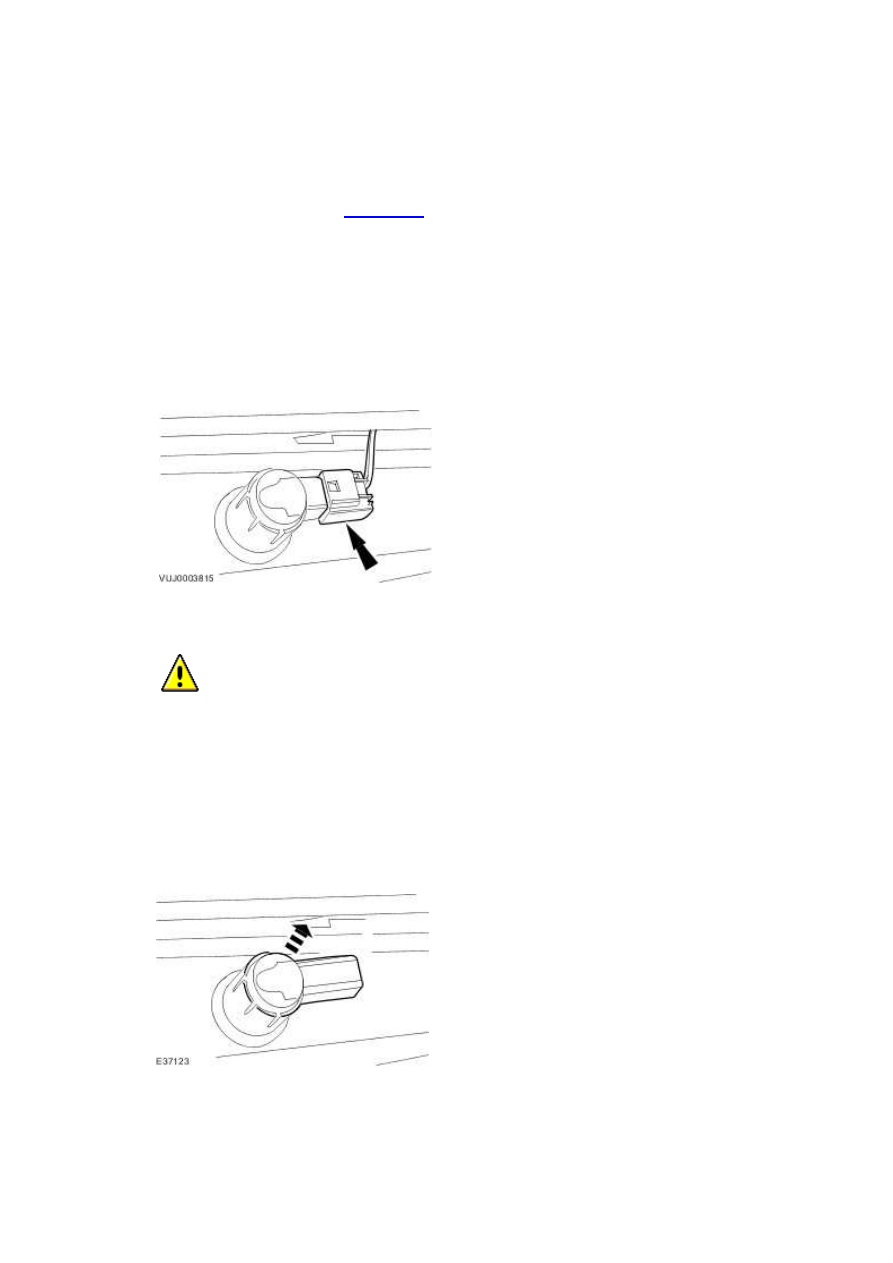
1 . Remove the bumper cover. <<501-19>>
2 . NOTE:
Rear parking aid sensor shown, front parking aid sensor similar.
Disconnect the electrical connector.
3
.
CAUTION: Make sure excessive pressure or tools are not used when removing the
parking aid sensor from the housing.
NOTE:
Rear parking aid sensor shown, front parking aid sensor similar.
Remove the parking aid sensor.
Installation
1 . To install, reverse the removal procedure.
Rear Parking Aid Speaker (86.54.19)
Removal
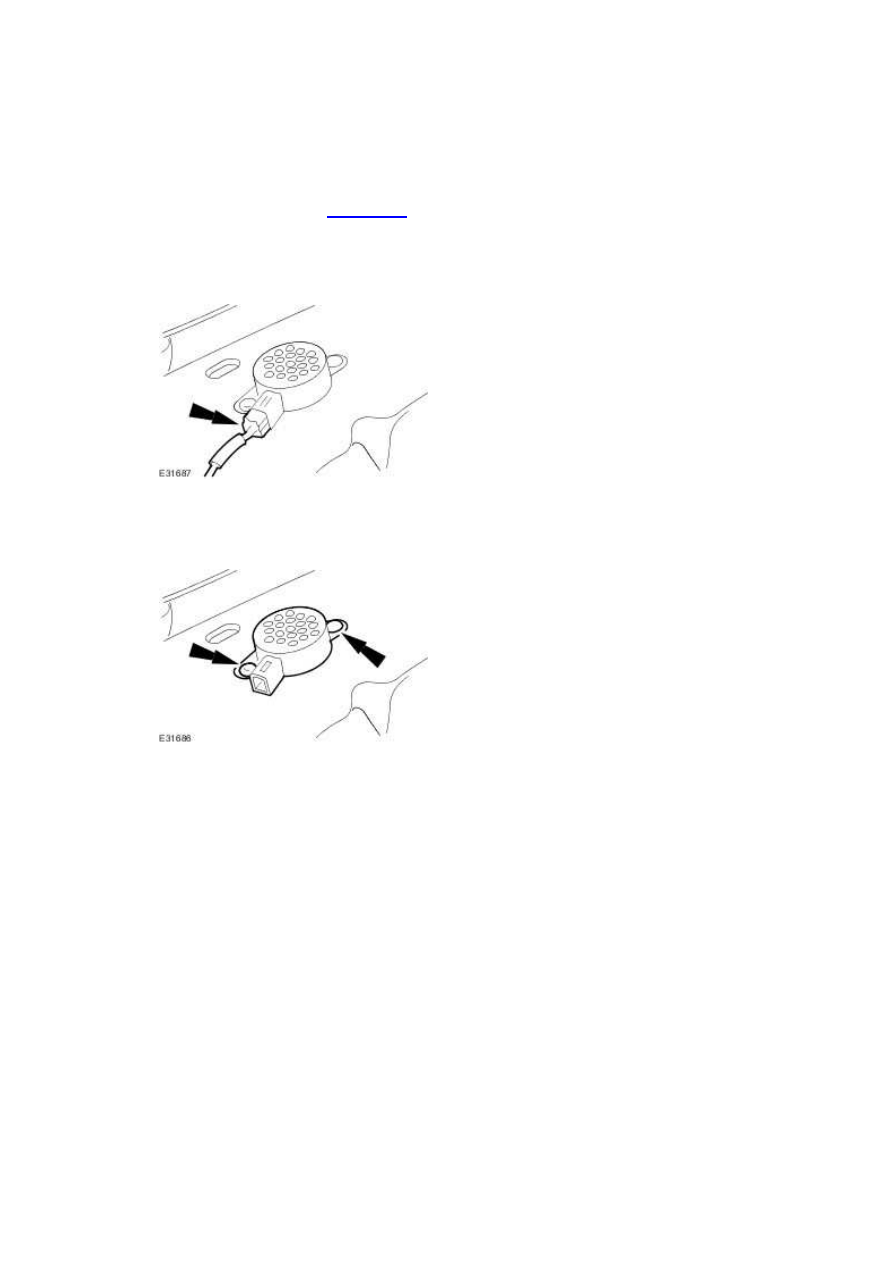
1 . Remove the parcel shelf. <<501-05>>
2 . Disconnect the electrical connector.
3 . Remove the parking aid speaker.
Installation
1 . To install, reverse the removal procedure.
www.

414 : Battery and Charging System
414-00 : Charging System – General Information
General Procedures
Battery Charging
1. Before charging a discharged battery inspect and repair the following conditions, if
necessary:
•
Loose accessory drive belt.
•
Pinched or grounded wiring harness to the generator or voltage regulator.
•
Loose wiring harness connections at the generator or voltage regulator.
•
Loose or corroded connections at battery, headlamp panel junction wire or engine
ground.
•
Carry out generator charging checks.
•
Excessive battery quiescent drain due to:
engine compartment, load space, glove compartment and courtesy lamps remaining on
(switch damaged or out of adjustment, glove compartment left open).
Battery Charging - Maintenance-Free
Batteries
WARNING: KEEP BATTERIES OUT OF REACH OF CHILDREN.
BATTERIES CONTAIN SULPHURIC ACID, AVOID CONTACT WITH SKIN, EYES
OR CLOTHING. SHIELD YOUR EYES WHEN WORKING NEAR THE BATTERY
TO PROTECT AGAINST POSSIBLE SPLASHING OF THE ACID SOLUTION. IN
CASE OF ACID CONTACT WITH SKIN OR EYES, FLUSH IMMEDIATELY WITH
WATER FOR A MINIMUM OF 15 MINUTES AND SEEK PROMPT MEDICAL
ATTENTION. IF ACID IS SWALLOWED, CALL A PHYSICIAN IMMEDIATELY.
FAILURE TO FOLLOW THESE INSTRUCTIONS MAY RESULT IN PERSONAL
INJURY.
WARNING: BATTERIES NORMALLY PRODUCE EXPLOSIVE GASES
WHICH CAN CAUSE PERSONAL INJURY, THEREFORE DO NOT ALLOW
FLAMES, SPARKS, OR LIGHTED SUBSTANCES TO COME NEAR THE
BATTERY. WHEN CHARGING OR WORKING NEAR A BATTERY ALWAYS
SHIELD YOUR FACE AND PROTECT YOUR EYES . ALWAYS PROVIDE
ADEQUATE VENTILATION. FAILURE TO FOLLOW THESE INSTRUCTIONS
MAY RESULT IN PERSONAL INJURY.
1. Cold batteries will not readily accept a charge. Therefore, batteries should be allowed to
warm up approximately to 15 degrees centigrade (59 degrees Fahrenheit) before charging.
This may require 12 hours at room temperature depending on the initial temperature and
battery size.
2. A battery which has been completely discharged may be slow to accept a charge initially,
and in some cases may not accept a charge at the normal charger setting. When batteries are
in this condition, charging can be started by use of the 'dead battery' switch which is fitted to
certain types of battery chargers. Follow the manufacturer's instructions when carrying out
this procedure.
3. To determine whether a battery is accepting a charge, follow the manufacturer's
instructions for the charger.
4. After releasing dead battery switch and with the charger still operating, measure battery
voltage. If the voltage is 12 volts or higher, the battery may be accepting a charge and may be
capable of being recharged. If the temperature of the battery is below 15 degrees centigrade
(59 degrees Fahrenheit) the battery may require charging for up to two hours before the
charge rate is high enough to show on the charger ammeter. It has been found that all un-
damaged batteries can be charged by this procedure. If a battery cannot be charged by this
procedure, it should be replaced.
5. A rapid recharge procedure has been developed for recharging batteries that have passed
the 'No-Load Test' and only need a recharge. This can be due to non start battery failures or
battery discharged in vehicle due to key-off loads.
6. The battery can be rapidly recharged by using either of the following methods:
•
Perform a two hour charge using a constant current of 20 amps (manual setting on the
charger).
•
Perform a two hour charge using a constant voltage (automatic setting on the charger).
Quiescent Current Measurement
1. NOTE:
The following quiescent current measurement does not apply to vehicles fitted with the
Tracker system. If the vehicle is fitted with the tracker system the quiescent current may
be up to 14 milliamps higher. If non-jaguar approved accessories are installed the
www.
Нет комментариевНе стесняйтесь поделиться с нами вашим ценным мнением.
Текст