Jaguar XK. Manual — part 57

231
Wheels and tires
R
Wheel changing procedure
Note: When one rear wheel is lifted off
the ground the selection P (Park) position
will not prevent the vehicle from moving
and possibly slipping off the jack as the
park brake only operates on the rear
wheels.
1. Ensure that all passengers are in a
safe place, clear of the vehicle.
2. Apply the park brake and select gear
position P (Park).
3. Ensure that the jack is placed on firm
and level ground.
Observe the instructions printed on the
jack.
Use the jack only for lifting the vehicle
during wheel changing and only use the
jack which is stored in the vehicle.
Before raising the vehicle slacken but do
not remove the wheel nuts.
Do not start or run the engine while the
vehicle is supported only by a jack.
There are four jacking points on the
underside of the floor. Two indented,
triangular indicators are provided on each
sill cover. These indicate the location for
the jack.
The simplest way to correctly locate the
jacking point is to feel along the sill panel
to the triangular indentation and then fit
the jack to the body, not to the sill panel.
WARNINGS
Have the passengers leave the
vehicle.
Make sure that the vehicle is on
firm, level ground with the wheels
pointing straight ahead.
Never place anything between the
jack and the ground or the jack
and the vehicle.
Make sure that the jack is vertical
to the jacking point and the base
is flat on the ground.
Before attempting to lift the
vehicle with the jack, chock the
wheel diagonally opposite to the
wheel being replaced to prevent the
vehicle from rolling when jacked up. A
wheel chock is supplied with the jacking
equipment for this purpose.
Never work under the vehicle
using only the jack as a support,
always use axle stands or suitable
supports under the jacking points.
E91711
Wheels and tires
232
L
Raising the vehicle
Carefully raise the vehicle by turning the
jack handle. Stop jacking the vehicle
when the tire just clears the ground.
Minimum tire lift gives maximum vehicle
stability.
Remove the wheel nuts and the wheel.
To remove the centre badge use the
plastic tipped end of the wheel nut
wrench handle, push the centre badge
from its housing from the inside of the
wheel.
Push the centre badge into the
replacement wheel. If the temporary use
spare wheel is to be fitted, keep the
centre badge safely and fit it to the
repaired full size wheel when it has been
refitted.
Fit the spare wheel and loosely secure
with the wheel nuts.
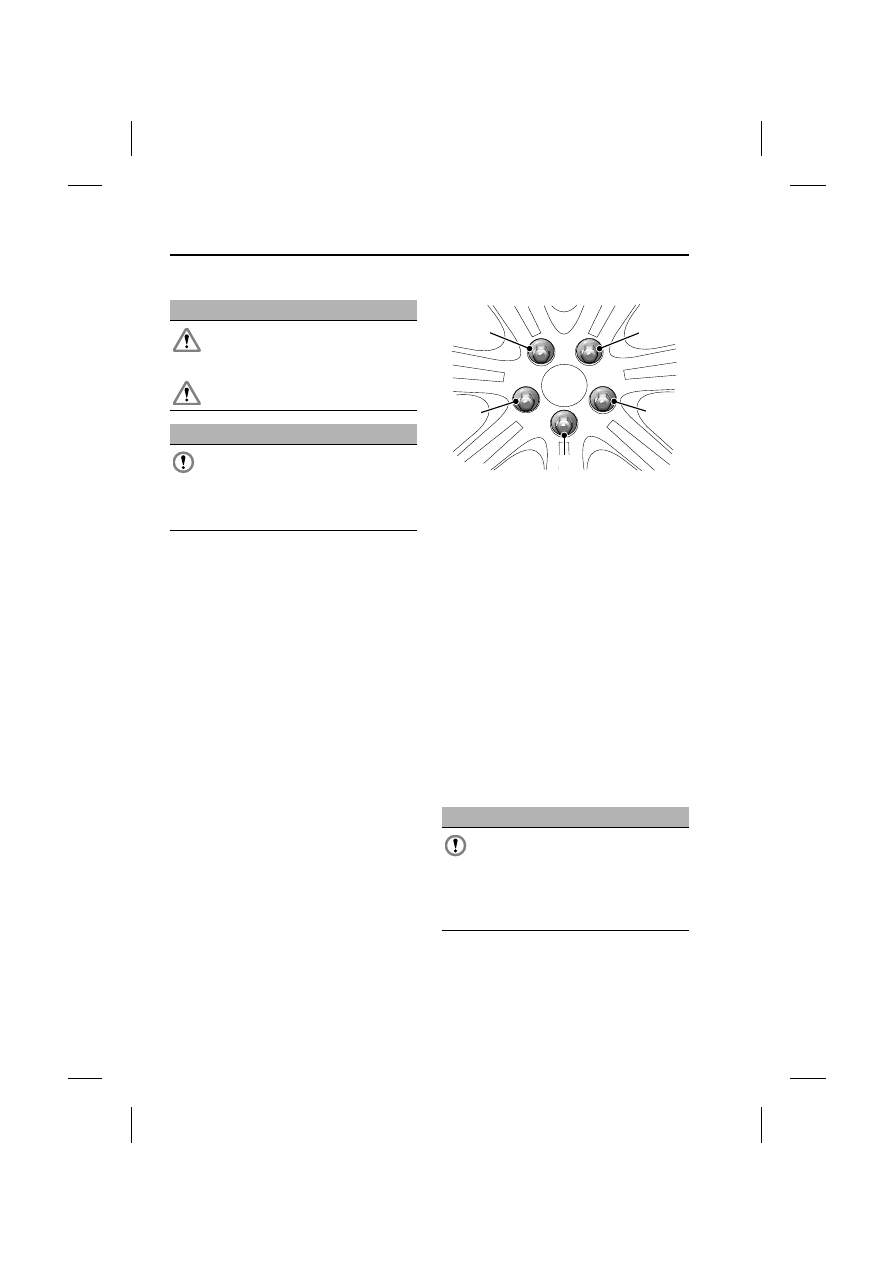
Using the wheel nut wrench, lightly
tighten the wheel nuts alternately using
the sequence shown in the illustration.
Tightening the wheel nuts
Lower the jack and tighten the wheel nuts
alternately. Do not overtighten by using
foot pressure or extension bars on the
wheel nut wrench.
At the earliest opportunity have the wheel
nuts tightened with a torque wrench to
125 Nm (92 lb.ft).
This torque must not be exceeded.
Stowing the equipment
Place the storage tray with the jack and
wrench in the wheel well.
Reposition the luggage compartment
floor panel.
Place the removed road wheel in the
luggage compartment. The full size road
wheel will not be able to be completely
stowed in the wheel well.
WARNINGS
Do not attempt to lift the vehicle
unless the jack head is fully
engaged in the jacking point.
Ensure that the park brake is
applied.
CAUTION
Use only specified jacking points. If
you use other positions you may
damage the body, steering,
suspension, engine, braking system or
the fuel lines.
CAUTION
Convertible only. The luggage
separator will required to be
removed before stowing the wheel
in the luggage compartment. See
OPENING THE CONVERTIBLE TOP
(page 140).
1
4
2
5
3
E91712

233
Wheels and tires
R
RUN FLAT TIRES
Run-flat tires
Run-flat tires can be identified by the
lettering RSC on the sidewall. The tire
construction utilises a specially
reinforced sidewall which allows the
vehicle to be driven at restricted speeds
even when the tire is depressurised.
Run-flat tires can only be fitted to special
rims constructed for run-flat tire use.
A tire pressure monitoring system is
mandatory when the vehicle is fitted with
run-flat tires, see page See TIRE
PRESSURE MONITORING SYSTEM
(TPMS) (page 238).
If the tire in a deflated the vehicle should
be driven with caution, as handling
characteristics will be different compared
to a fully inflated tire.
If the vehicle is fully laden with
passengers and luggage, the maximum
distance that can be completed on a fully
deflated tire is approximately 80
kilometres (50 miles).
Stop immediately if the tire construction
begins to break down, or if the tire
dislodges from the wheel rim. Typically,
this will be accompanied with excessive
vibration.
A tire driven in a deflated condition it
must be replaced.
Vehicles fitted with run-flat tires are not
fitted with a spare wheel or jacking
equipment. Therefore, run-flat tires
should be replaced with the same type of
tire.
TIRE REPAIR KIT
Your vehicle may not be equipped with a
spare tire. If this is the case, in its place
you will find a Jaguar tire repair kit
(except where run-flat tires are fitted). The
Jaguar tire repair kit can be used to repair
one tire, and it is essential that you read
the following guide before attempting to
repair a tire.
The Jaguar tire repair kit seals most
punctures caused by nails, or similar
items, with a maximum diameter of 6 mm
(1/4 inch).
WARNING
If a run-flat is deflated maximum
vehicle speed must not exceed 80
km/h (50 mph).
E91708
WARNINGS
To ensure vehicle safety, it is
essential that you read and
understand the following
information. Failure to follow the
instructions given here may lead to
serious tire damage, and may result in
death or serious injury.
If you are in any doubt regarding
your ability to carry out the
instructions, contact your Jaguar
Dealer before attempting the repair.

Wheels and tires
234
L
The tire repair kit is located in the rear
underfloor storage compartment under
the liner.
Note: The sealant used in the tire repair
kit has a shelf life, and the expiry date is
shown on the top of the tire repair kit
case. Ensure that the container is
replaced before the expiry date.
Jaguar tire repair kit safety
information
WARNINGS
Some tire damage may only be
partially sealed, or may not seal at
all, depending on the amount and
type of damage. Any loss of tire pressure
can seriously affect vehicle safety.
Do not use the tire repair kit if the
tire has been damaged by driving
while under-inflated.
Only use the tire repair kit to seal
damage located within the tire
tread area.
Do not use the tire repair kit to
seal damage to the tire sidewall.
Do not exceed 80 km/h (50 mph)
when a repaired tire is fitted to the
vehicle.
E92367
The maximum distance that
should be driven when a repaired
tire is fitted, is 200km (125 miles).
When a repaired tire is fitted, drive
with caution and avoid sudden
braking or steering manoeuvres.
Only use the tire repair kit for the
vehicle with which it was supplied.
Do not use the tire repair kit for
any other purpose than tire repair.
Never leave the tire repair kit
unattended when in use.
Only use the tire repair kit within
the -30 °C to +70 °C (-22 °F to
+158 °F) temperature range.
Always keep children and animals
at a safe distance from the tire
repair kit when in use.
Do not stand directly beside the
compressor when it is operating.
Check the tire sidewall prior to
inflation. If any cracks, damage, or
deformities are apparent do not
inflate the tire.
Watch the tire sidewall during
inflation. If any cracks, bumps or
similar damage, or deformities
appear, switch off the compressor, and
deflate the tire.
WARNINGS
Нет комментариевНе стесняйтесь поделиться с нами вашим ценным мнением.
Текст