Jaguar S-Type. Manual — part 38
Wheel Changing
160
L
Wheel Changing
OVERVIEW
Be prepared for a flat tire. Know where
equipment is stowed and read the wheel
changing and jacking instructions
carefully.
If a wheel change is required, pull off the
road completely. Park on ground which is
as level and solid as possible. Make sure
that the vehicle is clear of any objects that
will obstruct the safe removal of the
wheel. Switch on the hazard warning
indicators, and where legally required,
display a warning triangle.
!
WARNING:
• It can be dangerous to change a
wheel when the vehicle is on a
slope or soft, uneven ground.
• Wheels are extremely heavy. Take
care when lifting and particularly
when removing and replacing a
wheel in its storage position in the
luggage compartment.
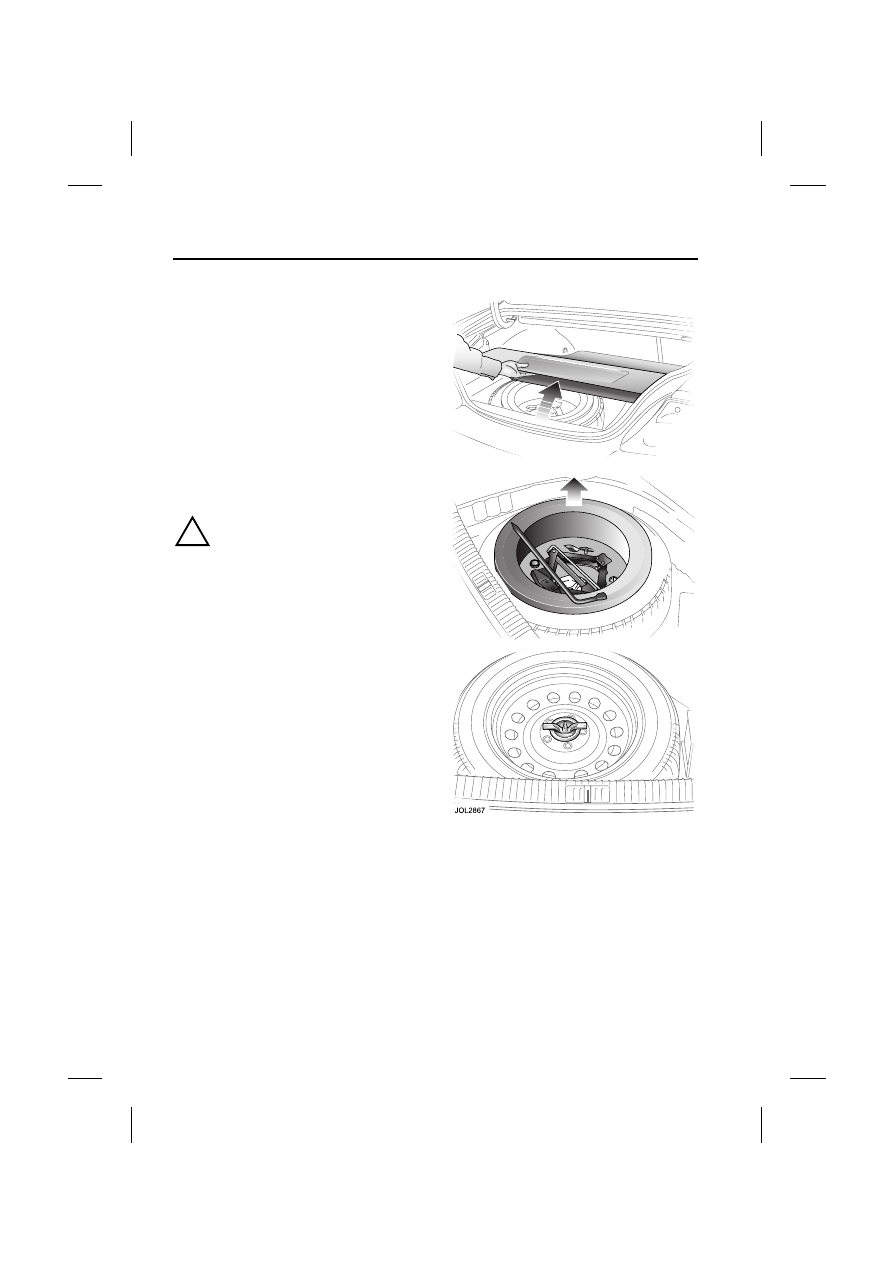
SPARE WHEEL LOCATION
The spare wheel and jacking equipment
are stored under the luggage
compartment floor panel.
To remove the spare wheel, fold the
luggage compartment floor panel towards
the rear seats. Remove the tray
containing the jacking equipment to gain
access to the wheel. Unscrew the
retaining nut and remove the spare wheel.
Remove the jack and wheel nut wrench.
161
Wheel Changing
R
TEMPORARY USE SPARE
WHEEL
Observe the following warnings before
using the wheel:
!
WARNING:
• Please note temporary use spare
wheel warning label. Follow the
instructions on the label. Failure to
comply can be dangerous.
• When a temporary use spare wheel
is fitted, drive with caution and
replace with the specified wheel
and tire as soon as possible.
• Do not fit more than one temporary
use spare wheel and tire assembly
at one time.
• The temporary use spare wheel
must be inflated to the correct
pressure.
• Temporary use spare wheel,
maximum speed is 80 km/h
(50 mph).
Note: Maintenance information for the
temporary use spare wheel is the same as
given for normal tires. See page 211.
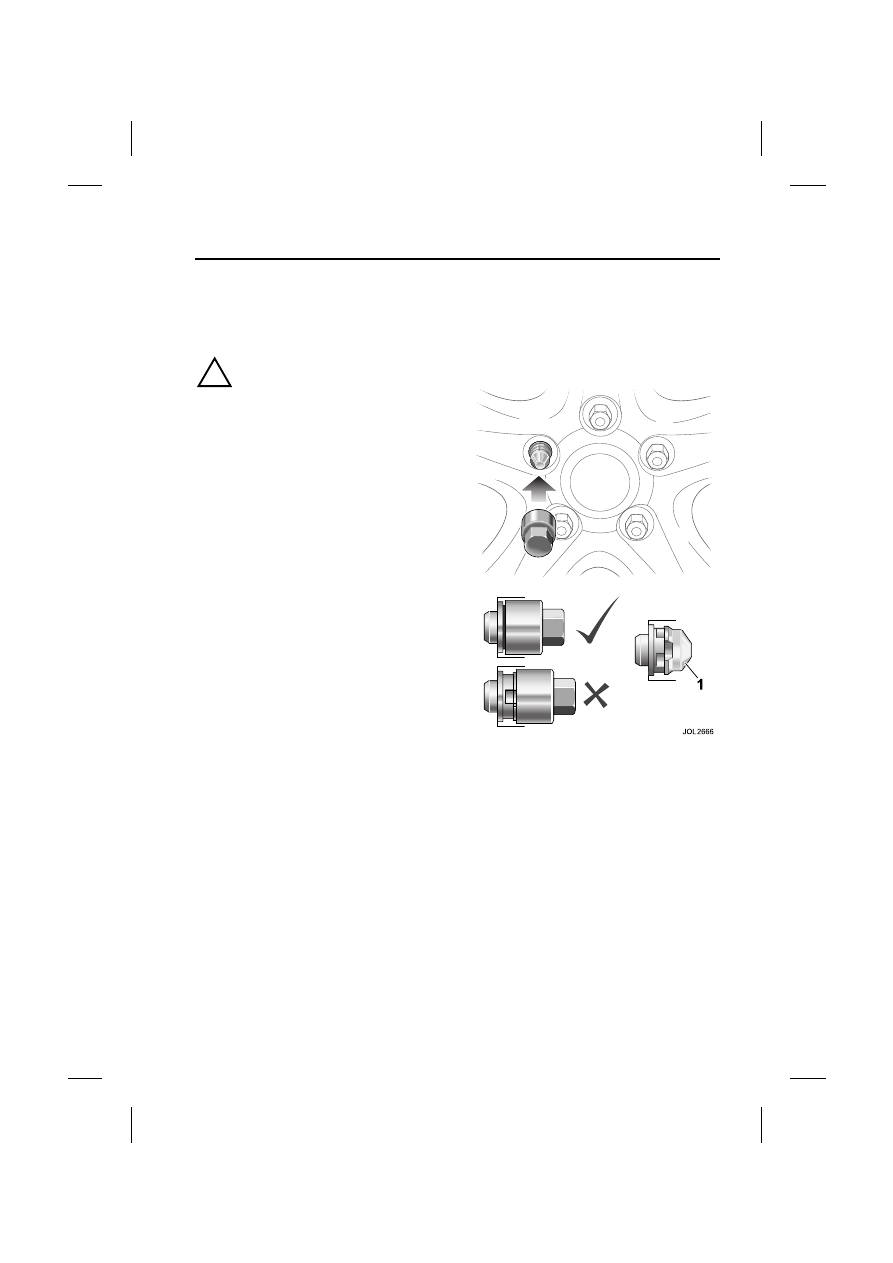
LOCKING WHEEL NUTS
Where Jaguar locking wheel nuts are
fitted (one on each wheel), they can only
be removed using the correct key socket.
The locking wheel nut comprises two
grooved parts, front and rear, which must
be turned together to allow the nut to be
fitted or removed.
To remove the nut, the front and rear
grooves must be aligned. Locate the key
socket in the grooves and push it fully
over both parts of the nut. Fit the wheel
nut wrench over the key socket and
loosen the locking wheel nut.
Attempting to remove the nut without the
correct key socket (such as attempted
theft) or with the socket not located over
the rear part of the nut, will cause the front
part (1) only to turn.
If this has happened, rotate the front part
with the key socket until the grooves are
re-aligned and then push the socket fully
over the nut.
Should a new key socket be required,
contact your Jaguar Dealer. Proof of
vehicle ownership will be required.

Wheel Changing
162
L
WHEEL CHANGING
1. Make sure that all passengers are in a
safe place, clear of the vehicle.
2. Apply the parkbrake and select gear
position P (Park) or select a low gear
on a manual transmission vehicle.
3. Make sure that the jack is placed on
firm and level ground.
Note: When one rear wheel is lifted off the
ground, the selection of a low gear on
manual vehicles or automatic
transmission P (Park) position will not
prevent the vehicle from moving and
possibly slipping off the jack.
!
WARNING:
• Before attempting to lift the vehicle
with the jack, chock the wheel
diagonally opposite to the wheel
being replaced to prevent the
vehicle from rolling when jacked
up. A wheel chock is supplied with
the jacking equipment for this
purpose.
• Never work under the vehicle using
only the jack as a support; always
use axle stands or suitable
supports under the jacking points.
Before raising the vehicle slacken, but do
not remove the wheel nuts.
Observe the instructions printed on the
jack.
Use the jack only for lifting the vehicle
during wheel changing, and only use the
jack which is stored in the vehicle.
Do not start or run the engine while the
vehicle is only supported by a jack.
There are four jacking points, two each
side of the vehicle on the underside of the
floor. These provide positive location for
the jack. The front jacking point is
approximately 18 cm (7 inches) from the
front wheel and the rear is approximately
28 cm (11 inches) forward of the rear
wheel.
The simplest way to correctly locate the
jacking point is to feel along the sill panel
to the cut-away portion and then fit the
jack to the body, not to the sill panel.
163
Wheel Changing
R
Caution: Make sure, before raising the
vehicle, that the jack is correctly
positioned to avoid any damage to the
vehicle sills or sill panels. Use only the
correct jacking points, never use
bumpers or any other part of the body
to lift the vehicle.
!
WARNING:
• Do not attempt to lift the vehicle
unless the jack head is fully
engaged in the jacking point.
• Make sure that the parkbrake is
applied.
Place the jack squarely beneath the
appropriate jacking point. Make sure that
the jack head is fully engaged. Carefully
raise the vehicle by turning the handle.
Stop jacking the vehicle when the tire just
clears the ground. Minimum tire lift gives
maximum vehicle stability.
Remove the wheel nuts and the wheel.
When changing the alloy road wheels,
transfer the center badge to the
replacement wheel (when a full size spare
wheel is used). Using the plastic tipped
end of the wheel nut wrench handle from
the inside of the wheel, push the center
badge from its housing. Push the center
badge into the replacement wheel. If the
temporary use spare wheel is to be fitted,
keep the center badge safely and fit it to
the repaired full size wheel when it has
been refitted.
Fit the spare wheel and loosely secure
with the wheel nuts.
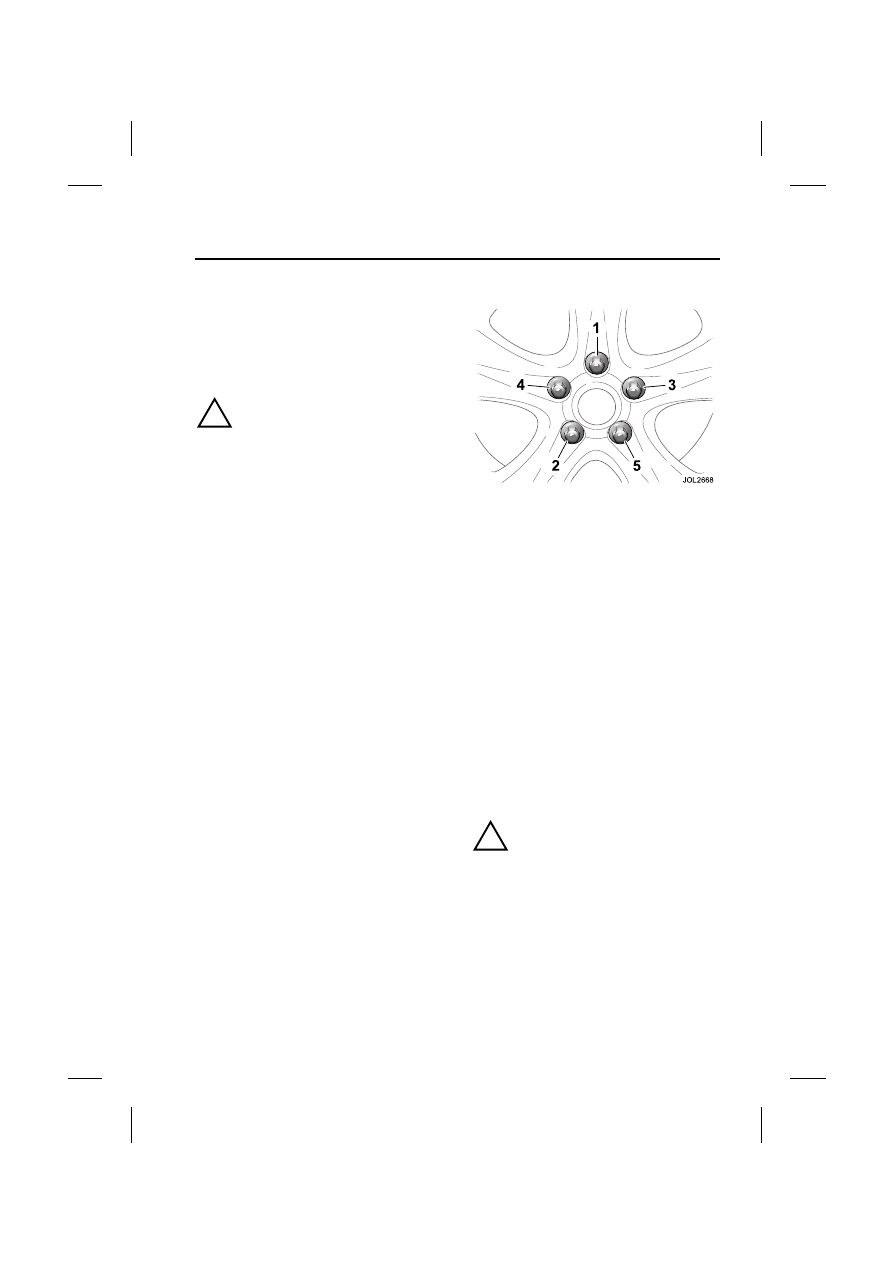
Using the wheel nut wrench, lightly
tighten the wheel nuts alternately using
the sequence shown in the illustration.
Tightening the wheel nuts
Lower the jack and tighten the wheel nuts
alternately, DO NOT OVER-TIGHTEN.
At the earliest opportunity have the wheel
nuts tightened with a torque wrench to
125 Nm (92 lbf.ft.).
This torque must not be exceeded.
Stowing the equipment
Stow the replaced road wheel in the
luggage compartment, position the wheel
and secure with the retaining nut.
Place the storage tray with the jack and
wrench over the wheel.
Reposition the luggage compartment
floor panel.
Note: Examine the jack occasionally and
clean and grease the threads to ensure it
is always ready for an emergency.
!
WARNING:
When the temporary use spare wheel
has been fitted, drive with caution and
replace with the specified wheel and
tire as soon as possible.
Нет комментариевНе стесняйтесь поделиться с нами вашим ценным мнением.
Текст