Jaguar S-Type. Manual — part 5

23
Quick Overview
R
RADIO OPERATION
To switch on the radio
function, press the AM/FM
button. Pressing this button
repeatedly scrolls through FM, MW and
LW wavebands.
To search for a radio
station, press the Seek
arrow buttons.
Setting the radio presets
Once a radio station
has been tuned,
press and hold the
desired preset
button (or touch a
station position on
the touch-screen) until a beep is heard.
The preset is now stored.
A total of nine presets can be stored for
each waveband.
The radio presets can be
automatically set by using the
Auto Memory function. Press
and hold the AMEM button for two
seconds. The radio will be briefly muted
while it searches the waveband for the
nine strongest stations.
Activating TA (Traffic Announcements)
To activate this function, press
and release the TA button. With
TA activated, traffic
announcements will interrupt radio or CD
play. To de-activate this feature, press
and release the TA button again.
Press and hold the TA button for two
seconds to display the radio station name
instead of the frequency.
CD OPERATION
Single CD player
If the radio or CD multichanger is
being used, pressing the CD
button will resume playing any
CD installed in the player mechanism.
When a CD is loaded into the aperture, it
will begin to load and play automatically.
Pressing the CD button, while in CD play
mode, will pause the current track. A
subsequent press of the CD button will
resume play mode.
Six discs can be loaded into the
multichanger unit, and a further single
disc in the audio console.
To skip tracks, continually
press the Seek arrow
buttons to move back or
forward accordingly. Pressing and
holding these buttons will search through
the selected track.
When a disc is inserted, the CD
icon is displayed. Press the
Disc eject button to eject the
CD. The display will show DISC EJECT
and the CD icon will be turned off.
24
Quick Overview
L
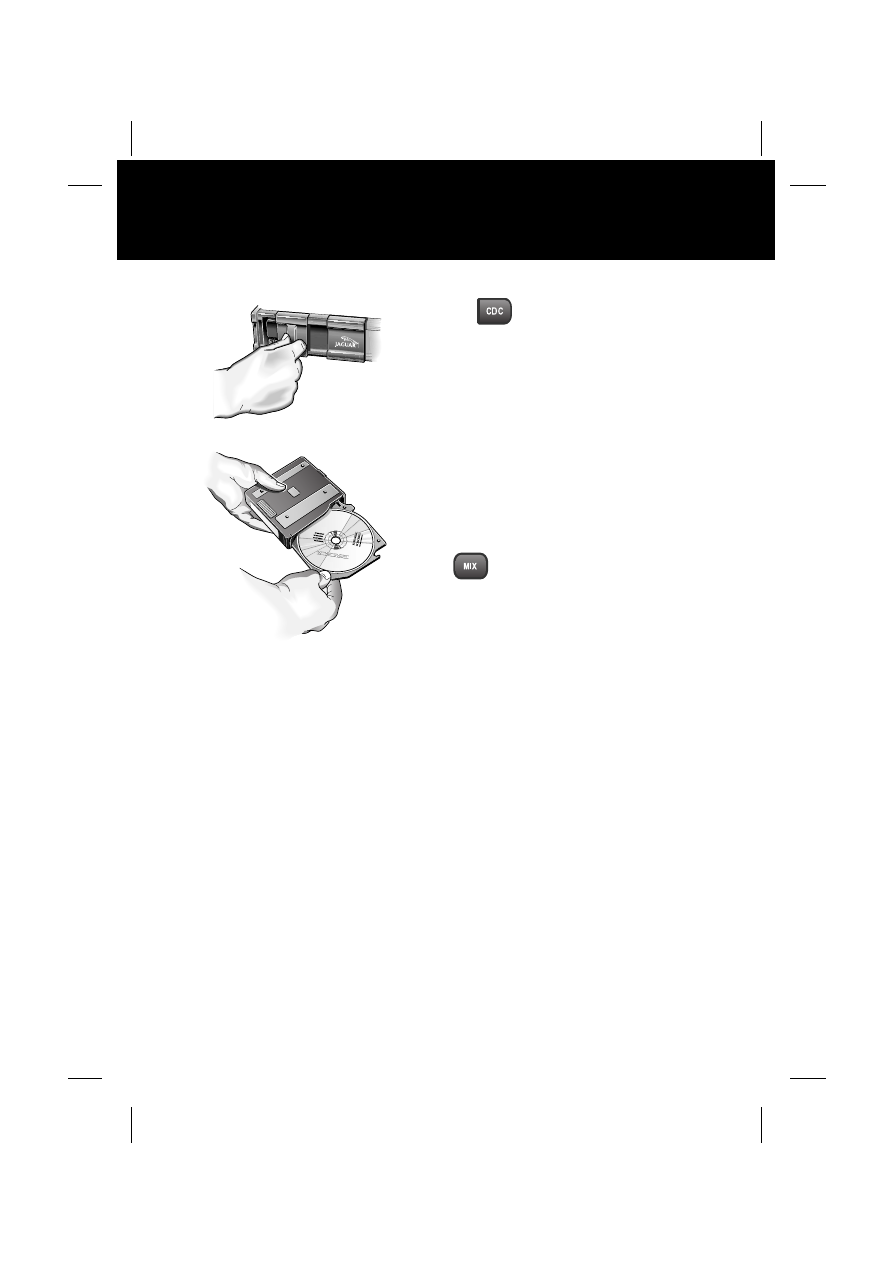
CD Multichanger
Care point
• Remember to close the multichanger
door. This will prevent dirt getting into
the unit and help reduce skipping.
The CD multichanger is located in the
luggage compartment. To load a CD into
the multichanger:
1. Slide open the multichanger door;
press the Eject button and remove
the magazine. Close the door.
2. Pull a tray out from the magazine and
insert a CD (label side up). Slide tray
into magazine until a click is heard.
3. Slide open the multichanger door and
ensuring correct orientation, replace
the magazine. Make sure the
magazine clicks into position.
CD selection
1. Press the CDC button to
select the CD multichanger
mode.
2. Press preset buttons 1 to 6 to select
the appropriate CD loaded in the
multichanger.
If a touch-screen is fitted to the
vehicle, disc selection can be made
by touching the relevant numbered
disc icon.
3. When playing a CD, press the CDC
button to pause play. Press again to
continue play.
Playing random tracks
To play random tracks from the
disc, press and release the MIX
button. To cancel, press the MIX
button again.
To play random tracks from all discs
loaded in the multichanger, press the MIX
button for two seconds. To cancel, press
and hold the MIX button.
JOL4713
25
Quick Overview
R
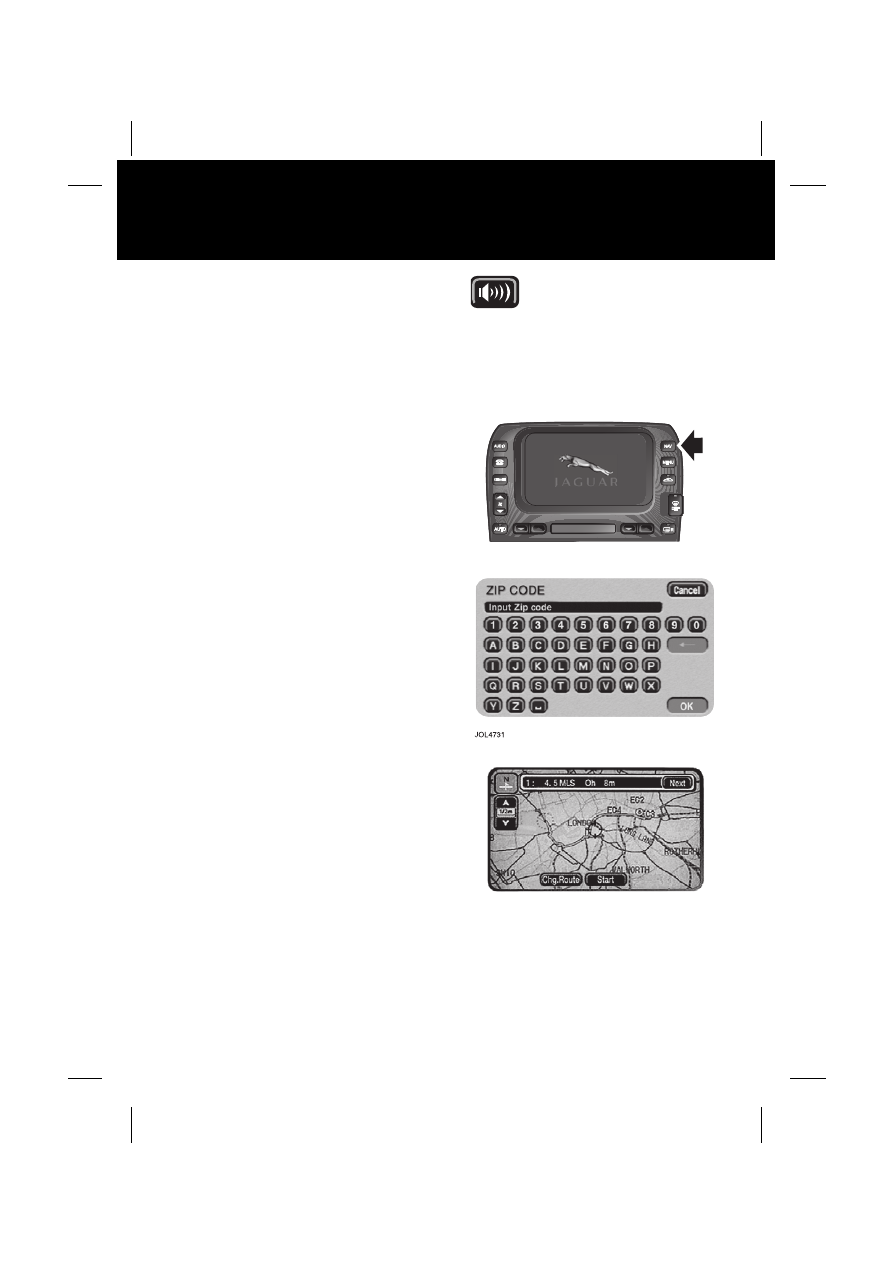
NAVIGATION
Caution: The screen allows touch
control of the navigation system. The
screen only requires a light touch to
operate the function. Excess pressure
on the screen could result in damage.
On initial activation, make sure that
both the correct country and area have
been selected.
Setting a destination
To set a destination and start using the
the navigation system, use the following
procedure:
1. Press the NAV button (arrowed in
illustration) and, when prompted,
touch Agree on the touch-screen to
access the initial map screen.
2. Touch Nav menu to access the
navigation menu and then touch
Destination Entry.
3. Touch either Address or Zip code.
4. Enter the address or zip code using
the on-screen keypad, making sure a
space is entered in the zip code. The
space character can be found after
the Z character on the bottom line of
the keypad. Touch OK to enter.
5. Touch Dest to calculate the route.
6. Once the most appropriate route is
calculated, the screen will display the
route. To scroll through alternative
routes, touch Next on the screen.
Note: Route Preferences should be
selected prior to setting a destination.
Access is via the Nav menu and then
Route Options.
7. Touch Start to commence navigation.
Drive away following the voice
guidance.
Note: Press the Audible repeat
button to hear the last voice
guidance instruction again.
Voice guidance can be selected or
de-selected via the Nav menu.
8. When your destination is reached,
voice and visual confirmation is given.
Cancelling guidance
To cancel guidance during navigation,
touch the zoom icon, select Change
Route then Cancel Guidance.
JOL4714
JOL4716

26
Quick Overview
L
TELEPHONE - BLUETOOTH®
SYSTEM
Mobile phones with Bluetooth capability
can communicate with the vehicle’s
inbuilt telephone system.
The following procedure demonstrates
how to connect the most popular brands
of mobile phone.
Pairing a handset to the vehicle
1. Turn the ignition switch to position II.
2. Press the telephone button on the
audio panel. The touch-screen will
display the message No BT phone
on. On touch-screen systems the
message SIG will be displayed.
3. Either using the on-screen or the
audio panel keyboard, press ##3#*#.
4. Touch the on-screen call icon or press
the call button on the audio panel.
5. Prepare the handset for pairing to the
system.
See the telephone manufacturer’s
instructions for further details, or follow
the table below for generic commands.
When the handset has been successfully
paired to the system, the touch-screen
message changes to REGISTERED. On
systems without a touch-screen the audio
system message changes to SIG.
Note: For best results when pairing your
handset to the system, ensure the
handset is fully charged.
Nokia
Motorola
Ericsson
1.
Select menu
Select menu
Select menu
2.
Select settings
Select settings
Select connectivity
3.
Select Bluetooth OR
Select Connectivity
then Bluetooth
Select Connection
Select Bluetooth
4.
Select On
Select Bluetooth link
Select My Devices
5.
Select Search for Audio
devices
Select Hands-free
With New Device
highlighted, select Add.
Press OK to confirm
6.
After search select
Jaguar
Select Look for
devices
After search select Jaguar
7.
Enter pass code 1313.
Press OK to confirm
After search select
Jaguar
Select Connect
8.
No connection? Select
Bluetooth (Menu) then
Paired devices Jaguar
Permission to bond?
Select Yes and enter
pass code 1313
Enter pass code 1313 after
prompt
Нет комментариевНе стесняйтесь поделиться с нами вашим ценным мнением.
Текст