Harley Davidson MX 250 COMPETITION MODEL. 1978 Owner's Manual
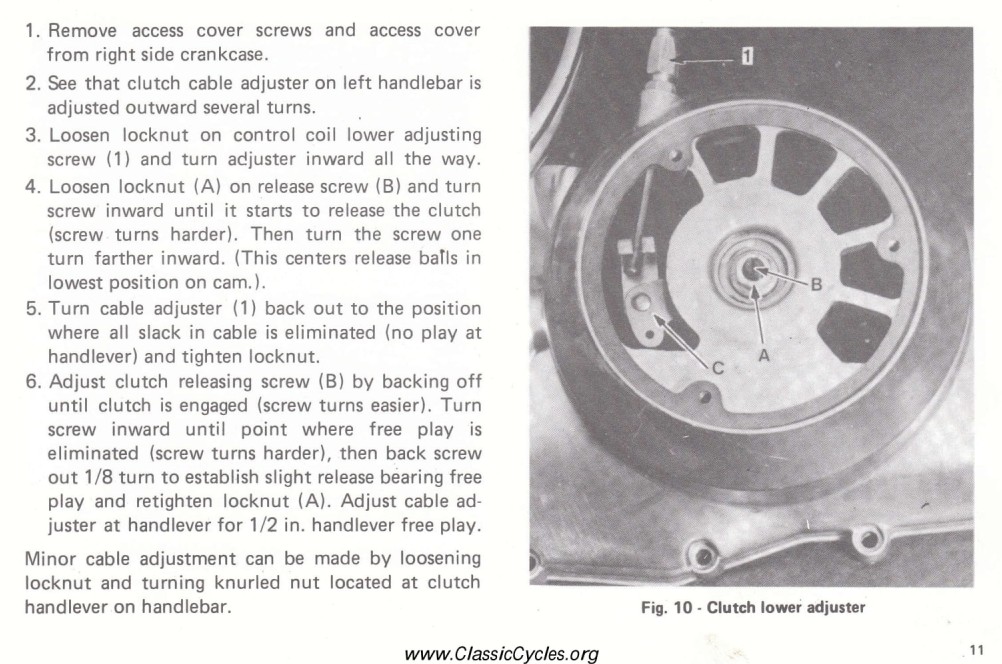
INDEX
Page
Page
Air cleaner. . . . . . . . . . . 19
Carburetor. . . . . .. 12-22
Clutch . . . . . . . . . . . . ..10
Decarbonizing . . . . . . . . . ..19
Drive chain. . . . . .. 13-20
Front brake . . . . . . . . . . ..9-20
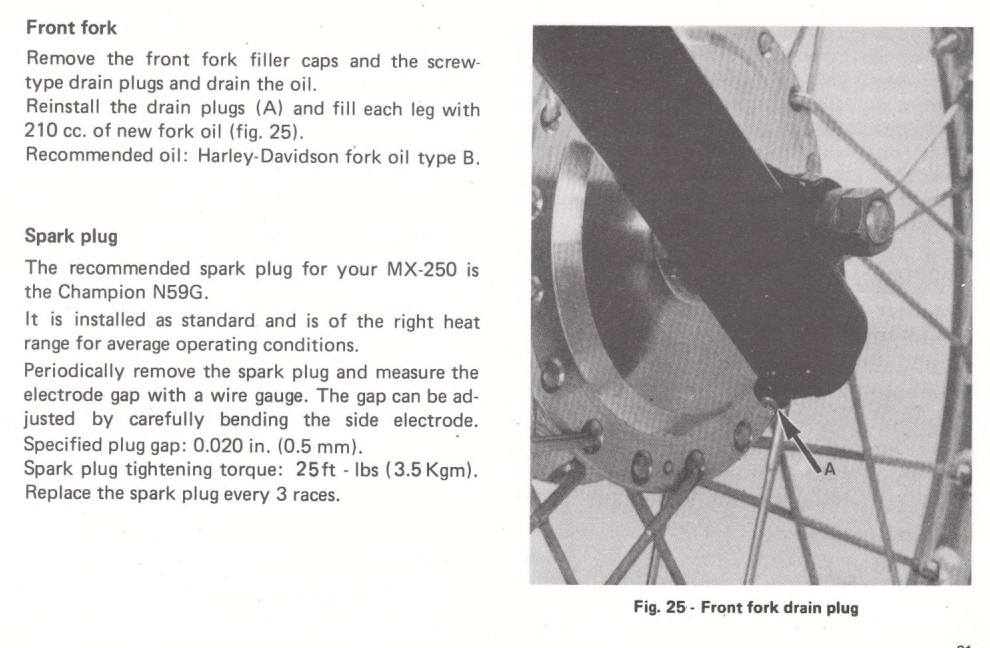
Front fork . . . . . . . . . . . 21
Fuel valve . .. . . . . . . . . . . 20
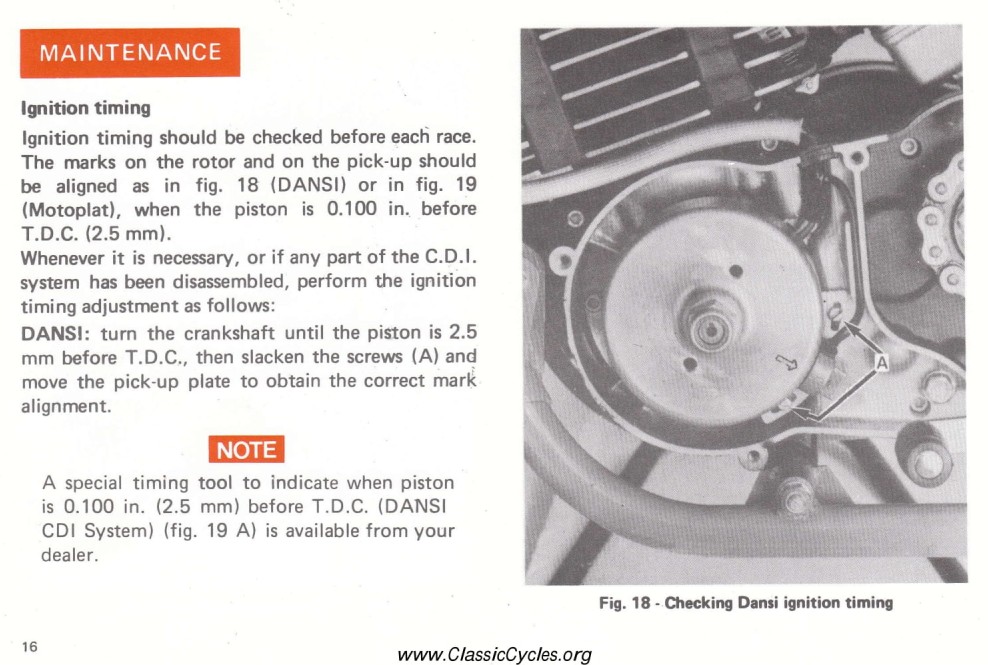
Ignition timing. . . . . . . . . ..16
Inspection and adjustments . . . . ..9
Maintenance. . . . . . . . . . ..16
Maintenance schedule. . . . . . . 25
Operating instructions. . i. .. 7
Rear brake. . . . . .. 10-20
Rear suspension. . . . . . . . . 8
Running-in. . . . . . . . . . . 6
Spark plug . . . . . . . . . . . 21
Starting Running and Stopping
Instructions. . . . . . . . . . ..7
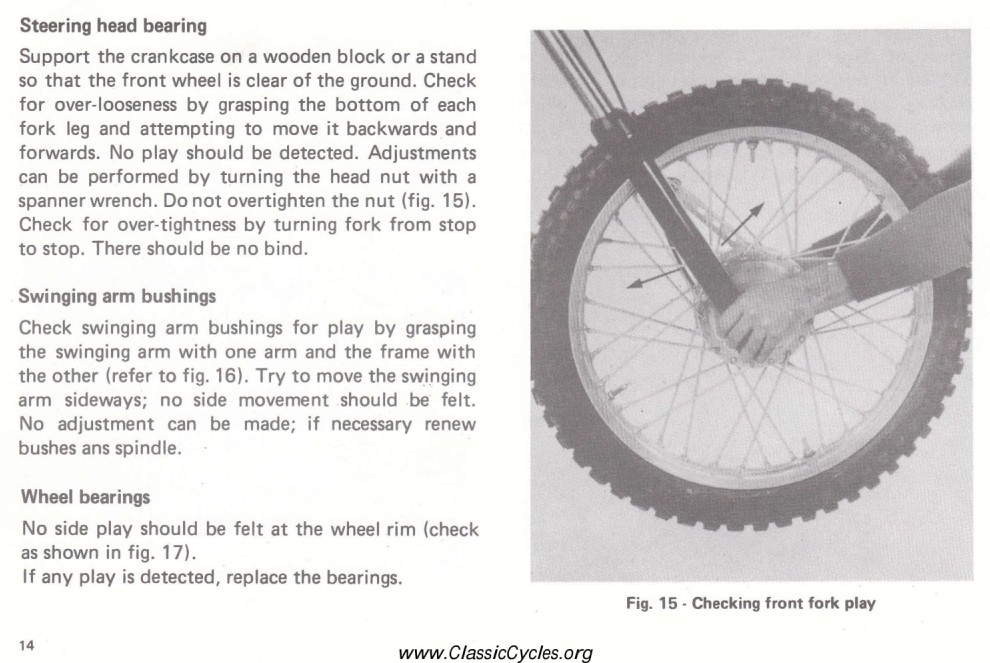
Steering head bearing. . . . . . . 14
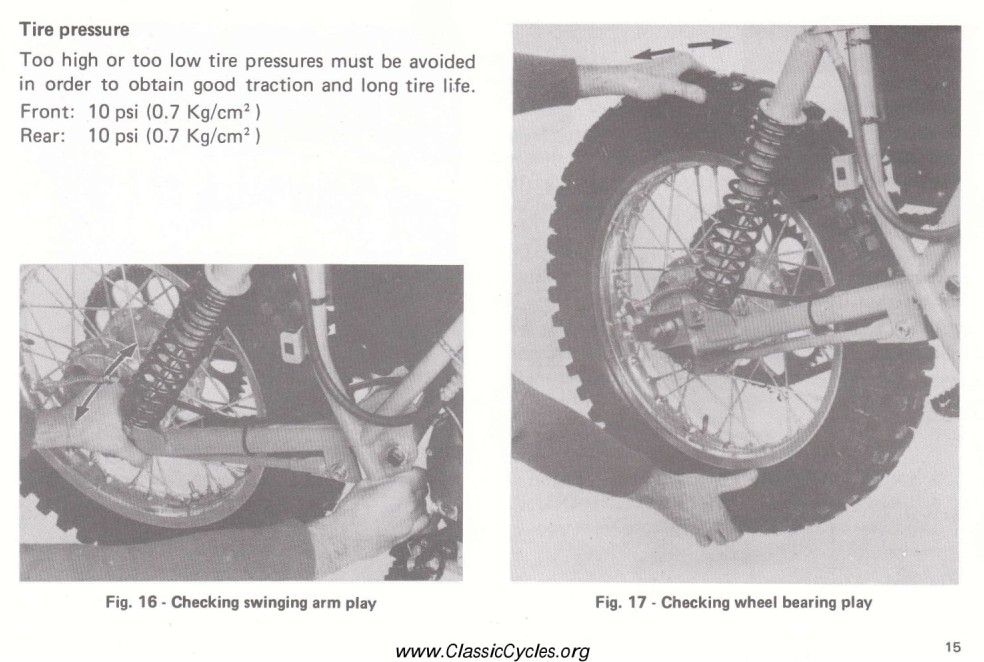
Swinging arm bushings . . . . . . .14
Technical data . . . . . . . . . ..2
Service specifications. . . . . . . 26
Tire pressure. . . . . . . . . . ..15
Transmission oil. . . . . . . . . 18
Troubleshooting. . . . . ..24
Wheel bearings. . . . . . . . . ...14
IMPORTANT NOTICE
The MX-250 Model is sold by Harley-Davidson Motor Co., Inc. without warranty. This vehicle is designed and manufactured for competition use only. It does not conform to federal motor vehicle safety standards and operation on public streets, roads or highways is illegal.
Some state laws prohibit operation of this vehicle except in an organized racing or competitive event upon a closed course which is conducted under the auspices of a recognized sanctioning body or by permit issued by the local governmental authority having jurisdiction.
For off-road use other than sanctioned racing events, an additional spark arrester-muffler may be required by law. Such spark arresters are available commercially to comply with noise level and spark arrester laws and regulations. Performance will be decreased and retuning may be necessary.
This motorcycle is designed and constructed as an operator only model. The vehicle load limit and seat do not safely permit carrying a passenger. Before operating your motorcycle, first determine that operation is legal.
For safe operation and proper maintenance, read the owner's manual carefully.
HARLEY DAVIDSON MOTOR CO., INC.
YOUR OWNER'S MANUAL
Welcome to the Harley-Davidson Motorcycling Family! Your new Harley-Davidson Motorcycle is designed and manufactured to be the finest in its field. The instructions in this book have been prepared to provide a simple and understandable guide for your motorcycle's operation and care. Follow the instructions carefully for its maximum performance and your personal motorcycling pleasure.
Your owner's manual contains instructions for owner care, maintenance and minor repair. Your Harley-Davidson dealer has the facilities, experience and genuine Harley-Davidson parts necessary to properly maintain this vehicle.
Harley-Davidson Motor Co., Inc.
TABLE OF CONTENTS
Section Page
TECHNICAL DATA. . . . . . . . . . . ...2
OPERATING INSTRUCTIONS. . . . . . . . . ..7
INSPECTION AND ADJUSTMENTS. . . . . . . ..9
MAINTENANCE. . . . . . . . . . . . . . 16
TROUBLESHOOTING. . . . . . . . . . . . 24
MAINTENANCE SCHEDULE . . . . . . . . . ..25
SERVICE SPECIFICATIONS. . . . . . . . . . 26
A complete alphabetical index appears at the end of this manual
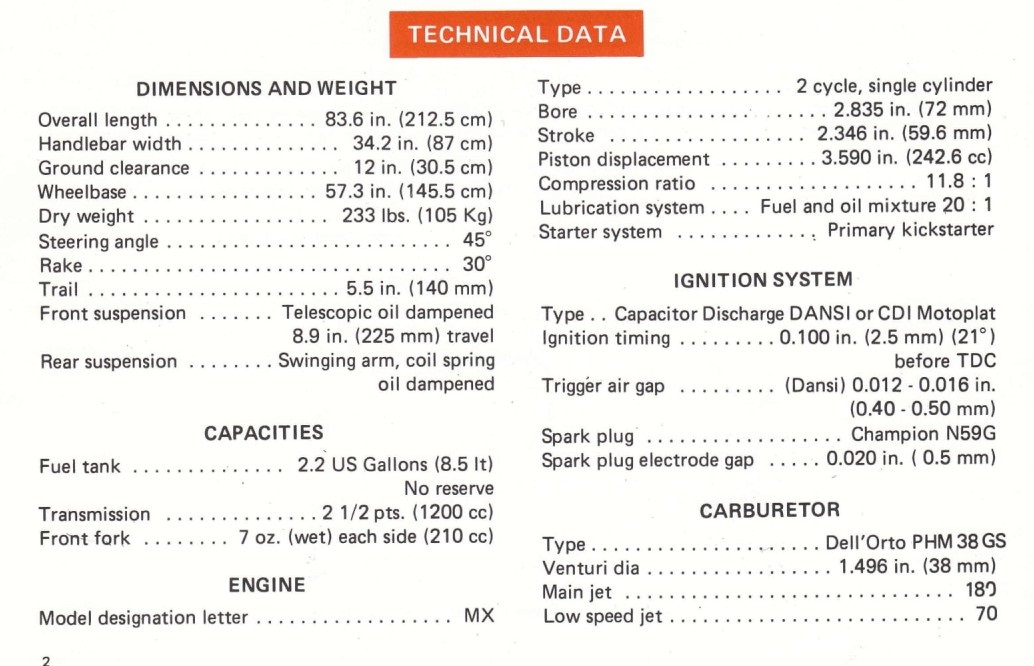
TECHNICAL DATA

 Running in the Motorcycle
The MX 250 requires a short breaking in period. Operate the motorcycle for the first hour using not more than half throttle. Maintain light load on the engine without high RPM or lugging.
This practice will help moving parts to break-in properly. The running-in should be performed not only with new motorcycles, but also after replacing cylinder, piston and/or piston rings.
Fuel and oil recommendation
The MX 250 has a two-stroke engine which requires a gasoline-oil mixture for proper lubrication. Use the correct oil quality and mixture ratio in order to avoid engine damage.
Use a high quality SAE 30 viscosity racing oil. 20 : 1 is the correct gas to oil mixture ratio for this engine.
Use only , Premium Grade (high octane) leaded gasoline.
CAUTION
Too little oil in the mixture will cause severe engine wear and possible engine damage. Too
much oil will cause spark plug fouling and excessive carbon formation that may lead to preignition.
Fuel mixing procedure
- Always mix gasoline and oil in a clean container. Pour the oil and the gasoline into the container and shake thoroughly for a few minutes. Make sure that the fuel is properly mixed, before filling the fuel tank.
CAUTION
Do not mix vegetable and mineral oils.
Remember that vegetable oils do not mix as easily with gasoline as mineral oils do.
Use the oil-gas mixture within a few days.
Transmission oil
Use a premium quality SAE 10 W - 40 or 20 W - 50 engine oil.
OPERATING INSTRUCTIONS
Starting the engine
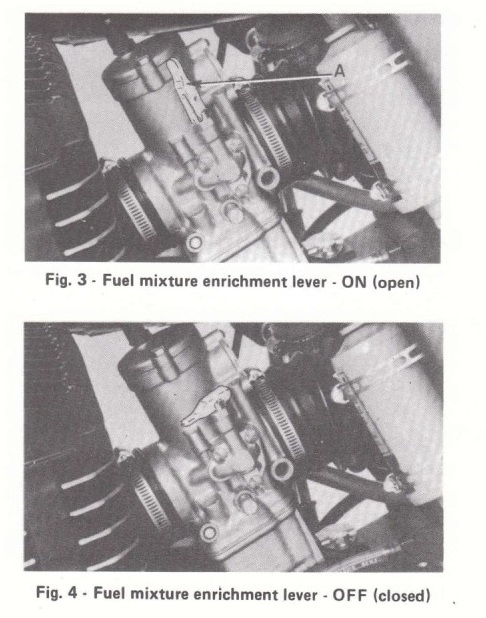
- When the engine is cold, raise the fuel mixture enrichment lever (A - fig. 3). Push down the kick-starter lever sharply without opening the throttle grip. Open the throttle valve when the engine starts. Lower the fuel mixture enrichment lever when the engine warms up.
• When the engine is warm, do not use the fuel mixture enrichment lever (fig. 4). Open the throttle 1/4 of a turn and operate the kick starter lever.
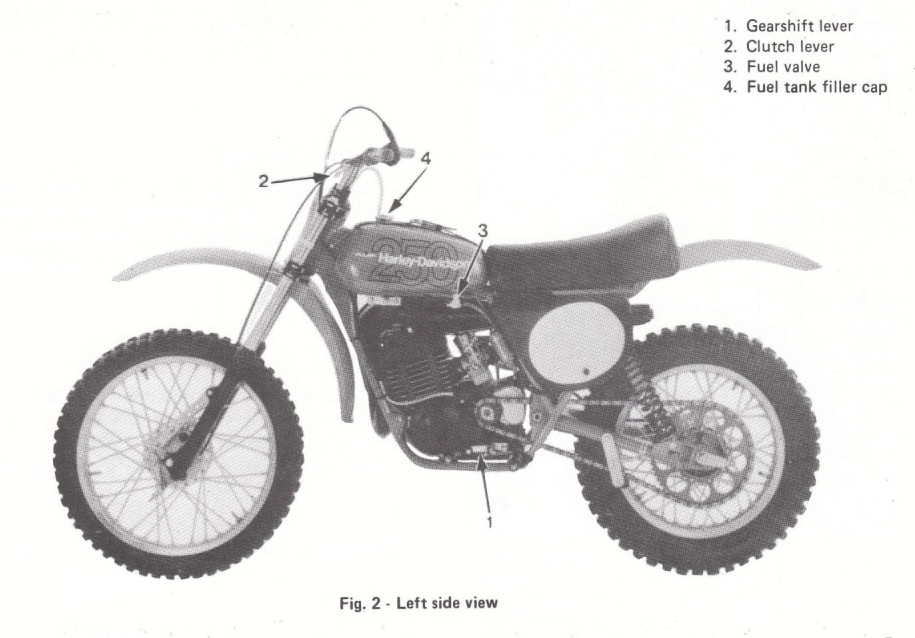
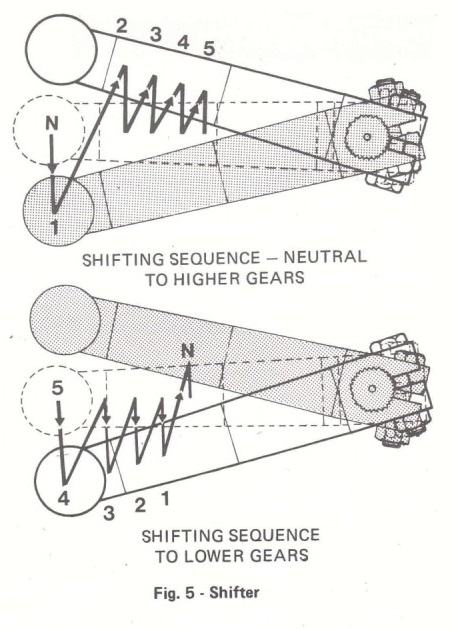
Gearshift lever
The five-speed gearbox operates as shown in fig. 5. To engage low gear, push the gear shift lever down from the neutral position, which is located between low and second gear. To engage higher gears, pull up the shift lever once for each gear. To shift into neutral, push down or raise the lever a half of the travel between low and second gear.
Engine stop button
To start the engine, just operate the kickstarter lever, as no ignition switch is fitted on this motorcycle.
To stop the engine, push the engine stop button. Turn the fuel tank valve lever to the "off" position, when the engine is stopped.
Rear suspension units
The spring preload may be adjusted by means of spacers located under the upper spring collar after removing the spring.
The rear shock absorbers cannot be adjusted; do not attempt to disassemble them, as they must be replaced with new ones when damaged or worn out.


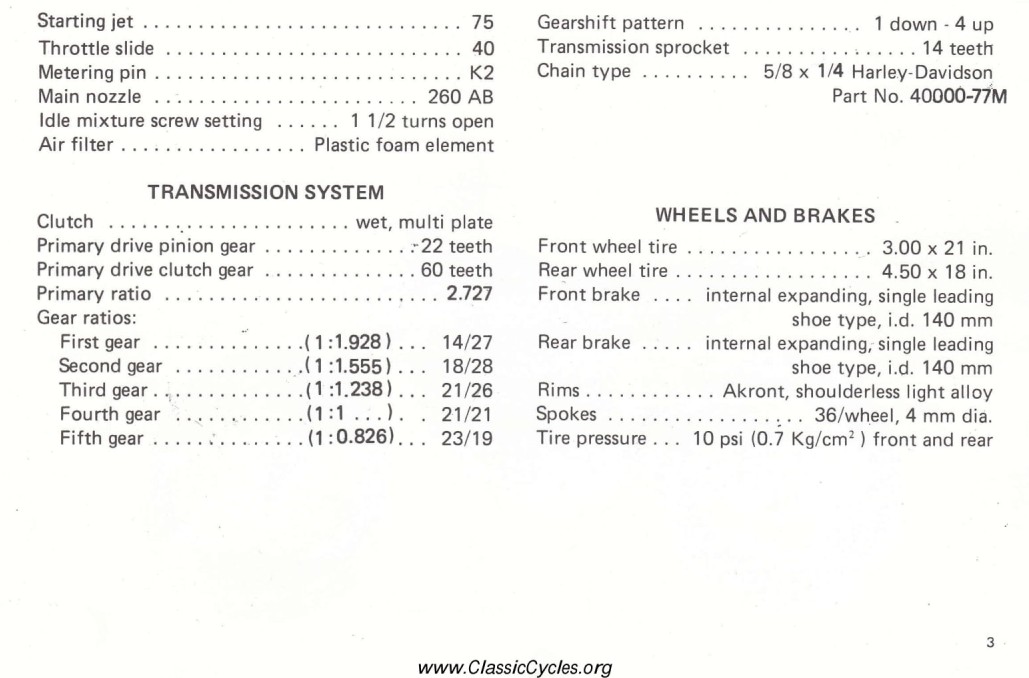
 - Metering pin: К2
- Throttle slide: 40
- Low speed mixture adjusting screw: 1-1/2 turns Carburetor setting should be adjusted to suit racing conditions (race field, weather etc.) in order to obtain maximum performance.
A visual inspection of the spark plug insulator is a good way to judge carburetor setting.
Switch the ignition off when running at full throttle in top gear, disengage the clutch and stop the motorcycle.
Remove the spark plug and inspect the insulator. A sooty, black insulator nose indicates a rich mixture. A whitish insulator nose, with burned or eroded electrodes, indicates a lean mixture.
The correct carburetor setting is obtained when the spark plug insulator nose is light brown.
NOTE
The spark plug readings are an accurate means for judging carburetor setting, when the plug heat range Is correct, the ignition timing properly adjusted and when using the correct gasoline/oil mixture.
Remember that between 1/4 and 3/4 throttle opening the air/fuel mixture ratio is affected mainly by the metering pin position. Raise the needle clip position to obtain a richer mixture; lower the clip position to obtain a leaner mixture.
Between 3/4 and full throttle, the mixture adjustment is made by changing the main jet.
Low speed mixture adjusting screw regulates the air-fuel ratio from idle to 1/4 throttle (refer to page 2).
TROUBLESHOOTING
The following checklist will be helpful in locating most operating troubles.
TROUBLE
Engine will not start
Engine overheats
Engine does not run smoothly; loss of power
Clutch slips Clutch drags Carburetor floods
CAUSE
1) The fuel tank is empty
2) The fuel tank valve is in the ''off" position
3) The fuel tank breather is clogged
4) The spark plug is fouled
5) The spark plug is damaged or dirty with carbon
6) If there is no spark when cranking the engine with the spark plug lead end held near the cylinder head, the trouble is in the ignition system.
1) Ignition timing is retarded
2) Improper carburetor setting (mixture is lean)
3) Cooling fins clogged with mud
1) Clogged air cleaner element
2) Improper carburetor setting (mixture is too rich or too lean)
3) Spark plug in bad condition
4) Worn piston and/or rings
1) Incorrect clutch adjustment
2) Worn plates or weak springs
1) Incorrect clutch adjustment
2) Transmission oil too heavy
1) Float valve and/or seat worn or damaged
2) Dirt or other foreign material between float valve and its seat
3) Too high float setting MAINTENANCE SCHEDULE
After the first hour of operation
Spoke nipples. . . . . . Retighten
Nuts and bolts . . . . . Retighten
Drive chain. . . . . ... Retighten
After the first two hours of operation
Transmission oil. . . . ...<. Change
Each heat
Spoke nipples tension. . . . .. Check
Drive chain tension,. . . . . Check
Drive chain. . . . . . Lubricate
Every moving part of the motorcycle
with oil and grease. . . . ..Lubricate
Each race
Transmission oil level. . . . .. Check
Air filter. . . . . . . .Clean
Bolts and nuts . . . . . ..Tighten
Spark plug . . . . .. Check and clean
Ignition timing. . . . . . Check
Every 2 races
Piston rings. . . . . . .Replace
Transmission oil. . . . . . Change
Every 3 races
Spark plug . . . . . . .Replace
Drive chain. . . . . . .Replace
Throttle, clutch and brake cables. . Replace
Gearbox sprocket. . . . . Replace
Every 5 races
Rear wheel sprocket. . . . ..Replace
Piston. . . . . . Replace
Brake linings for wear. . . . . Check
Every 10 races
Cylinder head, ports and piston. . Decarbonize
Cylinder for wear. . . . . . Check
Carbon from expansion chamber. . Remove
SERVICE SPECIFICATIONS
- Piston clearance in bore: 0.0016 --- 0.0024 in. (wear limit: 0.006 in.)
Measure piston diameter 25 mm from bottom of skirt, at right angles to piston pin axis (fig. 27).
- Piston ring end gap: 0.010 -- 0.016 in. (wear limit: 0.026 in.) (fig. 28).
- Piston ring side clearance in groove: 0.0025 --0.0045 in. (wear limit: 0.006) (fig. 29).
- When connecting rod small end swing exceeds
0.08 in. ( 2 mm) (refer to fig. 30), the connect-ing rod must be replaced with a new one.
- Connecting rod is supplied as a set with crankpin, big end bearing and thrust washers.
•
- Crankshaft runout must not exceed 0.0015 in.
- Crankshaft end float (axial play): 0.012--- -0.024 in.
- Gear selector drum side play: 0.008 --- 0.016 in. (max 0.024 in.).
Perform this measurement as shown in fig. 31. Perform this measurement several times,

TORQUE SETTINGS
Cylinder base nuts. . . . ...18 ft-lbs
Cylinder head socket head bolts. . .11 ft-lbs
Clutch hub nut. . .. . . ...70 ft-lbs
Primary drive pinion nut . . . ..75 ft-lbs
CDI rotor nut. . . . . . 55 ft-lbs
Sparkplug . . . . . . .25 ft-lbs
Нет комментариевНе стесняйтесь поделиться с нами вашим ценным мнением.
Текст