Dodge Dakota (ND). Manual — part 320
CENTER BEZEL LAMP
REMOVAL
BULB
WARNING: To avoid personal injury or death, on vehicles equipped with airbags, disable the supplemental
restraint system before attempting any steering wheel, steering column, airbag, occupant classification sys-
tem, seat belt tensioner, impact sensor, or instrument panel component diagnosis or service. Disconnect
and isolate the battery negative (ground) cable, then wait two minutes for the system capacitor to discharge
before performing further diagnosis or service. This is the only sure way to disable the supplemental
restraint system. Failure to take the proper precautions could result in accidental airbag deployment.
1. Disconnect and isolate the battery negative cable.
2. Remove the center bezel lamp (4) from the instru-
ment panel center bezel. (Refer to 8 - ELECTRI-
CAL/LAMPS/LIGHTING
-
INTERIOR/CENTER
BEZEL LAMP - REMOVAL).
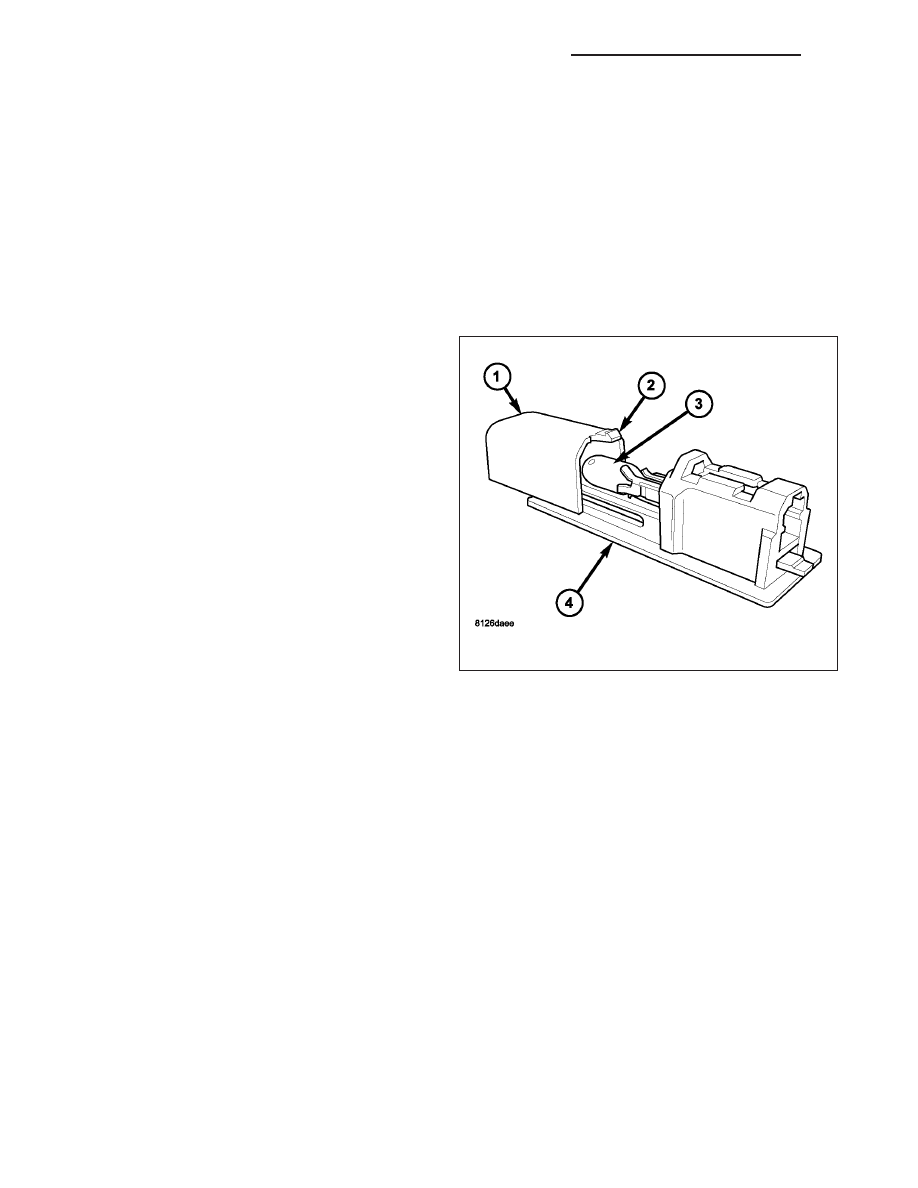
3. Depress the latch tab (2) and slide the hood (1) off
of the end of the lamp housing.
4. Pull the base of the bulb (3) straight out of the bulb
holder within the lamp housing.
LAMP
WARNING: To avoid personal injury or death, on vehicles equipped with airbags, disable the supplemental
restraint system before attempting any steering wheel, steering column, airbag, occupant classification sys-
tem, seat belt tensioner, impact sensor, or instrument panel component diagnosis or service. Disconnect
and isolate the battery negative (ground) cable, then wait two minutes for the system capacitor to discharge
before performing further diagnosis or service. This is the only sure way to disable the supplemental
restraint system. Failure to take the proper precautions could result in accidental airbag deployment.
8L - 142
LAMPS/LIGHTING - INTERIOR - SERVICE INFORMATION
ND
1. Disconnect and isolate the battery negative cable.
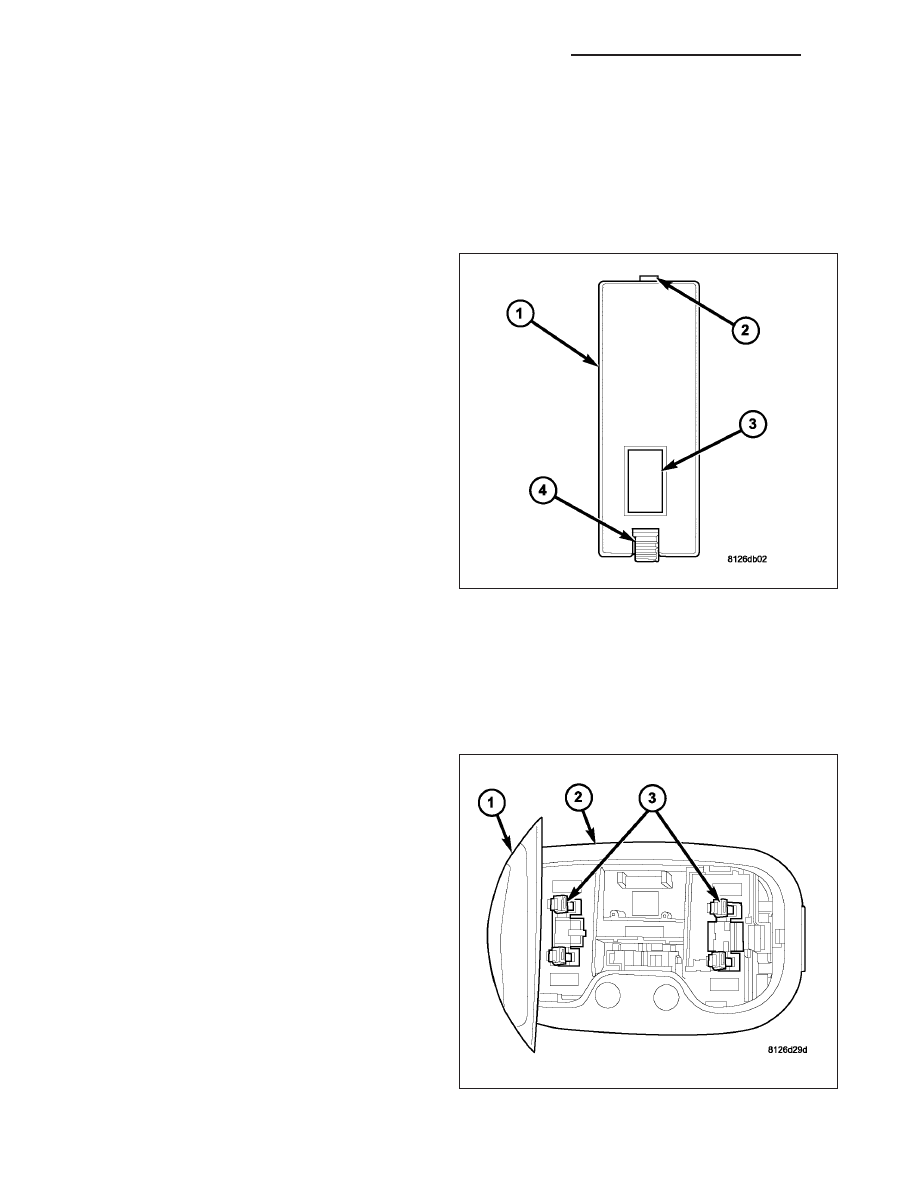
2. The center bezel lamp (1) is located on the under-
side of the instrument panel center bezel below the
heater-air conditioner controls, above the center
floor console forward storage bin. Use a small thin-
bladed screwdriver to depress the lamp retaining
latch (4) on the end of the lamp housing nearest
the lens (3).
3. Pull the lamp down and move it toward the latch
end to disengage the fixed retainer (2) from the
mounting hole.
4. Disconnect the wire harness connector from the
lamp connector.
5. Remove the lamp unit from the center bezel.
INSTALLATION
BULB
WARNING: To avoid personal injury or death, on vehicles equipped with airbags, disable the supplemental
restraint system before attempting any steering wheel, steering column, airbag, occupant classification sys-
tem, seat belt tensioner, impact sensor, or instrument panel component diagnosis or service. Disconnect
and isolate the battery negative (ground) cable, then wait two minutes for the system capacitor to discharge
before performing further diagnosis or service. This is the only sure way to disable the supplemental
restraint system. Failure to take the proper precautions could result in accidental airbag deployment.
CAUTION: Always use the correct bulb size and type for replacement. An incorrect bulb size or type may
overheat and cause damage to the lamp, the socket and/or the lamp wiring.
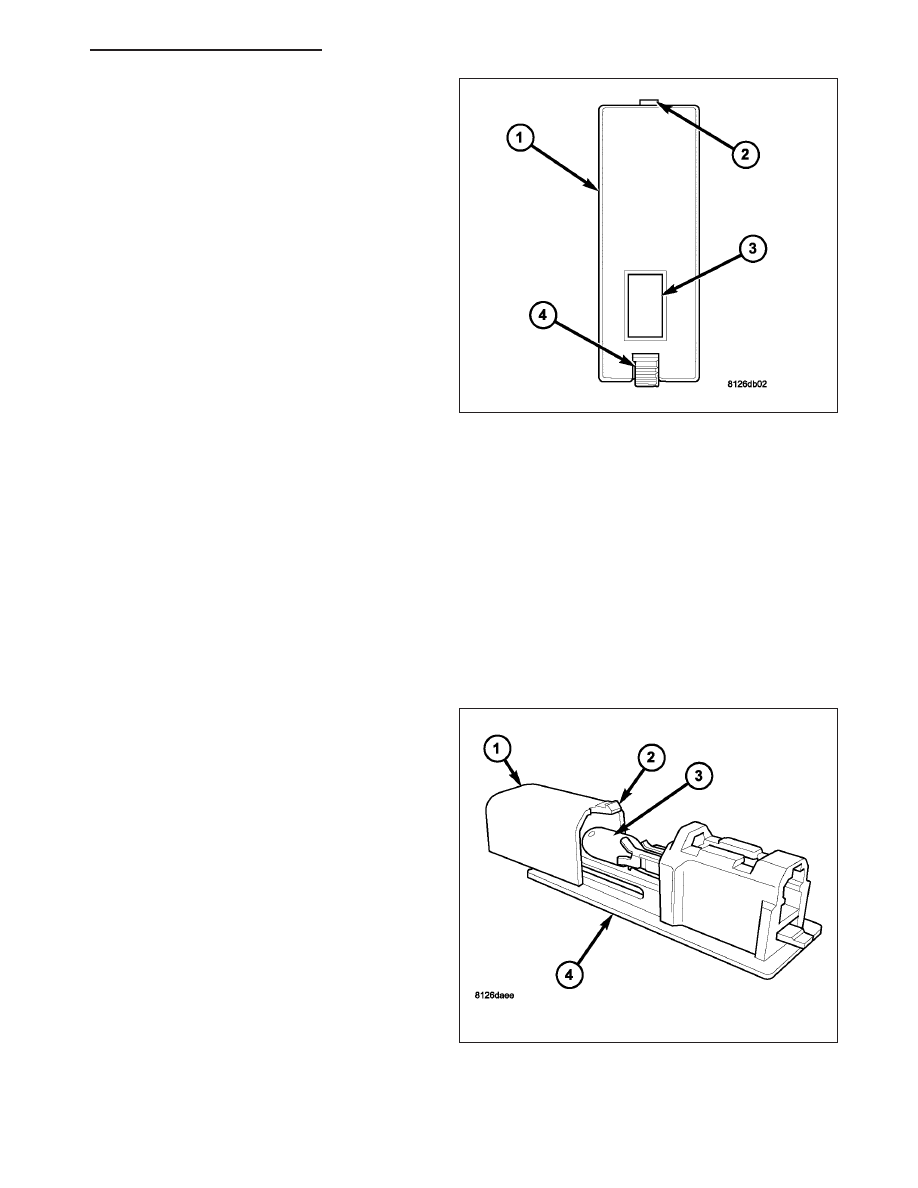
1. Align the base of the center bezel lamp bulb (3)
with the bulb holder within the lamp housing (4).
2. Push the bulb straight into the bulb holder until the
base is firmly seated.
3. Slide the hood (1) over the end of the lamp hous-
ing until the latch tab (2) snaps into place.
4. Reinstall the lamp unit into the instrument panel.
(Refer to 8 - ELECTRICAL/LAMPS/LIGHTING -
INTERIOR/CENTER BEZEL LAMP - INSTALLA-
TION).
5. Reconnect the battery negative cable.
ND
LAMPS/LIGHTING - INTERIOR - SERVICE INFORMATION
8L - 143
LAMP
WARNING: To avoid personal injury or death, on vehicles equipped with airbags, disable the supplemental
restraint system before attempting any steering wheel, steering column, airbag, occupant classification sys-
tem, seat belt tensioner, impact sensor, or instrument panel component diagnosis or service. Disconnect
and isolate the battery negative (ground) cable, then wait two minutes for the system capacitor to discharge
before performing further diagnosis or service. This is the only sure way to disable the supplemental
restraint system. Failure to take the proper precautions could result in accidental airbag deployment.
1. Position the center bezel lamp (1) to the mounting
hole in the center bezel above the forward storage
bin of the center floor console.
2. Reconnect the wire harness connector to the lamp
connector.
3. Engage the fixed retainer (2) of the lamp with one
edge of the mounting hole in the center bezel.
4. Push the opposite end of the lamp upward until the
retaining latch (4) snaps into the mounting hole.
5. Reconnect the battery negative cable.
DOME LAMP
REMOVAL
BULB - FRONT
1. Disconnect and isolate the battery negative cable.
2. Remove the front dome lamp (2) from the head-
liner. (Refer to 8 - ELECTRICAL/LAMPS/LIGHTING
- INTERIOR/FRONT DOME LAMP - REMOVAL).
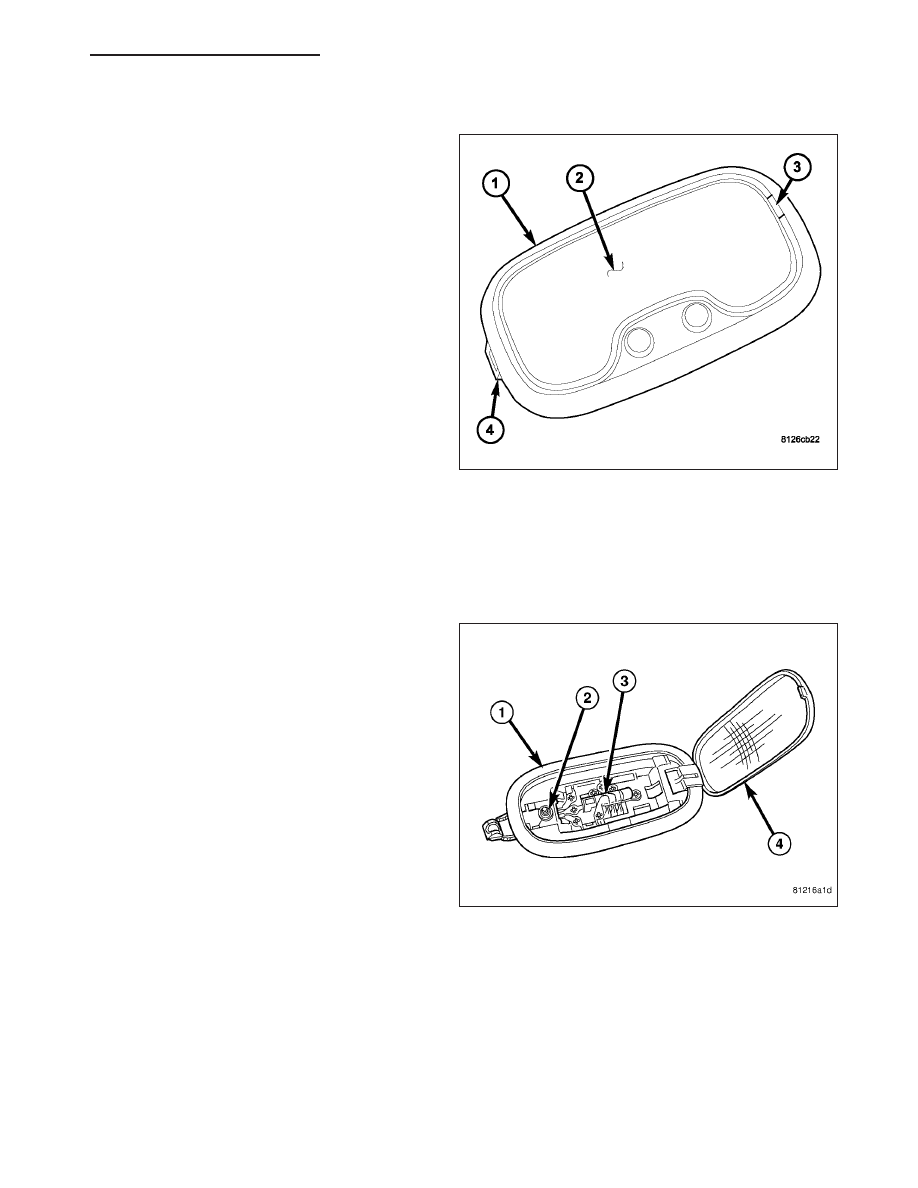
3. With the lamp lens (1) in the open position, care-
fully unsnap the bulb (3) from the two bulb holders
within the front dome lamp housing.
8L - 144
LAMPS/LIGHTING - INTERIOR - SERVICE INFORMATION
ND
LAMP - FRONT
1. Disconnect and isolate the battery negative cable.
2. Insert the tip of a small flat bladed screwdriver into
the notch (3) between the lens (2) and the housing
(1) on one side of the dome lamp unit.
3. Gently pry the end of the lens downward until it
unsnaps from the housing.
4. Swing the lens downward until it is perpendicular to
the housing.
5. Pull the lens hinge/retainer end (4) of the housing
downward slightly from the headliner, then slide the
lowered end of the housing away from the mount-
ing hole far enough to disengage the fixed retainer
on the notched end from the headliner.
6. Pull the lamp away from the headliner mounting
hole far enough to disconnect the wire harness
connector from the back of the lamp.
7. Remove the lamp from the vehicle.
BULB - REAR
NOTE: There are two types of dome lamps available in this model: one with a switch (2) that is activated by
depressing the lamp lens, and one without a switch. The bulb types and service procedures are identical for
both of these lamps.
1. Disconnect and isolate the battery negative cable.
2. Insert the tip of a small flat-bladed screwdriver into
the notch on one side of the rear dome lamp
between the lens (4) and the lamp housing (1).
3. Gently pry the notched edge of the lens downward
until it unsnaps from the housing.
4. Swing the notched end of the lens downward far
enough to access the bulb (3).
5. Carefully unsnap the bulb from the two bulb hold-
ers within the rear dome lamp housing.
LAMP - REAR
NOTE: There are two types of dome lamps available in this model: one with a switch that is activated by
depressing the lamp lens, and one without a switch. The bulb types and service procedures are identical for
both of these lamps.
ND
LAMPS/LIGHTING - INTERIOR - SERVICE INFORMATION
8L - 145
Нет комментариевНе стесняйтесь поделиться с нами вашим ценным мнением.
Текст