Chrysler Le Baron, Dodge Dynasty, Plymouth Acclaim. Manual — part 169

AJ/27-VEHICLE CONVERTIBLE BODY COMPONENT SERVICE
INDEX
page
page
. . . . . . . . . . . . . . . . . . . . 92
. . . . . . . . . . . . . . . . . . . . . . . 90
. . . . . . . . . . . . . . . . . . . . 87
Folding Top Storage Sling Well
. . . . . . . . . . . . . . 87
. . . . . . . . . . . . . . . . . . . . . . . . 95
. . . . . . . . . . . . . . . 95
. . . . . . . . . . . . . . . . . . 95
. . . . . . . . . . . . . . . . . 95
. . . . . . . . . . . . . . . . . . . . 95
. . . . . . . . . . . . . . . . . . . . . . . . 95
. . . . . . . . . . . . . . . . . . . . . . . . . 87
. . . . . . . . . . . . . . . . . . . . . . . . . . 86
. . . . . . . . . . . . . . . . . . 86
. . . . . . . . . . . . . . . . . . . . . . . 86
. . . . . . . . . . . . . . . . . . . 88
. . . . . . . . . . . . . . . 88
REAR SEAT CUSHION
REMOVAL (FIG. 1)
(1) Using a large flat blade screw driver, pry up-
ward at the retainer loop at each end of the seat
cushion.
(2) Disengage retainer loops from retainer cups in
floor pan.
(3) Separate seat cushion from vehicle.
INSTALLATION
Reverse the preceding operation.
REAR SEAT BACK
REMOVAL (FIG. 1)
(1) Remove rear seat cushion.
(2) Remove bolts holding rear seat back to floor
pan kick-up.
(3) Push seat back downward and disengage hook
retainers at top of back frame.
(4) Separate seat back from vehicle.
INSTALLATION
Reverse the preceding operation.
REAR SEAT BELT RETRACTORS
REMOVAL (FIG. 2)
(1) Remove rear seat cushion and back.
(2) Remove bolt holding shoulder belt turning loop
to seat back reinforcement panel.
(3) Remove bolts holding rear seat belt retractor to
floor kick-up.
(4) Remove bolts holding retractor to quarter panel
reinforcement.
(5) Remove bolts holding lap belt to lower quarter
panel reinforcement.
(6) Separate seat belt retractor from vehicle.
INSTALLATION
Reverse the preceding operation.
Fig. 1 Rear Seat Cushion
Fig. 2 Rear Seat Belts
23 - 86
AJ/27-BODY
Ä
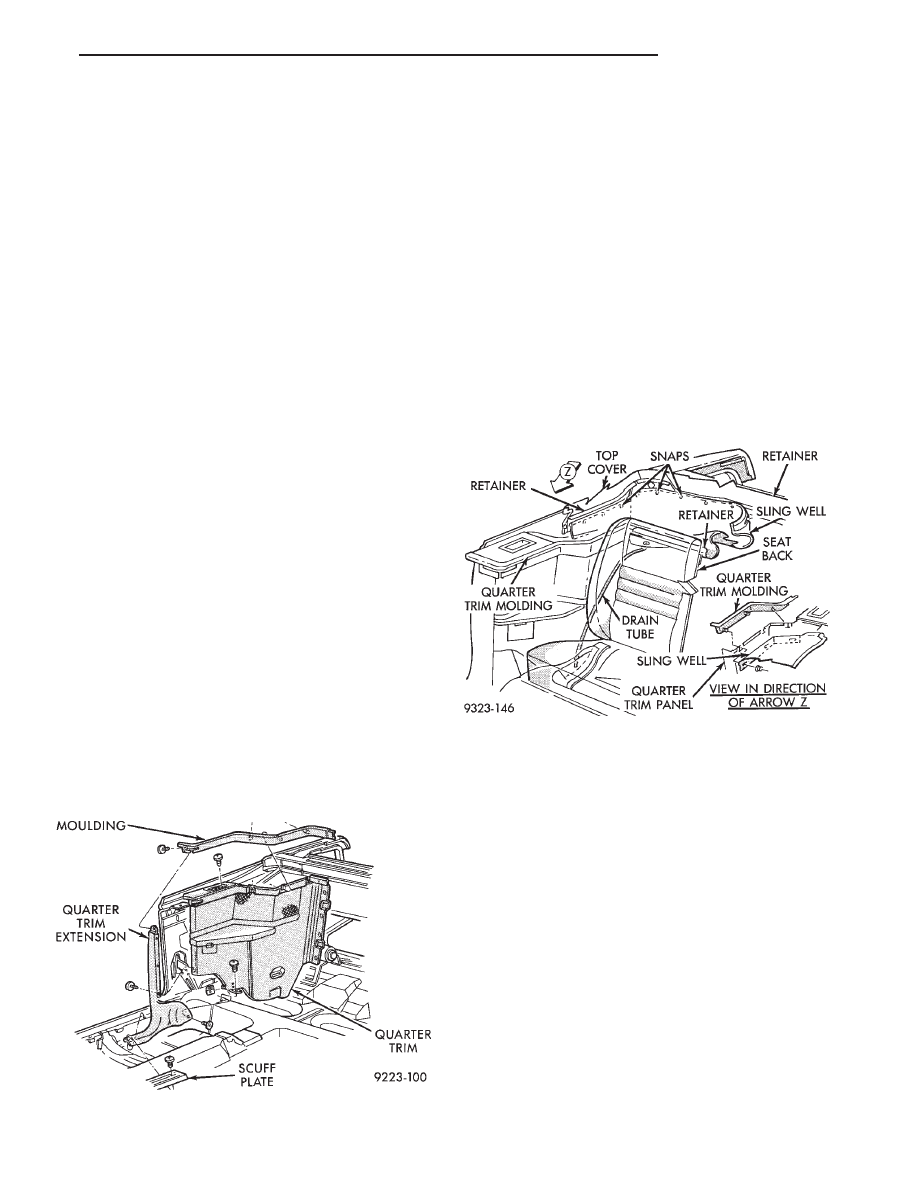
QUARTER WINDOW
REMOVAL
(1) Disengage snaps holding sling well to rear deck
panel.
(2) From each side of vehicle, Disengage clips hold-
ing sling well to belt reinforcement brace. Drape
sling well over rear seat back into passenger com-
partment.
(3) Remove screw holding quarter trim panel and
door weatherstrip to door opening.
(4) Remove the cowl trim and scuff plate covers.
(5) Remove the rear seat cushion.
(6) Disconnect rear speaker wire connectors.
(7) Remove screws holding seat back to floor
brackets and rear shoulder belt retractors (Fig. 1).
Separate rear seat back from vehicle.
(8) Remove screws holding quarter trim to quarter
panel at the boot latches.
(9) Remove screws holding quarter trim to floor
pan kick up.
(10) Separate quarter trim from rear reinforce-
ment. Position trim panel out of quarter window re-
moval path (Fig. 3).
(11) Raise quarter window approximately 100 mm
(4 in.) from the down position.
(12) Remove bolt holding glass stabilizer bumper
to top of quarter panel opening.
(13) Disconnect power window motor wire connec-
tor.
(14) Remove bolts holding quarter window assem-
bly to quarter panel and lift the assembly through
the opening at the top of the quarter panel.
INSTALLATION
Reverse the preceding operation. Align the quarter
glass to have adequate pressure on the weatherstrips
for proper sealing. Insert sling well drain tubes into
the holes in the floor pan.
FOLDING TOP STORAGE SLING WELL
REMOVAL (FIG. 4)
(1) Disengage snaps holding sling well to rear deck
inner panel.
(2) Disengage snaps holding sling well to quarter
inner panels.
(3) Disengage snaps holding sling well to back of
quarter trim panels.
(4) Remove bolts upper seat back support bar to
quarter trim panels.
(5) Separate support bar from vehicle.
(6) Disconnect drain tubes from bottom of sling
well.
(7) Pull sling well from the end of the support bar
retainer channel.
INSTALLATION
Reverse the preceding operation.
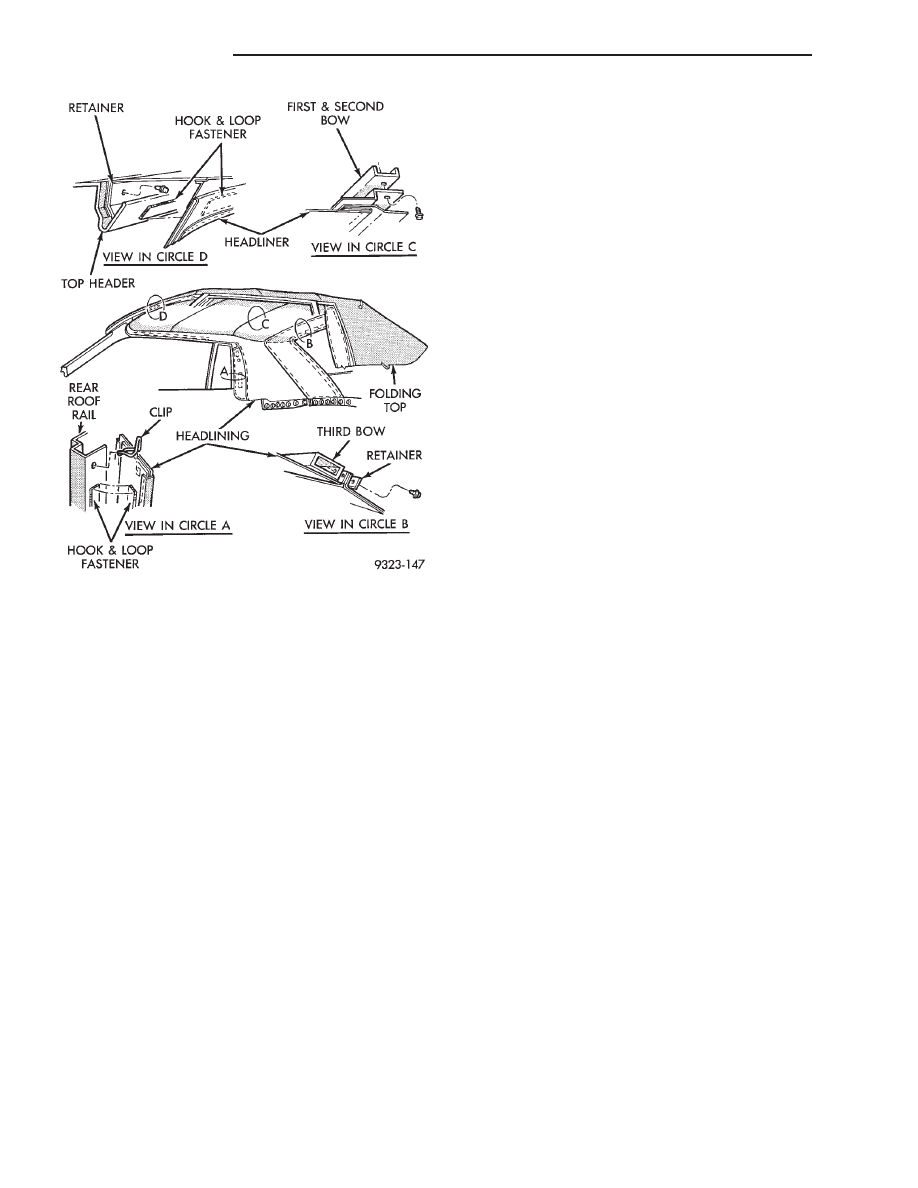
FOLDING TOP HEADLINING
REMOVAL (FIG. 5)
(1) Disengage snaps and hook and loop fasteners
holding headlining to quarter inner panels.
(2) Disengage hook and loop fasteners holding
headlining to roof rails and top header.
(3) Disengage clips holding headlining to roof rail
rearward of quarter glass opening.
(4) Remove screws holding headlining to third roof
bow.
(5) Remove screws holding headlining to second
roof bow.
(6) Remove screws holding headlining to first roof
bow.
(7) Remove
screws
holding
headlining
to
top
header.
(8) Separate headlining from vehicle.
INSTALLATION
Reverse the preceding operation.
Fig. 3 Quarter Trim Panel
Fig. 4 Folding Top Storage Sling Well
Ä
AJ/27-BODY
23 - 87
REAR WINDOW—WITHOUT ZIPPER
If the rear window zipper is damaged, perform
Rear Window and Zipper replacement procedures.
REMOVAL
(1) Release folding top latches and allow top cover
to relax.
(2) Disengage hook and loop fasteners holding
headlining to quarter panel areas.
(3) Pull headlining forward from behind quarter
trim panels and tape headlining around roof rails,
out of the way.
(4) Disengage snaps holding folding top storage
sling well to inner quarter and deck panels.
(5) Position sling well out of the way.
(6) Disengage wire connectors from terminals on
heated rear window.
(7) Pull wire harnesses from pockets at each side
of rear window.
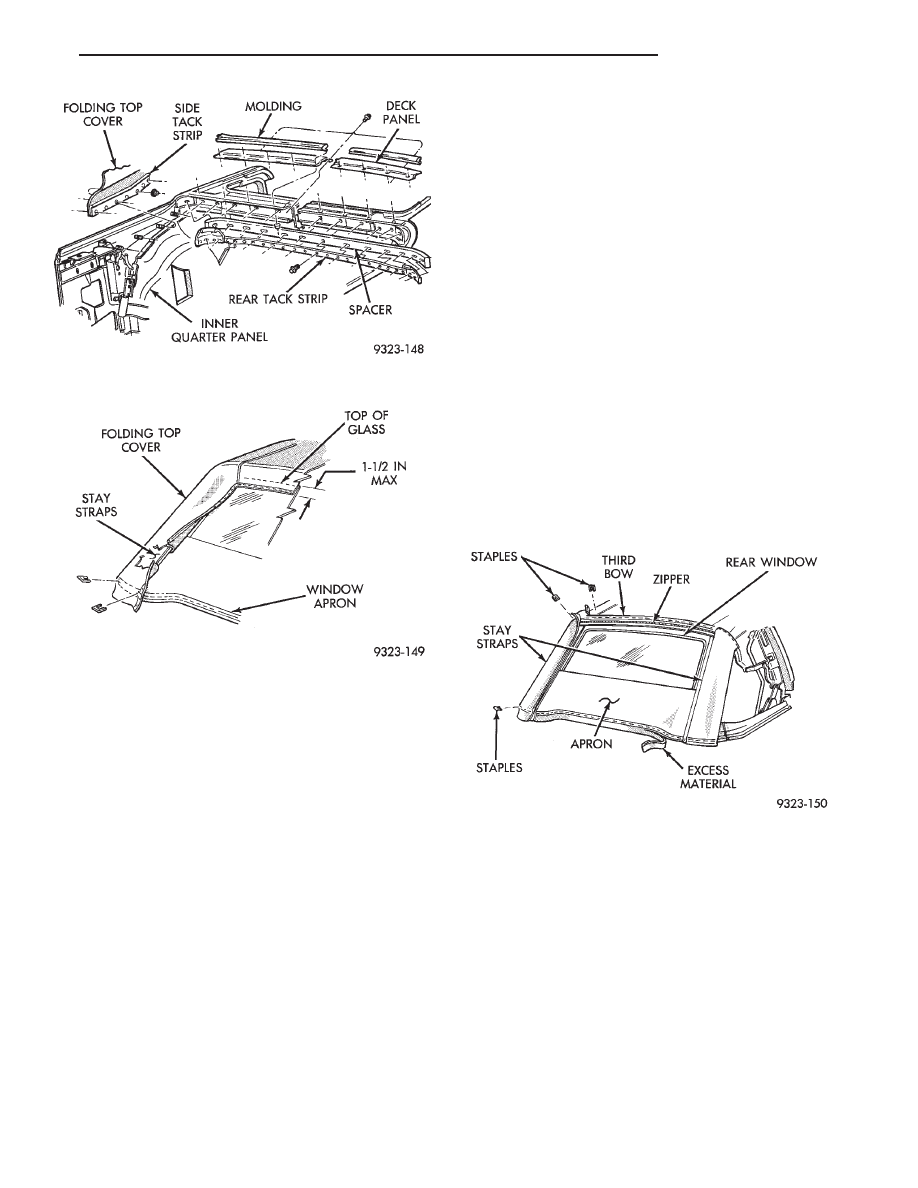
(8) Remove bolts holding rear tack strip to inner
deck panel (Fig. 6).
(9) Separate rear tack strip from deck panel.
(10) Position rear tack strip to gain access to sta-
ples holding material to tack strip.
(11) Using a grease pencil, mark location of outer
top cover on rear tack strip to aid installation.
(12) Remove staples holding top cover to rear tack
strip (Fig. 7).
(13) Unzip rear window from upper zipper listing.
(14) Separate window and rear tack strip from ve-
hicle.
(15) Place rear window on a suitable work surface.
(16) Using a grease pencil, mark location of rear
window apron on rear tack strip to aid installation.
(17) Remove staples holding rear window lower
apron to tack strip.
(18) Separate rear window from tack strip.
INSTALLATION
(1) Using old rear window as a pattern, mark new
window to the same size and shape as the old win-
dow.
(2) Trim excess material from new window.
(3) Position window at index marks on rear tack
strip.
(4) Install staples to hold window apron to tack
strip (Fig. 7).
(5) Trim excess material from around bolt holes in
tack strip.
(6) Position rear window and tack strip in opening
behind rear seat.
(7) Position top cover at index marks on rear tack
strip.
(8) Install staples to hold top cover to rear tack
strip.
(9) Zip rear window to upper zipper listing.
(10) Place rear tack strip in proper position under
deck panel (Fig. 6).
(11) Install bolts to hold rear tack strip to deck
panel.
(12) Latch top header to windshield header and in-
spect top cover for excess wrinkling. If wrinkling is
apparent, the top cover and rear window apron must
be repositioned on the tack strips.
(13) Route wire harnesses through pockets at each
side of window and connect ends to terminals on
glass.
(14) Install sling well and rear section of headlin-
ing.
REAR WINDOW AND ZIPPER
If the window zipper is not damaged and an origi-
nal equipment rear window is being installed, use
Rear Window Glass—Without Zipper replacement
procedures.
REMOVAL
(1) Release folding top latches and allow top cover
to relax.
(2) Disengage hook and loop fasteners holding
headlining to quarter panel areas.
(3) Pull headlining forward from behind quarter
trim panels and tape headlining around roof rails,
out of the way.
(4) Disengage snaps holding folding top storage
sling well to inner quarter and deck panels.
Fig. 5 Folding Top Headlining
23 - 88
AJ/27-BODY
Ä
(5) Position sling well out of the way.
(6) Disengage wire connectors from terminals on
heated rear window.
(7) Pull wire harnesses from pockets at each side
of rear window.
(8) Remove bolts holding rear tack strip to inner
deck panel (Fig. 6).
(9) Separate rear tack strip from deck panel.
(10) Remove bolts holding side tack strips to inside
of quarter panels (Fig. 6).
(11) Separate tack strips from quarter panels.
CAUTION: Cover all painted and upholstered sur-
faces to avoid damage while performing the follow-
ing operations.
(12) Reposition tack strips above rear deck and
quarter panels.
(13) Using a grease pencil, mark location of outer
top cover on rear tack strip to aid installation.
(14) Remove staples holding top cover to rear tack
strip (Fig. 7).
(15) Fold rear of top cover, tack strips and rear
window up and over the third (rear) roof bow (Fig. 8).
(16) Unzip and separate rear window from vehicle.
(17) Mark location of rear stay straps on third roof
bow.
(18) Remove staples holding rear stay straps to
third roof bow (Fig. 8).
(19) Mark location of top cover hold down listing
on third roof bow.
(20) Remove staples holding top cover listing to
third roof bow (Fig. 8).
(21) Mark location of rear window zipper upper
half listing on third roof bow.
(22) Remove staples holding zipper listing to third
roof bow (Fig. 8).
(23) Separate rear window zipper from third roof
bow.
The following is a work bench operation
(24) Place rear window on a suitable work surface.
(25) Using a grease pencil, mark location of rear
window apron on rear tack strip to aid installation.
(26) Remove staples holding rear window lower
apron to tack strip.
(27) Separate rear window from tack strip.
INSTALLATION
(1) Using old rear window as a pattern, mark new
window to the same size and shape as the old win-
dow.
(2) Trim excess material from new window.
(3) Position window at index marks on rear tack
strip.
(4) Install staples to hold window apron to tack
strip (Fig. 7).
(5) Trim excess material from around bolt holes in
tack strip.
(6) Using old zipper upper half listing as a pattern,
mark new listing to the same size and shape as the
old listing.
(7) Trim excess material from new listing.
Fig. 6 Tack Strips
Fig. 7 Rear Window Glass
Fig. 8 Third Roof Bow
Ä
AJ/27-BODY
23 - 89
Нет комментариевНе стесняйтесь поделиться с нами вашим ценным мнением.
Текст