Infiniti FX35, FX50 (S51). Manual — part 1611

C1D10 FRONT BODY VERTICAL G SENSOR
SCS-29
< DTC/CIRCUIT DIAGNOSIS >
C
D
F
G
H
I
J
K
L
M
A
B
SCS
N
O
P
Is the inspection result normal?
YES
>> GO TO 4.
NO
>> Replace E-SUS control unit. Refer to
4.
PERFORM DATA MONITOR
With CONSULT-III
1.
Connect the front RH body vertical G sensor harness connector.
2.
Start the engine.
3.
Select “DATA MONITOR” of “E-SUS”.
4.
Select “FR BDY G-SEN VOL” and “G-SEN VOL” of “DATA MONITOR”.
5.
Drive the vehicle and check whether it is within the following range.
Is the inspection result normal?
YES
>> Check pin terminal and connection of each harness connector for damage or loose connections.
NO
>> Replace front RH body vertical G sensor. Refer to
Front RH body vertical G sensor
Voltage
Connector
Terminal
E20
1
3
Approx. 4.75 – 5.25 V
FR BDY G-SEN VOL
: Approx. 0.5 – 4.5 V
G-SEN VOL
: Approx. 4.75 – 5.25 V
SCS-30
< DTC/CIRCUIT DIAGNOSIS >
C1D11 REAR VERTICAL G SENSOR
C1D11 REAR VERTICAL G SENSOR
Description
INFOID:0000000005588933
Detects the vertical G applied at vehicle rear, and outputs it to E-SUS control unit in analog voltage.
DTC Logic
INFOID:0000000005588934
DTC DETECTION LOGIC
DTC REPRODUCTION PROCEDURE
1.
DTC REPRODUCTION PROCEDURE
With CONSULT-III
1.
Turn the ignition switch OFF to ON.
2.
Perform “E-SUS” self-diagnosis.
Is DTC “C1D11” detected?
YES
>> Proceed to diagnosis procedure. Refer to
.
NO
>> INSPECTION END
Diagnosis Procedure
INFOID:0000000005588935
1.
CHECK REAR BODY VERTICAL G SENSOR
Check rear body vertical G sensor for damage, disconnection or looseness.
Is the inspection result normal?
YES
>> GO TO 2.
NO
>> Repair or replace rear body vertical sensor. Then perform the self-diagnosis.
2.
CHECK REAR BODY VERTICAL G SENSOR HARNESS
1.
Disconnect the E-SUS control unit harness connector and rear body vertical G sensor harness connector.
2.
Check the continuity between the E-SUS control unit harness connector and rear body vertical G sensor
harness connector.
Is the inspection result normal?
YES
>> GO TO 3.
NO
>> Repair or replace the malfunctioning harness or connector.
3.
CHECK REAR BODY VERTICAL G SENSOR POWER SUPPLY CIRCUIT
1.
Connect the E-SUS control unit harness connector.
2.
Turn the ignition switch ON.
CAUTION:
Never start the engine.
3.
Check the voltage between rear body vertical G sensor harness connector.
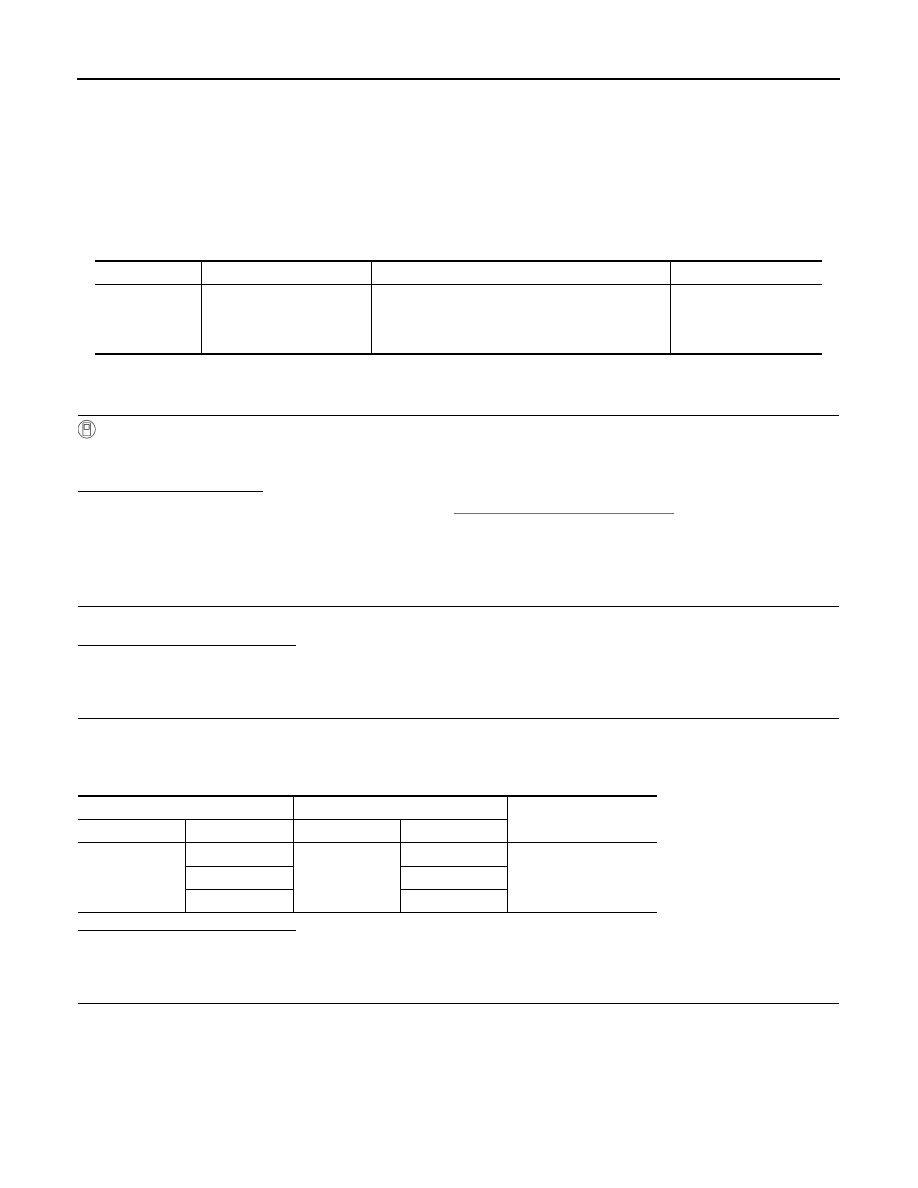
DTC
Display Item
Malfunction detected condition
Possible causes
C1D11
R VERTICAL G-SEN
• A malfunction occurs in the output voltage from
the rear body vertical G sensor.
• A malfunction occurs in the supply voltage to the
rear body vertical G sensor.
• Harness or connector
• rear body vertical G
sensor
• E-SUS control unit
E-SUS control unit
Rear body vertical G sensor
Continuity
Connector
Terminal
Connector
Terminal
B38
30
B56
1
Existed
14
2
25
3

C1D11 REAR VERTICAL G SENSOR
SCS-31
< DTC/CIRCUIT DIAGNOSIS >
C
D
F
G
H
I
J
K
L
M
A
B
SCS
N
O
P
Is the inspection result normal?
YES
>> GO TO 4.
NO
>> Replace E-SUS control unit. Refer to
4.
PERFORM DATA MONITOR
With CONSULT-III
1.
Connect the rear body vertical G sensor harness connector.
2.
Start the engine.
3.
Select “DATA MONITOR” of “E-SUS”.
4.
Select “R G-SEN VOL” and “G-SEN VOL” of “DATA MONITOR”.
5.
Drive the vehicle and check whether it is within the following range.
Is the inspection result normal?
YES
>> Check pin terminal and connection of each harness connector for damage or loose connections.
NO
>> Replace rear body vertical G sensor. Refer to
.
Rear body vertical G sensor
Voltage
Connector
Terminal
B56
1
3
Approx. 4.75 – 5.25 V
R G-SEN VOL
: Approx. 0.5 – 4.5 V
G-SEN VOL
: Approx. 4.75 – 5.25 V

SCS-32
< DTC/CIRCUIT DIAGNOSIS >
C1D12 SHOCK ABSORBER ACTUATOR
C1D12 SHOCK ABSORBER ACTUATOR
Description
INFOID:0000000005588936
Integrated into each the shock absorbers on wheels and opens or closes the orifice by moving the solenoid
core vertically with the control current from E-SUS control unit to regulate the damping force.
DTC Logic
INFOID:0000000005588937
DTC DETECTION LOGIC
DTC REPRODUCTION PROCEDURE
1.
DTC REPRODUCTION PROCEDURE
With CONSULT-III
1.
Start the engine and drive. Or select “E-SUS”, “FRONT RIGHT ACTUATOR” of “ACTIVE TEST”, and per-
form the active test. Refer to
SCS-10, "CONSULT-III Function"
.
2.
Perform “E-SUS” self-diagnosis.
Is DTC “C1D12” detected?
YES
>> Proceed to diagnosis procedure. Refer to
.
NO
>> INSPECTION END
Diagnosis Procedure
INFOID:0000000005588938
1.
CHECK FRONT RH SHOCK ABSORBER ACTUATOR CIRCUIT (1)
1.
Disconnect the E-SUS control unit harness connector.
2.
Check the resistance between the E-SUS control unit harness connector.
Is the inspection result normal?
YES
>> GO TO 3.
NO
>> GO TO 2.
2.
CHECK FRONT RH SHOCK ABSORBER ACTUATOR CIRCUIT (2)
1.
Disconnect the front RH shock absorber actuator harness connector.
2.
Check the continuity between the E-SUS control unit harness connector and front RH shock absorber
actuator harness connector.
Is the inspection result normal?
YES
>> GO TO 3.
NO
>> Repair or replace the malfunctioning harness or connector.
DTC
Display Item
Malfunction detected condition
Possible causes
C1D12
FR ACTUATOR SIG
An open or short circuit is detected in the front
RH wheel shock absorber actuator.
• Harness or connector
• Malfunction of the front RH
wheel shock absorber ac-
tuator
• E-SUS control unit
E-SUS control unit
Resistance
Connector
Terminal
B38
3
Approx. 0.65
Ω
2
E-SUS control unit
Front RH shock absorber actuator
Continuity
Connector
Terminal
Connector
Terminal
B38
3
E83
1
Existed
2
2
Нет комментариевНе стесняйтесь поделиться с нами вашим ценным мнением.
Текст