Infiniti FX35, FX50 (S51). Manual — part 1704

COLLISION DIAGNOSIS
SR-9
< BASIC INSPECTION >
C
D
E
F
G
I
J
K
L
M
A
B
SR
N
O
P
Part
Inspection
Side curtain air bag module LH
If the side curtain air bag LH has NOT deployed:
1.
Check for visible signs of damage (dents, tears, deformation, etc.) of the center pillar on the col-
lision side.
2.
If damaged
−
Remove the side curtain air bag module LH.
3.
Check for visible signs of damage (tears etc.) of the side curtain air bag module LH.
4.
Check harness and connectors for damage, and terminals for deformities.
5.
If no damage is found, reinstall the side curtain air bag module LH with new fasteners.
6.
If damaged
−
REPLACE the side curtain air bag module LH with new fasteners.
Side curtain air bag module RH
If the side curtain air bag RH has NOT deployed:
1.
Check for visible signs of damage (dents, tears, deformation, etc.) of the center pillar on the col-
lision side.
2.
If damaged
−
Remove the side curtain air bag module RH.
3.
Check for visible signs of damage (tears etc.) of the side curtain air bag module RH.
4.
Check harness and connectors for damage, and terminals for deformities.
5.
If no damage is found, reinstall the side curtain air bag module RH with new fasteners.
6.
If damaged
−
REPLACE the side curtain air bag module RH with new fasteners.
Front side air bag module LH
If the front side air bag LH has NOT deployed:
1.
Check for visible signs of damage (dents, tears, deformation, etc.) of the seat back on the col-
lision side.
2.
Check harness and connectors for damage, and terminals for deformities.
3.
If damaged
−
REPLACE the front seatback assembly LH.
Front side air bag module RH
If the front side air bag RH has NOT deployed:
1.
Check for visible signs of damage (dents, tears, deformation, etc.) of the seat back on the col-
lision side.
2.
Check harness and connectors for damage, and terminals for deformities.
3.
If damaged
−
REPLACE the front seatback assembly RH.
Side air bag (satellite) sensor
(LH or RH)
If none of the SRS components have been activated:
1.
Remove the side air bag (satellite) sensor (LH or RH) on the collision side. Check harness con-
nectors for damage, terminals for deformities, and harness for binding.
2.
Check for visible signs of damage (dents, cracks, deformation, etc.) of the side air bag (satellite)
sensor (LH or RH).
3.
Install the side air bag (satellite) sensor (LH or RH) to check fit.
4.
If no damage is found, reinstall the side sir bag (satellite) sensor (LH or RH) with new fasteners.
5.
If damaged
−
REPLACE the side air bag (satellite) sensor (LH or RH) with new fasteners.
Diagnosis sensor unit
If none of the SRS components have been activated:
1.
Check case and bracket for dents, cracks or deformities.
2.
Check connectors for damage, and terminals for deformities.
3.
If no damage is found, reinstall the diagnosis sensor unit with new fasteners.
4.
If damaged
−
REPLACE the diagnosis sensor unit with new fasteners.
Seat belt pre-tensioner assem-
blies
(All applicable locations: buckle,
retractor, lap outer)
If the pre-tensioners have NOT been activated:
1.
Remove seat belt pre-tensioners.
Check harness cover and connectors for damage, terminals for deformities, and harness for
binding.
2.
Check belts for damage and anchors for loose mounting.
3.
Check retractor for smooth operation.
4.
Check seat belt adjuster for damage.
5.
Check for deformities of the center pillar inner.
6.
If the center pillar inner has no damage, REPLACE the seat belt pre-tensioner assembly.
7.
If no damage is found, reinstall seat belt pre-tensioner assembly.
8.
If damaged
−
REPLACE. Install the seat belt pre-tensioners with new fasteners.
Seat (with front side air bag)
If the front LH or front RH side air bag modules have NOT deployed:
1.
Visually check the seat on the collision side.
2.
Remove the seat on the collision side and check the following for damage and deformities.
-
Harness, connectors and terminals
-
Frame and recliner (for front and rear seat), and also adjuster and slides (for front seat)
3.
If no damage is found, reinstall the seat.
4.
If damaged
−
REPLACE the damaged seat parts using new fasteners. If the front seat back is
damaged, the front seat back assembly must be replaced.
Center inner pillar
1.
Check the center inner pillar on the collision side for damage (dents, cracks, deformation, etc.).
2.
If damaged
−
REPAIR the center inner pillar.

SR-10
< BASIC INSPECTION >
COLLISION DIAGNOSIS
Trim/headlining
1.
Check for visible signs of damage (dents, cracks, deformation, etc.) of the interior trim on the
collision side.
2.
If damaged
−
REPLACE the damaged trim parts.
Door-mounted curtain air bag
module LH
If the door-mounted curtain air bag LH has NOT deployed:
1.
Check for visible signs of damage (dents, tears, deformation, etc.) of the door finisher on the
collision side.
2.
If damaged
−
REPLACE the door finisher LH with new fasteners.
3.
Check for visible signs of damaged (tears etc.) of the door-mounted curtain air bag module LH.
4.
Check harness and connectors for damage, and terminals for deformities.
5.
If no damage is found, reinstall door finisher.
CAUTION:
When removing door-mounted curtain air bag module from door finisher, never reuse
door finisher.
6.
If damaged
−
REPLACE the door finisher LH and door-mounted curtain air bag module LH with
new fasteners.
Door-mounted curtain air bag
module RH
If the door-mounted curtain air bag RH has NOT deployed:
1.
Check for visible signs of damage (dents, tears, deformation, etc.) of the door finisher on the
collision side.
2.
If damaged
−
REPLACE the door finisher RH with new fasteners.
3.
Check for visible signs of damage (tears etc.) of the door-mounted curtain air bag module RH.
4.
Check harness and connectors for damage, and terminals for deformities.
5.
If no damage is found, reinstall door finisher.
CAUTION:
When removing door-mounted curtain air bag module from door finisher, never reuse
door finisher.
6.
If damaged
−
REPLACE the door finisher RH and door-mounted curtain air bag module RH with
new fasteners.
Pop-up roll bar
If the pop-up roll bar has NOT deployed:
1.
Check for visible signs of damage (dents, tears, deformation, etc.) of the pop-up roll bar.
2.
If damaged
−
REPLACE the pop-up roll bar with new fasteners.
3.
Check harness and connectors for damage, and terminals for deformities.
4.
If no damage is found, reinstall the pop-up roll bar with new fasteners.
5.
Check for visible signs of damage (dents, cracks, deformation, etc.) of the seatback support
brace assembly.
6.
If damaged
−
REPAIR the seatback support brace assembly.
Part
Inspection
DRIVER AIR BAG MODULE
SR-11
< REMOVAL AND INSTALLATION >
C
D
E
F
G
I
J
K
L
M
A
B
SR
N
O
P
REMOVAL AND INSTALLATION
DRIVER AIR BAG MODULE
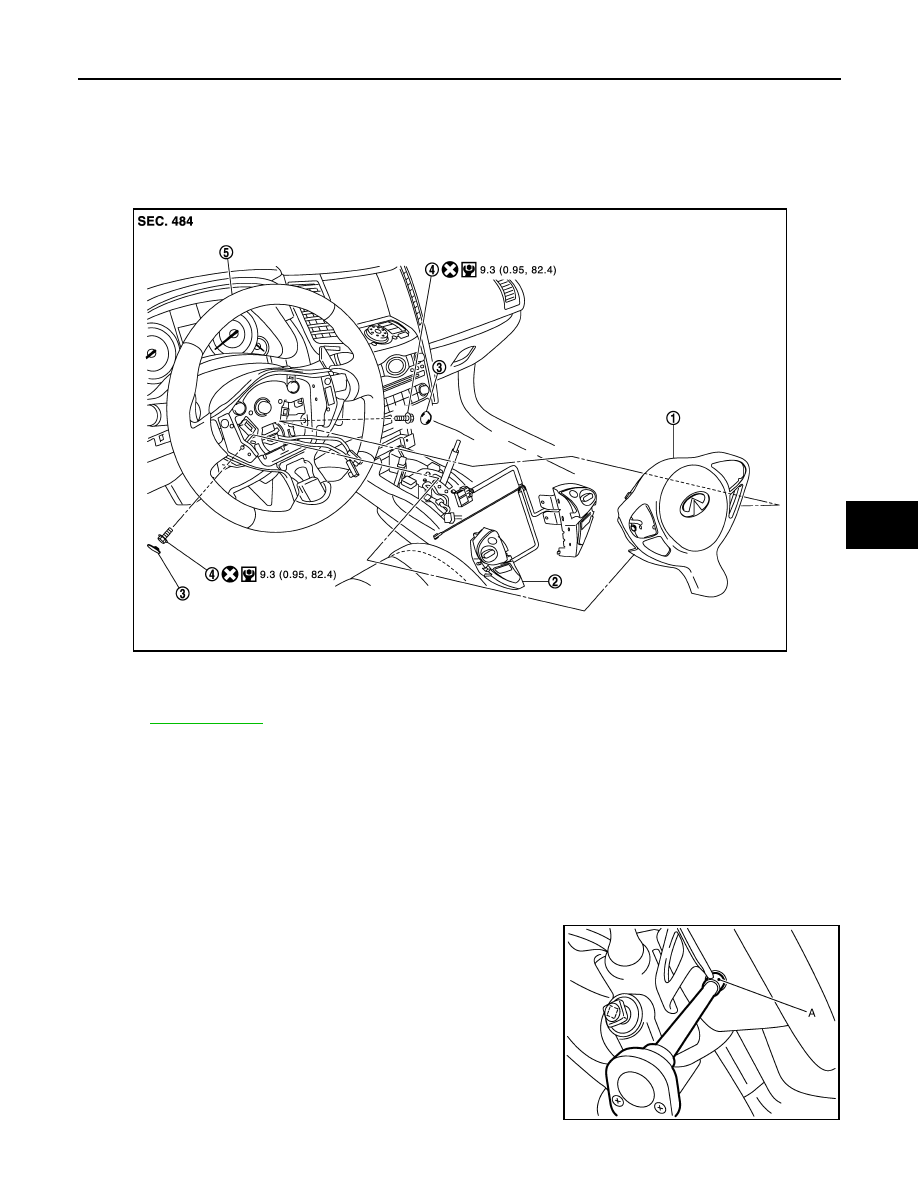
Exploded View
INFOID:0000000005249828
Removal and Installation
INFOID:0000000005249829
WARNING:
• Before servicing, turn ignition switch OFF, disconnect battery negative terminal and wait 3 minutes
or more.
• Always work from the side of air bag module. Never work in front of it.
• Never use the air tools or the electric tools for servicing.
REMOVAL
1.
Remove the side lids (LH/RH).
2.
Remove the driver air bag module mounting TORX bolt (LH/RH)
with TORX bit (A).
1.
Driver air bag module
2.
Steering switch
3.
Side lid (LH/RH)
4.
TORX bolt (LH/RH)
5.
Steering wheel
for symbols in the figure.
JMHIA0652GB
JMHIA0006ZZ

SR-12
< REMOVAL AND INSTALLATION >
DRIVER AIR BAG MODULE
3.
Pull out the driver air bag module assembly.
4.
Disconnect the driver air bag module harness connector.
CAUTION:
• For installing/removing the driver air bag module harness
connector, insert thin screwdriver wrapped in tape into
notch, lift lock and remove connector.
• Install connector with lock raised, and push lock into con-
nector.
• After installing the connector, check that the lock is
pushed securely into it.
5.
Remove the driver air bag module assembly.
CAUTION:
• Always place the driver air bag module with pad side facing
upward.
• Never impact the driver air bag module.
• Replace the driver air bag module if it has been dropped or
sustained an impact.
• Never insert any foreign objects (screwdriver, etc.) into the driver air bag module.
• Never disassemble the driver air bag module.
• Never expose the driver air bag module to temperatures exceeding 90
°
C (194
°
F).
• Never allow oil, grease, detergent, or water to come in contact with the driver air bag module.
INSTALLATION
Install in the reverse order of removal.
CAUTION:
• Never use the old TORX bolts after removal, replace with the new bolts.
PHIA0953J
: Upward
JMHIA0653ZZ
JMHIA0009ZZ
Нет комментариевНе стесняйтесь поделиться с нами вашим ценным мнением.
Текст