Infiniti EX35. Manual — part 1056
MA-14
< ON-VEHICLE MAINTENANCE >
ENGINE MAINTENANCE
6.
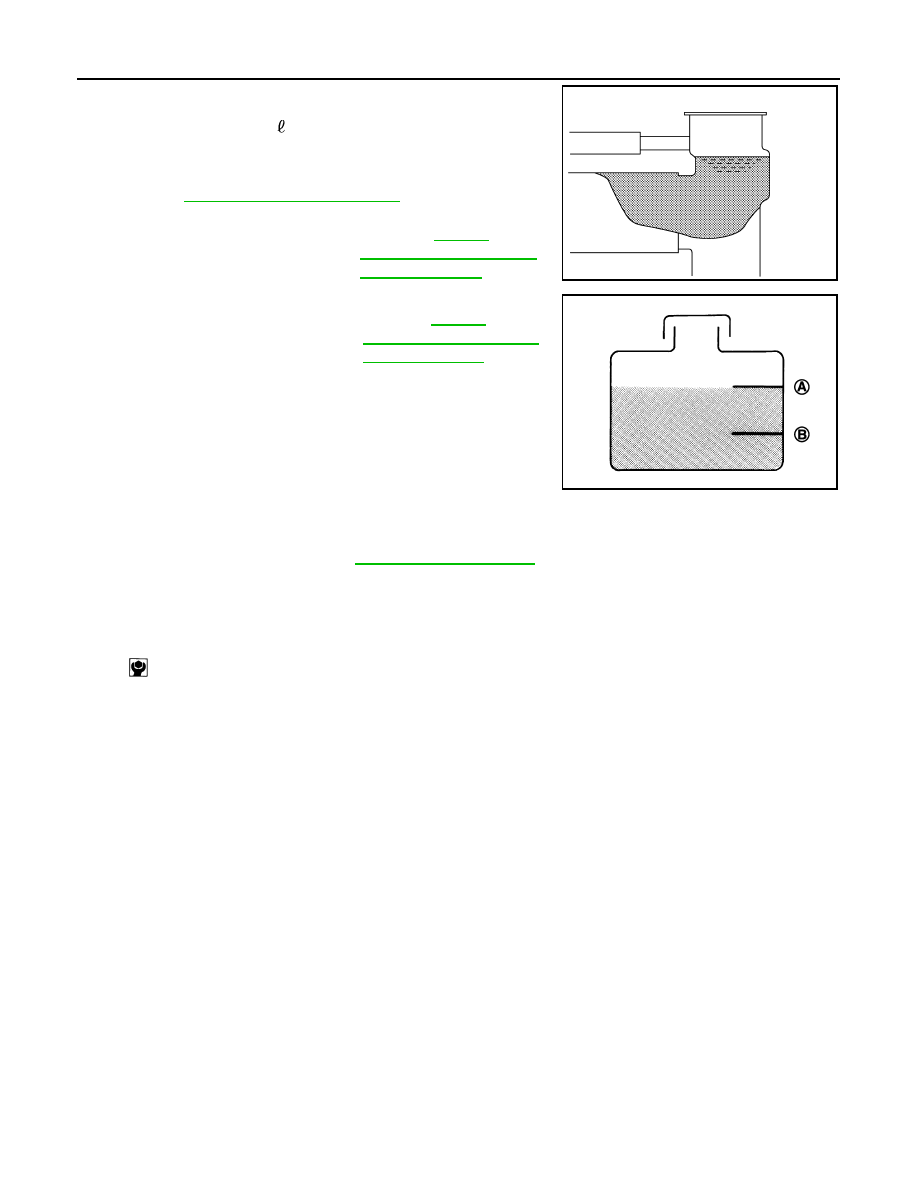
Fill radiator, and reservoir tank if removed, to specified level.
• Pour engine coolant through engine coolant filler neck
slowly of less than 2 (2-1/8 US qt, 1-3/4 lmp qt) a minute
to allow air in system to escape.
• Use Genuine NISSAN Long Life Antifreeze/Coolant or
equivalent mixed with water (distilled or demineralized).
Refer to
MA-10, "Fluids and Lubricants"
7.
When engine coolant overflows air relief hole on radiator, install air relief plug with new O-ring.
8.
Repeat step 6.
9.
When engine coolant overflows air relief hole on heater hose, install air relief plug with new O-ring. Then
refill radiator with engine coolant.
10. Install radiator cap.
11. Warm up engine until opening thermostat. Standard for warming-up time is approximately 10 minutes at
3,000 rpm.
• Check thermostat opening condition by touching radiator hose (lower) to see a flow of warm water.
CAUTION:
Watch water temperature gauge so as not to overheat engine.
12. Stop the engine and cool down to less than approximately 50
°
C (122
°
F).
• Cool down using fan to reduce the time.
• If necessary, refill radiator up to filler neck with engine coolant.
13. Refill reservoir tank to “MAX” level line with engine coolant.
14. Repeat steps 10 through 13 two or more times with radiator cap installed until engine coolant level no
longer drops.
15. Check cooling system for leakage with engine running.
16. Warm up the engine, and check for sound of engine coolant flow while running engine from idle up to
3,000 rpm with heater temperature controller set at several position between “COOL” and “WARM”.
• Sound may be noticeable at heater unit.
17. Repeat step 16 three times.
18. If sound is heard, bleed air from cooling system by repeating step 6, and steps from 10 to 17 until engine
coolant level no longer drops.
19. Check that the reservoir tank cap is tightened.
ENGINE COOLANT : Flushing
INFOID:0000000003556576
1.
Install reservoir tank if removed, and radiator drain plug.
Engine coolant capacity
: Refer to
"Periodical Maintenanc
e Specification"
(With reservoir tank at
“MAX” level)
Reservoir tank engine cool-
ant capacity
"Periodical Maintenanc
e Specification"
.
(At “MAX” level)
A
: MAX
B
: MIN
JPBIA0412ZZ
JPBIA0102ZZ
Tightening torque
: Refer to
.
: 1.2 N·m (0.12 kg-m, 11 in-lb)
ENGINE MAINTENANCE
MA-15
< ON-VEHICLE MAINTENANCE >
C
D
E
F
G
H
I
J
K
L
M
B
MA
N
O
A
CAUTION:
Be sure to clean drain plug and install with new O-ring.
If water drain plugs on cylinder block are removed, close and tighten them. Refer to
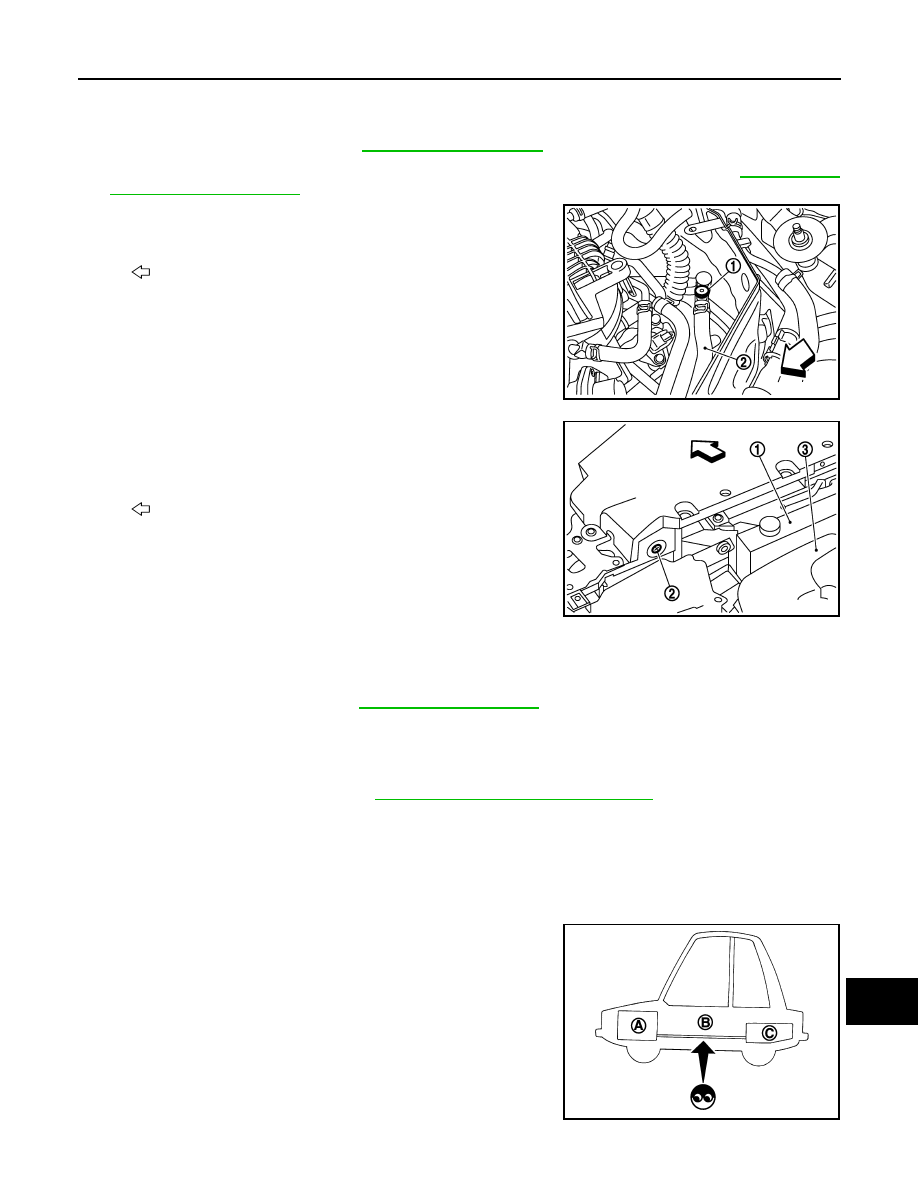
2.
Remove air relief plug (1) on heater hose.
3.
Remove air relief plug (2) on radiator.
4.
Fill radiator with water until water spills from the air relief holes, then close air relief plugs. Fill radiator and
reservoir tank with water and reinstall radiator cap.
5.
Run the engine and warm it up to normal operating temperature.
6.
Rev the engine two or three times under no-load.
7.
Stop the engine and wait until it cools down.
8.
Drain water from the system. Refer to
MA-12, "ENGINE COOLANT : Draining"
.
9.
Repeat steps 1 through 8 until clear water begins to drain from radiator.
10. Check that the reservoir tank cap is tightened.
FUEL LINES
FUEL LINES : Inspection
INFOID:0000000003556578
• Inspect fuel lines, fuel filler cap and fuel tank for improper attach-
ment, leakage, cracks, damage, loose connections, chafing or
deterioration.
• If necessary, repair or replace damaged parts.
AIR CLEANER FILTER
Tightening torque
2
: Heater hose
: Vehicle front
JPBIA0104ZZ
1
: Reservoir tank
3
: Engine cover
: Vehicle front
JPBIA0260ZZ
Tightening torque
: Refer to
.
A
: Engine
B
: Fuel line
C
: Fuel tank
JPBIA0129ZZ
MA-16
< ON-VEHICLE MAINTENANCE >
ENGINE MAINTENANCE
AIR CLEANER FILTER : Removal and Installation
INFOID:0000000003556579
REMOVAL
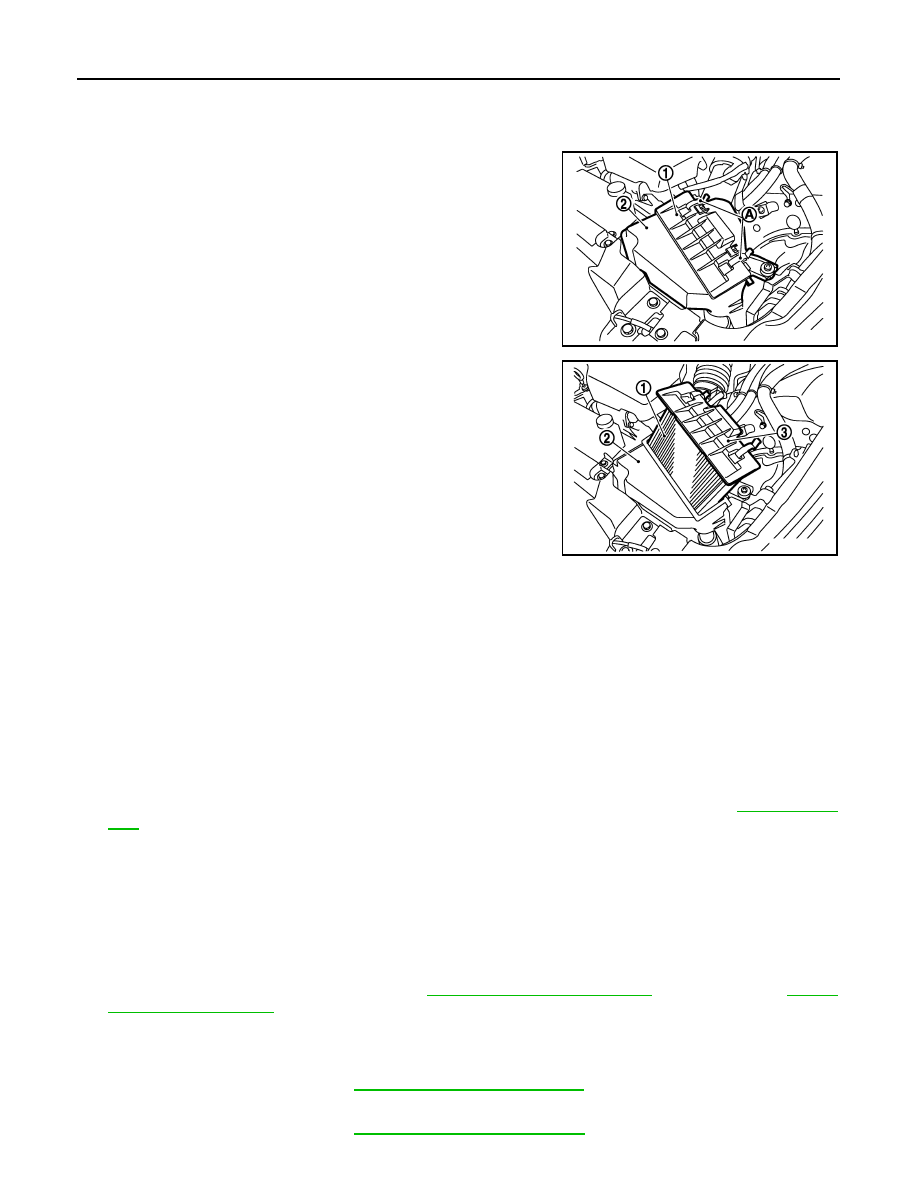
1.
Unhook clips (A).
2.
Remove holder (3) from air cleaner case (2), and then remove
air cleaner filter (1) from holder.
INSTALLATION
Note the following, and install in the reverse order of removal.
• Install the air cleaner filter by aligning the seal with the notch of air cleaner case.
ENGINE OIL
ENGINE OIL : Draining
INFOID:0000000003556580
WARNING:
• Be careful not to get burn yourself, as engine oil may be hot.
• Prolonged and repeated contact with used engine oil may cause skin cancer. Try to avoid direct skin
contact with used engine oil. If skin contact is made, wash thoroughly with soap or hand cleaner as
soon as possible.
1.
Warm up the engine, and check for engine oil leakage from engine components. Refer to
2.
Stop the engine and wait for 10 minutes.
3.
Loosen oil filler cap.
4.
Remove undercover with power tool.
5.
Remove drain plug and then drain engine oil.
ENGINE OIL : Refilling
INFOID:0000000003556581
1.
Install drain plug with new washer. Refer to
(2WD models) or
(AWD models).
CAUTION:
Be sure to clean drain plug and install with new washer.
2WD models
AWD models
1
: Holder
2
: Air cleaner case
JPBIA1597ZZ
JPBIA1598ZZ
Tightening torque
: Refer to
Tightening torque
: Refer to
.
ENGINE MAINTENANCE
MA-17
< ON-VEHICLE MAINTENANCE >
C
D
E
F
G
H
I
J
K
L
M
B
MA
N
O
A
2.
Refill with new engine oil.
Engine oil specification and viscosity: Refer to
MA-16, "ENGINE OIL : Refilling"
.
CAUTION:
• When filling engine oil, never pull out oil level gauge.
• The refill capacity depends on the engine oil temperature and drain time. Use these specifica-
tions for reference only.
• Always use oil level gauge to determine the proper amount of engine oil in engine.
3.
Warm up the engine and check area around drain plug and oil filter for engine oil leakage.
4.
Stop the engine and wait for 10 minutes.
5.
Check the engine oil level. Refer to
.
OIL FILTER
OIL FILTER : Removal and Installation
INFOID:0000000003556582
REMOVAL
CAUTION:
• Oil filter is provided with relief valve. Use genuine NISSAN oil filter or equivalent.
• Be careful not to get burned when engine and engine oil may be hot.
• When removing, prepare a shop cloth to absorb any engine oil leakage or spillage.
• Never allow engine oil to adhere to drive belt.
• Completely wipe off any engine oil that adheres to engine and vehicle.
1.
Remove engine undercover with power tool.
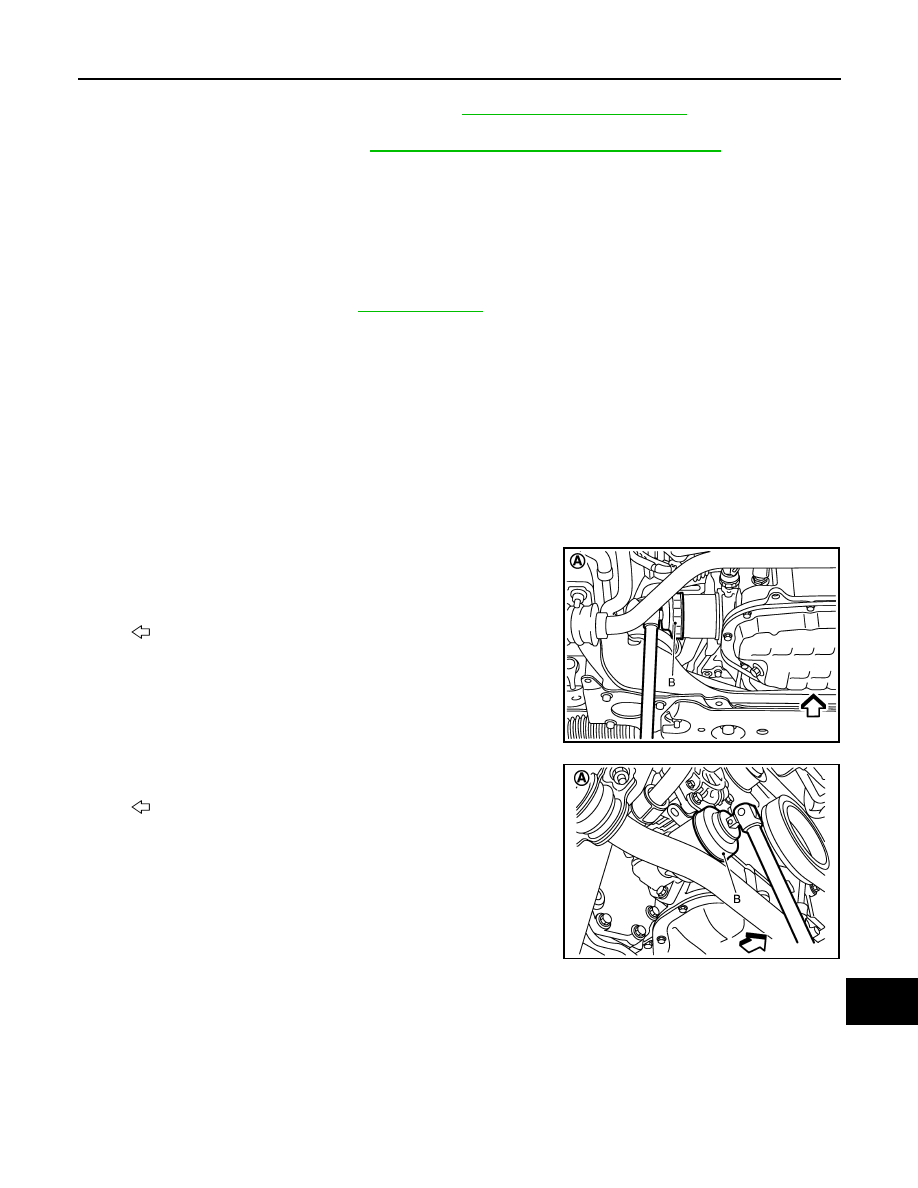
2.
Using oil filter wrench [SST: KV10115801 (J38956)] (B), remove
oil filter.
INSTALLATION
1.
Remove foreign materials adhering to oil filter installation surface.
Engine oil capacity
: Refer to
LU-16, "Periodical Maintenance Specification"
A
: 2WD models
: Engine front
JPBIA0252GB
A
: AWD models
: Engine front
JPBIA1828ZZ
Нет комментариевНе стесняйтесь поделиться с нами вашим ценным мнением.
Текст