Infiniti EX35. Manual — part 939
HAC-152
< PRECAUTION >
[AUTOMATIC AIR CONDITIONER]
COMPRESSOR
COMPRESSOR
General Precautions
INFOID:0000000003569899
CAUTION:
• Plug all openings to prevent moisture and foreign matter from entering.
• Store it in the same way at it is when mounted on the car when the compressor is removed.
• Follow “Maintenance of Lubricant Quantity in Compressor” exactly when replacing or repairing
compressor. Refer to
HA-30, "Maintenance of Lubricant Quantity"
• Keep friction surfaces between clutch and pulley clean. Wipe it off by using a clean waste cloth
moistened with thinner if the surface is contaminated with lubricant.
• Turn the compressor shaft by hand more than five turns in both directions after compressor service
operation. This distributes equally lubricant inside the compressor. Let the engine idle and operate
the compressor for one hour after the compressor is installed.
• Apply voltage to the new one and check for normal operation after replacing the compressor magnet
clutch.
LEAK DETECTION DYE
HAC-153
< PRECAUTION >
[AUTOMATIC AIR CONDITIONER]
C
D
E
F
G
H
J
K
L
M
A
B
HAC
N
O
P
LEAK DETECTION DYE
General Precautions
INFOID:0000000003569900
CAUTION:
• The A/C system contains a fluorescent leak detection dye used for locating refrigerant leakages. An
ultraviolet (UV) lamp is required to illuminate the dye when inspecting for leakages.
• Wear always fluorescence enhancing UV safety goggles to protect eyes and enhance the visibility of
the fluorescent dye.
• The fluorescent dye leak detector is not a replacement for an electrical leak detector (SST: J-41995).
The fluorescent dye leak detector should be used in conjunction with an electrical leak detector
(SST: J-41995) to pin-point refrigerant leakages.
• Read and follow all manufacture’s operating instructions and precautions prior to performing the
work for the purpose of safety and customer’s satisfaction.
• A compressor shaft seal should not necessarily be repaired because of dye seepage. The compres-
sor shaft seal should only be repaired after confirming the leakage with an electrical leak detector
(SST: J-41995).
• Remove always any remaining dye from the leakage area after repairs are completed to avoid a mis-
diagnosis during a future service.
• Never allow dye to come into contact with painted body panels or interior components. Clean imme-
diately with the approved dye cleaner if dye is spilled. Fluorescent dye left on a surface for an
extended period of time cannot be removed.
• Never spray the fluorescent dye cleaning agent on hot surfaces (engine exhaust manifold, etc.).
• Never use more than one refrigerant dye bottle (1/4 ounce /7.4 cc) per A/C system.
• Leak detection dyes for HFC-134a (R-134a) and CFC-12 (R-12) A/C systems are different. Never use
HFC-134a (R-134a) leak detection dye in CFC-12 (R-12) A/C system, or CFC-12 (R-12) leak detection
dye in HFC-134a (R-134a) A/C system, or A/C system damage may result.
• The fluorescent properties of the dye remains for three or more years unless a compressor malfunc-
tion occurs.
IDENTIFICATION
NOTE:
Vehicles with factory installed fluorescent dye have a green label.
Vehicles without factory installed fluorescent dye have a blue label.
IDENTIFICATION LABEL FOR VEHICLE
Vehicles with factory installed fluorescent dye have the identification label on the front side of hood.
HRN-1
DRIVER CONTROLS
C
D
E
F
G
H
I
J
K
M
SECTION
HRN
A
B
HRN
N
O
P
CONTENTS
HORN
COMPONENT DIAGNOSIS . . . . . . ..
HORN . . . . . . . . . . . . . . . . ..
Wiring Diagram - HORN - . . . . . . . . . .....
PRECAUTION . . . . . . . . . . . ...
PRECAUTIONS . . . . . . . . . . . . ...
ON-VEHICLE REPAIR . . . . . . . . ..
HORN . . . . . . . . . . . . . . . . .
Exploded View . . . . . . . . . . . . . . ..
HRN-2
< COMPONENT DIAGNOSIS >
HORN
COMPONENT DIAGNOSIS
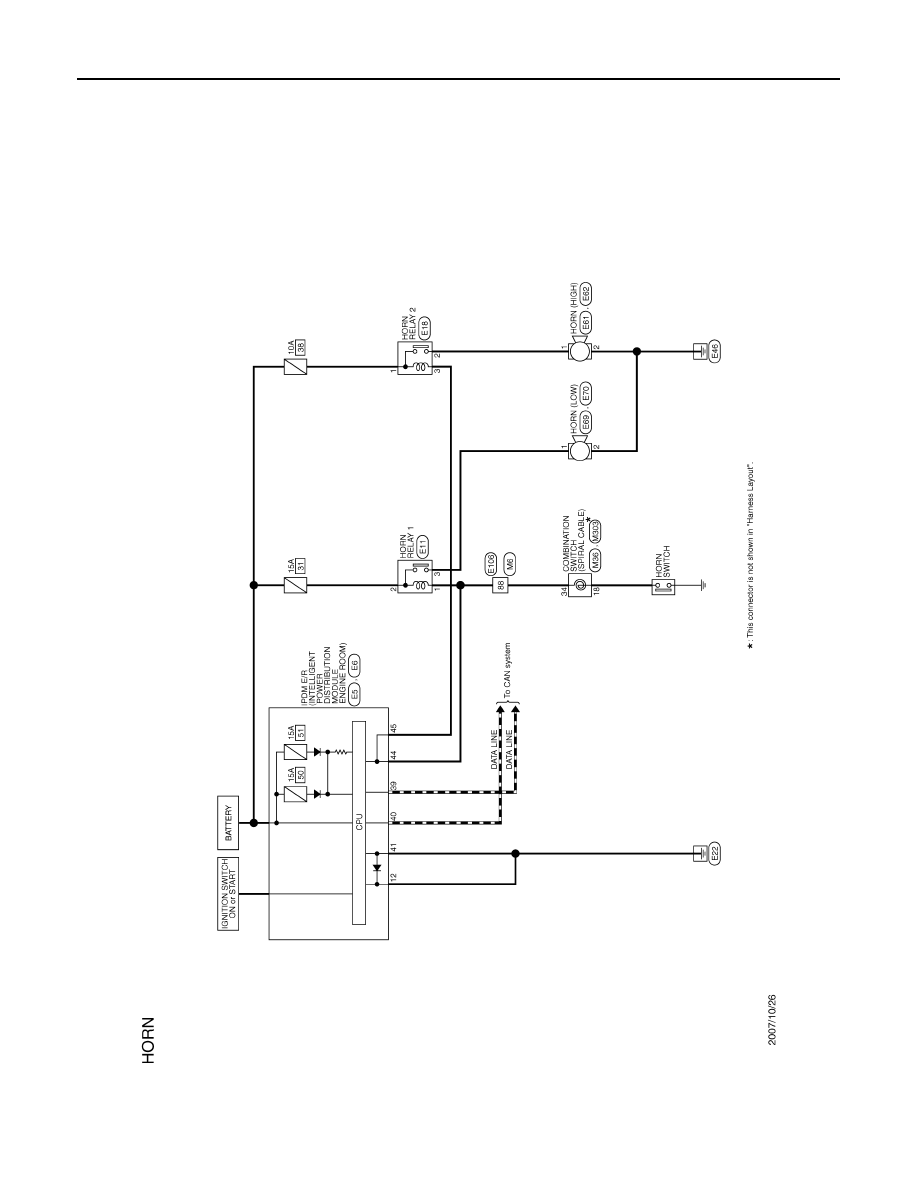
HORN
Wiring Diagram - HORN -
INFOID:0000000003138918
JCLWM1305GB
Нет комментариевНе стесняйтесь поделиться с нами вашим ценным мнением.
Текст