Infiniti EX35. Manual — part 791
EXL-208
< ON-VEHICLE REPAIR >
[XENON TYPE]
LICENSE PLATE LAMP
LICENSE PLATE LAMP
Exploded View
INFOID:0000000003135421
Removal and Installation
INFOID:0000000003135422
CAUTION:
Disconnect the battery negative terminal or remove the fuse.
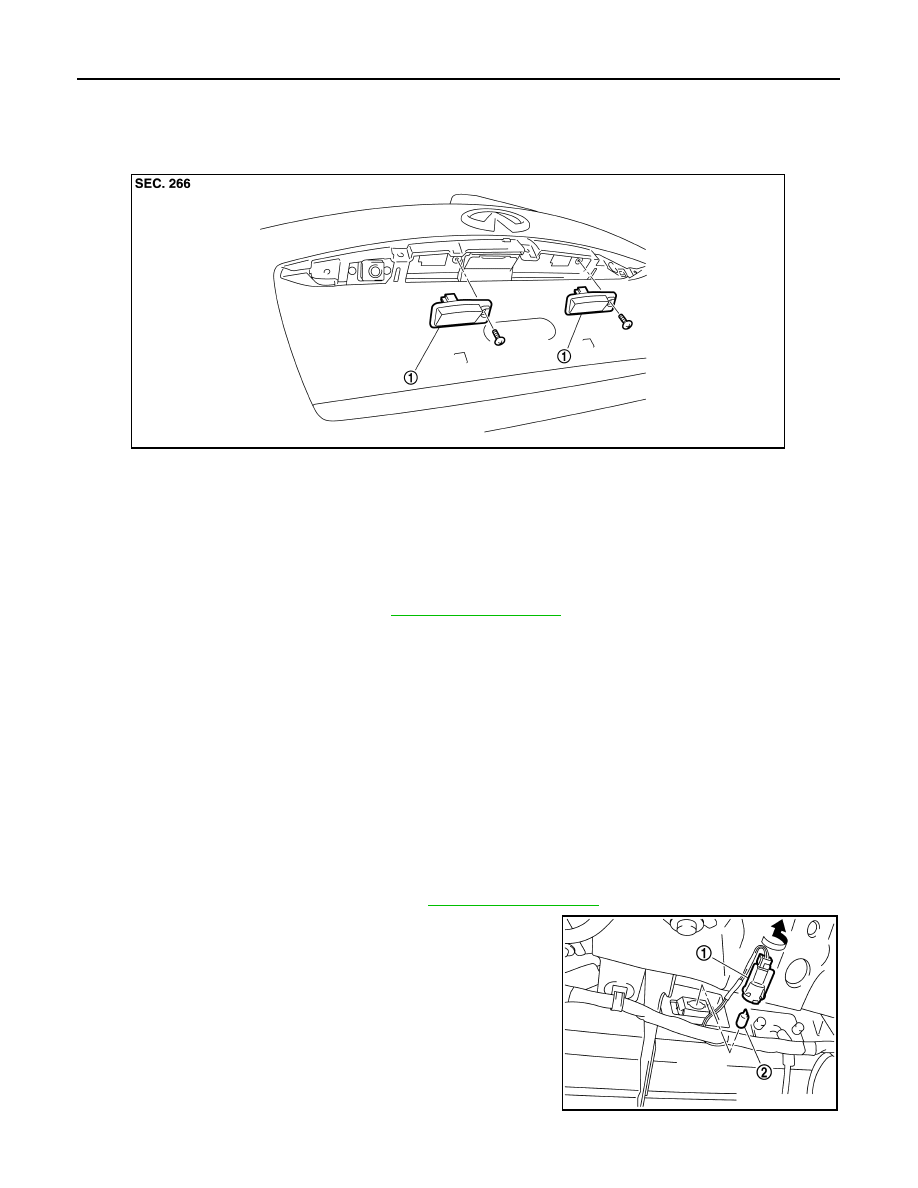
REMOVAL
1.
Remove the door handle cover. Refer to
.
2.
Remove the screw. And then remove the license plate lamp.
3.
Disconnect the license plate lamp connector.
INSTALLATION
Install in the reverse order of removal.
Replacement
INFOID:0000000003135423
CAUTION:
• Disconnect the battery negative terminal or remove the fuse.
• Never touch the glass of bulb directly by hand. Keep grease and other oily matters away from it.
Never touch bulb by hand while it is lit or right after being turned off.
• Never leave bulb out of lamp reflector for a long time because dust, moisture smoke, etc. may affect
the performance of lamp. When replacing bulb, be sure to replace it with new one.
LICENSE PLATE LAMP BULB
1.
Remove the back door finisher inner. Refer to
2.
Turn the bulb socket (1) counterclockwise and unlock it.
3.
Remove the bulb (2) from the socket.
1.
License plate lamp
JPLIA0929ZZ
JPLIA0930ZZ
SERVICE DATA AND SPECIFICATIONS (SDS)
EXL-209
< SERVICE DATA AND SPECIFICATIONS (SDS)
[XENON TYPE]
C
D
E
F
G
H
I
J
K
M
A
B
EXL
N
O
P
SERVICE DATA AND SPECIFICATIONS (SDS)
SERVICE DATA AND SPECIFICATIONS (SDS)
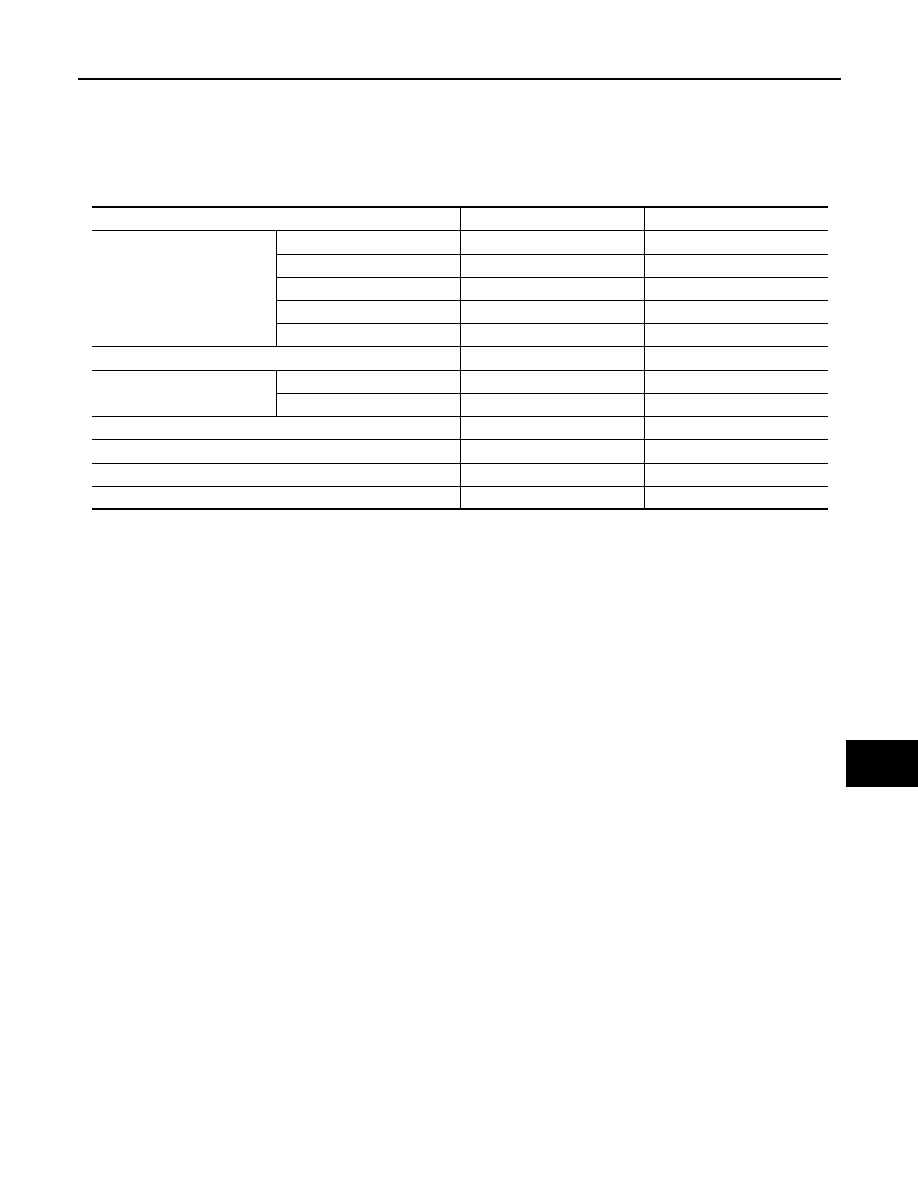
Bulb Specifications
INFOID:0000000003135424
Item
Type
Wattage (W)
Front combination lamp
Headlamp (HI)
H9 (Halogen)
65
Headlamp (LO)
D2S (XENON)
35
Front turn signal lamp
W21W
21
Parking lamp
W5W
5
Front side marker lamp
W5W
5
Front fog lamp
H8
35
Rear combination lamp
Stop lamp/Tail lamp
LED
—
Rear side marker lamp
LED
—
Rear turn signal lamp
PY21W (Amber)
21
Back-up lamp
W16W
16
License plate lamp
W5W
5
High-mounted stop lamp
LED
—
EXL-210
< BASIC INSPECTION >
[HALOGEN TYPE]
DIAGNOSIS AND REPAIR WORKFLOW
BASIC INSPECTION
DIAGNOSIS AND REPAIR WORKFLOW
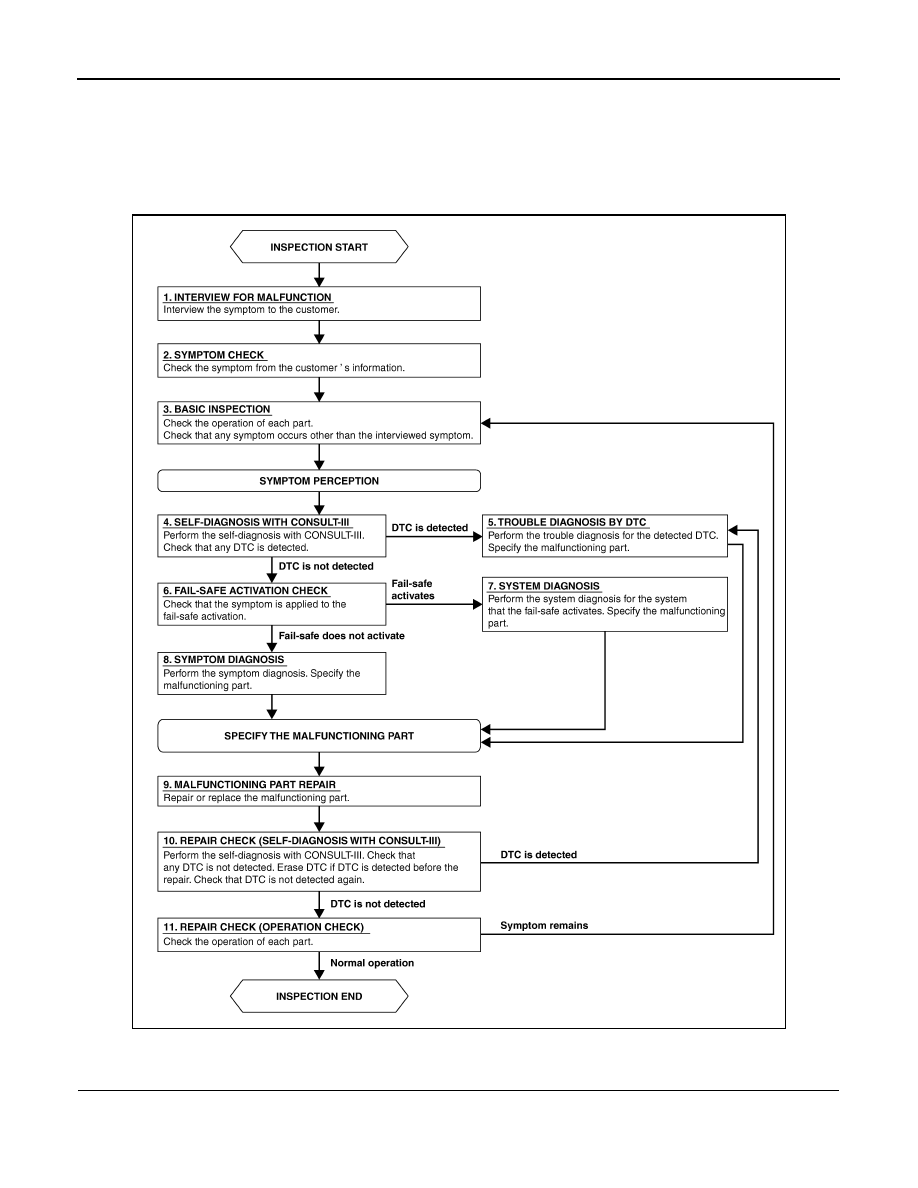
Work Flow
INFOID:0000000003533917
OVERALL SEQUENCE
DETAILED FLOW
1.
INTERVIEW FOR MALFUNCTION
Interview the symptom to the customer.
JPLIA0313GB
DIAGNOSIS AND REPAIR WORKFLOW
EXL-211
< BASIC INSPECTION >
[HALOGEN TYPE]
C
D
E
F
G
H
I
J
K
M
A
B
EXL
N
O
P
>> GO TO 2.
2.
SYMPTOM CHECK
Check the symptom from the customer's information.
>> GO TO 3.
3.
BASIC INSPECTION
Check the operation of each part. Check that any symptom occurs other than the interviewed symptom.
>> GO TO 4.
4.
SELF-DIAGNOSIS WITH CONSULT-III
Perform the self-diagnosis with CONSULT-III. Check that any DTC is detected.
Is any DTC detected?
YES
>> GO TO 5.
NO
>> GO TO 6.
5.
TROUBLE DIAGNOSIS BY DTC
Perform the trouble diagnosis for the detected DTC. Specify the malfunctioning part.
>> GO TO 9.
6.
FAIL-SAFE ACTIVATION CHECK
Check that the symptom is applied to the fail-safe activation.
Does the fail-safe activate?
YES
>> GO TO 7.
NO
>> GO TO 8.
7.
SYSTEM DIAGNOSIS
Perform the system diagnosis for the system that the fail-safe activates. Specify the malfunctioning part.
>> GO TO 9.
8.
SYMPTOM DIAGNOSIS
Perform the symptom diagnosis. Specify the malfunctioning part.
>> GO TO 9.
9.
MALFUNCTION PART REPAIR
Repair or replace the malfunctioning part.
>> GO TO 10.
10.
REPAIR CHECK (SELF-DIAGNOSIS WITH CONSULT-III)
Perform the self-diagnosis with CONSULT-III. Check that any DTC is not detected. Erase DTC if DTC is
detected before the repair. Check that DTC is not detected again.
Is any DTC detected?
YES
>> GO TO 5.
NO
>> GO TO 11.
11.
REPAIR CHECK (OPERATION CHECK)
Check the operation of each part.
Does it operate normally?
YES
>> INSPECTION END
NO
>> GO TO 3.
Нет комментариевНе стесняйтесь поделиться с нами вашим ценным мнением.
Текст