Infiniti EX35. Manual — part 1441

TM-152
< ON-VEHICLE MAINTENANCE >
[5AT: RE5R05A]
ROAD TEST
Cruise Test - Part 3
INFOID:0000000003130597
1.
MANUAL MODE FUNCTION
Shift the selector lever to manual mode from “D” position.
Does it switch to manual mode?
YES
>> GO TO 2.
NO
>> Record the malfunction, GO TO 2.
2.
CHECK SHIFT-DOWN
During manual mode driving, is downshift from M5
→
M4
→
M3
→
M2
→
M1 performed?
With CONSULT-III
Read the value of “GEAR” and “ENGINE SPEED” with “Data Monitor” mode for “TRANSMISSION”.
Is the inspection result normal?
YES
>> GO TO 3.
NO
>> Record the malfunction, GO TO 3.
3.
CHECK ENGINE BRAKE
Check engine brake.
Does engine braking effectively reduce speed in M1 position?
YES
>> Check malfunction phenomena to repair or replace malfunctioning part. Refer to
NO
>> 1.
Record the malfunction.
2.
Check malfunction phenomena to repair or replace malfunctioning part. Refer to
.
A/T POSITION
TM-153
< ON-VEHICLE MAINTENANCE >
[5AT: RE5R05A]
C
E
F
G
H
I
J
K
L
M
A
B
TM
N
O
P
A/T POSITION
2WD
2WD : Inspection and Adjustment
INFOID:0000000003130598
INSPECTION
1.
Place selector lever in “P” position, and turn ignition switch ON (engine stop).
2.
Check that selector lever can be shifted to other than “P” position when brake pedal is depressed. Also
check that selector lever can be shifted from “P” position only when brake pedal is depressed.
3.
Shift the selector lever and check for excessive effort, sticking, noise or rattle.
4.
Confirm that the selector lever stops at each position by feeling the engagement when it is moved through
all the positions. Check whether or not the actual position the selector lever matches the position shown
by the shift position indicator and the A/T body.
5.
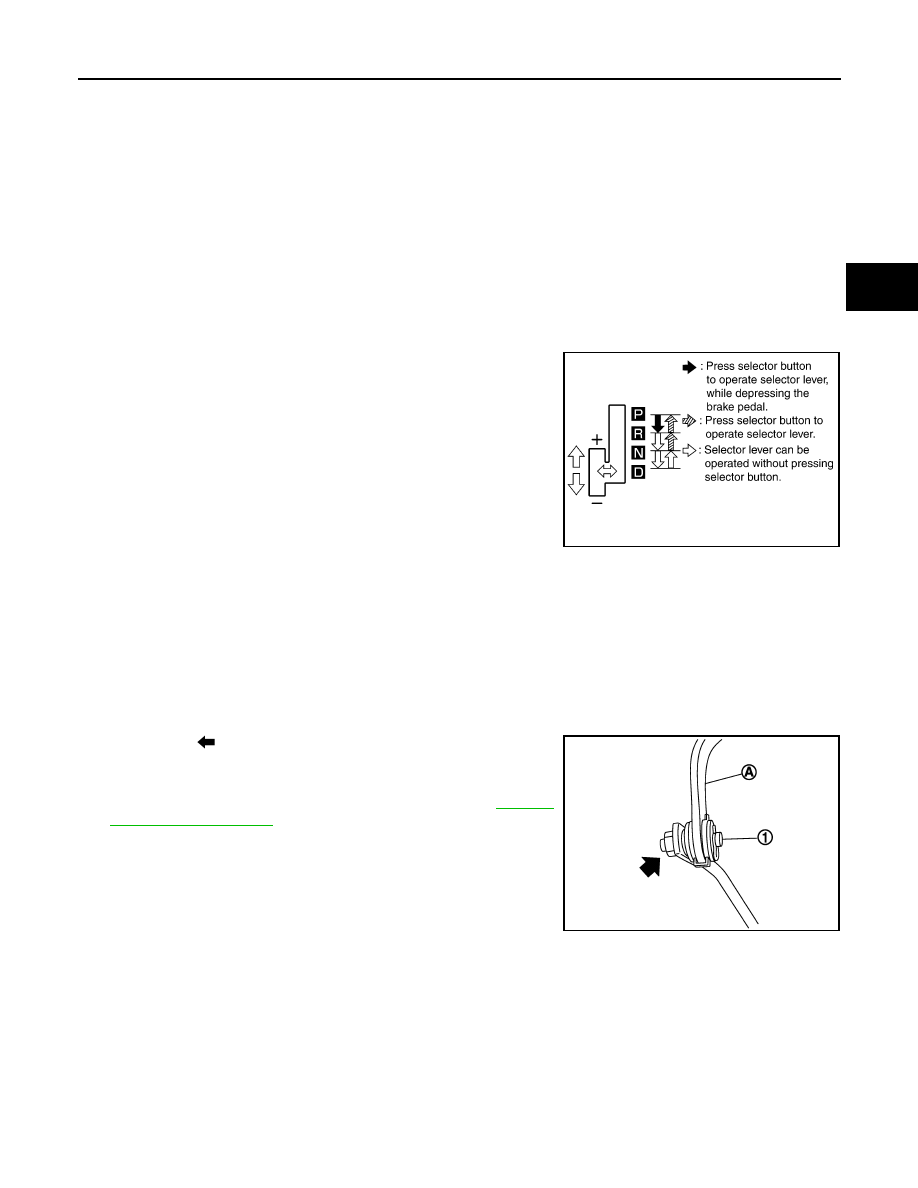
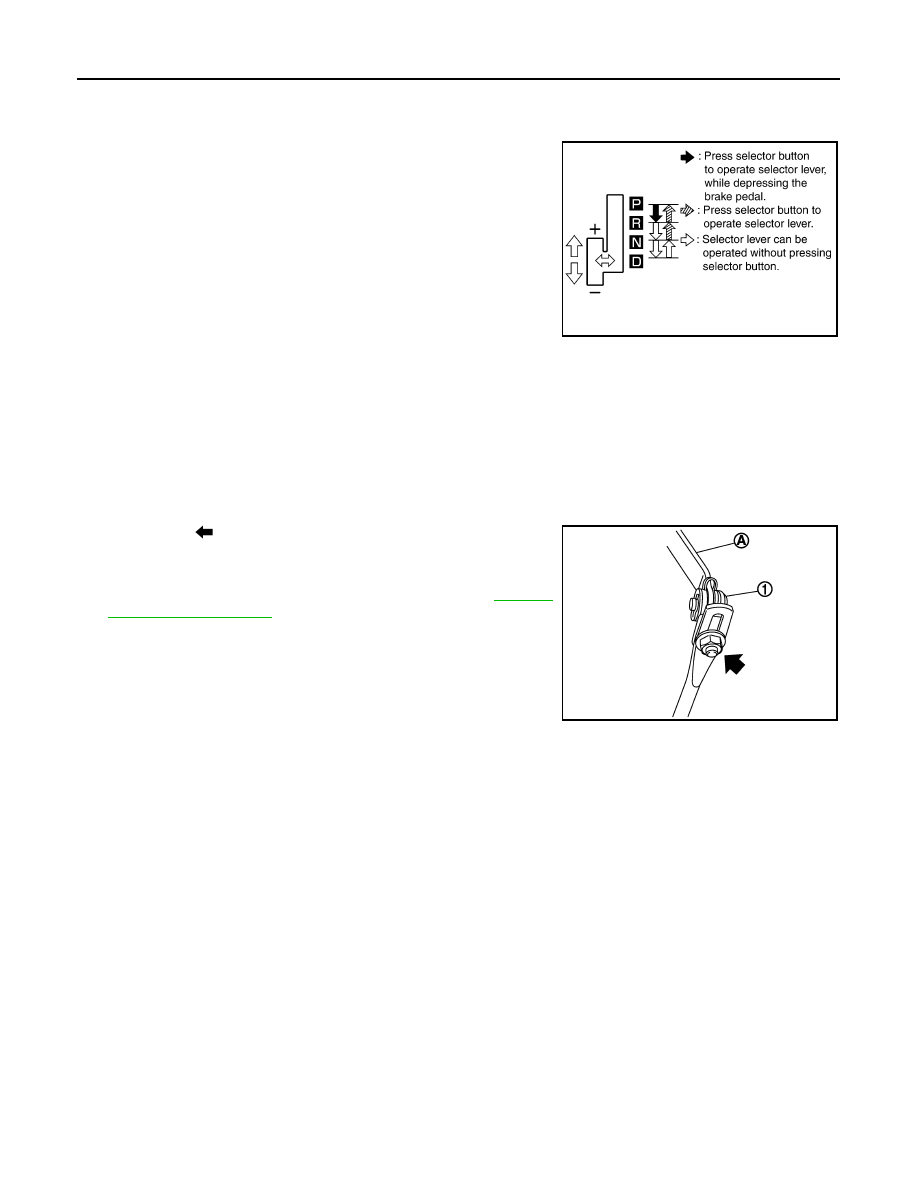
The method of operating the lever to individual positions cor-
rectly is shown in the figure.
6.
When selector button is pressed in “P”, “R”, or “N” position with-
out applying forward/backward force to selector lever, check but-
ton operation for sticking.
7.
Confirm that the back-up lamps illuminate only when lever is
placed in the “R” position. Confirm that the back-up lamps does
not illuminate when selector lever is pushed against “R” position
in the “P” or “N” position.
8.
Confirm that the engine can only be started with the selector
lever in the “P” and “N” positions. (With selector lever in the “P”
position, engine can be started even when selector lever is
moved forward and backward.)
9.
Make sure that A/T is locked completely in “P” position.
10. DS mode must be indicated on the combination meter when the selector lever is shifted to the manual
shift gate. When the selector lever is shifted to the “+” or “
−
” side in the DS mode, manual mode should be
indicated on the combination meter.
In addition, a set shift position must be changed when the selector lever is shifted to the “+” or “
−
” side in
the manual mode. (Only while driving.)
ADJUSTMENT
1.
Loosen nut (
) of pivot pin (1).
2.
Place PNP switch and selector lever in “P” position.
3.
While pressing lower lever (A) toward rear of vehicle (in “P” posi-
tion direction), tighten nut to specified torque. Refer to
AWD
AWD : Inspection and Adjustment
INFOID:0000000003130599
INSPECTION
1.
Place selector lever in “P” position, and turn ignition switch ON (engine stop).
2.
Check that selector lever can be shifted to other than “P” position when brake pedal is depressed. Also
check that selector lever can be shifted from “P” position only when brake pedal is depressed.
3.
Shift the selector lever and check for excessive effort, sticking, noise or rattle.
SCIA6760E
JSDIA0134ZZ
TM-154
< ON-VEHICLE MAINTENANCE >
[5AT: RE5R05A]
A/T POSITION
4.
Confirm that the selector lever stops at each position by feeling the engagement when it is moved through
all the positions. Check whether or not the actual position the selector lever matches the position shown
by the shift position indicator and the A/T body.
5.
The method of operating the lever to individual positions cor-
rectly is shown in the figure.
6.
When selector button is pressed in “P”, “R”, or “N” position with-
out applying forward/backward force to selector lever, check but-
ton operation for sticking.
7.
Confirm that the back-up lamps illuminate only when lever is
placed in the “R” position. Confirm that the back-up lamps do not
illuminate when selector lever is pushed against “R” position in
the “P” or “N” position.
8.
Confirm that the engine can only be started with the selector
lever in the “P” and “N” positions. (With selector lever in the “P”
position, engine can be started even when selector lever is
moved forward and backward.)
9.
Make sure that A/T is locked completely in “P” position.
10. DS mode must be indicated on the combination meter when the selector lever is shifted to the manual
shift gate. When the selector lever is shifted to the “+” or “
−
” side in the DS mode, manual mode should be
indicated on the combination meter.
In addition, a set shift position must be changed when the selector lever is shifted to the “+” or “
−
” side in
the manual mode. (Only while driving.)
ADJUSTMENT
1.
Loosen nut (
) of pivot pin (1).
2.
Place PNP switch and selector lever in “P” position.
3.
While pressing lower lever (A) toward rear of vehicle (in “P” posi-
tion direction), tighten nut to specified torque. Refer to
SCIA6760E
JPDIA0058ZZ
CONTROL DEVICE
TM-155
< ON-VEHICLE REPAIR >
[5AT: RE5R05A]
C
E
F
G
H
I
J
K
L
M
A
B
TM
N
O
P
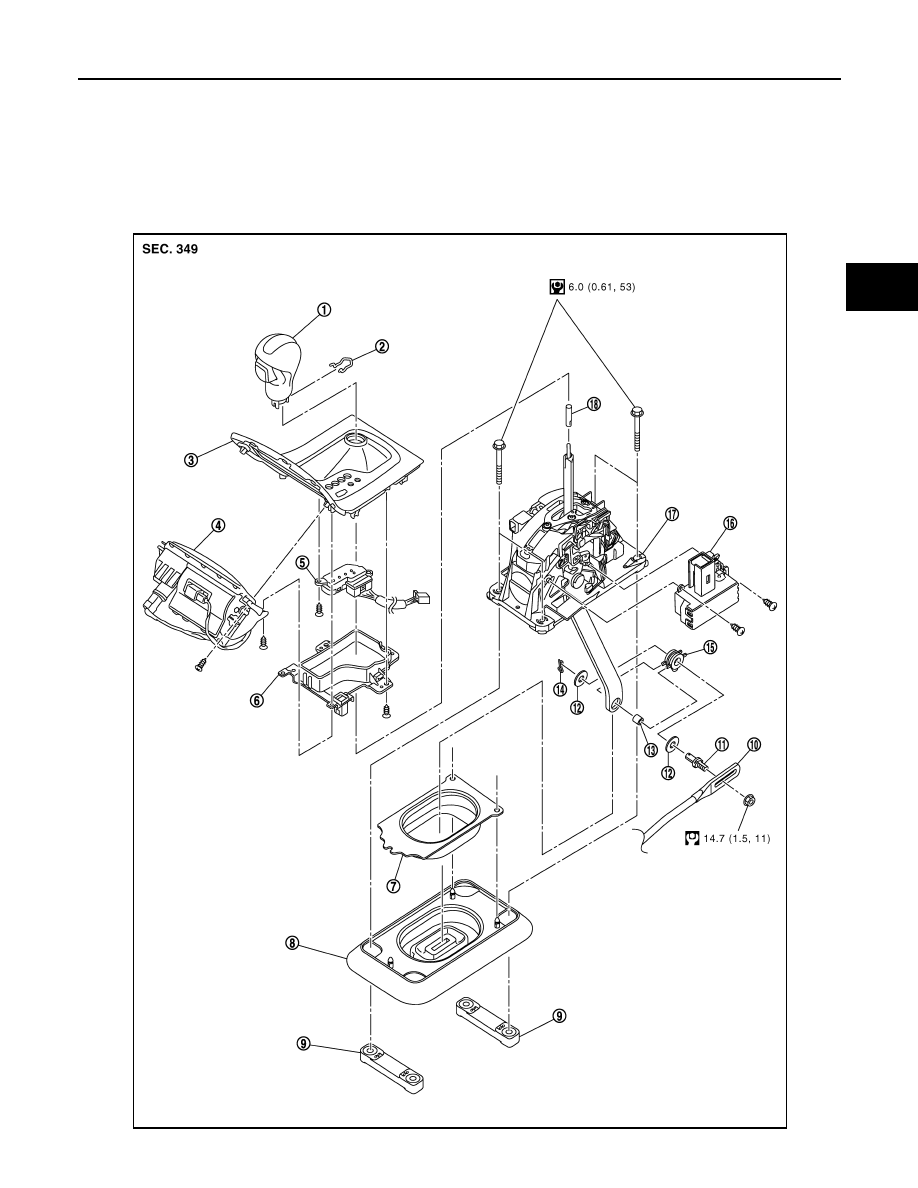
ON-VEHICLE REPAIR
CONTROL DEVICE
2WD
2WD : Exploded View
INFOID:0000000003130600
JPDIA0631GB
Нет комментариевНе стесняйтесь поделиться с нами вашим ценным мнением.
Текст