Infiniti EX35. Manual — part 881
GW-10
< ON-VEHICLE REPAIR >
WINDSHIELD GLASS
ON-VEHICLE REPAIR
WINDSHIELD GLASS
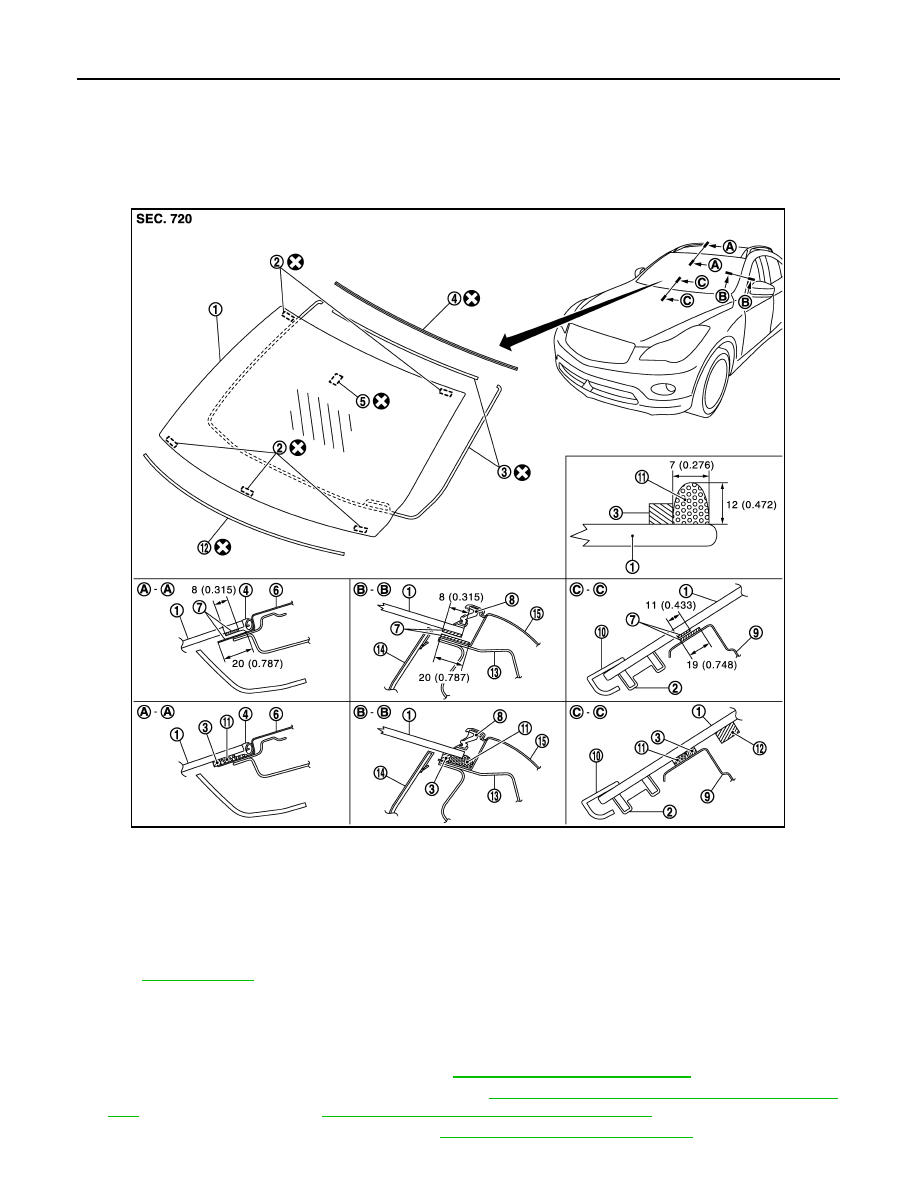
Exploded View
INFOID:0000000003566721
Removal and Installation
INFOID:0000000003566722
REMOVAL
1.
Remove the front pillar garnish (LH/RH). Refer to
INT-20, "Removal and Installation"
.
2.
Remove partially the headlining (front edge). Refer to
INT-27, "NORMAL ROOF : Removal and Installa-
INT-30, "SUNROOF : Removal and Installation"
for sunroof.
3.
Remove the front wiper arms (LH/RH). Refer to
WW-106, "Removal and Installation"
1.
Windshield glass
2.
Clip
3.
Dam sealant rubber (upper, lower)
4.
Windshield molding
5.
Mirror base
6.
Roof panel
7.
Primer
8.
Roof side molding
9.
Dash upper cross member
10.
Cowl top cover
11.
Adhesive
12. Insulator
13.
Front pillar outer upper
14. Front pillar garnish
15. Body side outer
Unit:
mm (in)
Refer to
for symbols in the figure.
JMKIA1941GB
WINDSHIELD GLASS
GW-11
< ON-VEHICLE REPAIR >
C
D
E
F
G
H
I
J
L
M
A
B
GW
N
O
P
4.
Remove the cowl top cover. Refer to
EXT-23, "Removal and Installation"
.
5.
Remove the roof side molding. Refer to
EXT-37, "Removal and Installation"
.
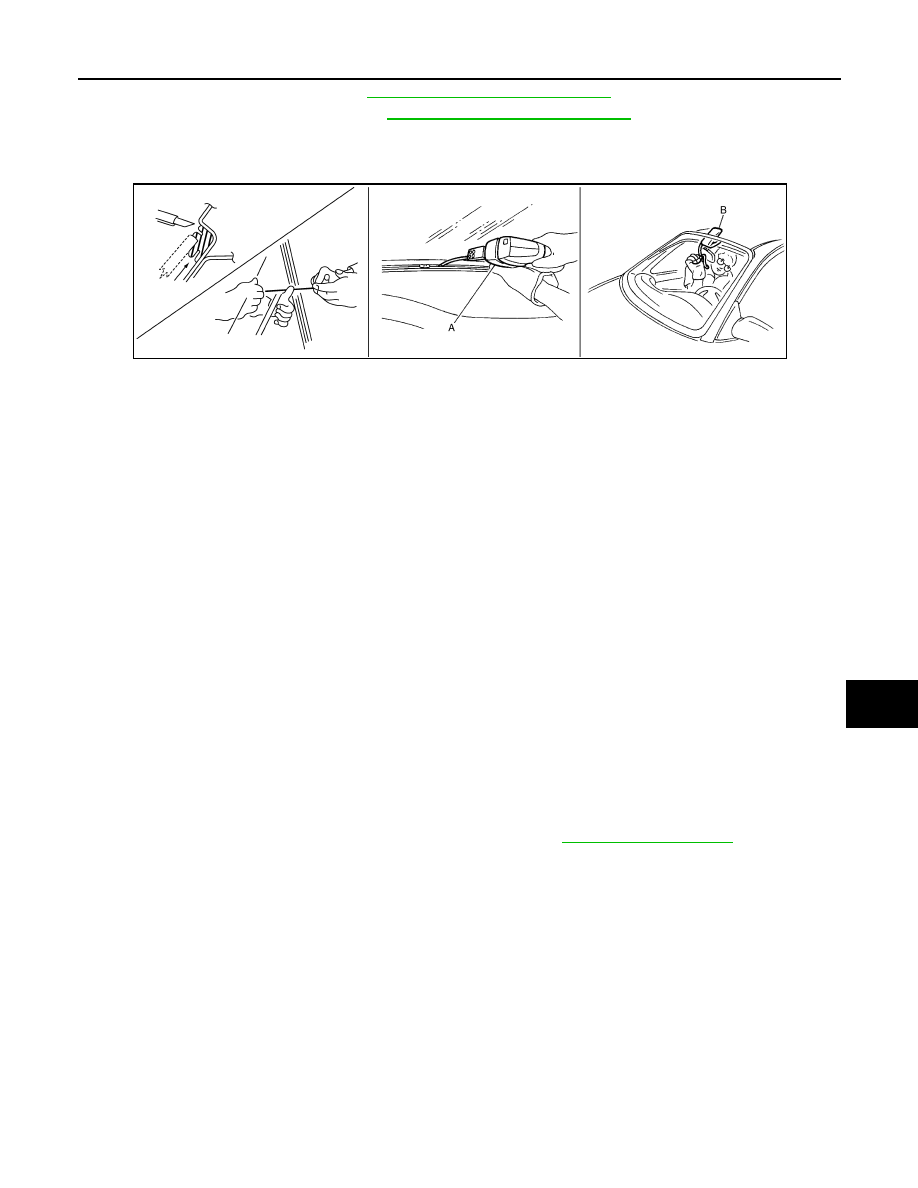
6.
Apply protective tape around the windshield glass to protect the painted surface from damage.
7.
Remove glass using piano wire or power cutting tool (A) and an inflatable pump bag (B) after removing
moldings.
NOTE:
Mark the body and the glass with matching marks if the windshield glass is reused.
WARNING:
Always wear safety glasses and heavy gloves to prevent injury.
CAUTION:
• Never use a cutting knife or power cutting tool when the windshield glass is reused.
• Be careful not to scratch the glass when removing.
• Never set or stand the glass on its edge. Small chips may develop into cracks.
INSTALLATION
• The dam sealant rubber and insulator should be installed in position.
• Use a genuine Nissan Urethane Adhesive Kit (if available) or an equivalent and follow the instructions fur-
nished with it.
• Open a door window while the urethane adhesive is curing. This prevents the glass from being forced out by
passenger room air pressure when all door windows are closed.
• The molding must be installed securely so that it is in position and leaves no clearance.
• Inform the customer that the vehicle should remain stationary until the urethane adhesive has completely
cured (approximately 24 hours). Curing time varies with temperature and humidity.
WARNING:
• Keep heat and open flames away as primers and adhesive are flammable.
• The materials contained in the kit are harmful if swallowed, and may irritate skin and eyes. Never let
them in contact with the skin and eyes.
• Use in an open, well ventilated location. Never breathe the vapors. They may be harmful if inhaled.
Move immediately to an area with fresh air if affected by vapor inhalation.
• Driving the vehicle before the urethane adhesive has completely cured may affect the performance
of the windshield in case of an accident.
CAUTION:
• Perform adjustment of front wiper arms stop location. Refer to
.
• Never use an adhesive which is past its usable term. Shelf life of this product is limited to six months
after the date of manufacture. Carefully adhere to the expiration or manufacture date printed on the
box.
• Keep primers and adhesive in a cool, dry place. Ideally, they should be stored in a refrigerator.
• Never leave primers or adhesive cartridge unattended with their caps open or off.
• The vehicle should not be driven for at least 24 hours or until the urethane adhesive has completely
cured. Curing time varies depending on temperature and humidity. The curing time increases under
lower temperature and lower humidity.
Inspection
INFOID:0000000003566723
REPAIRING WATER LEAKAGE FOR WINDSHIELD
Leakage can be repaired without removing the glass.
Determine the extent of leakage if water is leaking between the urethane adhesive material and body or glass.
This can be done by applying water to the windshield area while pushing glass outward.
Apply primer (if necessary) and then urethane adhesive to the leakage point to stop the leakage.
PIIB5779E
GW-12
< ON-VEHICLE REPAIR >
SIDE WINDOW GLASS
SIDE WINDOW GLASS
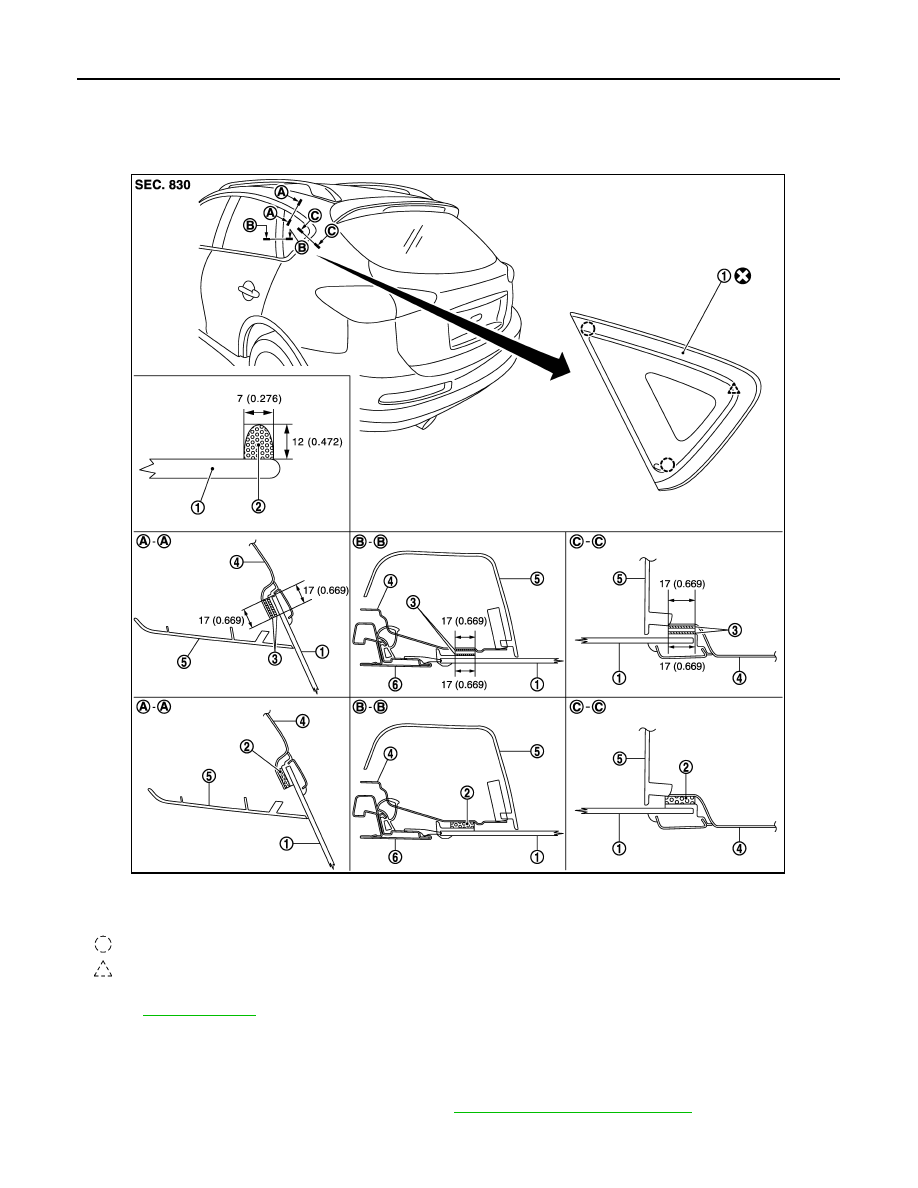
Exploded View
INFOID:0000000003566724
Removal and Installation
INFOID:0000000003566725
REMOVAL
1.
Remove the luggage side upper finisher. Refer to
INT-35, "Removal and Installation"
.
2.
Apply protective tape around the side window to protect the painted surface from damage.
1.
Side window glass
2.
Adhesive
3.
Primer
4.
Body side outer panel
5.
Luggage side upper finisher
6.
Door sash
: Clip
: Pawl
Unit:
mm (in)
Refer to
for symbols in the figure.
JMKIA1942GB
SIDE WINDOW GLASS
GW-13
< ON-VEHICLE REPAIR >
C
D
E
F
G
H
I
J
L
M
A
B
GW
N
O
P
3.
Remove the side window glass using piano wire.
WARNING:
Always wear safety glasses and heavy gloves to prevent injury.
CAUTION:
• Be careful not to scratch the glass when removing.
• Never set or stand the glass on its edge. Small chips may develop into cracks.
INSTALLATION
• Use a genuine Nissan Urethane Adhesive Kit (if available) or an equivalent and follow the instructions fur-
nished with it.
• Open a door window while the urethane adhesive is curing. This prevents the glass from being forced out by
passenger room air pressure when all door windows are closed.
• Inform the customer that the vehicle should remain stationary until the urethane adhesive has completely
cured (approximately 24 hours). Curing time varies with temperature and humidity.
WARNING:
• Keep heat and open flames away as primers and adhesive are flammable.
• The materials contained in the kit are harmful if swallowed, and may irritate skin and eyes. Never let
them in contact with the skin and eyes.
• Use in an open, well ventilated location. Never breathe the vapors. They may be harmful if inhaled.
Move immediately to an area with fresh air if affected by vapor inhalation.
• Driving the vehicle before the urethane adhesive has completely cured may affect the performance
of the side window in case of an accident.
CAUTION:
• Never use an adhesive which is past its usable term. Shelf life of this product is limited to six months
after the date of manufacture. Carefully adhere to the expiration or manufacture date printed on the
box.
• Keep primers and adhesive in a cool, dry place. Ideally, they should be stored in a refrigerator.
• Never leave primers or adhesive cartridge unattended with their caps open or off.
• The vehicle should not be driven for at least 24 hours or until the urethane adhesive has completely
cured. Curing time varies depending on temperature and humidity. The curing time will increase
under lower temperature and lower humidity.
Inspection
INFOID:0000000003566726
Repairing Water Leakage for side window glass
Leakage can be repaired without removing glass.
Determine the extent of leakage if water is leaking between the urethane adhesive material and body or glass.
This can be done by applying water to the side window glass area while pushing glass outward.
Apply primer (if necessary) and then urethane adhesive to the leakage point to stop the leakage.
Нет комментариевНе стесняйтесь поделиться с нами вашим ценным мнением.
Текст