Chrysler Le Baron, Dodge Dynasty, Plymouth Acclaim. Manual — part 118
Use MOPAR
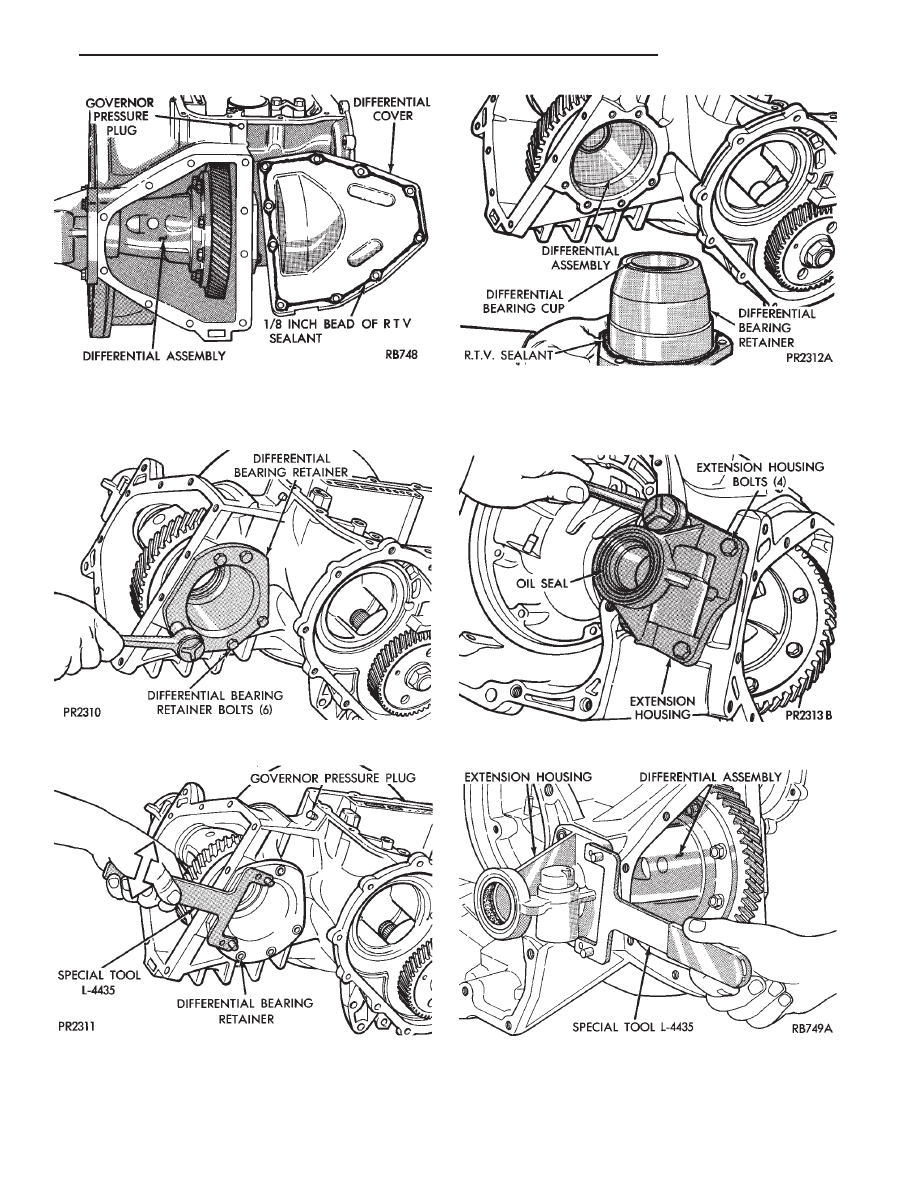
t Adhesive Sealant when install-
ing differential cover.
Use MOPAR
t Adhesive Sealant when install-
ing differential bearing retainer.
Fig. 4 Remove or Install Differential Cover
Fig. 5 Differential Bearing Retainer Bolts
Fig. 6 Remove or Install Bearing Retainer
Fig. 7 Differential Bearing Retainer—Typical
Fig. 8 Extension Bolts
Fig. 9 Remove or Install Extension Housing
Ä
TRANSAXLE
21 - 77

WARNING: HOLD ONTO DIFFERENTIAL ASSEMBLY
TO PREVENT IT FROM ROLLING OUT OF HOUSING.
Use MOPAR
t Adhesive Sealant when installing ex-
tension housing.
Fig. 10 Differential and Extension
Fig. 11 Remove Differential Bearing Cone
Fig. 12 Install Differential Bearing Cone
Fig. 13 Remove Differential Bearing Cone
Fig. 14 Install Differential Bearing Cone
Fig. 15 Remove or Install Ring Gear Bolts and Ring
Gear
21 - 78
TRANSAXLE
Ä

CAUTION: Always install new ring gear bolts. Bolts
must be properly torqued.
CAUTION: Side gear end play must be within .001
to .013 inch.
Four select thrust washers are available: .032,
.037, .042, and .047 inch.
Fig. 16 Remove Pinion Shaft Roll Pin
Fig. 17 Remove or Install Pinion Shaft
Fig. 18 Remove or Install Pinion Gears, Side Gears,
and Tabbed Thrust Washers, by Rotating Pinion
Gears to Opening in Differential Case
Fig. 19 Differential Gears
Fig. 20 Checking Side Gear End Play
Fig. 21 Checking Side Gear End Play
Ä
TRANSAXLE
21 - 79

CAUTION: Side gear end play must be within .001 to
.013 inch.
Four select thrust washers are available: .032,
.037, .042, and .047 inch.
DETERMINING SHIM THICKNESS
Shim thickness need only be determined if any of
the following parts are replaced:
• Transaxle case
• Differential carrier
• Differential bearing retainer
• Extension housing
• Differential bearing cups and cones
Refer to Bearing Adjustment Procedure in rear
of this section to determine proper shim thickness for
correct bearing preload and proper bearing turning
torque.
When rebuilding, reverse the above procedure.
Fig. 25 Differential Bearing Retainer
Fig. 26 Install Bearing Cup
Fig. 22 Remove Oil Seal
Fig. 23 Install New Oil Seal
Fig. 24 Remove Bearing Cup
21 - 80
TRANSAXLE
Ä
Нет комментариевНе стесняйтесь поделиться с нами вашим ценным мнением.
Текст