Chrysler Le Baron, Dodge Dynasty, Plymouth Acclaim. Manual — part 134
When rebuilding, reverse the above procedure.
Remove old sealant before applying new seal-
ant. Use MOPAR
t Adhesive Sealant on retainer
to seal retainer to case.
BEARING ADJUSTMENT PROCEDURE
GENERAL RULES ON SERVICING BEARINGS
(1) Take extreme care when removing and in stalling
bearing cups and cones. Use only an arbor press for
installation, as a hammer may not properly align the
bearing cup or cone. Burrs or nicks on the bearing seat
will give a false end play reading, while gauging for
proper shims. Improperly seated bearing cup and cones
are subject to low-mileage failure.
(2) Bearing cups and cones should be replaced if they
show signs of pitting or heat distress.
If distress is seen on either the cup or bearing rollers,
both cup and cone must be replaced.
Bearing end play and drag torque specifica-
tions must be maintained to avoid premature
bearing failures.
Used (original) bearing may lose up to 50
of the original drag torque after break-in.
All bearing adjustments must be made with no
other component interference or gear inter-
mesh, except the transfer gear bearing.
Oil all bearings before checking turning torque.
OUTPUT GEAR BEARING
With output gear removed:
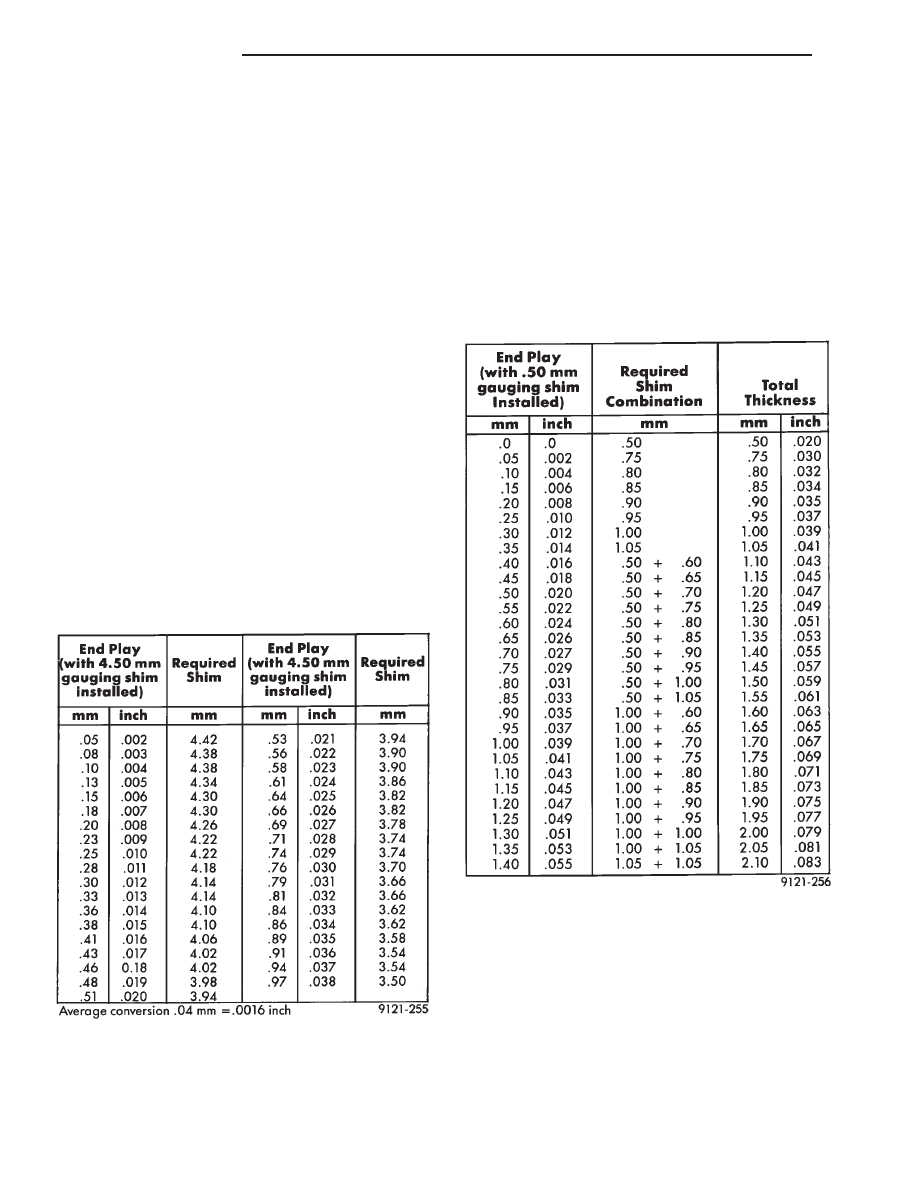
(1) Install a 4.50 mm (0.177 inch) gauging shim on
the rear carrier assembly hub, using grease to hold the
shim in place.
(2) Install output gear and bearing assembly. Torque
to 271 N
Im (200 ft. lbs.).
(3) To measure bearing end play:
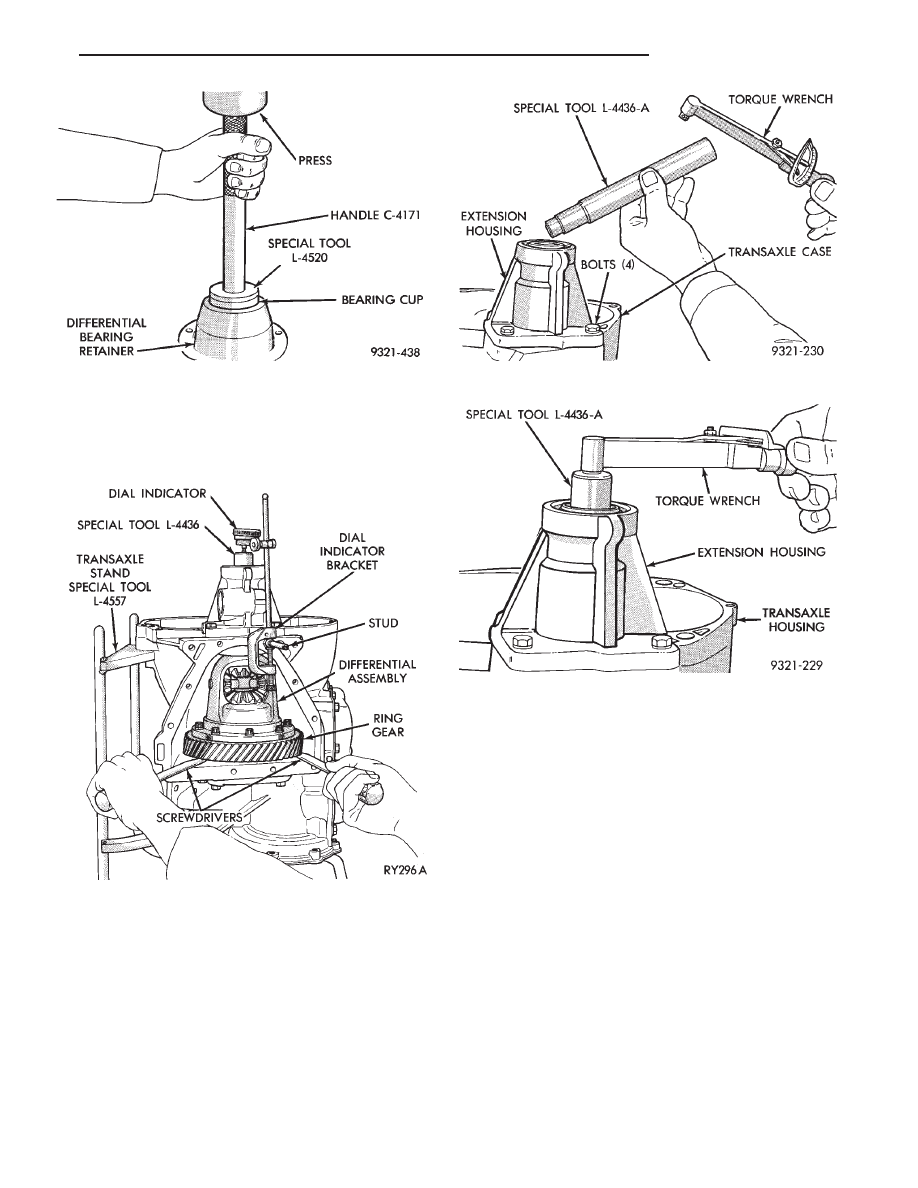
Fig. 26 Install Bearing Cup
Fig. 27 Checking Differential End Play
Fig. 28 Tool L-4436 and Torque Wrench
Fig. 29 Checking Differential Bearings Turning
Torque
Ä
TRANSAXLE
21 - 141
(a) Attach Tool L-4432 to the gear.
(b) Push and pull the gear while rotating back
and forth to insure seating of the bearing rollers.
(c) Using a dial indicator, mounted to the tran-
saxle case, measure output gear end play.
(4) Once bearing end play has been determined, re-
fer to the output gear bearing shim chart for the re-
quired shim to obtain proper bearing setting.
(5) Use Tool 6259 to remove the retaining bolt and
washer. To remove the output gear, use Tool L-4407.
(6) Remove the gauging shim and install the
proper shim. Use grease to hold the shim in place.
Install the output gear and bearing assembly.
CAUTION: Always use new retaining bolt, old re-
taining bolt may not be reused.
(7) Install the new retaining bolt and washer.
Tighten to 271 N
Im (200 ft. lbs.).
(8) Using an inch-pound torque wrench, check the
turning torque. The torque should be between 3
and 8 inch-pounds.
If the turning torque is too high, install a .04 mm
(.0016 inch) thicker shim. If the turning torque is too
low, install a .04 mm (.0016 inch) thinner shim. Re-
peat until the proper turning torque is 3 to 8 inch
pounds.
DIFFERENTIAL BEARING
(1) Remove the bearing cup from the differential
bearing retainer using Tool L-4518, and remove the
existing shim from under the cup.
(2) Install a .50 mm (.020 inch) gauging shim and
reinstall the bearing cup into the retainer. Use an
arbor press to install the cup.
Oil Baffle is not required when making shim
selection.
(3) Install the bearing retainer into the case and
torque bolts to 28 N
Im (250 in. lbs.).
(4) Position the transaxle assembly vertically on the
support stand and install Tool C-4995 into side gear.
(5) Rotate the differential at least one full revolution
to ensure the tapered roller bearings are fully seated.
(6) Attach a dial indicator to the case and zero the
dial indicator. Place the indicator tip on the end of Tool
L-4436.
(7) Place a large screwdriver to each side of the ring
gear and lift. Check the dial indicator for the amount of
end play.
CAUTION: Do not damage the transaxle case and/or
differential cover sealing surface.
OUTPUT GEAR BEARING SHIM CHART
DIFFERENTIAL BEARING SHIM CHART
21 - 142
TRANSAXLE
Ä
(8) When the end play has been determined, refer to
the Differential Bearing Shim Chart for the correct
shim combination to obtain the proper bearing setting.
(9) Remove the differential bearing retainer. Re-
move the bearing cup and the .50 mm (.020 inch)
gauging shim.
(10) Install the proper shim combination under the
bearing cup. Make sure the oil baffle is installed
properly in the bearing retainer, below the bearing
shim and cup.
(11) Install the differential bearing retainer. Seal
the retainer to the housing with MOPAR
t Adhesive
Sealant and torque bolts to 28 N
Im (250 in. lbs.).
(12) Using Tool C-4995 and an inch-pound torque
wrench, check the turning torque of the differential.
The turning torque should be between 5 and 18
inch-pounds.
If the turning torque is too high, install a .05
mm (.002 inch) thinner shim. If the turning
torque is too low, install a .05 mm (.002 inch)
thicker shim. Repeat until 5 to 18 inch-pounds
turning torque is obtained.
TRANSFER SHAFT BEARING
(1) Use Tool 6259 to remove the retaining nut and
washer. Remove the transfer shaft gear using Tool
L-4407.
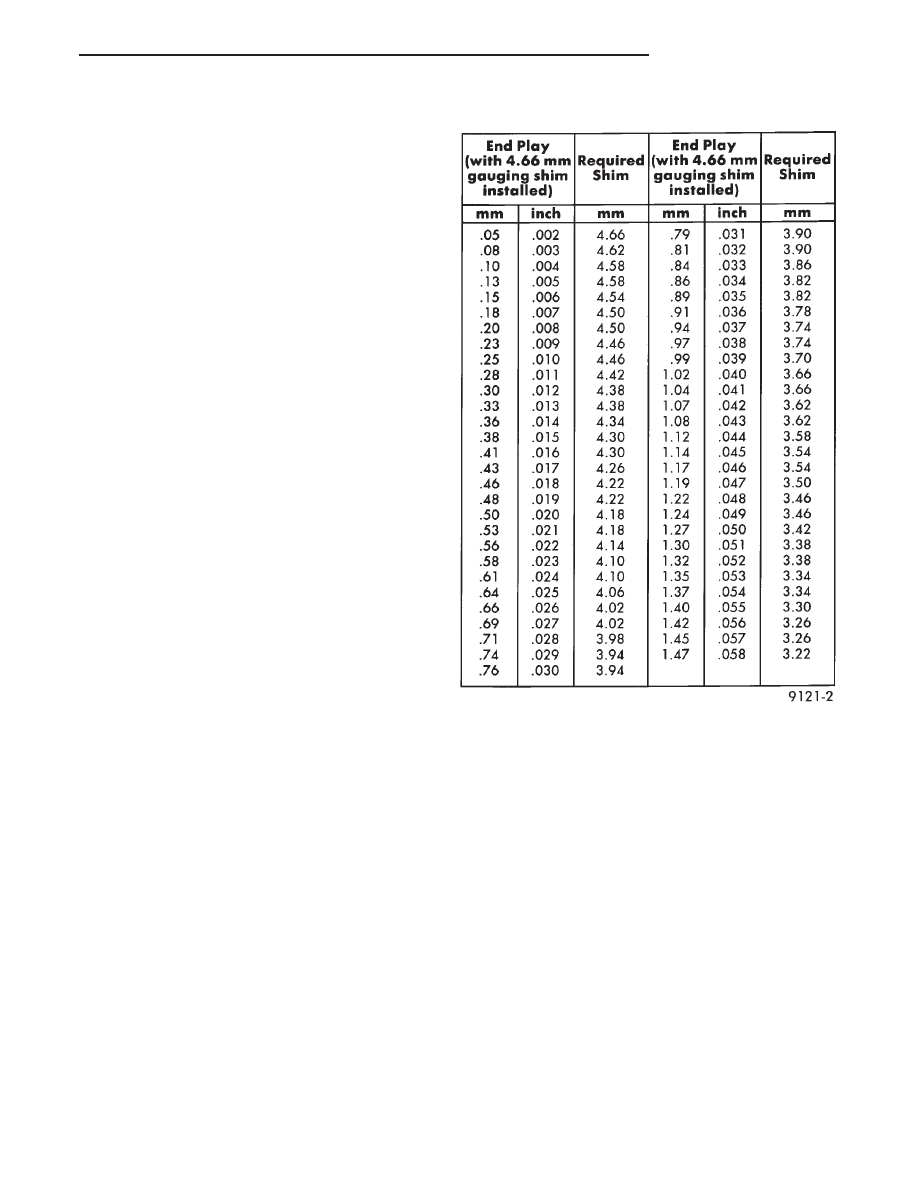
(2) Install a 4.66 mm (.184 inch) gauging shim on the
transfer shaft.
(3) Install transfer shaft gear and bearing assembly
and torque the nut to 271 N
Im (200 ft. lbs.).
(4) To measure bearing end play:
(a) Attach Tool L-4432 to the transfer gear.
(b) Mount a steel ball with grease into the end of
the transfer shaft.
(c) Push and pull the gear while rotating back and
forth to insure seating of the bearing rollers.
(d) Using a dial indicator, measure transfer shaft
end play.
(5) Refer to the Transfer Bearing Shim Chart for the
required shim combination to obtain the proper bear-
ing setting.
(6) Use Tool 6259 to remove the retaining nut and
washer. Remove the transfer shaft gear using Tool
L-4407.
(7) Remove the gauging shim and install the correct
shim. Install the transfer gear and bearing assembly.
CAUTION: Original retaining nut may not be re-
used. Always use a new retaining nut when reassem-
bling.
(8) Install the new retaining nut and washer and
torque to 271 N
Im (200 ft. lbs.). Measure transfer
shaft end play, end play should be .05 to .10 mm
(.002 to .004 inch).
(9) Measure bearing end play as outlined in Step (4).
End play should be between .05 mm and .10 mm (.002
to .004 inch).
If end play is too high, install a .04 mm (.0016
inch) thinner shim. If end play is too low, install
a .04 mm (.0016 inch) thicker shim combination.
Repeat until .05 to .10 mm (.002 to .004 inch) end
play is obtained.
TRANSFER BEARING SHIM CHART
Ä
TRANSAXLE
21 - 143
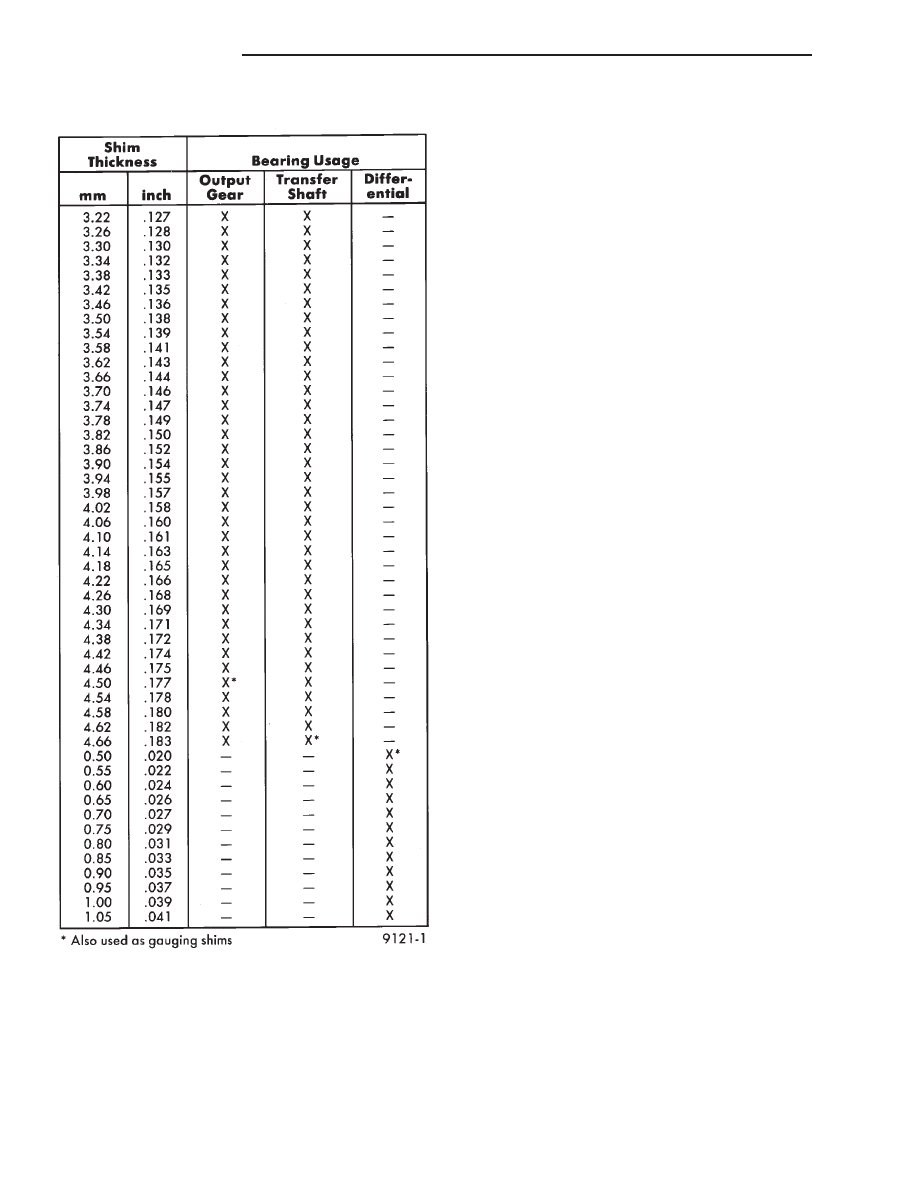
BEARING SHIM CHART
21 - 144
TRANSAXLE
Ä
Нет комментариевНе стесняйтесь поделиться с нами вашим ценным мнением.
Текст