SsangYong Actyon Sports II. Manual — part 173

01-10
(2) Step 2
The sensors and air mix door are checked for proper operation in this step. When the step 2 is started,
the number "2", which indicates that the system is in the step 2, apprears on the display and the check
for sensors is performed. Once the check is done (for 10 to 20 sec.), the one digit number between 0
and 8 is added behind "2". "20" means there is no fault code. For the meaning of the rest of the
numbers, refer to the description below.
1. Turn temperature dial lightly toward right to enter step 2
10 to 20
sec.
System starts sensor
check after "2" is displayed
2.
Fault code for sensor
appears and blinks
3.
Fault code no. 1
(ambient temperature
sensor) blinks twice
Fault code no. 5 (sun
sensor) blinks twice
(fault codes appears
sequentially)
If "-" is displayed before "2", it means that
the sensor for that flashing fault code has
a short circuit.
Ambient temperature
sensor short circuited
Refer to the following table for the meaning of the fault code.
01-11
6810-01
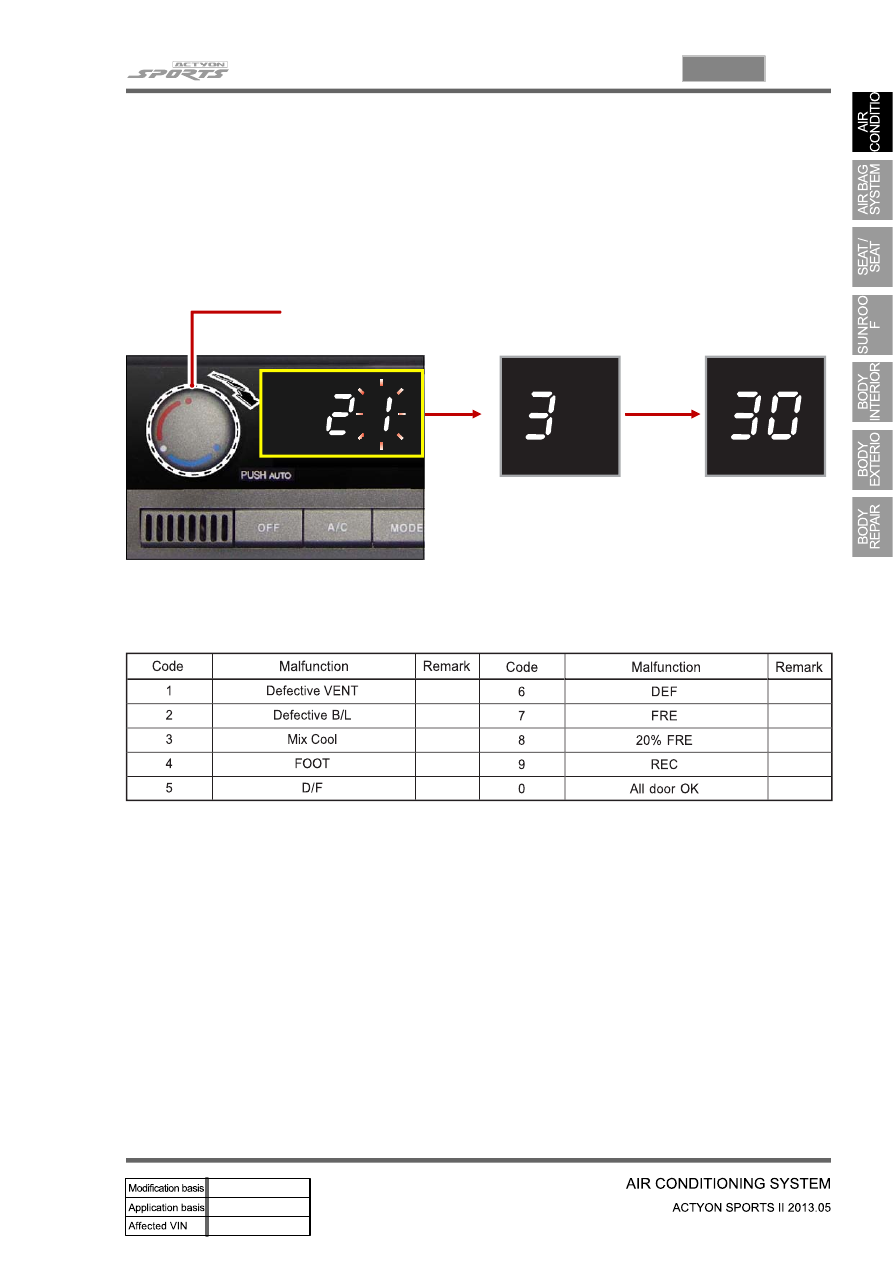
(3) Step 3
In this step, you can check the position and condition of the air source door and mode door. To start step
3, turn the temperature control dial lightly toward the right and confirm that the number 3 appears on the
display. It takes several tens of seconds to finish the check. If there is no fault code, "30" is displayed.
And if there is a malfunction, the corresponding fault code is added as described in the step 2.
Turn temperature dial lightly toward
right to enter step 3
1.
System starts sensor
check after "3" is
displayed
2.
Fault code for
sensor appears and
blinks (30 is
displayed when
there is no fault)
3.
Refer to the following table for the meaning of the fault code.

01-12
In this step, the door position of each actuator, fan speed and operation of the compressor are checked.
To enter this step, turn the temperature dial to the right in the step 3. The number, "41", appears on the
display as soon as the step 4 is started. Press the defroster switch to change the diagnosis mode.
(4) Step 4
Press
Press
Press
Press
Press
Press
Turn temperature dial lightly
toward right to enter step 4
1.
Below table describes the detailed diagnosis items performed for each number. Check the
corresponding component for proper operation according to the table. The voltage values listed in the
table are the output voltage to operate the blower motor. The higher the voltage, the faster the fan speed
is.
01-13
6810-01
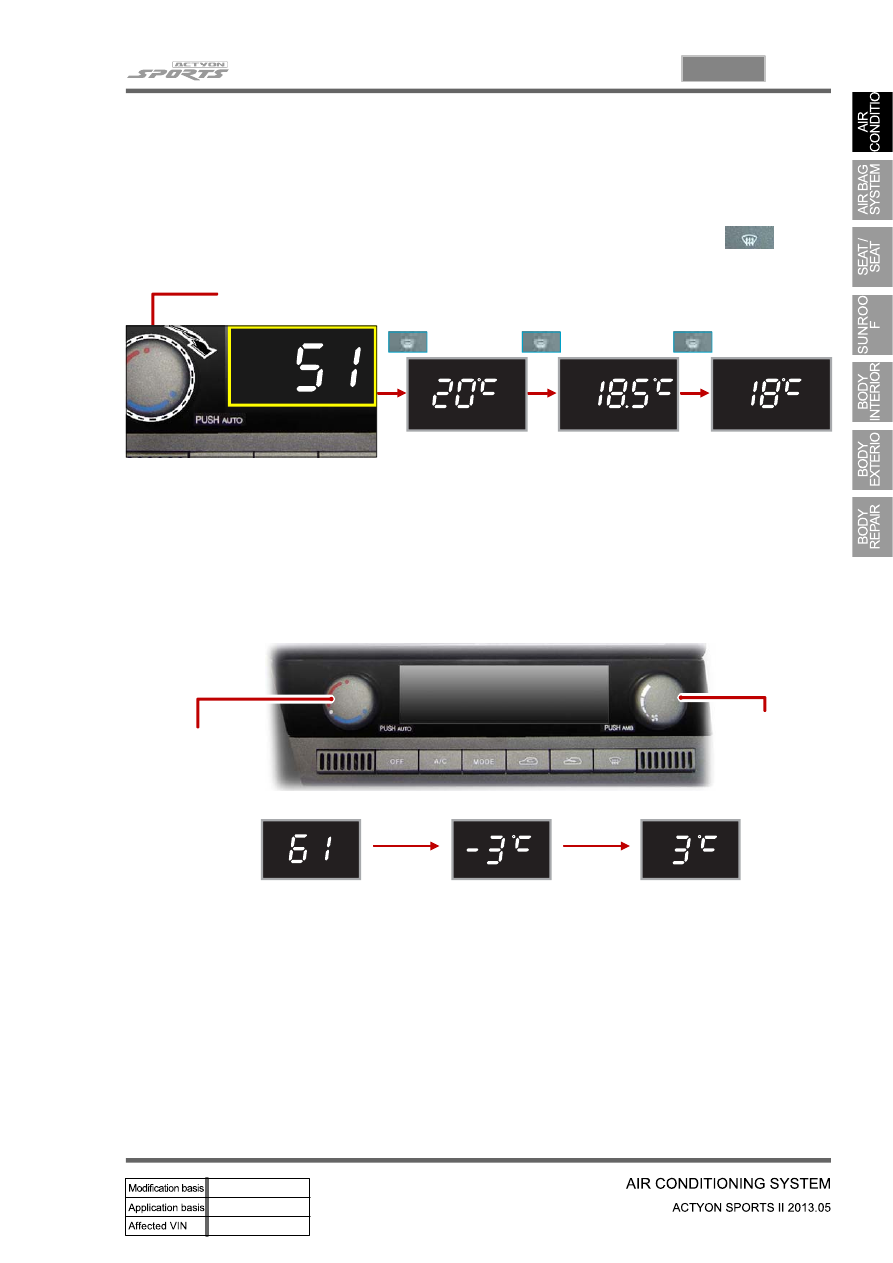
(5) Step 5
In this step, the system checks the temperature sensors used to control the A/C. To enter this step, turn
the temperature dial to the right in the step 4. The ambient temperature appears on the display first and
the interior temperature appears next and the intake air temperature last. The display changes the
temperature value each time the defroster switch is pressed.
1. Turn temperature dial lightly toward right to enter step 5
Press
Press
Press
Ambient
temperature
display
Interior
temperature
display
Intake air
temperature
display
(6) Step 6
You can increase or decrease by up to 3 degrees from the set temperature. When entering the step 6
from 5, turn the fan speed dial.
Step 6 starts
Decrease by up to
3 degrees
Increase by up to
3 degrees
Turn fan
speed dial
to enter
step 6
1.
Turn
temperature
control dial to
adjust
temperature
2.
Нет комментариевНе стесняйтесь поделиться с нами вашим ценным мнением.
Текст