Isuzu D-Max / Isuzu Rodeo (TFR/TFS). Manual — part 584

ENGINE COOLING 6B – 7
WATER PUMP
REMOVAL AND INSTALLATION
Read this Section carefully before performing any removal and installation procedure. This Section gives you
important points as well as the order of operation. Be sure that you understand everything in this Section before you
begin.
Important Operations - Removal
Radiator Upper Hose
1. Disconnect the wiring harness
Q
.
2. Partially drain the engine coolant.
3. Remove the radiator upper hose
S
.
Fan and Fan Clutch
1. Loosen the fan clutch nuts
T
.
2. Remove the fan together with the fan clutch.
Take care not to damage the radiator core.
Water Pump
1. Remove the water pump bolts.
2. Remove the water pump.
6B – 8 ENGINE COOLING
Important Operations – Installation
Follow the removal procedure in the reverse order to
perform the installation procedure. Pay careful attention to
the important points during the installation procedure.
Water Pump
1) Apply the recommended liquid gasket or its equivalent
to the water pump at the position shown in the
illustration.
Do not apply an excessive amount of liquid gasket.
2) Tighten the water pump bolts to the specified torque.
Water Pump Bolt Torque
kg·m (lb.ft/N·m)
2.0
± 0.5 (14.5 ± 3.6/19.6 ± 4.9)
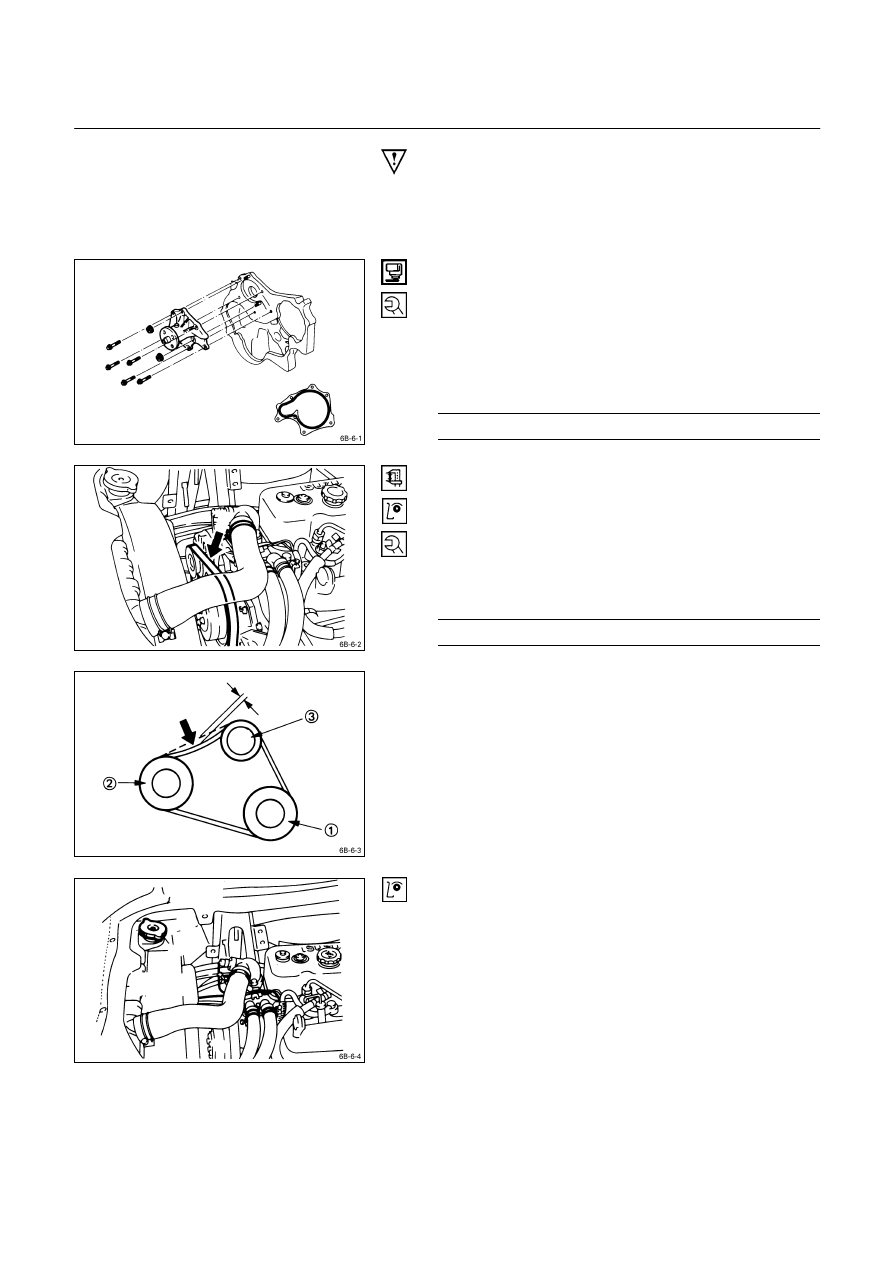
Cooling Fan Drive Belt
1. Install the cooling fan drive belt.
2. Apply tension to the cooling fan drive belt by moving
the generator .
3. Apply a force of 10 kg (22 lb/98 N) to the drive belt
mid-portion to check the drive belt deflection.
Cooling Fan Drive Belt Deflection
mm (in)
10 (0.4)
Q
Crankshaft damper pulley
R
Generator pulley
S
Cooling fan drive pulley
4. Tighten the remaining water pump bolt to the specified
torque.
Radiator Upper Hose
Heater Hose
1. Connect the radiator upper hose to the water outlet
pipe.
2. Replenish the engine coolant.
3. Make sure the wiring harness is properly connected.
4. Start the engine and allow it to warm up.
5. Check the temperature gauge operation.
ENGINE COOLING 6B – 9
THERMOSTAT
REMOVAL AND INSTALLATION
Read this Section carefully before performing any removal and installation procedure. This Section gives you
important points as well as the order of operation. Be sure that you understand everything in this Section before you
begin.
Important Operations – Removal
Radiator Upper Hose
1. Disconnect the wiring harness
Q
.
2. Partially drain the engine coolant.
3. Disconnect the radiator upper hose
R
.
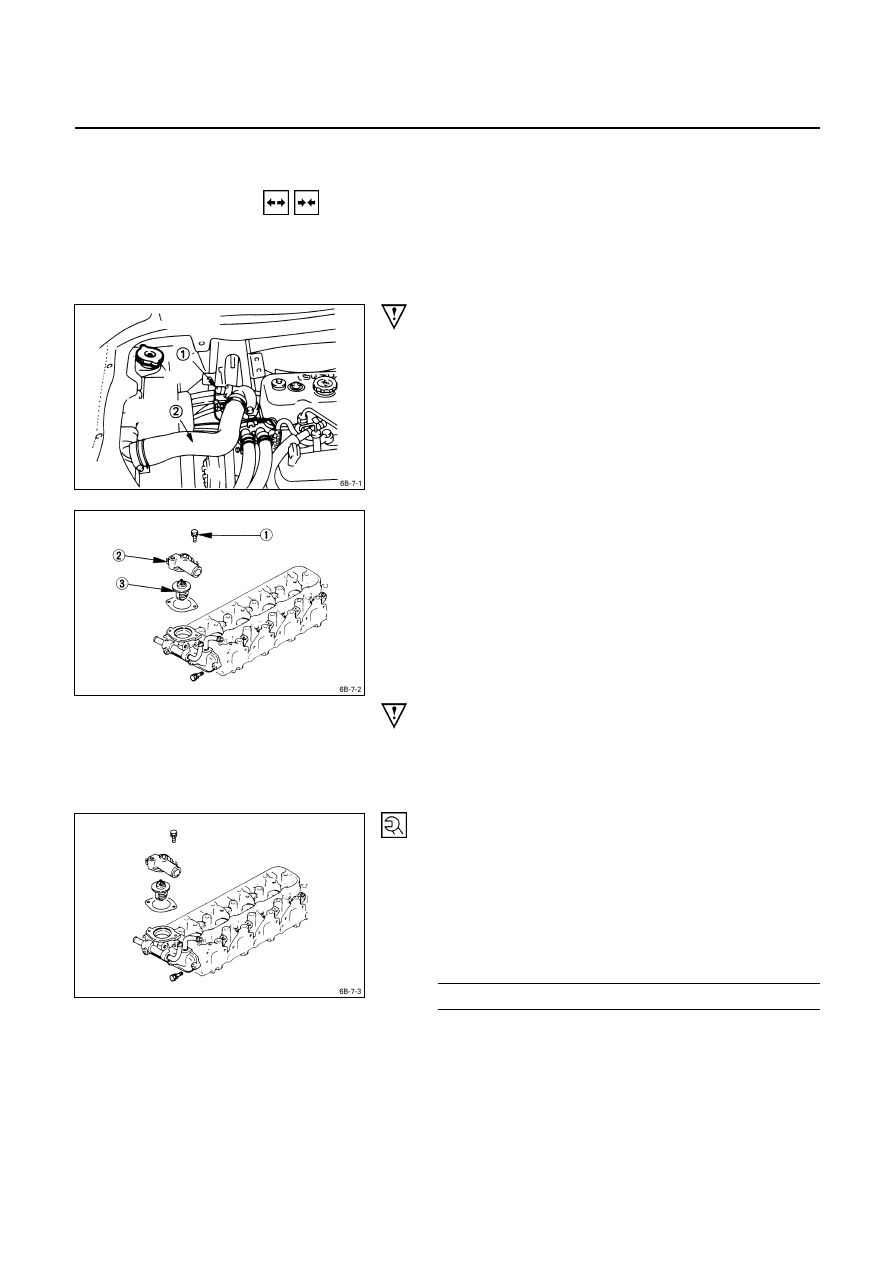
Water Outlet Pipe
Thermostat
1. Loosen the water outlet pipe bolt
Q
.
2. Remove the water outlet pipe
R
.
3. Remove
the
thermostat
S
from the thermostat
housing.
Take care not to damage the thermostat.
Important Operations – Installation
Follow the removal procedure in the reverse order to
perform the installation procedure. Pay careful attention to
the important points during the installation procedure.
Thermostat
Water Outlet Pipe
1. Install the thermostat to the thermostat housing.
2. Install the water outlet pipe with the gasket to the
thermostat housing.
3. Tighten the outlet pipe to the specified torque.
Outlet Pipe Bolt Torque
kg·m (lb.ft/N·m)
1.9
± 0.5 (13.7 ± 3.6/18.6 ± 4.9)

6B – 10 ENGINE COOLING
Radiator Upper Hose
1. Connect the radiator upper hose to the water outlet
pipe.
2. Replenish the engine coolant.
3. Make sure the wiring harness is properly connected.
4. Start the engine and allow it to warm up.
5. Check the temperature gauge operation.
INSPECTION AND REPAIR
Make the necessary adjustments, repairs, and part replacements if excessive wear or damage is discovered during
inspection.
Operating Test
1. Completely submerge the thermostat in water.
2. Heat
the
water.
Stir the water constantly to avoid direct heat being
applied to the thermostat.
3. Check the thermostat initial opening temperature.
Thermostat Initial Opening Temperature
°C (°F)
82 (180)
4. Check the thermostat full opening temperature.
Thermostat Full Opening Temperature
°C (°F)
95 (203)
Valve Lift At Fully Open Position
mm (in)
9.5 (0.37)
Q
Thermometer
R
Agitating rod
S
Wooden piece
Нет комментариевНе стесняйтесь поделиться с нами вашим ценным мнением.
Текст