Isuzu D-Max / Isuzu Rodeo (TFR/TFS). Manual — part 1090
ELECTRICAL-BODY AND CHASSIS 8-117
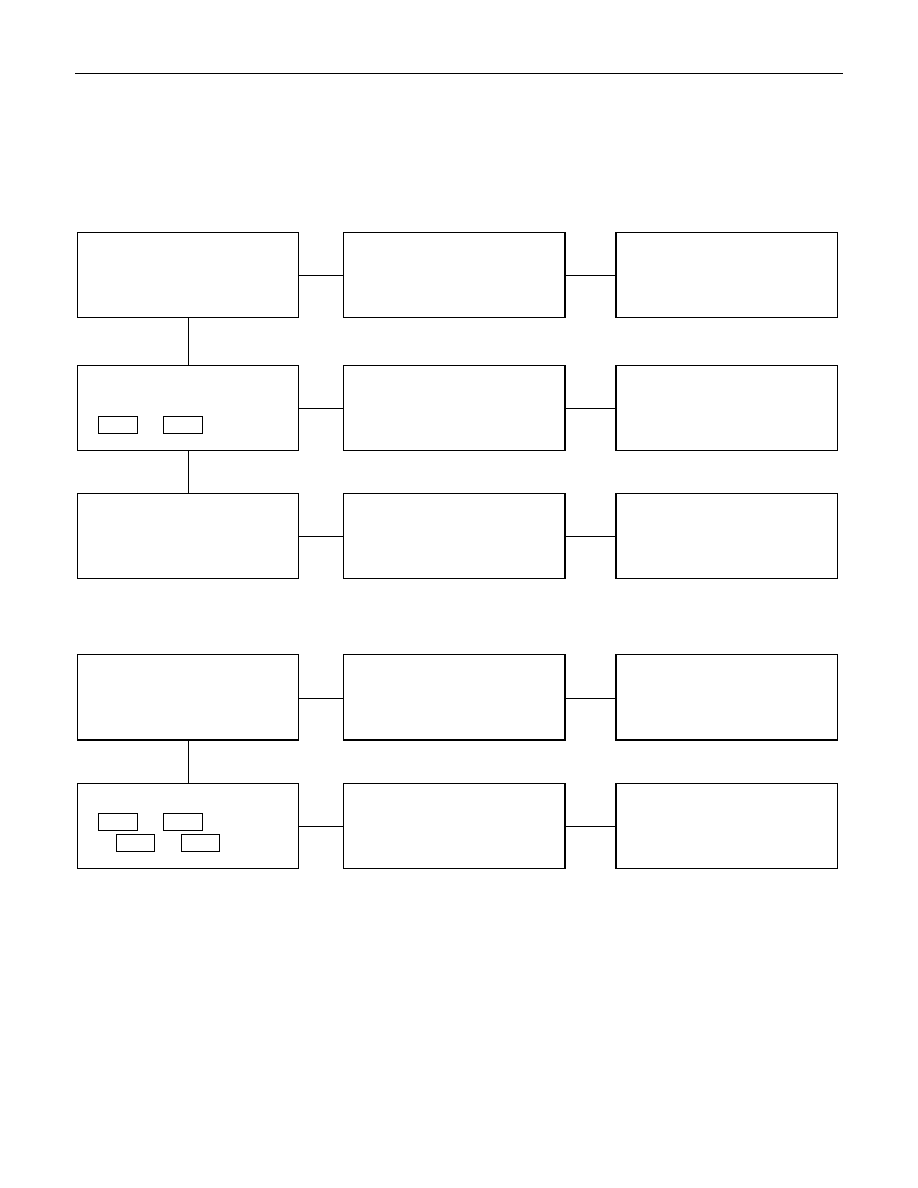
TAIL LIGHT, LICENSE PLATE LIGHT, CLEARANCE LIGHT AND ILLUMINATION
CONTROLLER
1. All lights do not light
Checkpoint
Trouble Cause
Countermeasure
Repair or replace the
combination switch
Lighting switch continuity
between connector
8
C-42
- 7
C-42
Poor switch point or connector
contact
NG
Reinstall or replace the tail
relay
Tail relay
Poor relay contact or relay
faulty
NG
OK
Reinstall or replace the fuse
No. EB-12
Fuse No. EB-12 (15A, Relay
and fuse box)
Poor fuse contact or blown
NG
OK
2. Tail light does not light
Replace the bulb or repair
connector contact
Tail light bulb continuity
Bulb burned out or poor
connector contact
NG
Repair open circuit or
connector contact
Continuity between connector
3
T-6
- 4
T-6
(RH)
or 3
T-1
- 4
T-1
(LH)
Open circuit or poor connector
contact
NG
OK

8-118 ELECTRICAL-BODY AND CHASSIS
3. License plate light does not light
Checkpoint
Trouble Cause
Countermeasure
Repair open circuit or
connector contact
Continuity between
connector 1
T-3
- 2
T-3
Open circuit or poor connector
contact
NG
Replace the bulb or repair
connector contact
License plate light bulb
continuity
Bulb burned out or poor
connector contact
NG
OK
4. Clearance light does not light
Replace the bulb or repair
connector contact
Clearance light bulb continuity
Bulb burned out or poor
connector contact
NG
5. Illumination controller does not operate
Repair knob installation or
replace the controller
Turn the illumination controller
knob (Brightness should
change)
Loose knob or faulty controller
NG
Repair short circuit or replace
the wire
Disconnect the illumination
controller connector (Light
should be dim)
Short circuit
NG
OK
ELECTRICAL-BODY AND CHASSIS 8-119
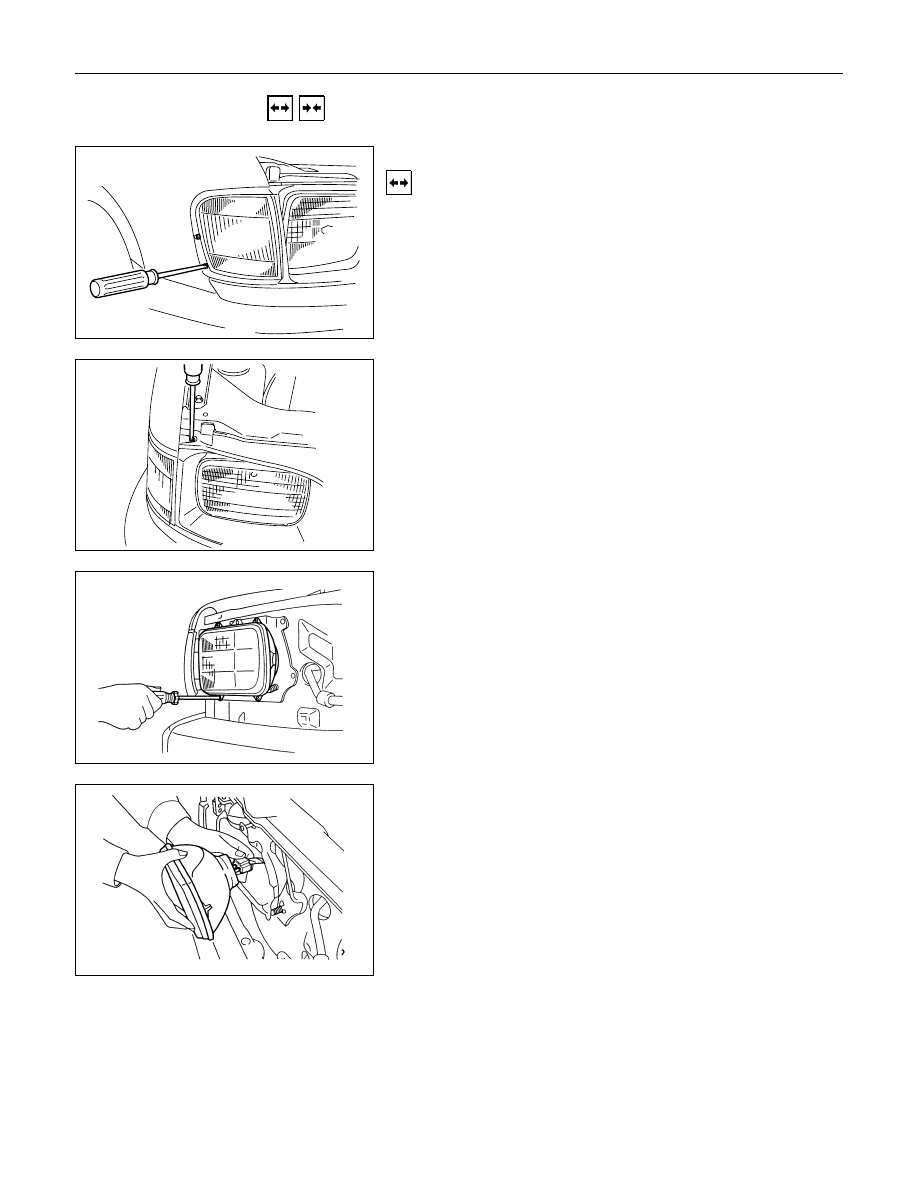
REMOVAL AND INSTALLATION
HEADLIGHT
Removal
1. Remove the radiator grille center bolt.
2. Use a screwdriver to raise the clip and release the lock.
Place a clean rag beneath the screwdriver tip to protect the
body painted surfaces.
3. Remove the radiator grille.
4. Remove the headlight rim.
5. Disconnect the headlight connector.
6. Remove the headlight.

8-120 ELECTRICAL-BODY AND CHASSIS
Installation
Follow the removal procedure in the reverse order to install the
headlight.
Pay close attention to the important points mentioned in the
following paragraphs.
Connector
Be absolutely sure that the headlight connector is securely
connected.
This will prevent a contact and an open circuit.
LIGHTING SWITCH
Removal
1. Remove the steering wheel
1
.
Refer to the “STEERING” Section of this manual.
2. Remove the Instrument panel lower cover
2
.
3. Remove the steering column cover
3
.
4. Disconnect the connector.
5. Remove the lighting switch from the steering shaft.
Installation
Follow the removal procedure in the reverse order to install the
lighting switch.
Pay close attention to the important points mentioned in the
following paragraphs.
Нет комментариевНе стесняйтесь поделиться с нами вашим ценным мнением.
Текст