Isuzu Rodeo UE. Manual — part 578
8D–160
WIRING SYSTEM
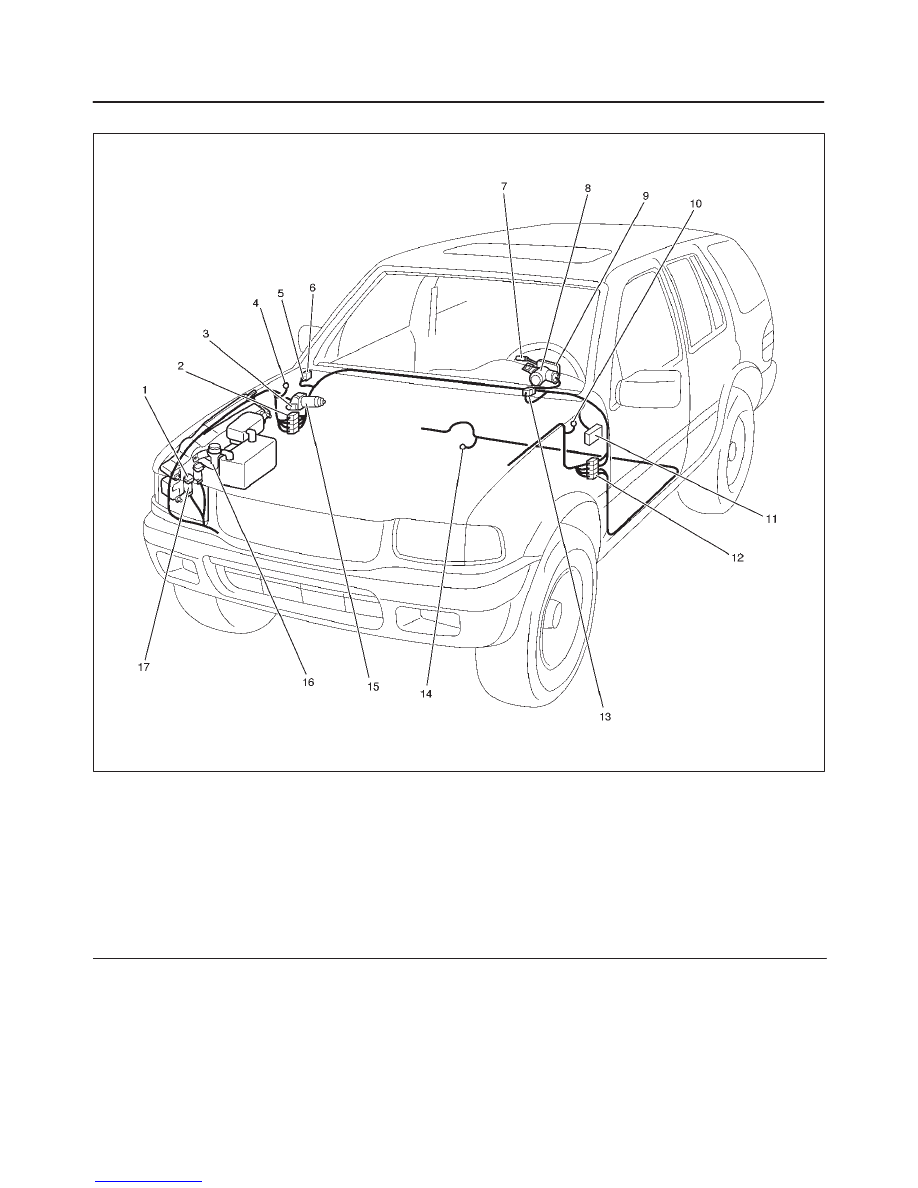
Parts Location
D08RX074
Legend
(1) Windshield Washer Motor
(2) H–13
(3) C–27
(4) C–36
(5) I–14, 42
(6) Alarm & Relay Control Unit
(7) FRT Windshield Wiper, Washer Switch
(8) Stater Switch
(9) Combination Switch
(10) C–16
(11) Relay and Fuse Box
(12) H–32
(13) I–31, I–46
(14) B–8
(15) Windshield Motor
(16) Windshield Washer Tank
(17) C–28

8D–161
WIRING SYSTEM
Diagnosis
Windshield Wiper Does Not Operate At Any Switch Position
Step
Action
Value(s)
Yes
No
1
Is the fuse 16 normal?
—
Go to Step 2
Replace the
fuse
2
Is C–36 grounded securely?
—
Go to Step 3
Ground it
securely
3
Disconnect the windshield wiper motor connector
C–27.
Is there continuity between harness side connector
C–27 terminal 3 and the ground?
—
Go to Step 5
Go to Step 4
4
Repair an open circuit between connector C–27
terminal 3 and the ground C–36.
Is the action complete?
—
Go to Step 3
5
1. Disconnect the windshield wiper & washer switch
connector I–31.
2. Turn the starter switch on.
Is the battery voltage applied between harness side
connector I–31 terminal 3 and the ground?
Approx. 12V
Go to Step 7
Go to Step 6
6
Repair an open circuit between the fuse 16 and
connector I–31 terminal 3.
Is the action complete?
—
Go to Step 5
—
7
Is the continity between the windshield wiper and
washer switch terminal normal?
—
Repair or
replace the
windshield
wiper motor
Repair or
replace the
switch

8D–162
WIRING SYSTEM
Windshield Wiper Does Not Operate At “INT” Position
Step
Action
Value(s)
Yes
No
1
1. Disconnect the windshield wiper and washer switch
connector I–31.
2. Turn the windshield wiper and washer switch to INT
position.
Is there continuity between switch side connector I–31
terminal 2 and 3, 5 and 6 and 8 and 13?
—
Go to Step 2
Repair or
replace the
switch
2
Is B–8 grounded securely?
—
Go to Step 3
Ground it
securely
3
1. Reconnect the windshield wiper and washer switch
connector I–31.
2. Disconnect the alarm and relay control unit
connector I–41 and I–42.
3. Turn the starter switch on.
Is the battery voltage applied between harness side
connector I–42 terminal 12 or 9 and the ground?
Approx. 12V
Go to Step 5
Go to Step 4
4
Repair an open circuit between connector I–31
terminal 2 and connector I–42 terminal 12 or connector
I–42 terminal 9.
Is the action complete?
—
Verify repair
—
5
Is the battery voltage applied between harness side
connector I–41 terminal 3 or connector I–41 terminal 25
and the ground?
Approx. 12V
Replace the
alarm and
relay control
unit
Go to Step 6
6
Repair an open circuit between the fuse 16 and
connector I–41 terminal 3 or connector I–41 terminal
25.
Is the action complete?
—
Verify repair
—
Intermittent Interval Does Not Change
Step
Action
Value(s)
Yes
No
1
Disconnect the windshield wiper and washer switch
connector I–31.
Does the resistance value between the switch side
connector I–31 terminal 8 and 13 vary within the range
specified in the value(s) column while the intermittent
knob is being turned?
0
W
– 2K
W
Go to Step 2
Replace the
switch
2
1. Reconnect the windshield wiper and washer switch
connector I–31.
2. Disconnect the alarm and relay control unit
connector I–41 and I–42.
Does the resistance value between harness side
connector I–42 terminal 21 or connector I–42 terminal 5
and the ground vary within the range specified in the
value(s) column while the intermittent knob is being
turned?
0
W
– 2K
W
Replace the
alarm and
relay control
unit
Go to Step 3
3
Repair a short circuit between connector I–31 terminal
8 and connector I–42 terminal 21 or connector I–42
terminal 5.
Is there action complete?
—
Verify repair
—

8D–163
WIRING SYSTEM
Windshield Wiper Does Not Operate At “LO” Position
Step
Action
Value(s)
Yes
No
1
Repair or replace the windshield wiper and washer
switch.
NOTE: There should be continuity between switch
side connector I–31 terminal 3 and 5 with the switch
turned to the LOW position.
Is the action complete?
—
Verify repair
—
Windshield Wiper Does Not Operate At “HI” Position
Step
Action
Value(s)
Yes
No
1
1. Disconnect the windshield wiper and washer switch
connector I–31.
2. Turn the windshield wiper and washer switch to the
HIGH position.
Is there continuity between switch side connector I–31
terminal 3 and 4?
—
Go to Step 2
Repair or
replace the
switch
2
1. Reconnect the windshield wiper and washer switch
connector I–31.
2. Disconnect the windshield wiper motor connector
C–27.
3. Turn the starter switch on.
Is the battery voltage applied between harness side
connector C–27 terminal 1 and the ground?
Approx. 12V
Repair or
replace the
windshield
wiper motor
Go to Step 3
3
Repair an open circuit between connector I–31
terminal 4 and connector C–27 terminal 1.
Is the action complete?
—
Verify repair
—
Нет комментариевНе стесняйтесь поделиться с нами вашим ценным мнением.
Текст