Isuzu Rodeo UE. Manual — part 594
8D–224
WIRING SYSTEM
Step
No
Yes
Value(s)
Action
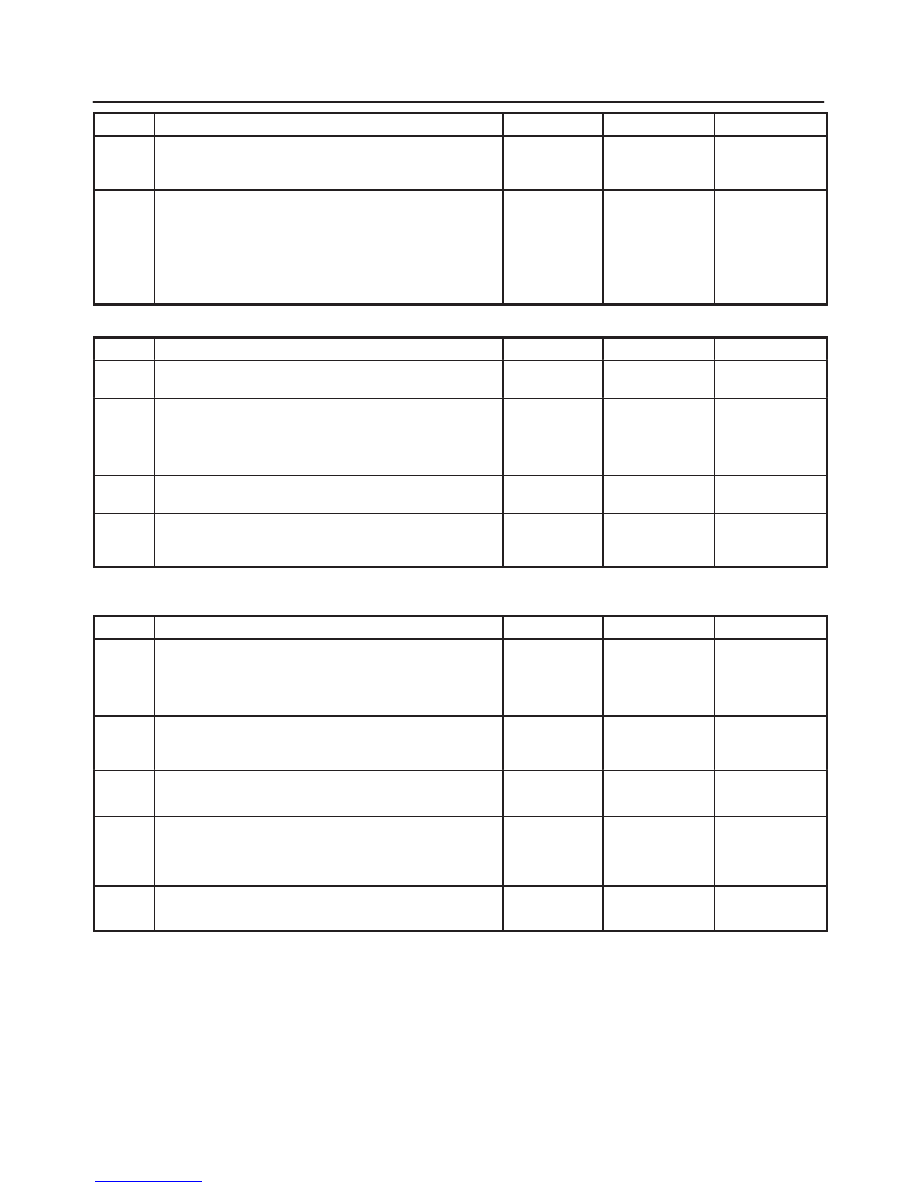
3
Is the engine coolant temperature unit normal?
—
Repair a poor
connection at
the connector
Replace the
unit
4
Is the circuit between the engine coolant temperature
gauge and the engine coolant temperature unit
normal?
—
Replace the
meter
assembly
Replace a
poor
connection of
the
connectors or
an open
circuit.
Gauge Reading Is Too Low (Or High)
Step
Action
Value(s)
Yes
No
1
Does the thermostat operate normally?
—
Go to Step 2
Replace the
thermostat
2
Turn the starter switch on.
When inserting and pulling out the thermostat
connector E–19 terminal 1 several times, does the
indication of the gauge vary?
—
Go to Step 3
Go to Step 4
3
Repair a poor connection at the connector of the
thermo unit.
—
4
Is the engine coolant temperature unit normal?
—
Repair an
open or short
circuit
Replace the
unit
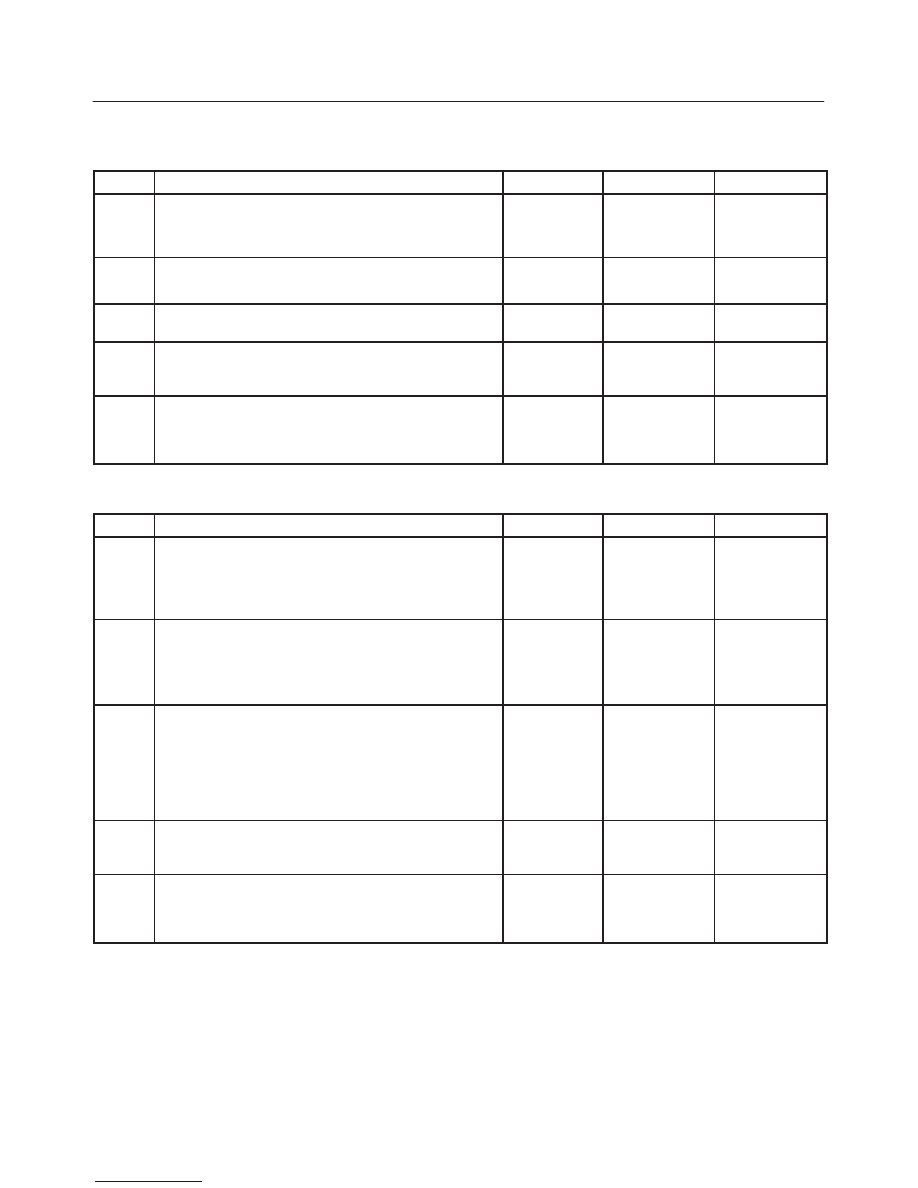
Needle Overshoots (Or Goes Up To The “H” Range)
Step
Action
Value(s)
Yes
No
1
Disconnect the connector of the engine coolant
temperature unit.
When the starter sw is turned on, does the pointer
reach to the “H” range?
—
Go to Step 2
Replace the
unit
2
Is there a short circuit between the engine coolant
temperature unit and the engine coolant temperature
(ECT) gauge?
—
Go to Step 3
Go to Step 4
3
Repair the short circuit.
Is the action complete?
—
Verify repair
—
4
Is the printed circuit of the meter assembly grounded
securely?
—
Go to Step 5
Repair or
replace the
printed circuit
board
5
Check the ECT gauge, and replace it if necessary.
Is the action complete?
—
Verify repair
—
8D–225
WIRING SYSTEM
Diagnosis
Even When The Tank Is Not Full Of Fuel, The Needle Overshoots (Or Goes Up To “F”)
Step
Action
Value(s)
Yes
No
1
1. Disconnect the connector of the fuel tank unit.
2. Turn the starter sw on.
Does the needle still point to “F”?
—
Go to Step 4
Go to Step 2
2
Remove the fuel tank unit.
Does the float arm operate smoothly?
—
Go to Step 3
Replace the
fuel tank unit.
3
Are the resistance values of the fuel tank unit at “E” and
“F” points normal?
—
Replace the
fuel tank unit.
4
Is the circuit between the fuel tank unit and the fuel
gauge normal?
—
Go to Step 5
Repair a
short circuit in
the circuit.
5
Is the printed circuit of the meter assembly grounded
securely?
—
Check the
fuel gauge,
and replace it
if necessary.
Repair or
replace the
printed circuit
board.
When The Parking Brake Lever Is Pulled, The Indicator Light Does Not Light Up
Step
Action
Value(s)
Yes
No
1
1. Disconnect the parking brake switch connector.
2. Connect the harness side connector to the ground.
3. Turn the starter switch on.
Does the indicator light light up?
—
Go to Step 4
Go to Step 2
2
Does the indicator light have a burned out bulb, or is the
socket poorly connected?
—
Replace the
bulb or repair
the poor
connection at
the socket.
Go to Step 3
3
Is there continuity in the circuit between the parking
brake switch connector B–23 terminal 1 and I–1
terminal 8 (meter)?
—
—
Repair a poor
connection at
the
connectors or
an open
circuit in the
circuit.
4
Is the parking brake switch installed to the correct
position?
—
Go to Step 5
Adjust the
installation
position.
5
Pull the parking brake.
Is there continuity between the switch connector B–23
terminal 1 and ground?
—
Ground the
parking brake
switch
securely.
Repair or
replace the
parking brake
switch.

8D–226
WIRING SYSTEM
Even When The Parking Brake Lever Is Released, The Indicator Light Does Not Go Off
Step
Action
Value(s)
Yes
No
1
Is the parking brake switch installed to the correct
position, and does it operate normally?
—
Go to Step 2
Adjust the
switch
installation
position.
2
Disconnect the parking brake switch connector B–23.
Does the indicator light go off?
—
Repair or
replace the
switch.
Go to Step 3
3
Is the brake fluid sufficient?
—
Go to Step 4
Replenish the
brake fluid.
4
Is the brake fluid switch normal?
—
Go to Step 5
Replace the
brake fluid
tank.
5
Repair a short circuit between the parking brake switch
connector B–23 terminal 1 and I–1 terminal 8, or the
brake fluid switch connector I–1 terminal 8 and C–6
terminal 2.
Is the action complete?
—
Verify repair
—
While The Engine Is Operating, The Oil Pressure Warning Light Does Not Go Off
Step
Action
Value(s)
Yes
No
1
Is the engine oil pressure normal?
—
Go to Step 2
Refer to the
“Engine”
section of this
manual.
2
Disconnect the oil pressure switch connector E–1
disconnected.
Does the warning light go off?
—
Go to Step 3
Repair a
short circuit
between
connector
E–1 terminal
1 and I–1
terminal 4
(meter).
3
Is there continuity between the oil pressure switch
connector E–1 terminal 1and the body ground?
—
—
Replace the
oil pressure
switch.
Even When The Fuel Tank Is Full Of Fuel, The Fuel Warning Light Lights Up
Step
Action
Value(s)
Yes
No
1
Disconnect the fuel tank unit connector F–1.
Does the warning light go off?
—
Go to Step 2
Repair a
short circuit
between the
fuel tank unit
harness side
connectors
PCM B15 and
connector I–9
terminal 9
(meter).
2
Is the fuel tank unit normal?
—
—
Replace the
fuel tank unit.
8D–227
WIRING SYSTEM
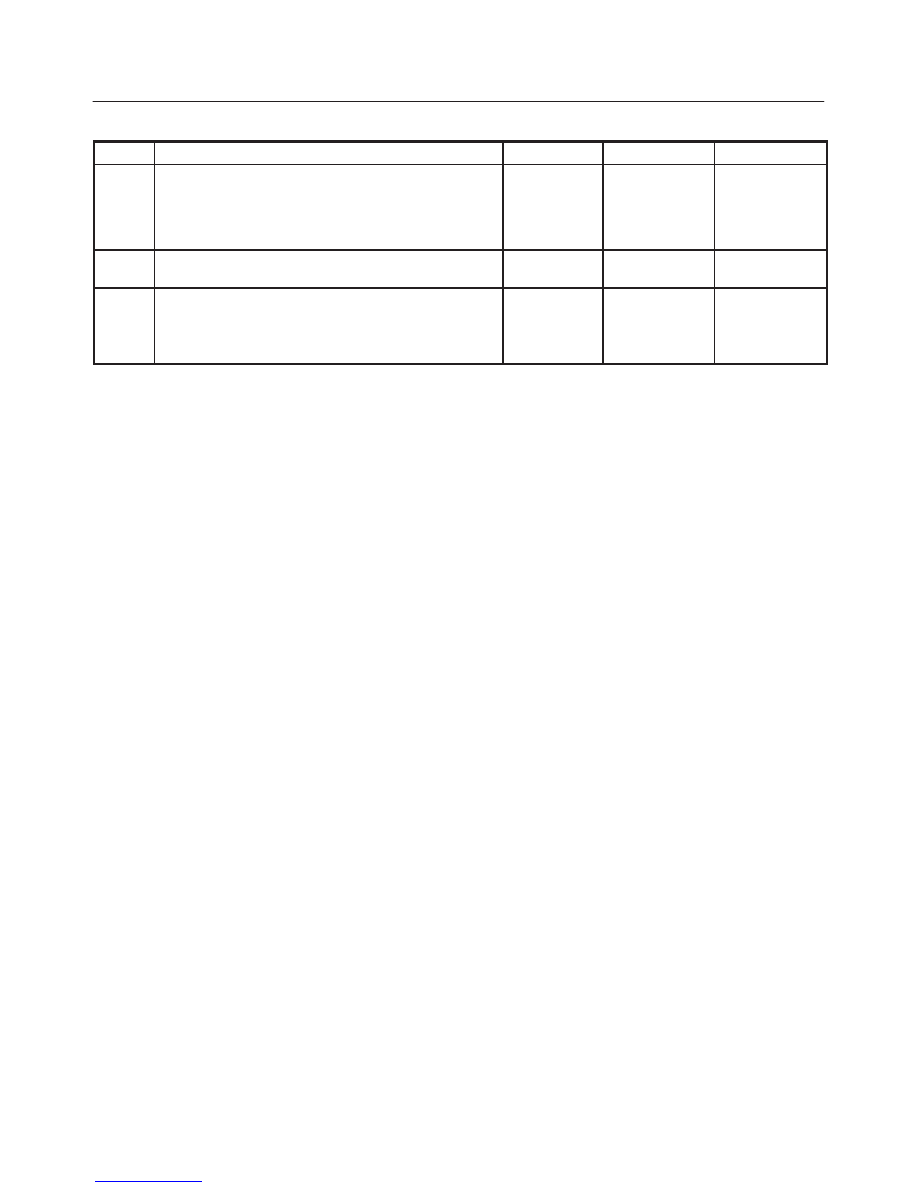
Even When The Fuel Tank Is Empty, The Fuel Warning Light Does Not Light Up
Step
Action
Value(s)
Yes
No
1
Does the warning light have a burned out bulb, or is the
socket poorly connected?
—
Replace the
bulb, or repair
a poor
connection at
the socket.
Go to Step 2
2
Is the fuel tank unit normal?
—
Go to Step 3
Replace the
fuel tank unit.
3
Repair a poor connection at the connector or an open
circuit in the circuit between the harness side connector
F–1 terminal 4 and I–2 terminal 13 (meter).
Is the action complete?
—
Verify repair
—
Starter Switch
Refer to “START AND CHARGING” in this section.
Lighting Switch / Dimmer Passing Switch /
Headlight
Refer to “HEADLIGHT AND FOG LIGHT” in the section.
Turn Signal Switch
Refer to “TURN SIGNAL LIGHT, HAZARD WARNING
LIGHT, CORNERING LIGHT, BACKUP LIGHT AND
HORN” in this section.
Illumination Controller
Refer to “FRONT SIDE MAKER LIGHT, PARKING
LIGHT, TAILLIGHT,LICENSE PLATE LIGHT AND
ILLUMINATION LIGHT” in the section.
Нет комментариевНе стесняйтесь поделиться с нами вашим ценным мнением.
Текст