Isuzu KB P190. Manual — part 16
1-30 HEATER AND AIR CONDITIONING
ON-VEHICLE SERVICE
PRECAUTIONS FOR REPLACEMENT OR
REPAIR OF AIR CONDITIONING PARTS
There are certain procedures, practices and precautions that
should be followed when servicing air conditioning systems:
• Keep your work area clean.
• Always wear safety goggle and protective gloves when
working on refrigerant systems.
• Beware of the danger of carbon monoxide fumes caused by
running the engine.
• Beware of discharged refrigerant in enclosed or improperly
ventilated garages.
• Always disconnect the negative battery cable and discharge
and recover the refrigerant whenever repairing the air
conditioning system.
• When discharging and recovering the refrigerant, do not
allow refrigerant to discharge too fast; it will draw
compressor oil out of the system.
• Keep moisture and contaminants out of the system. When
disconnecting or removing any lines or parts, use plugs or
caps to close the fittings immediately.
Never remove the caps or plugs until the lines or parts are
reconnected or installed.
• When disconnecting or reconnecting the lines, use two
wrenches to support the line fitting, to prevent from twisting
or other damage.
• Always install new O-rings whenever a connection is
disassembled.
• Before connecting any hoses or lines, apply new specified
compressor oil to the O-rings.
• When removing and replacing any parts which require
discharging the refrigerant circuit, the operations described
in this section must be performed in the following sequence:
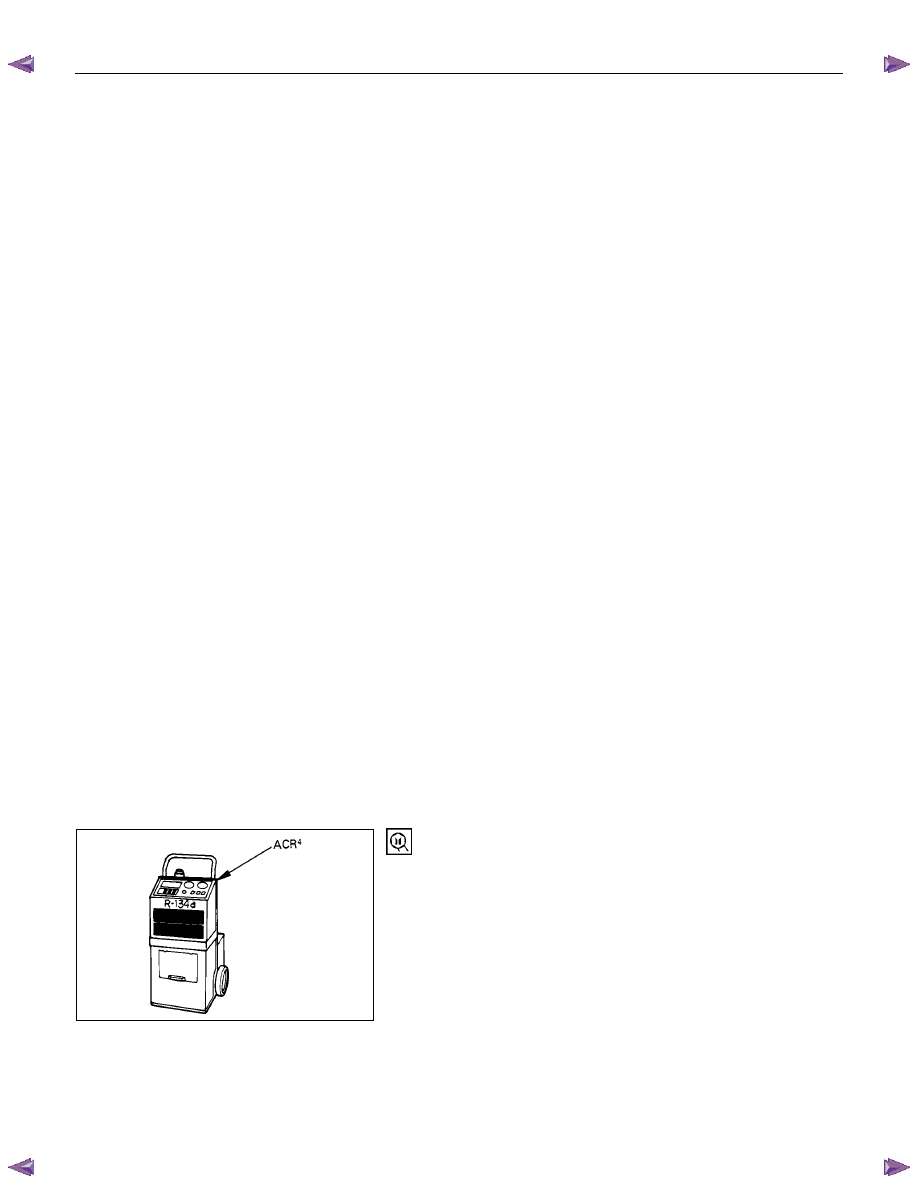
1) Using the ACR
4
(HFC-134a Refrigerant Recovery/
Recycling/Recharging/System) or equivalent to
thoroughly discharge and recover the refrigerant.
ACR
4
(115V 60Hz) : 5-8840-0629-0 (J-39500-A)
ACR
4
(220-240V 50/60Hz)
: 5-8840-0630-0 (J-39500-220A)
ACR
4
(220-240V 50/60Hz Australian model)
: 5-8840-0631-0 (J-39500-220ANZ)
2) Remove and replace the defective part.
3) After evacuation, charge the air conditioning system and
check for leaks.
HEATER AND AIR CONDITIONING 1-31
REPAIR OF REFRIGERANT LEAKS
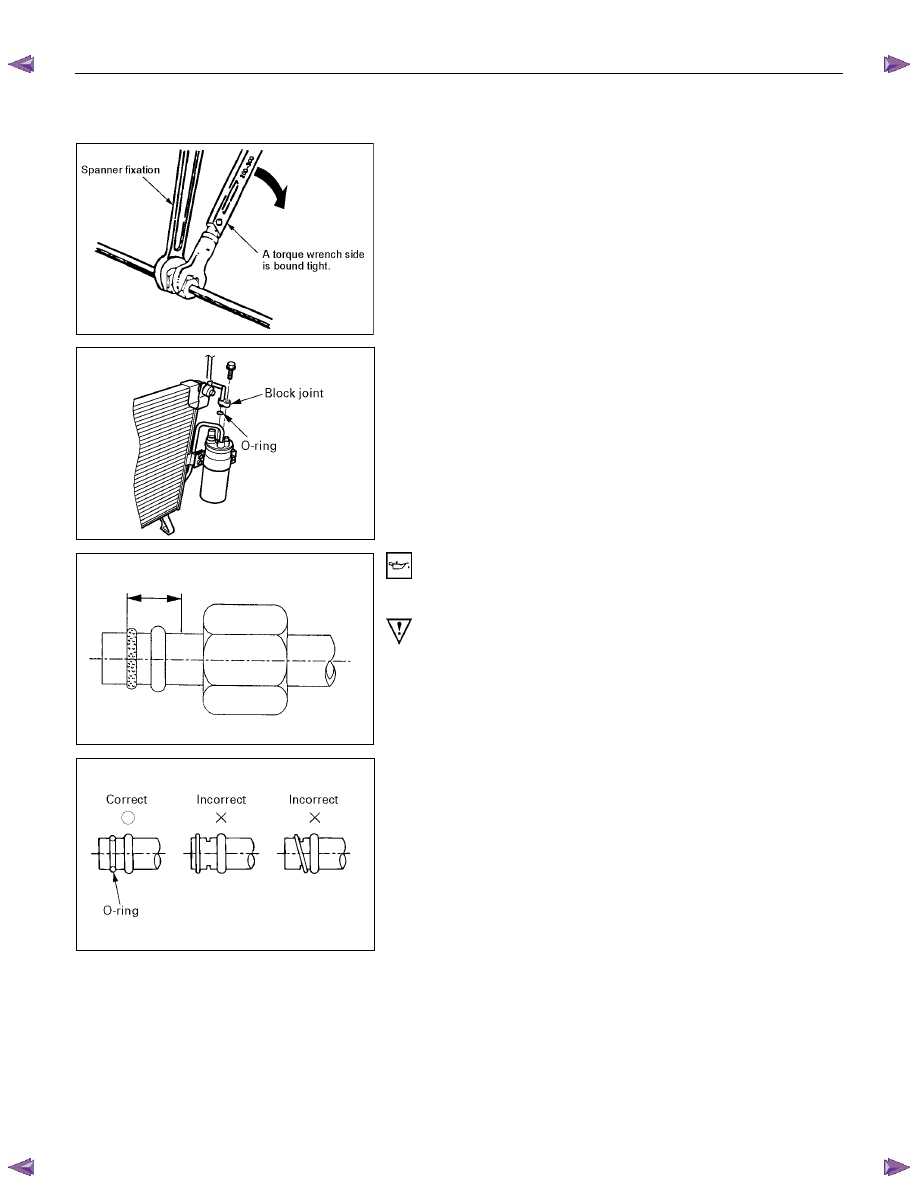
Refrigerant Line Connections
RTW410SH000101
Install new O-ring, if required. When disconnecting or
connecting lines, use two wrenches to prevent the connecting
portion from twisting or becoming damaged.
When connecting the refrigerant line at the block joint, securely
insert the projecting portion of the joint portion into the
connecting hole on the unit side and secure with a bolt.
Apply specified compressor oil to the O-rings prior to
connecting.
CAUTION:
Compressor (PAG) oil to be used varies according to
compressor model. Be sure to apply oil specified for the
model of compressor.
O-rings must be closely aligned with raised portion of
refrigerant line.
1-32 HEATER AND AIR CONDITIONING
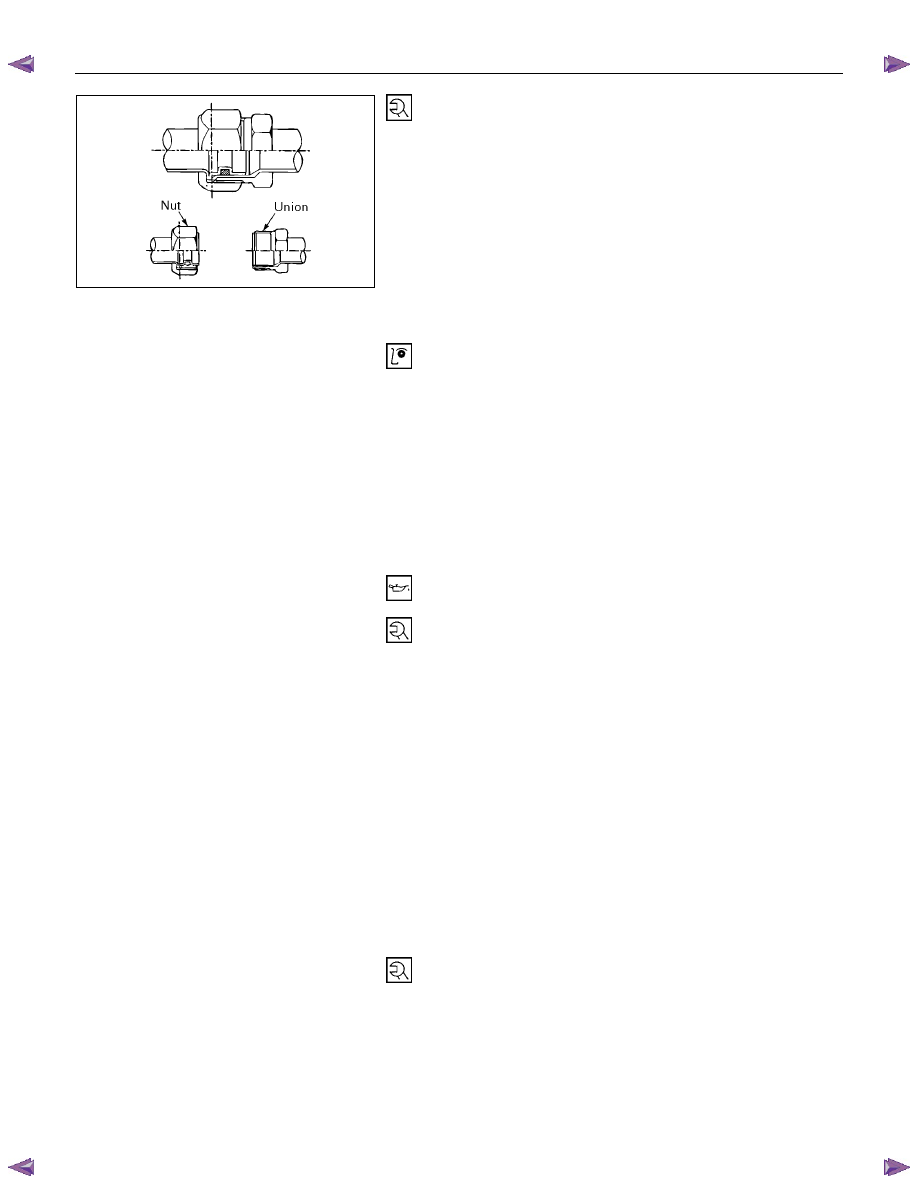
Insert nut into union. First tighten nut by hand as much as
possible. Then, tighten nut to specified torque.
(Refer to "Special Parts Fixing Nuts and Bolts" in this section)
LEAK AT REFRIGERANT LINE
CONNECTIONS
1) Check the torque on the refrigerant line fitting and, if too
loose, tighten to the specified torque.
• Use two wrenches to prevent twisting and damage to the
Line.
• Do not over tighten.
2) Perform a leak test on the refrigerant line fitting.
3) If the leak is still present, discharge and recover the
refrigerant from the system.
4) Replace the O-rings.
• O-rings cannot be reused. Always replace with new
ones.
• Be sure to apply specified compressor oil to the new O-
rings.
5) Retighten the refrigerant line fitting to the specified torque.
• Use two wrenches to prevent twisting and damage to the
line.
6) Evacuate, charge and retest the system.
LEAK IN THE HOSE
If the compressor inlet or outlet hose is leaking, the entire hose
must be replaced. Refrigerant hose must not be cut or spliced
for repair.
1) Locate the leak.
2) Discharge and recover the refrigerant.
3) Remove the hose assembly.
• Cap the open connections at once.
4) Connect the new hose assembly.
• Use two wrenches to prevent twisting or damage to the
hose fitting.
• Tighten the hose fitting to the specified torque.
5) Evacuate, charge and test the system.
COMPRESSOR LEAKS
If leaks are located around the compressor shaft seal or shell,
replace or repair the compressor.
HEATER AND AIR CONDITIONING 1-33
RECOVERY, RECYCLING, EVACUATION
AND CHARGING
Handling Refrigerant-134a (HFC-134a)
Air conditioning systems contain HFC-134a.
This is a chemical mixture, which requires special handling
procedures to avoid personal injury.
• Always wear safety goggles and protective gloves.
• Always work in a well-ventilated area. Do not weld or steam
clean on or near any vehicle-installed air conditioning lines
or components.
• If HFC-134a should come in contact with any part of the
body, flush the exposed area with cold water and
immediately seek medical help.
• If it is necessary to transport or carry any container of HFC-
134a in a vehicle, do not carry it in the passenger
compartment.
• If it is necessary to fill a small HFC-134a container from a
large one, never fill the container completely. Space should
always be allowed above the liquid for expansion.
• Keep HFC-134a containers stored below 40°C (104°F).
WARNING
•••• SHOULD HFC-134a CONTACT YOUR EYE(S), CONSULT
A DOCTOR IMMEDIATELY.
•••• DO NOT RUB THE AFFECTED EYE(S). INSTEAD,
SPLASH QUANTITIES OF FRESH COLD WATER OVER
THE AFFECTED AREA TO GRADUALLY RAISE THE
TEMPERATURE OF THE REFRIGERANT ABOVE THE
FREEZING POINT.
•••• OBTAIN PROPER MEDICAL TREATMENT AS SOON AS
POSSIBLE. SHOULD THE HFC-134a TOUCH THE SKIN,
THE INJURY MUST BE TREATED THE SAME AS SKIN
WHICH HAS BEEN FROSTBITTEN OR FROZEN.
F06R300012
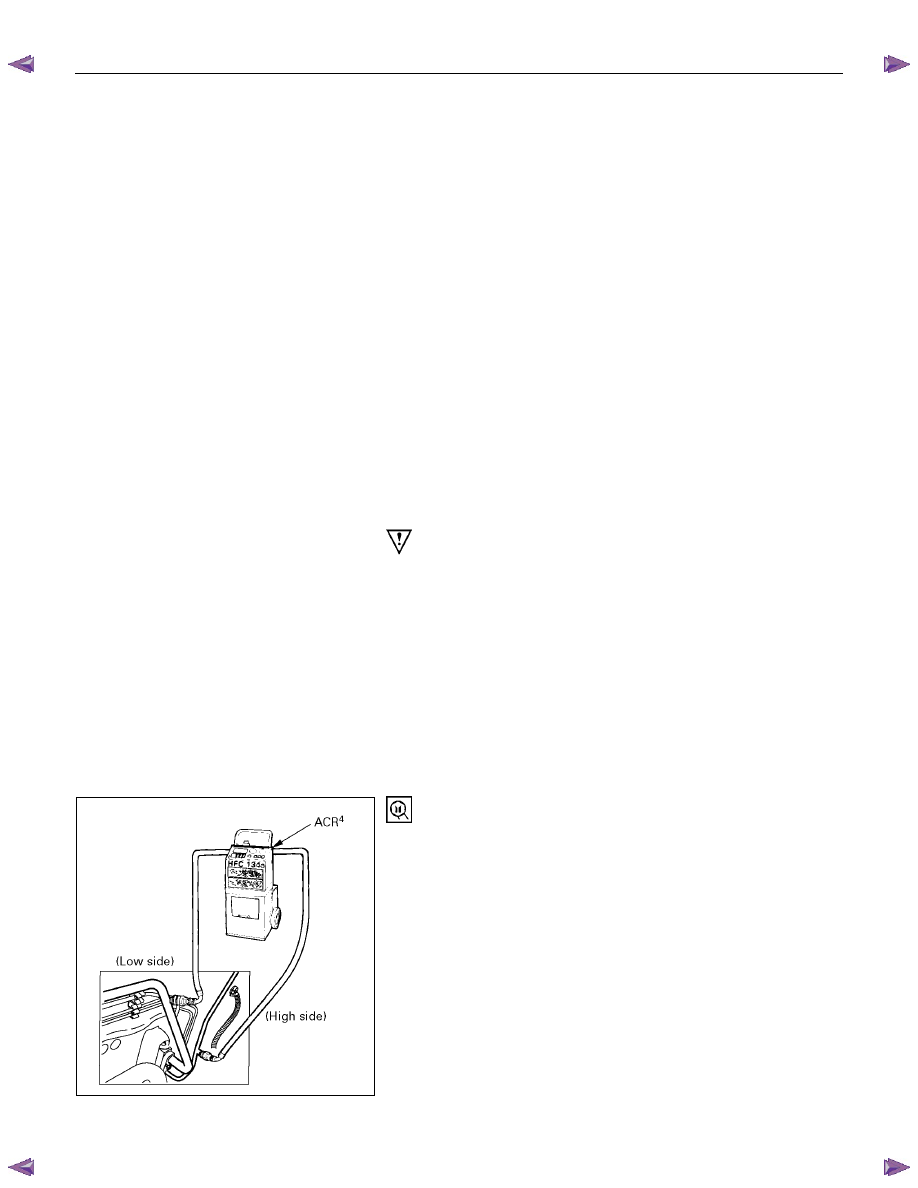
REFRIGERANT RECOVERY
The refrigerant must be discharged and recovered by using
ACR
4
(HFC-134a Refrigerant Recovery/Recycling/Recharging/
System) or equivalent before removing or installing air
conditioning parts.
ACR
4
(115V 60Hz) :5-8840-0629-0 (J-39500-A)
ACR
4
(220-240V 50/60Hz)
: 5-8840-0630-0 (J-39500-220A)
ACR
4
(220-240V 50/60Hz Australian model)
: 5-8840-0631-0 (J-39500-220ANZ)
1) Connect the high and low charging hoses of the ACR
4
(or
equivalent) as shown.
2) Recover the refrigerant by following the ACR
4
Manufacturer's Instructions.
3) When a part is removed, put a cap or a plug on the
connecting portion so that dust, dirt or moisture cannot get
into it.
Нет комментариевНе стесняйтесь поделиться с нами вашим ценным мнением.
Текст