BYD E6. Service Manual — part 7
BYD e6A AUTO Owner's Manual
Air Conditioning System 1-85
-- Operation Gist
● To cool down the vehicle after being
parked under the hot sunlight, open the
windows and drive for several minutes
to let the hot air flow out, and then
raise the windows to cool using the air
conditioner in a short time.
● Confirm that the air suction grid in the
front of windshield is not blocked (such
as leaves or snow).
● When it is moist, do not cool the
windshield. Otherwise, condensation
may fog on the windshield due to the
temperature difference between the
inside and outside of the vehicle.
● You must keep it ventilated under the
front seat so as to make the air fully
recycled in the car.
● In cold weather, you must set the
rotating speed of blower to a high
speed for one minute so as to clear the
snow or moisture in the air inlet
channel. By doing so, you can reduce
fogging on the windows.
● When following other vehicles on a
dusty road or driving in windy and dusty
conditions, it is recommended to select
the internal air recirculation mode
temporarily. Thus the external air
suctions are closed to prevent external
air and dust entering the vehicle as well.
Heating
To get best effect, set the panel of air
conditioner to the following:
Automatic operation --
Press "AUTO" button
Temperature -- set to the desired
temperature
Air suction mode -- external recirculation
(ambient air)
Air conditioner -- OFF
Manual operation --
Fan speed -- set to the desired fan speed
Temperature -- set to high temperature
Air suction mode -- external recirculation
(ambient air)
Air supply mode --
Air conditioner -- OFF
● To speed warm up, enable internal air
recirculation for a few minutes. To prevent
fog on the windows, enable external air
recirculation after the car has warmed up.
● Press the "A/C" button down when
warming up, it may minimize the moisture
in air flow.
● To warm up when performing defrost or
defog operation for windshield, you may
choose " " mode.
-------------------------------------------------------------------------------------------------------------------------------------------------------------
BYD e6A AUTO Owner's Manual
1-86 Air Conditioning System
Air Conditioning System
To get best effect, set the panel of the air
conditioner to the following:
Automatic operation --
Press "AUTO" button
Temperature -- set to the desired
temperature
Air suction mode -- external recirculation
(ambient air)
Air conditioner -- ON
Manual operation --
Fan speed -- set to the desired fan speed
Temperature -- set to low temperature
Air suction mode -- external recirculation
(ambient air)
Air supply mode --
Air conditioner -- ON
● To speed cooling, turn the temperature
control knob to LO position, and enable
internal air recirculation for a few minutes.
Ventilation
To get best effect, set the panel of the air
conditioner to the following:
Automatic operation --
Press "AUTO" button
Temperature -- set to low temperature
Air suction mode -- external recirculation
(ambient air)
Air conditioner -- OFF
Manual operation --
Fan speed -- set to the desired fan speed
Temperature -- set to low temperature
Air suction mode -- external recirculation
(ambient air)
Air supply mode --
Air conditioner -- OFF
Defog & defrost
-- Inside of windshield
To get best effect, set the panel of the air
conditioner to the following:
Automatic operation --
Temperature -- set to high temperature
(heating);
set to low temperature
(cooling)
Air suction mode -- external recirculation
(ambient air)
Air supply mode --
Manual operation --
Fan speed -- set to the desired fan speed
Temperature -- set to high temperature
(heating);
set to low temperature
(cooling)
Air flow mode -- external recirculation
(ambient air)
Air supply mode --
Press "
" button down, and the air flow will
be supplied from windshield vents.
To keep a clear forward view, you may
activate defog function.
-------------------------------------------------------------------------------------------------------------------------------------------------------------
BYD e6A AUTO Owner's Manual
Air Conditioning System 1-87
Press "
" button to enable the defog
function and the air conditioner will run as well.
That is to say, whether or not the "A/C" button
is pressed, the "A/C" indicator will turn on.
Thus, the forward view of a driver will become
clearer quickly.
Press "
" button again, the air supply
mode will return to the previous mode.
● When it is moist, do not cool the
windshield. Otherwise, more
condensation fog may form on the
windshield due to the temperature
difference between the inside and outside
of the vehicle.
-- Outside of windshield
To get best effect, set the panel of the air
conditioner to the following:
Automatic operation --
Temperature -- set to high temperature
Air flow mode -- external recirculation
(ambient air)
Air supply mode --
Manual operation -
Fan speed -- set to the desired fan speed
Temperature -- set to high temperature
Air flow mode -- external recirculation
(ambient air)
Air supply mode --
Press "
" button down, and the air flow will
be supplied from windshield vents.
To keep a clear forward view, you may
activate defog function.
Press "
" button to enable the defog
function and the air conditioner will run as well.
That is to say, whether or not the "A/C" button
is pressed, the "A/C" indicator will turn on.
Thus, the forward view of a driver will become
clearer quickly.
Press "
" button again, the air supply
mode will return to the previous mode.
● To warm up when performing defrost or
defog operation for windshield, you may
choose
" " the air supply mode.
-------------------------------------------------------------------------------------------------------------------------------------------------------------
BYD e6A AUTO Owner's Manual
88 Air Conditioning System
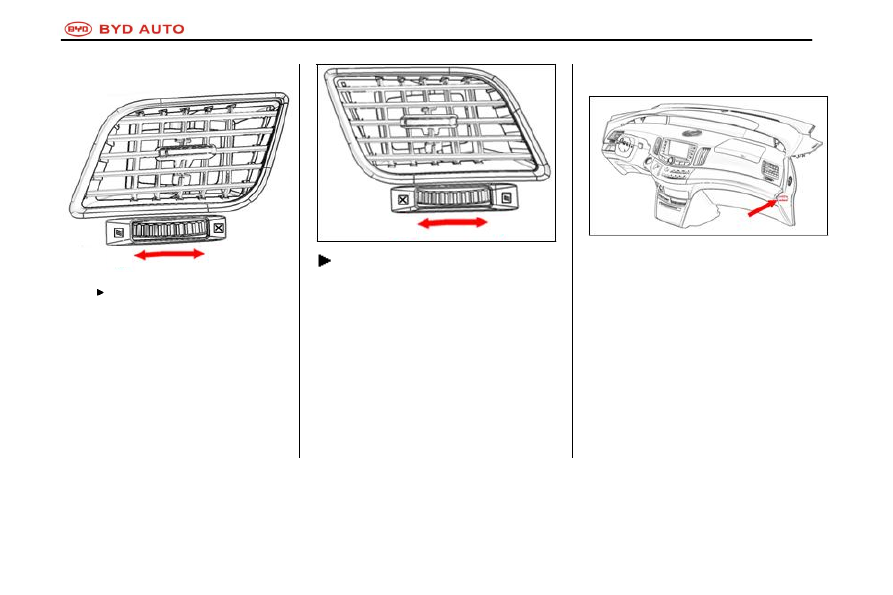
--
Side air vent
Left side air vent
Right side air vent
If you are not satisfied with the air flow, check
the side and central vents, which may be
opened or closed as shown in the figure.
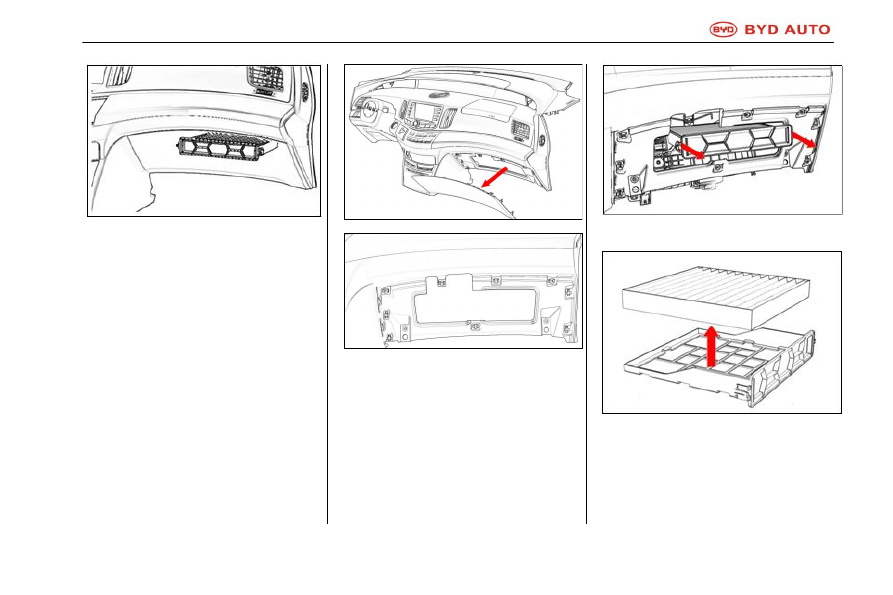
--
Check and replace air filter
The label for air filter shown in the figure is
located on the right side of the instrument
panel. It indicates that there is an air filter
installed.
Air filter can prevent dust getting into the
vehicle from the vents of air conditioning
system.
ON
OFF
OFF
ON
-------------------------------------------------------------------------------------------------------------------------------------------------------------
BYD e6A AUTO Owner's Manual
Air Conditioning System 1-89
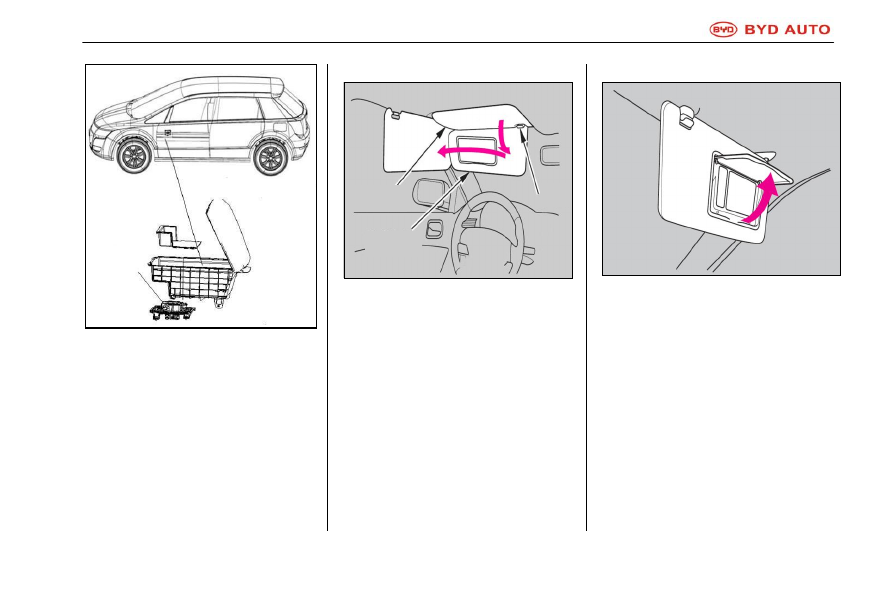
The air filter is located behind the lower
protector RH.
The air filter may be clogged after an
extended period of operation time. If the air
flow from air conditioner decreases suddenly,
or the window glass fogs easily during
external air recirculation air suction mode,
replace the air filter.
To maintain the efficiency of air conditioner,
you must check and replace air filter
according to the maintenance program. (refer
to "BYD Maintenance Program")
a.
Remove the instrument panel lower
protector RH (9 clamps used to assembly
lower protector RH and instrument panel).
b. Take out the filter box from the outlet of
filter as shown in the figure.
c. Remove the strainer from the filter box
d. Check the surface of the filter. Use
compressed air to blow common dust
against the opposite side. Do not wash the
filter in water or apply grease to it. If it is
dirty, replace with a new one.
-------------------------------------------------------------------------------------------------------------------------------------------------------------
BYD e6A AUTO Owner's Manual
1-90 Air Conditioning System
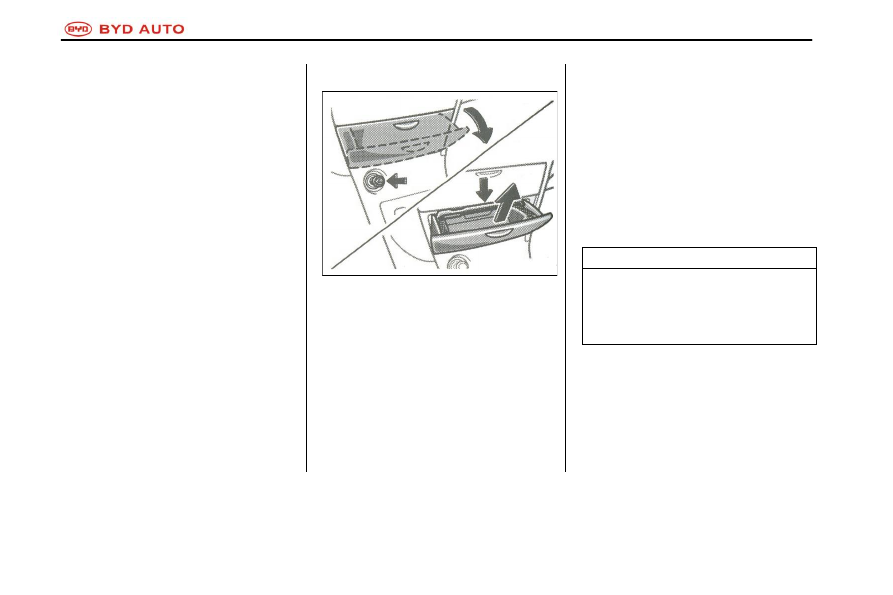
When installing filter and filter box, keep the
arrow upward.
Tips:
The air filter must be in place. Using the air
conditioner without the air filter will reduce
the dust-proof effect and also affect the
performance of the air conditioner.
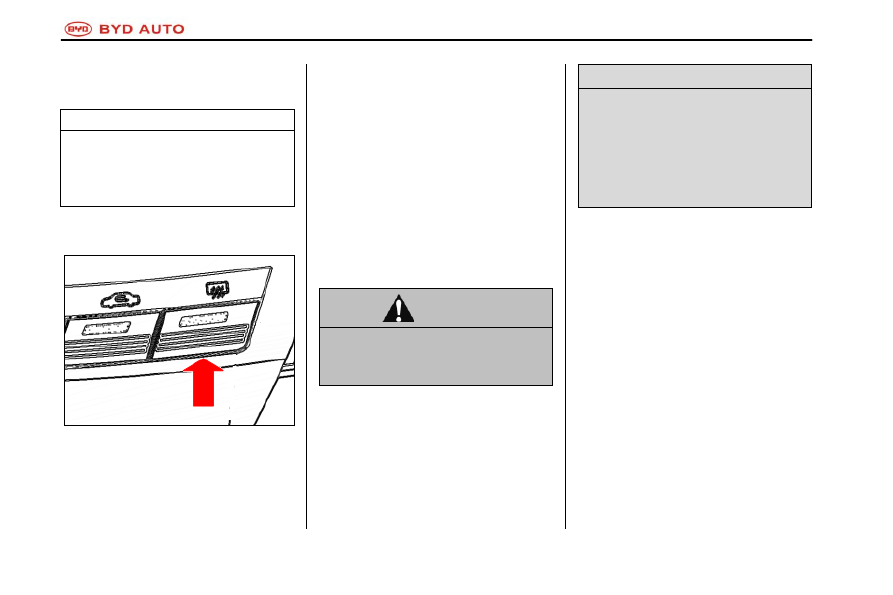
--
Defogger for the rear window and outer
rear view mirror (if equipped)
Press this button switch down to enable the
defogger for the power rear window and outer
rear view mirror to operate.
The power supply should be ON.
The thin heater wires inside the rear window
will clear the glass surface quickly. When the
defogger is operating, the indicator light will
come on.
The defogger turns off automatically after
approximately 15 minutes.
WARNING
Do not touch the outer rear view mirror
surface when the defogger is operating,
because the mirror surface will be hot.
When the glass surface is clear, press this
button switch again to turn the defogger off. If
the defogger continues operating for a long
time, it may cause battery discharging,
especially during stop-go driving. The
defogger is not intended to dry rain and melt
snow.
NOTICE
When cleaning the inside of the rear
window, do not scratch or damage heater
wires or their connectors.
To prevent the battery discharging
unnecessarily, turn the defogger switch off
when the power supply is not ON.
-------------------------------------------------------------------------------------------------------------------------------------------------------------
BYD e6A AUTO Owner's Manual
Other Equipment 1-91
Chapter 1
Section 8
Other Equipment
Clock and Temperature Adjustment . . . . . . . . .1-92
Reversing Radar System . . . . . . . . . . . . .1-93
Cigarette Lighter and Ashtray . . . . . . . . . . ...1-94
Service Switch . . . . . . . . . . . . . . . . ..1-94
Sun Visors . . . . . . . . . . . . . . . . . . 1-95
Vanity mirror . . . . . . . . . . . . . . . . . .1-95
-------------------------------------------------------------------------------------------------------------------------------------------------------------
BYD e6A AUTO Owner's Manual
1-92 Other Equipment
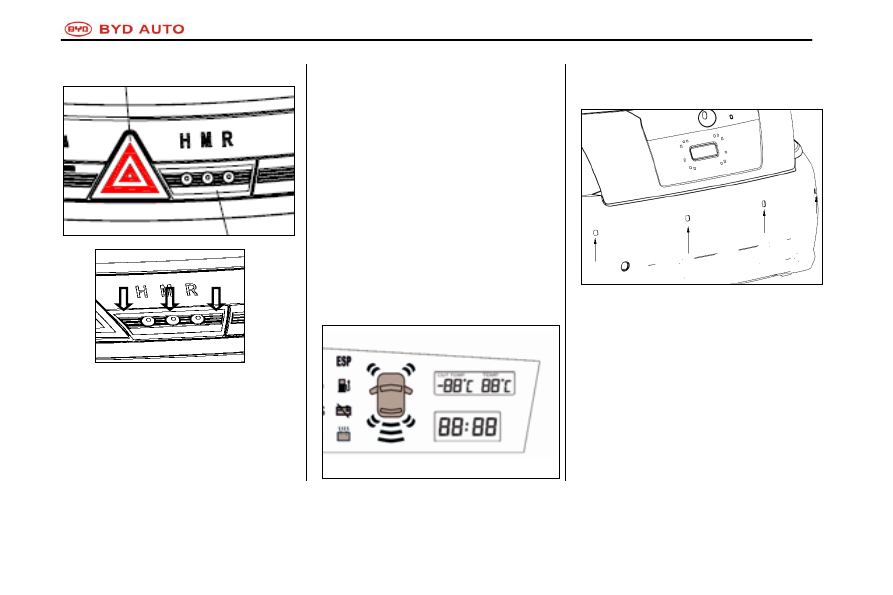
Electronic Clock Adjustment
In gear ACC or ON:
Press H to adjust the hours displayed in the
clock. The hour number will increase by 1
within 00-23 in a circulating way every time
the button is pressed;
Press M to adjust the minutes displayed in the
clock. The minute number will increase by 1
within 00-59 in a circulating way every time
the button is pressed;
The hours can be set to the adjacent value
rapidly by pressing R. For example, 1:06 is
changed into 1:00, or 1:56 is changed into
2:00 (
≤ 30,the current hours will be selected;
otherwise, the next hours will be selected)
Electronic clock and external
temperature display
Time and temperature are shown on the
combination meter
Reversing Radar System
(if equipped)
During reversing, it will remind the driver of
the approximate distance between the car
and barrier through indicator and buzzer. A
sensor is used in this system to detect the
barrier.
When power switch is at "ON" position and
selection lever stays at reverse gear, the
system is in operating conditions.
-------------------------------------------------------------------------------------------------------------------------------------------------------------
BYD e6A AUTO Owner's Manual
Other Equipment 1-93
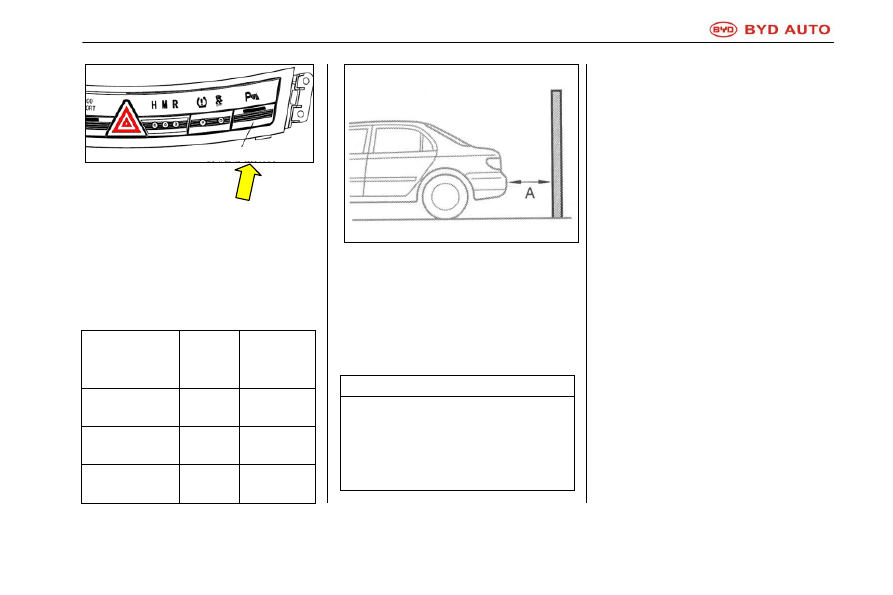
ON: press the switch.
Indicator is on and buzzer sounds.
OFF: press the switch again.
This system reminds the driver of the
distance between car and barrier through
indicator and buzzer.
ADistance
illustrated by A
mm
Indicator
Buzzer
About 1000-750
Flicker
Sound
intermittently
About 750-500
Flicker
Fast sound
intermittently
About 500or less
than 500
ON
Sound
continuously
Sensing Range
Sensing range means the maximum value is
about 1000 mm to probe A.
Due to limited sensing range, you must check
around the car before driving and start driving
quite slowly.
Tips
Do not stick accessories or other things on
the sensor used for probing barriers.
Otherwise, it will interfere with the accurate
operation of the system, which may cause
unexpected accidents.
The system cannot work normally under the
following conditions.
● Things such as ice, snow and mud are
stuck on the sensor.
● Stop the car in the environment of high or
low temperature for a long time.
● Drive on the rough path, muddy road or
road with deep grass.
● Be close to the horn of other vehicles,
engine of motorcycle or any object which
may generate supersonic wave.
● Drive in the heavy rain or with water
splashed on the car.
● Be equipped with two-channel radio
antenna or buffer rod.
● Car weight is tilt.
● Cover the sensor with hands.
● Be too close to the object.
● Beat the sensor heavily.
Reversing Radar System
reversing radar power switch
-------------------------------------------------------------------------------------------------------------------------------------------------------------
BYD e6A AUTO Owner's Manual
1-94 Other Equipment
When the following objects approach the
sensor, the system may not work.
● Metal line, rope or thinner objects
● Cotton, snowflake or absorbent things
● Smaller objects
● Objects with sharp edges
● High and protruding objects
In the following conditions you must entrust
authorized BYD Service Station to check the
system.
● Bumper den.
● Indicator continues to be on but the
buzzer does not sound
.
Cigarette Lighter and Ashtray
Cigarette lighter and ashtray
Cigar Lighter
To use cigar lighter, just press it. After cigar
lighter lights up, it will pop up for use.
If the motor is not running, the key must be in
the position of "ACC".
Do not press and hold the cigar lighter.
Ashtray
To use ashtray, pull it out.
Make sure to extinguish the cigarette
thoroughly after smoking in order to prevent
fire caused by the lit cigarettes. Push back the
ashtray to its original position after use.
To take out the ashtray,press the locking
spring plate and pull it out.
Service Switch
Make sure the service switch is turned off by
professionals before maintenance. Thus, high
voltage power is cut off to prevent electric
shocks.
Tips
Close the ashtray completely after use,so
as to reduce the possibility of accidents
while driving or injury during emergency
braking.
-------------------------------------------------------------------------------------------------------------------------------------------------------------
BYD e6A AUTO Owner's Manual
Other Equipment 1-95
a. To pull out the maintenance switch, rotate
the handle by 90 degrees to its limit
position, then pull up.
b. After the switch is pulled out, you may see
an opening on the switch housing. There is
a connector port inside the housing. Never
insert your finger or make contact with the
port.
c. To insert the switch, plug the handle in and
rotate it by 90 degrees to the limit position.
Sun Visors
Pull down the sun visors for usage. Remove
the sun visors from clips, and turn them to the
side window. Thus, they can also be used as
the side window sun visors.
Make sure the sun visors have been put back
to their original positions when entering or
leaving the vehicle.
Vanity mirror (if equipped)
Open the cover to use the vanity cosmetic
mirror in the sun visors. The lamp beside the
mirror will light on when the cover is opened.
Rotate
down
Clip
Rotate to
one side
-------------------------------------------------------------------------------------------------------------------------------------------------------------
BYD e6A AUTO Owner's Manual
1-96 Other Equipment
NOTICE
The high voltage in BYD e6A pure
electric vehicle could be 220 V or
more. For the sake of safety,
remember to pull the service switch
out when performing maintenance
work.
During charging, the emergency
switch can be pulled out in an
emergency. The switch service life
while charging is only once.
To insert or pull the service switch,
make sure that the overall low voltage
supply is switched off and the start
button is not enabled (Never insert or
pull the emergency switch when the
overall low voltage is on, otherwise
the controller may be damaged).
-------------------------------------------------------------------------------------------------------------------------------------------------------------
BYD e6A AUTO Owner's Manual
BYD e6A Operation and Driving 2-1
Chapter 2
BYD e6A Operation and Driving
e6A Operation Tips
Gear Actuator . . . . . . . . . . . . . . . . . . 2-2
Electric Power Steering . . . . . . . . . . . . . .. 2-3
Cooling System . . . . . . . . . . . . . . . . .. 2-4
Brake System . . . . . . . . . . . . . . . . . . 2-7
Precautions on Luggage Loading . . . . . . . . . ... 2-9
Charging Introduction & Precautions on Electric Vehicle
High Voltage System . . . . . . . . . . . . . . .. 2-9
-------------------------------------------------------------------------------------------------------------------------------------------------------------
BYD e6A AUTO Owner's Manual
2-2 BYD e6A Operation and Driving
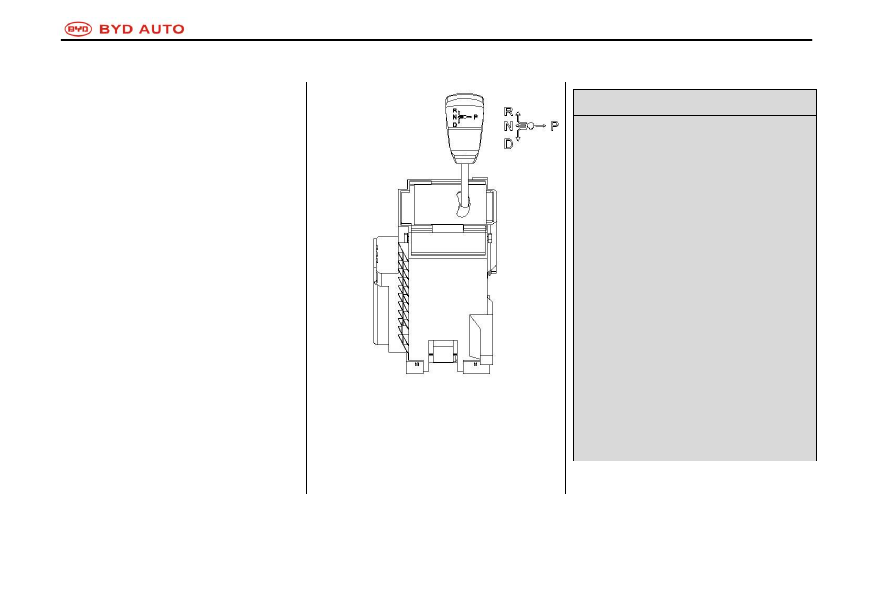
Gear selection and operation
The gears for automatic transmission are
marked on the shift handle, P is park. When
the brake pedal is pressed, and the READY
indicator lights on after starting, you may shift
from P to other gears; R is reverse, which can
function after the vehicle is stationary. Nis
neutral, which can function when temporarily
stopped. D is driving, which can be used in
normal driving. The gear shifting can be
realized easily by shift handle
,
except that the
brake pedal has to be pressed down when
starting. The shift handle will return to the
central position after releasing your hand and
gear shifting successfully.
NOTICE
Do not depress the accelerator pedal
when shifting the lever, or depress it at
once even if gear shifting is completed
successfully, to prevent damage to the
transmission.
Never shift to reverse position when
the vehicle is driving forward to prevent
parts damage. Be sure that the vehicle
is stationary before shifting into reverse
position.
Do not brake only using P gear to
prevent damage from the excessive
force. And do not coast in neutral gear
for a long time to prevent damage to
the transmission.
When idling, please release the brake
pedal slowly after shifting to D or R
gear in order to achieve a steady
driving speed.
-------------------------------------------------------------------------------------------------------------------------------------------------------------

BYD e6A AUTO Owner's Manual
BYD e6A Operation and Driving 2-3
Electric-hydraulic power steering
system
An electric-hydraulic power steering system is
adopted in this vehicle model.
When the power switch is at ON position,
EHPSwill be activated.
The steering system warning lamp is as
shown in the illustration below:
You may feel the steering wheel is hard to
operate while the warning lamp of electrical
power steering system doesn't come on
under the following conditions, but this is not
a malfunction.
Operate or turn the steering wheel
frequently for a long time
The motor may be overheating when
operating the steering wheel for an extended
period of time. To protect the mechanical
units in the motor, the overheat protection
function may be activated in the ECU, so the
amount of power assistance will be reduced
or cancelled. At this time, please stop turning
the steering wheel or stop the vehicle and put
the power switch to ACC or OFF position. The
steering system will cool down and restore
power assistance in 10 minutes.
In addition, the steering wheel is also hard to
turn when the battery lacks power.
When the battery lacks power
The minimum voltage for EPS ECU is 10 V.
When the battery lacks power and deviates
from the operating voltage range for ECU,
there will be no power assistance. At this
point, check the condition of battery. And then
charge the battery or replace a new one if
necessary.
Warning lamp for electrical power steering
system
When any of the situations below occur, there
may be a malfunction with the steering
system indicated by the warning lamp.
When the power switch is at ON position, this
lamp will remain on or not come on.
1. This lamp will remain on when driving.
In the above cases, please have the vehicle
repaired by the authorized BYD service
station as soon as possible. You have to hold
the steering wheel tightly and operate it with
more force under such conditions.
Tips
Be sure that the brake pedal is depressed
before starting, and then move the shift
handle to start and drive. It is preferred to
move the shift handle to the desired
position after the motor has run for a few
seconds, and release the parking brake,
then release the brake pedal slowly to start
the vehicle when it creeps forward.
Keep the brake pedal depressed firmly and
move your foot away from the accelerator
pedal, when stopping in D, N or R position.
Do remember to switch gear to park
position whenever leaving the vehicle.
Please keep a proper driving speed in order
to comply with the local regulations.
-------------------------------------------------------------------------------------------------------------------------------------------------------------
BYD e6A AUTO Owner's Manual
2-4 BYD e6A Operation and Driving
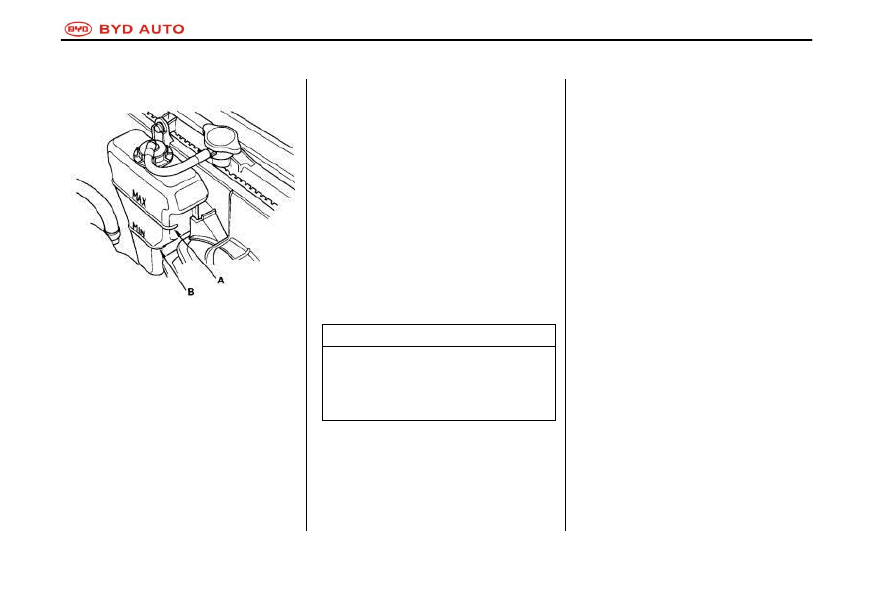
Cooling System
Refill motor coolant
If the coolant level is not higher than the
expansion tank Low limit scale (MIN), refill the
coolant or distilled water to the High limit
scale (MAX). Check the cooling system for
leakage. Please replace the specified coolant
after consulting the service personnels in the
BYD service station.
Always use the BYD original long-life
antifreeze coolant. It is unnecessary to add
any mixture. If it cannot be obtained then any
coolant not containing silicate from a
reputable brand could be used as a substitute.
Only use use recommended and qualified
coolants which are suitable for aluminum
motors. Otherwise, corrosion may occur and
will result the malfunction of the cooling
system or even failure if non-original coolant
is used for a long period. In this case, please
drain the cooling system in good time and
refill using BYD original antifreeze coolant. Do
not mix and use the coolants with different
brands and types.
If the expansion tank is drained completely,
check the radiator coolant level as well.
Tips
If the radiator cap is opened when the
motor hasn't cooled down thoroughly, the
coolant may spill out, resulting in serious
burn injuries.
Before opening the radiator cap, make sure
the motor, DC-DC, motor controller and
radiator have all cooled down.
a. Confirm that the motor, DC-DC, motor
controller and radiator have cooled down.
b. Turn the radiator cap counterclockwise
(without pressing down), until it cannot be
turned any more. The residual pressure in
the cooling system can be released
completely.
c. To remove the radiator cap, turn the cap
counterclockwise while pressing it.
d. The coolant level should reach the lower
edge of coolant filler neck. If the coolant
amount is still insufficient, please refill it
again.
Refill the coolant slowly and carefully to
prevent from spilling out. Since the spilled
coolant could damage the components in the
engine cabin. If it spills, clean it up
immediately and completely.
e. Install and tighten the radiator cap securely.
f.
Refill coolant into the expansion tank, until
the level reaches between the upper limit
scale (MAX) and Lower limit scale (MIN).
Then install the radiator cap.
-------------------------------------------------------------------------------------------------------------------------------------------------------------
Нет комментариевНе стесняйтесь поделиться с нами вашим ценным мнением.
Текст