Freightliner Cargo Maintenance Manual — part 16
35–01 Axle Lubricant Level
Check
CAUTION
Failure to keep the rear axle filled to the proper
level with the recommended lubricant can result in
rear axle damage.
1.
Clean the oil fill hole plug, located in the carrier
or the side of the axle housing, and the area sur-
rounding it. Remove the plug.
NOTE: Some Meritor axles have a small tapped
and plugged hole located near and below the
housing oil fill hole. This smaller hole is for the
lubricant temperature sensor only, and must not
be used as a fill or level hole.
2.
With the vehicle on level ground, lubricant must
be level with the bottom of the oil fill hole.
If low, add lubricant. See
for approved
axle lubricants and see
for axle capaci-
ties.
3.
Install the fill hole plug, and tighten it 35 lbf·ft (47
N·m).
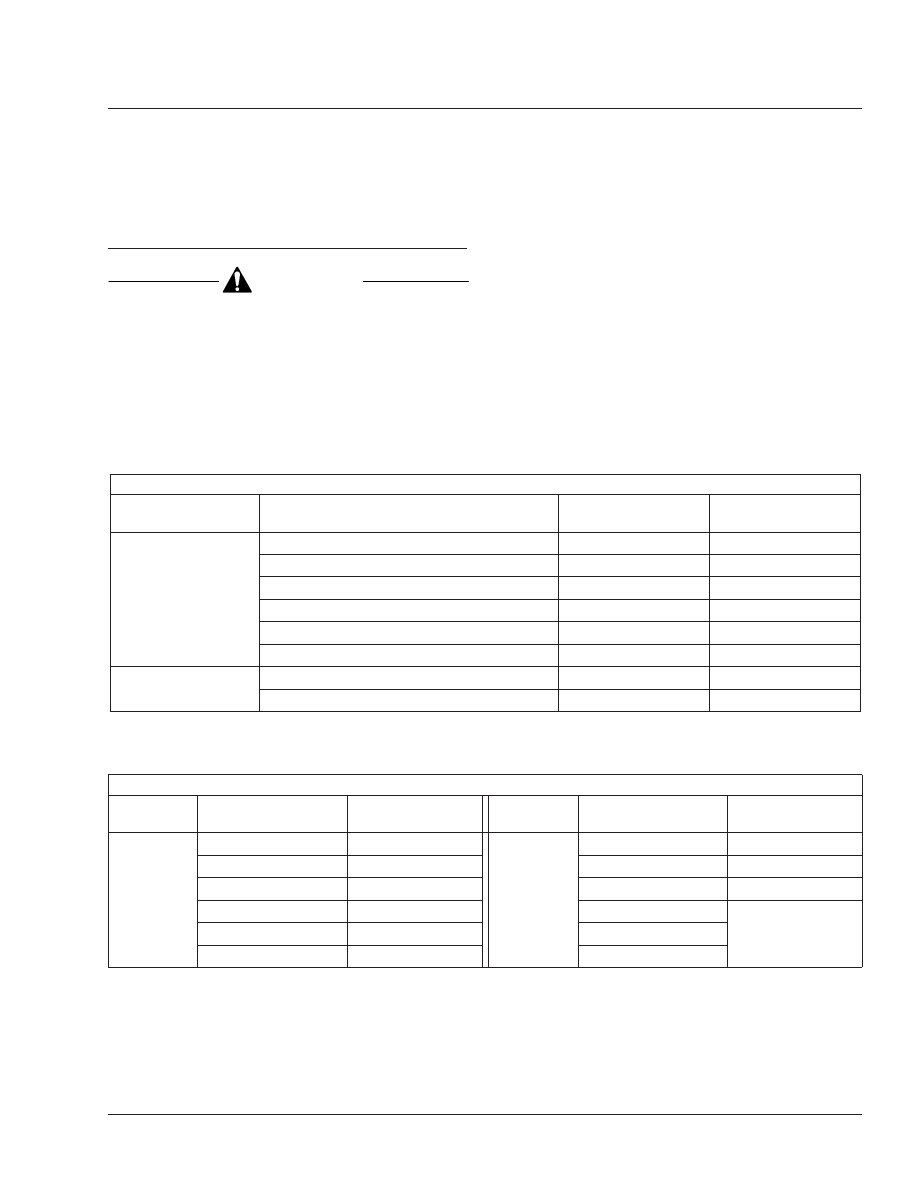
Meritor Drive Axle Recommended Lubricant
Recommended
Lubricant Type
Ambient Temperature
Lubricant SAE
Viscosity Grade
Meritor Specification
Hypoid Gear Oil API
Service Classification
GL-5
+10°F (–12.2°C) and up
*
85W–140
0-76-A
–15°F (–26.1°C) and up
*
80W–140
0-76-B
–15°F (–26.1°C) and up
*
80W–90
0-76-D
–40°F (–40°C) and up
*
75W–90
0-76-E
–40°F (–40°C) to +35°F (+2°C)
75W
0-76-J
–40°F (–40°C) and up
*
75W–140
0-76-L
Synthetic Gear Oil
–40°F (–40°C) and up
*
75W–90
0-76-N
–40°F (–40°C) and up
*
75W–140
0-76-M
*
There is no upper limit on these ambient temperatures, but axle sump temperature must never exceed 250°F (121°C).
Table 1, Meritor Drive Axle Recommended Lubricant
Meritor Drive Axle Lubricant Capacities, Single Axles
Axle Type
Axle Model
Capacity
*
pints (liters)
Axle Type
Axle Model
Capacity
*
pints (liters)
Single
†
RS-17-145
33.6 (15.9)
Single
†
RS-21-230
39 (18.5)
RS-17-220
31 (14.7)
RS-23-160
42 (19.9)
RS-19-145
34.4 (16.3)
RS-23-161
37.2 (17.6)
RS-19-220
31 (14.7)
RS-23-186
45 (21.3)
RS-21-145
32 (15.1)
RS-23-240
RS-21-160
39.5 (18.7)
RS-26-185
*
Quantities listed are approximate and include 1 pint (0.5 liter) for each wheel end and with the drive pinion at 3 degrees.
†
Single drive axles equipped with traction equalizers may require a "friction modifier" to correct a slip-stick condition. Meritor’s experience shows that the fol-
lowing additives perform adequately: Add Elco No. 2 Friction Modifier (1 ounce [30 mL] of additive for each 1 pint [0.5 liter] of lube capacity) or Lubrizol No. 797
or 762 (one ounce [30 mL] of additive for each 1 pint [0.5 liter] of lube capacity).
Table 2, Meritor Drive Axle Lubricant Capacities, Single Axles
Rear Axle
35
Cargo Maintenance Manual, January 2000
35/1

35–02 Axle Breather Check
The axle housing breather must remain clean. When-
ever the axle lubricant level is checked, check that
the axle breather is open. Check more often under
poor operating conditions. If the breather is plugged,
clean or replace it as needed.
35–03 Axle Lubricant Change
and Magnetic Plug Clean
A regular schedule for changing the axle lubricant in
a particular vehicle and operation can be accurately
determined by analyzing oil samples taken from the
axle at specified intervals or mileages. Lubricant sup-
pliers frequently make their laboratory facilities avail-
able for determining the useful life of their product
under actual service conditions. The final schedule
that is recommended may, for economic reasons, be
correlated with lubricant changes that are governed
by climatic conditions and magnetic plug mainte-
nance. Change lubricant type and viscosity as cli-
matic temperatures demand, regardless of vehicle
mileage or established change schedule.
The normal operating temperature of compounded
lubricants during the summer season is about 160°
to 220°F (71° to 104°C). The chemicals and addi-
tives that give these lubricants increased load-
carrying capacity, oxidize faster at temperatures
above 220°F (104°C), contributing to more rapid lu-
bricant deterioration. For this reason, lubricants of
this type, that operate continuously at high tempera-
tures, must be changed more frequently.
CAUTION
Failure to change the axle lubricant at more fre-
quent intervals, when adverse operating condi-
tions require, could result in axle damage.
Axle Drain and Flush
1.
Remove the plug at the bottom of the housing
and drain the lubricant while the unit is warm.
Allow enough time for all the old lubricant to
drain completely.
2.
Flush the unit with clean flushing oil, then drain it
completely.
IMPORTANT: Do not flush axles with solvent,
such as kerosene.
3.
Clean the drain plugs. For magnetic drain plugs,
a piece of key stock or any other convenient
steel slug may be used to short the two magnetic
poles and divert the magnetic field.
NOTE: Meritor recommends using magnetic
plugs with elements having a minimum pickup
capacity of 2 pounds (1 kg) of low-carbon steel,
in plate or bar form. Magnets will rapidly lose
effectiveness as collected material bridges the
gap between the two poles. Clean or change
the plugs before this occurs. It may be neces-
sary to clean or change the plugs one or more
times between lubrication change intervals.
4.
After cleaning the drain plugs, install and tighten
them 35 lbf·ft (47 N·m).
Axle Fill
1.
With the vehicle on a level surface, fill the axle
housings to the bottom of the oil fill hole (in the
carrier or housing) with lubricant. See
for
approved axle lubricants and see
for
axle capacities.
NOTE: Meritor axles have a small tapped and
plugged hole located near and below the hous-
ing oil fill hole. This smaller hole is for the lubri-
cant temperature sensor only, and must not be
used as a fill or level hole.
2.
Install the fill hole plug, and tighten it 35 lbf·ft (47
N·m).
3.
After filling the carrier and housing assembly with
lubricant, drive the vehicle, unloaded, for 1 or 2
miles (2 or 3 kilometers) at speeds not to exceed
25 mph (40 km/h), to thoroughly circulate the
lubricant throughout the assembly.
Rear Axle
35
Cargo Maintenance Manual, January 2000
35/2
Title of Maintenance Operation (MOP)
MOP Number
Wheel Nut and Rim Nut Check. . . . . . . . . . . . . . . . . . . . . . . . . . . . . . . . . . . . . . . . . . . . . . . . . . . . . . . . 40–01
Wheels and Tires
40
Index, Alphabetical
Cargo Maintenance Manual, January 2000
40–01 Wheel Nut and Rim Nut
Check
IMPORTANT: In addition to the maintenance
interval in this manual, check the wheel nut
torque the first 50 to 100 miles (80 to 160 km)
of operation after a wheel has been removed
and installed.
When checking wheel nuts on a dual disc assembly,
remove one outer nut at a time, tighten the inner nut,
then reinstall the outer nut. Repeat this procedure for
all of the inner wheel nuts in the sequence shown in
, then tighten all of the outer wheel nuts in the
same sequence.
CAUTION
Too little wheel nut torque can cause wheel
shimmy, resulting in wheel damage, stud break-
age, and extreme tire tread wear. Too much wheel
nut torque can break studs, damage threads, and
crack discs in the stud hole area.
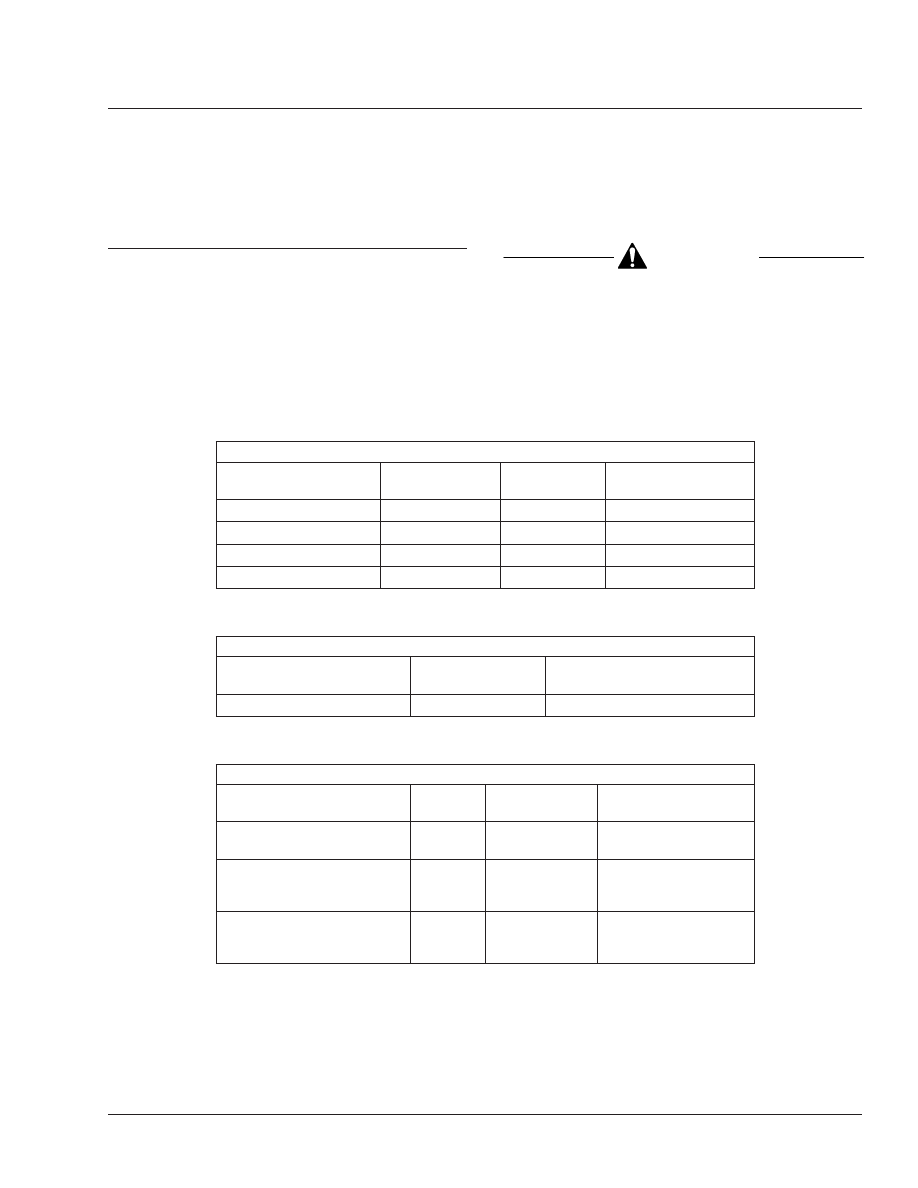
See
, or
for wheel nut
torque specifications, and see
for the tighten-
ing sequence.
Fastener Torque for 10-Hole Disc Wheel With Inner and Outer Locknuts
Description
Nut Size
Wheel
Manufacturer
Torque (dry threads)
lbf·ft (N·m)
Front Wheel Nut
3/4–16, 1-1/8–16
Accuride
450–500 (610–680)
Rear Wheel Inner Nut
3/4–16
Accuride
450–500 (610–680)
Rear Wheel Outer Nut
1-1/8–16
Accuride
450–500 (610–680)
Wheel Stud Retainer Nut
3/4–16
Accuride
175–200 (235–270)
Table 1, Fastener Torque for 10-Hole Disc Wheel With Inner and Outer Locknuts
Fastener Torque for 8-Hole Disc Wheel With Cone Locknuts
Description
Nut Size
Torque (lubricated threads)
lbf·ft (N·m)
Front and Rear Wheel Nuts
M20
280–310 (380–420)
Table 2, Fastener Torque for 8-Hole Disc Wheel With Cone Locknuts
Spoke-Type Wheel Fastener Torque
Description
Size
Wheel
Manufacturer
Torque (dry threads)
lbf·ft (N·m)
Front Wheel Nut, 5- and
6-Spoke
3/4–10
Gunite
200–225 (270–305)
*
Rear Wheel Nut, 5- and
6-Spoke With Channel Spacer
(
3/4–10
Gunite
200–225 (270–305)
Rear Wheel Nut, 5- and
6-Spoke With Corrugated
Channel Spacer (
3/4–10
Gunite
240–260 (325–350)
*
On front axles with over 12,000 lbs (5448 kg) capacity, tighten the wheel nuts 240 to 265 lbf·ft (325 to 359 N·m).
Gunite part number W-854 nut with a phosphate and oil coating must be used.
Table 3, Spoke-Type Wheel Fastener Torque
Wheels and Tires
40
Cargo Maintenance Manual, January 2000
40/1
Нет комментариевНе стесняйтесь поделиться с нами вашим ценным мнением.
Текст