Freightliner Business Class. Manual — part 18
7.
Insert the dipstick into the tube and remove the
dipstick.
8.
Check the fluid level reading and repeat the
check procedure to verify the reading.
If the fluid level is within the COLD RUN band,
the transmission may be operated until the fluid
is hot enough to perform a HOT RUN check.
If the fluid level is not within the COLD RUN
band, add or drain fluid as needed to adjust the
fluid level to the middle of the COLD RUN band.
See
for the AT, MD, and HD series, and
for the MT series.
CAUTION
Do not fill above the COLD RUN band if the trans-
mission fluid is below normal operating tempera-
ture. As fluid temperature increases, so does the
fluid level. Filling above the COLD RUN band
when the transmission is below normal operating
temperature may result in an overfilled transmis-
sion, which causes fluid foaming, and aeration.
Fluid foaming and aeration cause transmission
overheating and erratic shifting.
NOTE: Perform a hot check at the first opportu-
nity after the normal operating temperature,
160° to 200°F (71° to 93°C) has been reached.
09/24/96
f260396
1
13
17
19
15
11
3
5
9
7
6
10
8
4
12
16
20
21
18
14
2
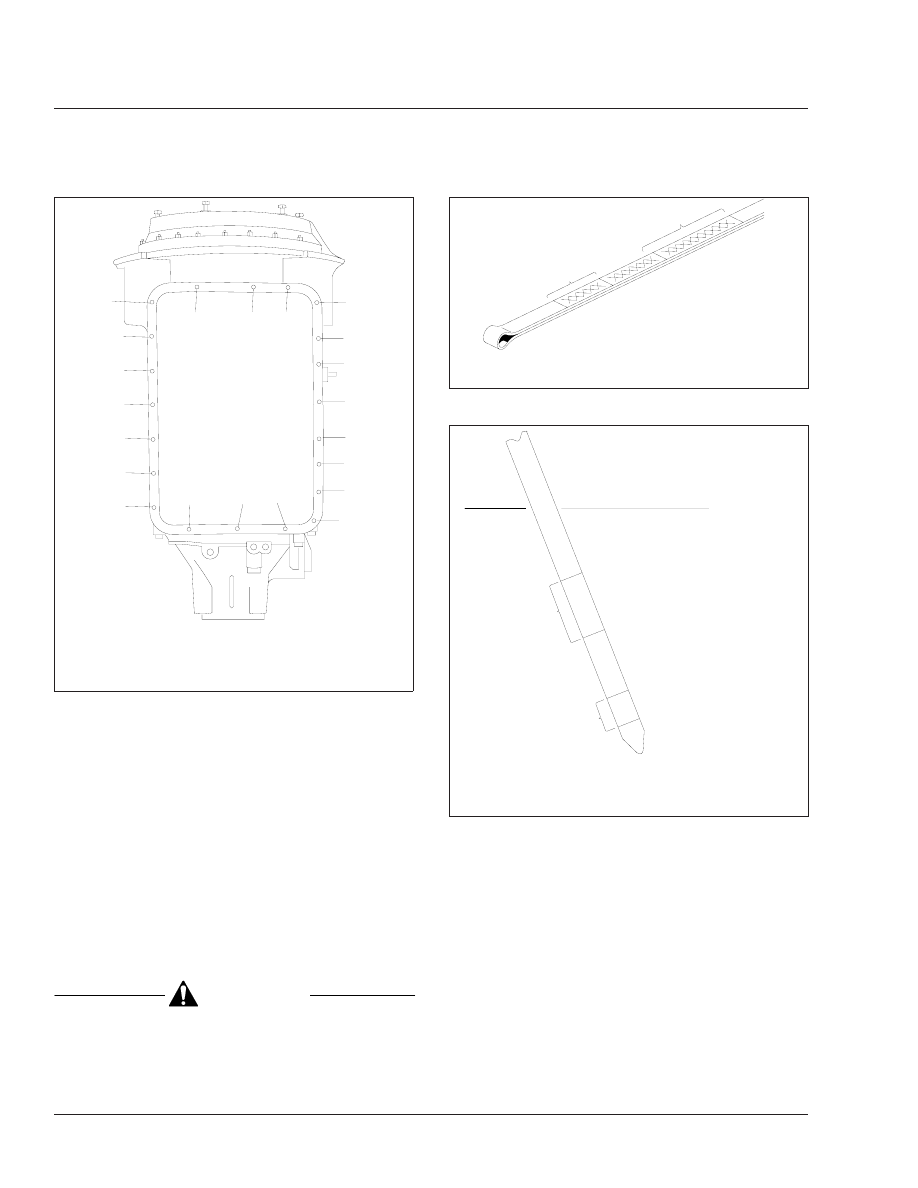
NOTE: Torque the oil pan bolts with a click-type torque
wrench following this torque pattern. Tighten the bolts 5
lbf·ft (7 N·m), then repeat the torque pattern with a click-
type torque wrench 15 to 20 lbf·ft (20 to 27 N·m).
Fig. 9, Allison MT Series Transmission, Oil Pan Torque
Pattern
12/01/97
A
B
f270002a
A. Cold Run Band
B. Hot Run Band
Fig. 10, AT, MD, and HD Series Dipstick Markings
B
C
CHECK IN NEUTRAL AT IDLE
HOT RUN
RE
F
FILL
01/22/97
f260395
A
A. Transmission Housing/Oil Pan Split Line
B. Hot Run Band
C. Cold Run Band
Fig. 11, MT Series Dipstick Markings, 5.1-Inch Depth Oil
Pan
Transmission
26
26/12

Hot Check
1.
Park the vehicle on a flat, level surface. Apply
the parking brakes and chock the rear tires.
2.
Shift the transmission to NEUTRAL.
3.
Operate the engine at idle (500–800 rpm) until
normal operating temperature is reached. Check
that the sump temperature is 160° to 200°F (71°
to 93°C). Check that the converter-out tempera-
ture is 180° to 220°F (82° to 104°C).
4.
With the engine idling, remove the dipstick from
the tube and wipe it clean.
5.
Insert the dipstick into the tube and remove it.
6.
Check the fluid level reading and repeat the
check procedure to verify the reading. Safe oper-
ating level is within the HOT RUN band on the
dipstick. The HOT RUN band is between the
HOT FULL and HOT ADD marks.
If the fluid level is not within the HOT RUN band,
add or drain fluid as needed to bring the fluid
level within the HOT RUN band. See
for
the AT, MD, and HD series, and
for the
MT series.
26–06 Chrysler Transmission
Fluid and Filter
Changing
Replacement
1.
Park the vehicle on a level surface and apply the
parking brakes.
CAUTION
To prevent dirt from entering the transmission,
use only clean containers and fillers for the trans-
mission fluid. Do not use containers or fillers that
have been used for water or antifreeze. Dirt, water,
or antifreeze could damage the transmission.
2.
While the transmission fluid is warm, raise the
vehicle, remove the oil pan, and drain the fluid.
IMPORTANT: Examine the used transmission
fluid for dirt, coolant or water, and metal par-
ticles. If any of these contaminants are present,
there may be a problem within the transmission.
3.
Remove the three filter screws. Remove the filter
from the valve body. See
4.
Install the new filter.
4.1
Position the new filter on the valve body
and install the filter screws finger-tight.
4.2
Tighten the filter screws 35 lbf·in (400
N·cm).
4.3
Install the oil pan bolts and tighten them
13 lbf·ft (17 N·m).
Refilling After Fluid and Filter Change
1.
Lower the vehicle and remove the dipstick. Using
a clean funnel in the fill tube, add 2 quarts (1.9
liters) of Mopar ATF Plus, Type 7176 transmis-
sion fluid.
2.
Check and adjust the fluid level using the proce-
dures under "Checking the Fluid Level."
Checking the Fluid Level
1.
With the transmission in neutral and the parking
brake applied, run the engine at idle for at least
one minute to clear the fluid system of air.
2.
Shift the transmission briefly through all the gear
ranges. Then shift back into neutral.
3.
Wipe the dipstick clean and check the fluid tem-
perature.
NOTE: Fluid at the operating temperature of
approximately 180°F (82°C) is hot. Hot fluid
cannot be held comfortably between the finger-
tips. The fluid will be hot if the vehicle has been
driven 15 miles (23 km) or more.
Fluid at temperatures of approximately 85° to
125°F (29° to 52°C) is warm.
4.
Wipe the dipstick clean again and reinsert it until
seated. Check the fluid level and add or drain
fluid as necessary.
4.1
If the fluid is warm, any level above the
MIN dot (see
) is satisfactory. If
the level is at or below the MIN dot, use a
funnel to add fluid until the level is above
this dot. At the next opportunity, check the
fluid when it is hot.
Transmission
26
26/13

CAUTION
Do not overfill the transmission. Overfilling
causes leakage from the pump vent (this can be
mistaken for a pump seal leak), bubbles in the
fluid, and foaming. This can reduce fluid life sig-
nificantly and cause shifting problems.
1
2
3
4
5
6
7
8
9
10
11
12
13
14
15
16
17
18
19
20
21
f260301
12/12/94
1.
Torque Converter
2.
Input Shaft
3.
Oil Pump
4.
Front Band
5.
Front Clutch
6.
Rear Clutch
7.
Planetaries
8.
Rear Band
9.
Overrunning Clutch
10. Overdrive Clutch
11. Direct Clutch
12. Planetary Gear
13. Governor
14. Output Shaft
15. Seal
16. Intermediate Shaft
17. Overdrive Overrunning Clutch
18. Direct Clutch Spring
19. Overdrive Piston Retainer
20. Filter
21. Valve Body
Fig. 12, Chrysler 46RH Transmission and Overdrive Unit
MAX
MIN
OK
1
2
3
4
f260302
12/12/94
1.
MIN Dot (Minimum Level—Add Fluid)
2.
OK Band (Acceptable Fluid Level)
3.
MAX Mark (Maximum Correct Fluid Level)
4.
Dipstick
Fig. 13, Dipstick Fluid Level Markings, Chrysler Transmission
Transmission
26
26/14

4.2
If the fluid is hot, any level within the OK
band (see
) is satisfactory. If the
level is below the OK band, use a funnel
to add just enough fluid to bring the level
up to the MAX mark. Do not overfill.
4.3
If fluid is above the MAX mark, drain off
any excess fluid at one of the cooler
lines. If the cooler lines are too hot, use a
suction gun and flexible tubing with a di-
ameter of 1/8 inch to 3/16 inch (3 mm to
4.75 mm).
NOTE: See
for approved transmission
lubricants, and
for lubricant capacities.
5.
To prevent dirt and water from entering the trans-
mission, be sure the dipstick cap is properly
seated.
6.
When the fluid level is correct, shut down the
engine and release the parking brake.
Approved Chrysler Transmission Lubricants
Lubricant Type
Temperature
in °F (°C)
SAE
Viscosity
Mopar ATF Plus, Type 7176
—
—
Table 6, Approved Chrysler Transmission Lubricants
Chrysler Transmission Lubricant Capacities
Transmission Model
Refill Capacity in
Quarts (liters)
46RH (Full Capacity)
10.9 (10.3)
46RH (Fill Amount After Fluid
Change)
2.0 (1.9)
46RH (Fill Amount After Overhaul)
6.0 (5.7)
Table 7, Chrysler Transmission Lubricant Capacities
26–07 Chrysler Transmission
Band Adjusting
Front Band Adjusting
The front (kickdown) band adjusting screw is located
on the left-hand side of the transmission case above
the manual lever shaft and the park/neutral position
switch. See
1.
Raise the vehicle.
2.
Loosen the locknut on the front band adjusting
screw.
3.
Back off the locknut three to five turns. Make
sure the adjusting screw turns freely in the trans-
mission case. If necessary, apply lubricant to the
screw threads.
4.
Set the adjusting screw. To turn the adjusting
screw, use a 5/16-inch 8-point socket on a 0 to
100 lbf·in (0 to 1100 N·cm) torque wrench.
4.1
Tighten the adjusting screw 72 lbf·in (800
N·cm).
4.2
Back off the adjusting screw 2-7/8 turns.
5.
Holding the adjusting screw in position, tighten
the locknut 30 lbf·ft (41 N·m).
6.
Lower the vehicle.
Rear Band Adjusting
The rear (low-reverse) band adjusting screw is lo-
cated on the lower surface of the valve body. It is
accessible only when the oil pan and filter are re-
moved. See
1.
Raise the vehicle.
f260303
1
12/13/94
2
3
4
1.
Front Band Adjusting Screw
2.
Locknut
3.
Manual Lever Shaft
4.
Park/Neutral Position Switch
Fig. 14, Front Band Adjusting Screw, Chrysler
Transmission
26
26/15
Нет комментариевНе стесняйтесь поделиться с нами вашим ценным мнением.
Текст