Freightliner Business Class. Manual — part 16
Meritor Transmission Lubricant Capacities
Transmission Model
Refill Capacity
*
in Quarts (liters)
–115A/B/C/R (all)
10.0 (9.5)
–125A/B/C/R (all)
–135A/B/C/R (all)
10.25 (9.7)
–145A/B/C/R
10.25 (9.7)
–155A/B/C/R (all)
–165A (all)
Meritor 13-Speed RMO Series
RMO13–145A
11.0 (10.4)
*
Quantities listed are approximate. Fill the transmission until the lubricant
is level with the bottom of the fill hole, with the vehicle in normal operating
position.
Table 3, Meritor Transmission Lubricant Capacities
CAUTION
Operating a manual transmission with the oil level
higher or lower than recommended can result in
transmission damage. Do not overfill the transmis-
sion; overfilling will force oil out of the case
through the main shaft openings. Oil overflow
may also drain onto the clutch or clutch brake,
causing additional problems.
IMPORTANT: Do not mix types of oil, because
of possible incompatibility. Do not use multi-
viscosity oils or EP (Extreme Pressure) gear
oils. Do not use oil additives or friction modifi-
ers. If switching from a petroleum based lubri-
cant to a synthetic, all areas of each affected
component must be thoroughly drained. Switch-
ing to a synthetic lubricant, when a petroleum-
based lubricant has been used for 50,000 miles
(80 000 km) or longer, may affect transmission
performance. Monitor all seal areas for the first
10,000 miles (16 000 km) after changing to a
synthetic from a petroleum-based lubricant.
NOTE: The correct oil level is established by
checking the fill plug opening.
2.
Clean the fill plug, then install it in the gear case.
Tighten the plug as follows:
•
25 to 35 lbf·ft (34 to 48 N·m) for Eaton
Fuller transmissions with 3/4-inch pipe
threads.
•
60 to 75 lbf·ft (81 to 102 N·m) for Eaton
Fuller transmissions with 1-1/4-inch pipe
threads.
•
35 to 50 lbf·ft (48 to 67 N·m) for all Meritor
transmissions.
•
42 lbf·ft (57 N·m) for all Mercedes-Benz
transmissions.
26–03 Allison, Eaton Fuller,
and Meritor
Transmission Breather
Checking
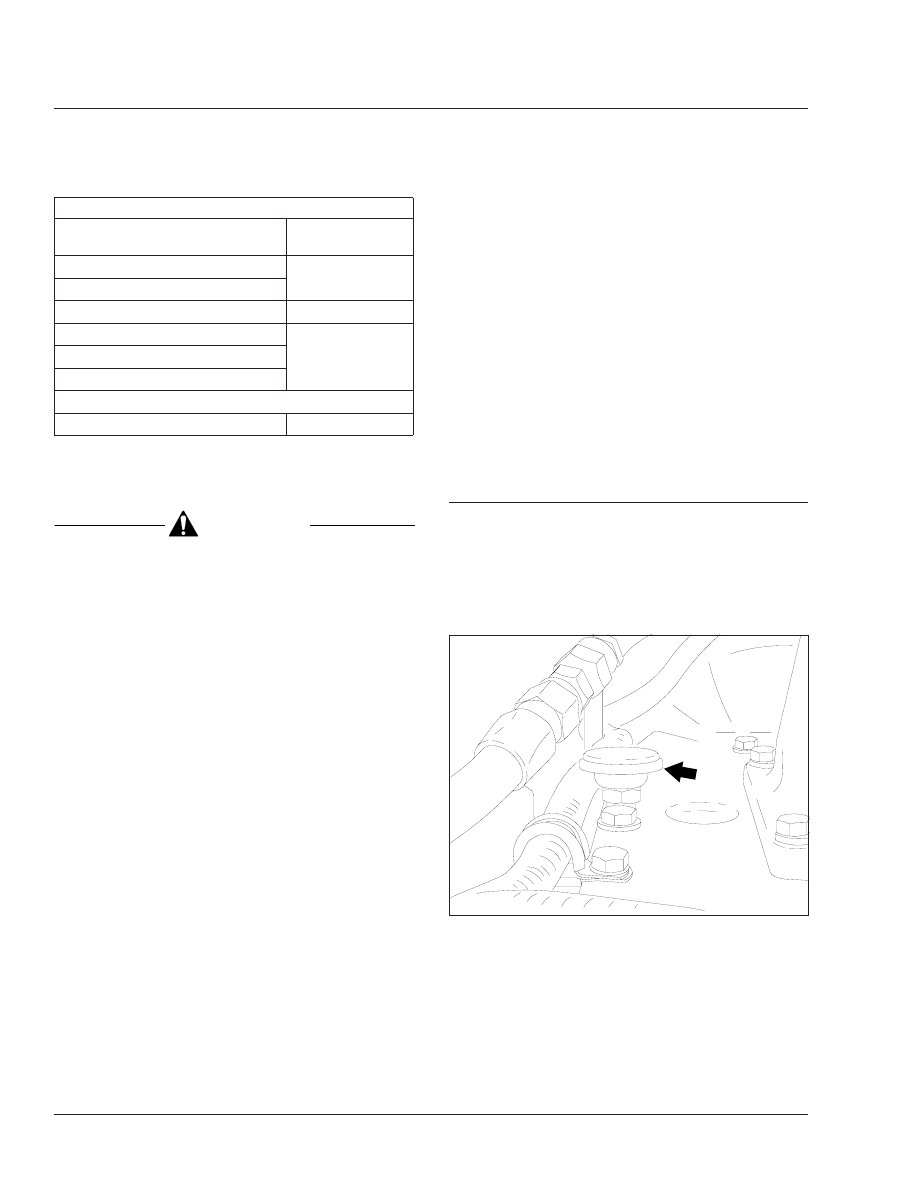
Transmission housing breathers must remain clear. A
plugged breather could result in pressure build-up,
which could cause oil leakage.
If the breather is plugged, clean or replace it. See
. Check more often if the vehicle is operating
under very dusty conditions.
f260007a
05/27/93
Fig. 2, Transmission Breather (Eaton Fuller shown)
Transmission
26
26/4

26–04 Eaton Fuller
Transmission Air Filter/
Regulator Element
Cleaning
NOTE: Meritor transmissions do not have an air
filter/regulator element that needs servicing.
1.
Exhaust the air from the air reservoirs.
WARNING
Exhaust the air supply before servicing the air
filter/regulator; otherwise, serious personal injury
and component damage could result.
2.
Clean the outside of the air filter/regulator with
cleaning solvent, then let it air dry. See
3.
Remove the end cap, large O-ring, and filter ele-
ment from the filter housing. See
. Remove
the small O-ring from the end cap.
NOTE: Do not remove, disassemble, or adjust
the air regulator. If the air regulator is not keep-
ing the air pressure between 57 to 62 psi (396
to 431 kPa), replace the air filter/regulator. It
cannot be repaired.
4.
Clean the filter element.
4.1
Dip the filter element in alcohol or other
cleaning solvent. Blow compressed air
through the filter element (inside to out-
side) to loosen surface dirt and to dry the
element. The sintered metallic filter ele-
ment will last the life of the vehicle, pro-
vided it is not damaged.
4.2
Wipe out the filter housing with a clean,
dry, lint-free rag.
5.
Clean and inspect the O-rings and the end cap.
Replace any parts that are damaged.
6.
Install the large O-ring, then the filter element
(small end first) into the filter housing.
7.
Install the small O-ring into the end cap, then
install the end cap on the filter housing. Tighten
the end cap until firm.
8.
Start the engine, and build up pressure in the air
system. Check for air leaks at the filter housing
and air line connections, and repair any leaks.
f260037a
05/27/93
Fig. 3, Eaton Fuller Transmission Air Filter/ Regulator
Location
1
2
3
4
5
6
7
f260052a
10/17/2001
1.
Air Regulator
2.
Housing
3.
Large O-Ring
4.
Filter Element
5.
Small O-Ring
6.
End Cap
7.
Plug
Fig. 4, Eaton Fuller Transmission Air Filter/ Regulator
Components
Transmission
26
26/5

CAUTION
Repair any air leaks. A leaking air filter or air lines
can cause slow or hard shifting of the transmis-
sion, and eventual transmission damage.
26–05 Allison Transmission
Fluid and Filter
Changing
AT Series
1.
Park the vehicle on a level surface and apply the
parking brakes.
2.
Run the engine until the transmission fluid
reaches the operating temperature of 160° to
200°F (71° to 93°C). Shift the transmission to
neutral (N) and shut down the engine.
CAUTION
To prevent dirt from entering the transmission,
use only clean containers and fillers for the trans-
mission fluid. Do not use fillers or containers that
have been used for water or antifreeze. Dirt, water,
or antifreeze could damage the transmission.
3.
Clean the area around the drain plug. While the
transmission fluid is warm, remove the drain plug
and drain the fluid. Disconnect the fill tube from
the oil pan.
IMPORTANT: Examine the used transmission
fluid for dirt, coolant or water, and metal par-
ticles. If any of these contaminants are present,
a problem may exist within the transmission
system.
4.
Support the oil pan, then remove the twenty-one
washer-head screws that attach the oil pan to
the transmission case. Remove the pan, and dis-
card the pan gasket.
5.
Clean the oil pan with mineral spirits.
6.
Remove the washer-head screw that attaches
the internal fluid filter to the filter spacer, then
remove the filter and discard it. See
. Re-
move the fluid intake tube, and then remove the
seal ring from the intake tube, and discard the
seal ring.
7.
Remove, clean, and install the governor feed line
screen, located in the control valve body. See
8.
Install a new seal ring into the fluid intake tube.
IMPORTANT: Avoid twisting the intake tube
when installing the internal fluid filter, intake
tube, and seal ring; the seal ring could be
pinched, cut, or deformed. An air-tight seal must
be maintained.
9.
Install the intake tube, with the seal ring installed,
into the main housing. Install the internal fluid
filter on the intake tube, making sure the grom-
met in the filter fits the intake tube snugly.
10. Install the washer-head screw to retain the fluid
filter, and tighten it 10 to 15 lbf·ft (14 to 20 N·m).
11. Submerge a new oil pan gasket in transmission
fluid for five minutes. Then place the gasket on
the pan; do not use any substance as a gasket
retainer.
IMPORTANT: Do not use gasket-sealing com-
pounds any place inside the transmission or
where they might get washed into the transmis-
f260133a
1
2
3
4
5
6
10/05/94
1.
Fluid Intake Tube
2.
Filter Spacer
3.
Internal Fluid Filter
4.
Washer-Head Screw
5.
Governor Pressure
Tube
6.
Governor Feed Tube
Fig. 5, Allison AT Series Transmission Filter
Transmission
26
26/6
sion. Also, nonsoluble vegetable-based cooking
compounds or fibrous greases must not be used
inside the transmission.
12. Install the oil pan and gasket.
12.1
Guide the pan and gasket carefully into
place. Guard against dirt or foreign mate-
rial entering the pan. Retain the pan with
four 5/16–18 washer-head screws, in-
stalled by hand into the corners of the
pan.
12.2
Install the remaining seventeen washer-
head screws by hand, carefully threading
each through the gasket and into the
transmission. Bottom all of the screws
before tightening any of them.
12.3
Tighten all twenty-one screws evenly 10
to 15 lbf·ft (14 to 20 N·m). Check the gas-
ket fit while the screws are being tight-
ened.
IMPORTANT: The oil pan bolts must main-
tain a minimum torque of 60 lbf·in (680
N·cm) after the oil pan gasket has taken a
set.
13. Install the fill tube at the side of the pan. Tighten
the tube fitting 90 to 100 lbf·ft (122 to 136 N·m).
14. Install the drain plug and gasket, and tighten the
plug 15 to 20 lbf·ft (20 to 27 N·m).
15. Replace the external (auxiliary) fluid filter.
16. Clean the area around the fill tube and remove
the dipstick. Using a clean funnel in the fill tube,
add transmission fluid. See
for approved
transmission lubricants, and
for lubricant
capacities.
17. Check and adjust the fluid level using the proce-
dure under "Checking the Fluid Level."
MD and HD Series
When draining transmission fluid, check for evidence
of dirt or water contamination. A small amount of
condensation will appear in the fluid during operation.
Water contamination is normally characterized as a
milky discoloration of the transmission fluid. Obvious
contamination of the transmission fluid indicates a
leak between the water and fluid areas of the trans-
mission cooler. Inspect and pressure-test the cooler
to confirm the leak; replace leaking transmission
coolers.
CAUTION
To prevent dirt from entering the transmission,
use only clean containers and fillers for the trans-
mission fluid. Do not use fillers or containers that
have been used for water or antifreeze. Dirt, water,
or antifreeze could damage the transmission.
1.
Park the vehicle on a level surface, apply the
parking brakes, and chock the rear tires.
Approved Allison Transmission Lubricants
Lubricant Type
*
Temperature in °F (°C)
SAE
Viscosity
All Allison Transmissions
Castrol
TranSynd
™
Above –67 (–55)
—
AT and MD Series
† ‡
Dexron
®
II
–25 to +120 (–32 to +48)
—
MT Series
Dexron IIE
–10 to +120 (–23 to +48)
—
Dexron III
Above –17 (–27)
—
Type C4
10 to 120 (–12 to +48)
SAE 10W
Type C4
32 to 120 (0 to 48)
SAE 30W
HD Series
‡
Dexron III
Above –17 (–27)
—
*
Lubricants listed in order of preference. Do not mix types of oil.
†
Factory filled with Dexron
®
II.
‡
For off-highway operation or where ambient temperature is consistently
above 86°F (30°C) or below –17°F (–27°C), refer to the manufacturer’s fluid
recommendations.
Table 4, Approved Allison Transmission Lubricants
Allison Transmission Lubricant Capacities
Transmission Model
Refill Capacity
*
in Quarts (liters)
On-Highway Series
1000/2000/2400
15.0 (14.2)
AT Series
AT–545
16.0 (15.1)
MT Series
Transmission
26
26/7
Нет комментариевНе стесняйтесь поделиться с нами вашим ценным мнением.
Текст