Freightliner Business Class. Manual — part 22
32–01 Suspension Inspecting
Freightliner Spring Front and Rear
Suspension Spring Assemblies
Inspecting
Inspect the front and rear suspension spring assem-
blies for pitted, cracked, broken, or abnormally bent
leaves and extreme rust. If any of these conditions
exist, replace the spring assembly. See Group 32 of
the
Business Class
®
Trucks Service Manual
for
instructions.
WARNING
Do not replace individual leaves of a damaged leaf
spring assembly; replace the complete spring as-
sembly. Visible damage (cracks or breaks) to one
leaf causes hidden damage to other leaves. Re-
placement of only the visibly damaged part(s) is
no assurance that the spring is safe. On front
spring assemblies if cracks or breaks exist in the
two top leaves, a loss of vehicle control could oc-
cur. Failure to replace a damaged spring assembly
could cause an accident resulting in property
damage, serious personal injury or death.
IMPORTANT: On multi-leaf suspensions, closely
inspect each component of the leaf spring as-
semblies, including the brackets, U-bolts, and
related parts.
Freightliner Spring Rear Suspension
Spring Brackets and Equalizer
Brackets Inspecting
Inspect the forward and rear spring brackets, equal-
izer brackets, and the wear pads, for wear, cracks,
and other damage. If any of these conditions exist,
replace the damaged bracket(s) and wear pad(s).
See Group 32 of the
Business Class
®
Trucks Ser-
vice Manual
for instructions.
WARNING
Failure to replace the forward spring brackets,
equalizer brackets, or rear spring brackets if they
are worn, cracked, or otherwise damaged could
result in progressive damage to and eventual
breakage of the bracket. This could cause a loss
of vehicle control resulting in property damage,
serious personal injury or death.
Freightliner Spring Tandem-Axle
Suspension Crossmember and
Gussets Inspecting
Inspect the tandem-axle frame crossmember and
gussets for wear, cracks, and other damage. If any of
these conditions exist, replace the damaged parts.
See Group 31 of the
Business Class
®
Trucks Ser-
vice Manual
for instructions. Check all fasteners for
tightness; see
in this manual for torque
values.
CAUTION
Failure to replace the suspension crossmember or
gussets if they are cracked, worn, or otherwise
damaged could result in damage to the vehicle
chassis.
Freightiner Spring Shock Absorber
Checking
Make sure that the shock absorber brackets are
tight, and that the shock absorber is not striking or
rubbing on the frame or some other part of the chas-
sis. See
. Check the rubber mounting bushings
and replace if worn. Inspect the shock absorber for
oil leakage.
If the shock absorber is worn or damaged, replace it
with a new one.
Freightliner Spring (Tandem) Radius
Rod Bushing Checking
1.
Without detaching the torque arms, attempt to
move (by hand) each of the radius-rod ends up,
down, in, and out. If there is any movement, re-
place the torque arm.
2.
Inspect the weld seams between the torque arm
tube and the shorter bushing tubes. If there are
cracks, replace the torque arm. Do not weld the
torque arm for any reason.
3.
Inspect the rubber bushing ends. See
. Re-
place the torque arm for any of the following rea-
sons:
Suspension
32
Business Class Trucks Maintenance Manual, July 1999
32/1

•
There are gaps between the rubber bush-
ing and the pin or the outer steel sleeve.
•
Either bushing end contacts a torque arm
pin mounting bolt.
•
There are cracks in the bushing.
•
Part of the rubber bushing extends beyond
the outside diameter of the outer bushing
sleeve.
Freightliner Spring (Tandem)
Equalizer Bushing Checking
1.
Block the frame up enough to take the weight of
the chassis off of the springs. Attempt to move
the equalizer up and down, by using a pry bar
between the top of the equalizer and the top of
the equalizer bracket. Apply hand pressure only.
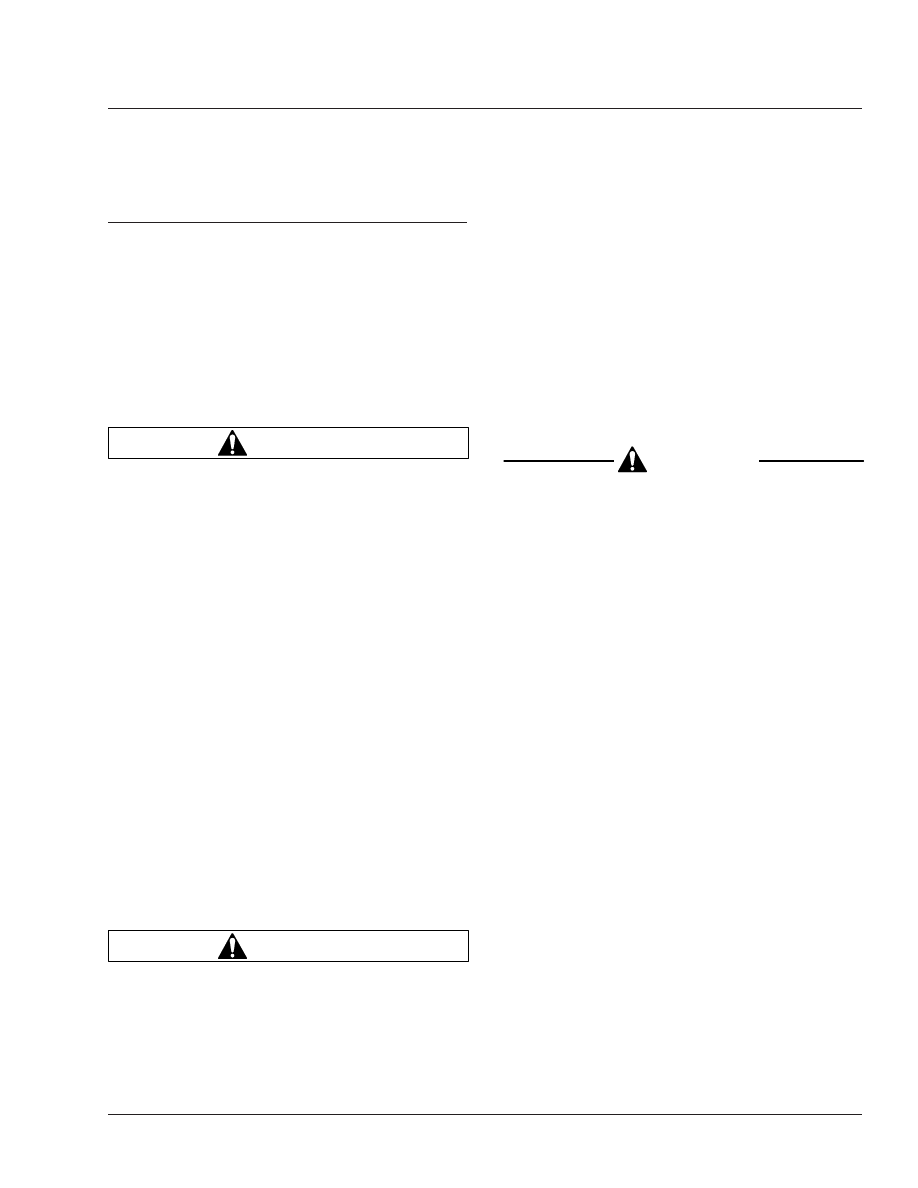
See
. If movement at the center of the
equalizer exceeds 1/8 inch (3 mm), replace the
equalizer bushings.
2.
With the vehicle unloaded, attempt to move the
equalizer side to side using a pry bar between
the equalizer and frame rail. Apply hand pressure
only. See
. If clearance between the equal-
izer assembly and any frame component or fas-
tener is less than 1/8 inch (3 mm), replace the
equalizer bushings.
Freightiner AirLiner Component
Clearance Checking
Check that the air line support brackets are posi-
tioned so the air lines do not rub against anything.
Reposition any configurations that could contact and
result in friction and wear. There must be at least 1
inch (25 mm) clearance around the rubber air spring
f320267a
10/05/94
1
2
3
1.
Upper Mounting Bracket
2.
Shock Absorber
3.
Lower Mounting Bracket
Fig. 1, Shock Absorber Installation (front suspension
shown)
f320021a
05/27/93
Fig. 2, Torque Arm Bushings
f320022a
05/27/93
1
2
3
A
A. Measure the change in gap at this point.
1.
Equalizer Bracket
2.
Equalizer
3.
Pry Bar
Fig. 3, Side View of the Equalizer
Suspension
32
Business Class Trucks Maintenance Manual, July 1999
32/2
when inflated. If the clearance is less than 1 inch (25
mm), relocate the obstructing parts.
CAUTION
Failure to relocate obstructing parts could result
in damage to the air spring.
Freightliner AirLiner Component
Inspecting and Operation Checking
WARNING
Inspect the components and check their operation
as described below. Failure to perform these in-
spections and checks could result in separation of
worn suspension components and loss of vehicle
control resulting in property damage, serious per-
sonal injury or death.
1.
Chock the front tires. Raise the rear of the ve-
hicle so the tires just clear the ground and the
suspension is fully extended. Place safety stands
under the vehicle frame.
2.
Squeeze all air springs to check for complete
deflation. If any air springs remain partially or
fully inflated, see Group 32 of the
Business
Class
®
Trucks Service Manual
.
3.
Inspect each air spring for wear at its connection
to its pedestal. Replace any worn air springs; for
instructions, see Group 32 of the
Business
Class
®
Trucks Service Manual
.
4.
Check the axle connection welds (beam-seat to
equalizing-beam) and axle-adapter to axle for
cracks. If welds are cracked, grind them out and
reweld the parts.
5.
Move the axle up and down while checking for
signs of looseness due to worn parts at the front
pivot connections. Replace any worn parts by
following the procedures in Group 32 of the
Business Class
®
Trucks Service Manual
.
6.
Inspect the shock absorbers for oil leaks and
worn rubber bushings. Replace the shock ab-
sorbers and/or rubber bushings if wear or dam-
age is noted. For instructions, see Group 32 of
the
Business Class
®
Trucks Service Manual
.
7.
Remove the safety stands and lower the rear of
the vehicle to the ground. Run the engine until
air pressure of at least 100 psi (689 kPa) is
maintained throughout the system.
8.
Check that all air springs are inflated. If the air
springs do not inflate, see Group 32 of the
Busi-
ness Class
®
Trucks Service Manual
for possible
causes and corrections.
Freightliner AirLiner Control Rod
Checking
1.
Without disconnecting the control rods, attempt
to move (by hand) each of the control rod ends
up, down, in, and out. If there is any movement,
examine the control rods for wear or damage.
Replace if necessary.
2.
Inspect the rubber bushings for cracks or cuts.
3.
Check for any shifting of the barpin.
4.
Check for cracks in the metal components and
welds.
NOTE: The Freightliner AirLiner Suspension is
manufactured at numerous weight ratings up to
46,000 pounds. The control rod on the 46,000-
pound-rated suspension is larger, and is fas-
tened differently than on other applications; see
Group 32of the
Business Class
®
Trucks Service
Manual for removal and installation information.
f320023a
05/27/93
1
2
3
4
5
A
A. 1/8 inch (3 mm) Clearance
1.
Frame Fasteners
2.
Frame Rail
3.
Pry Bar
4.
Equalizer
5.
Equalizer Bracket
Fig. 4, Top View of the Equalizer
Suspension
32
Business Class Trucks Maintenance Manual, July 1999
32/3
Hendrickson Suspension Inspecting
Inspect the suspension assembly for wear, cracks,
and damage to its components. Replace the compo-
nent(s) if any wear, cracks, or damage exists. For
instructions, see Group 32 of the
Business Class
®
Trucks Service Manual
. Check all fasteners for
tightness.
Check for distorted or frayed rubber at the beam end
bushings. If the bushings are damaged, replace
them.
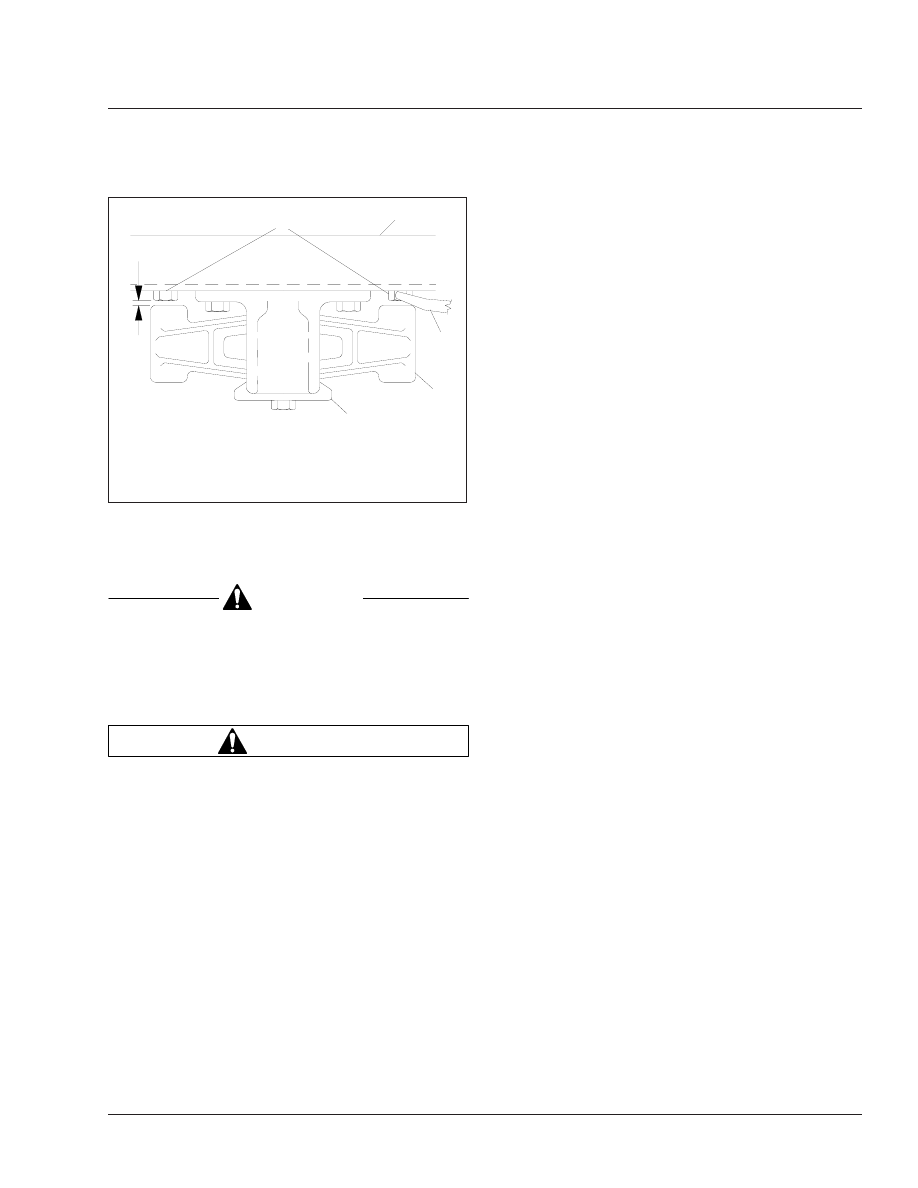
Check that the ends of the equalizer beam are not
lower in the beam hanger.
If the equalizer beam ends appear lower, use a jack
to raise each beam end, and check for movement of
the inner metal of the rubber end bushing (see
). Movement cannot be corrected by tightening
the fastener, because parts could be damaged. If
there is movement, replace the rubber end bushings
and all connecting parts.
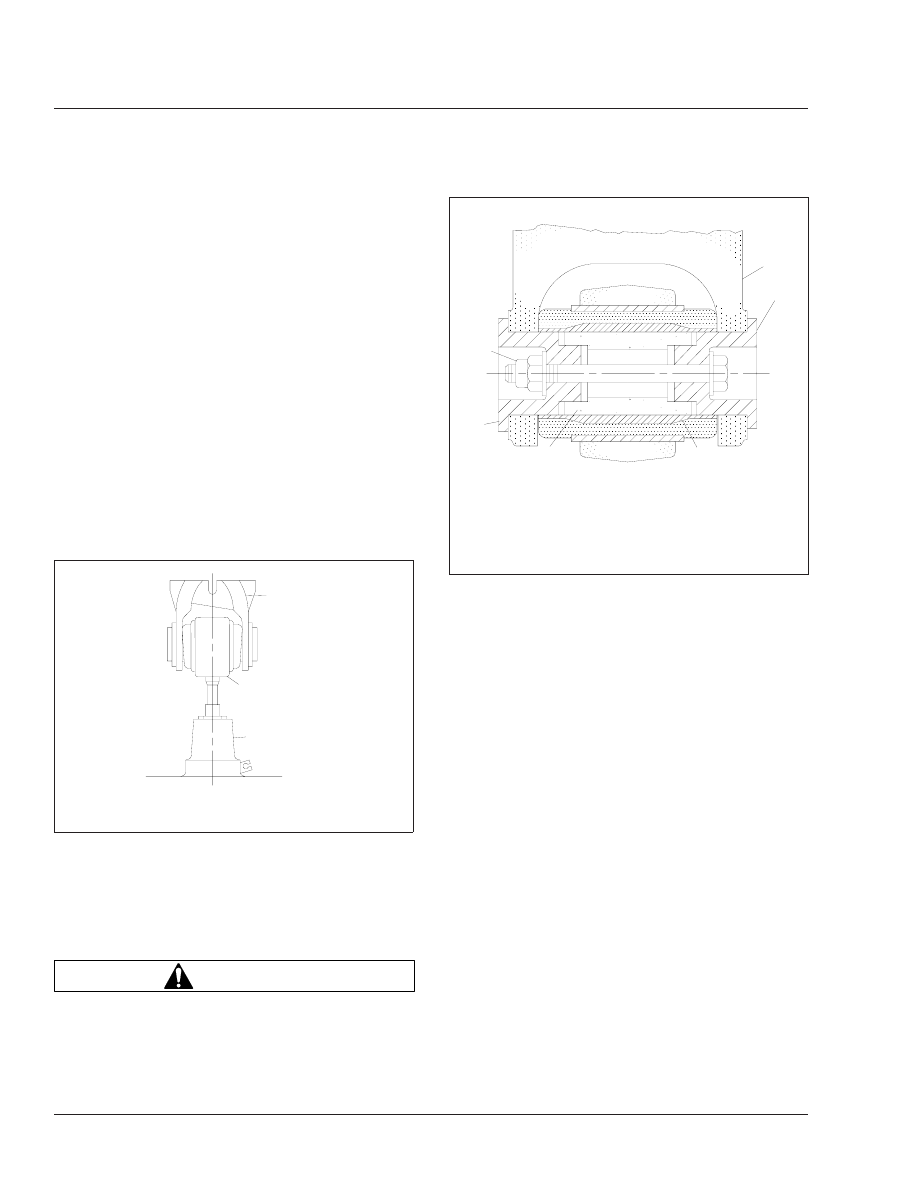
After repairs to the suspension, check the fastener
torque after the vehicle has been in service for 2500
miles (4000 km). Tighten the adapter-type beam end
connection nut (see
), 210 to 240 lbf·ft (285 to
325 N·m). Do not over-torque.
WARNING
Insufficient beam end fastener torque could cause
the beam to separate from the axle. This will
cause loss of vehicle control resulting in property
damage, serious personal injury or death.
f320039a
05/27/93
1
2
3
1.
Beam Hanger
2.
Equalizer Beam
3.
Jack
Fig. 5, Raising the Beam End
f320110a
05/27/93
1
2
2
3
4
5
NOTE: Do not use the three-piece adapter without the
intermediate tube.
1.
Nut
2.
Adapter
3.
Intermediate Tube
4.
Inner Metal of Beam
End Bushing
5.
Beam Hanger
Fig. 6, Three-Piece Adapter-Type Beam End Connection
Suspension
32
Business Class Trucks Maintenance Manual, July 1999
32/4
Нет комментариевНе стесняйтесь поделиться с нами вашим ценным мнением.
Текст