Suzuki Grand Vitara JB416 / JB420. Manual — part 396
9J-5 Hood / Fenders / Doors:
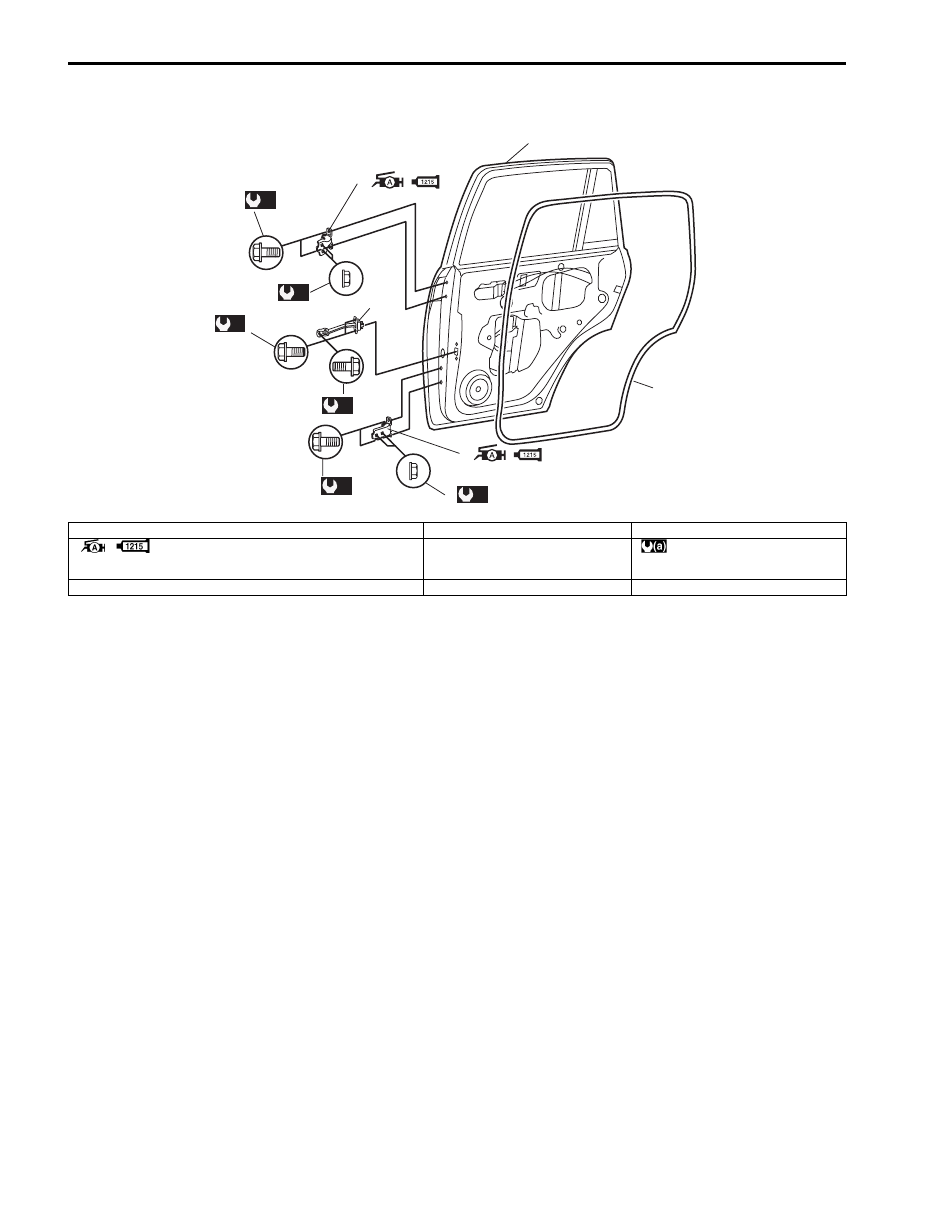
Rear Door Assembly Components
S5JB0A9A06007
Rear Door Assembly Removal and Installation
S5JB0A9A06008
Refer to “Front Door Assembly Removal and Installation” as removal and installation procedures are basically the
same. However, note the following.
• Tighten rear door hinge bolts and nuts to specified torque referring to “Rear Door Assembly Components”.
2
2
(a)
4
(a)
4
(a)
7
(a)
5
(a)
(a)
7
3
1
6
I5JB0A9A0008-01
1. Door panel
4. Rear door hinge bolt
7. Rear door hinge nut
2. Door hinge
: Apply lithium grease 99000-25010 to rotating part.
: Apply sealant 99000-31110 to contact face.
5. Door open stopper bolt
: 23 N
⋅m (2.3 kgf-m, 17.0 lb-ft)
3. Door open stopper
6. Rear door opening weather-strip

Hood / Fenders / Doors: 9J-6
Rear End Door Assembly Components
S5JB0A9A06009
A
A
A
A
A
A
A
A
A
A
A
E
E
E
A
A
A
A
A
A
A
A
1
2
4
5
5
6
(a)
3
3
I5JB0A9A0009-01
1. Rear end door panel assembly
4. Rear end door balancer
: 23 N
⋅m (2.3 kgf-m, 17.0 lb-ft)
2. Rear end door window glass
5. Rear end door trim
3. Rear end door hinge
: Apply lithium grease 99000-25010 to door hinge
moving section.
: Apply sealant 99000-31110 to contact face.
6. Rear end door opening wether-strip

9J-7 Hood / Fenders / Doors:
Rear End Door Assembly Removal and
Installation
S5JB0A9A06010
Removal
1) Remove rear end door trims (1).
2) Remove spare tire.
3) Disconnect rear end door harness coupler (2) and
washer hose (3).
4) Remove rear end door balancer (4).
5) Remove door hinge bolts (5) and remove rear end
door assembly (6).
WARNING
!
Handling of Rear End Door Balancer
(Damper)
• Handle balancer carefully. Do not scar or
scratch exposed surface of its piston rod,
and never allow any paint or oil to stick to
its surface.
• Do not turn piston rod with balancer fully
extended.
• Do not disassemble balancer (1) because
its cylinder is filled with gas.
Discarding of Rear End Door Balancer
(Damper)
• The gas itself in balancer is harmless but it
may issue out of the hole together with
chips generated by the drill (2). Therefore,
be sure to wear goggle when drilling.
• Using a 2 to 3 mm (0.08 to 0.12 in.) drill (2),
make a hole to remove gas inside as
shown before discarding.
Installation
Reverse removal procedure noting the following.
• Tighten rear end door hinge bolts and balancer nut to
specified torque referring to “Rear End Door
Assembly Components”
• Secure wiring harness (1).
• Adjust door latch striker position by referring to “Rear
End Door Lock Assembly Removal and Installation in
Section 9F”.
• Adjust door cushion so that door contacts body when
closed.
• Apply sealant to contact face “A” of door hinge (1) and
apply grease to rotating part “B” of hinge (1).
“A”: Sealant 99000–31110 (SUZUKI Bond
No.1215)
“B”: Grease 99000–25010 (SUZUKI Super Grease
A)
A
A
A
A
A
A
A
A
A
A
A
A
A
A
A
A
A
A
E
E
A
1
1
1
1
2
3
4
5
5
6
E
I5JB0A9A0010-01
I2RH019A0010-01
1
I5JB0A9A0011-01
“A”
“A”
“B”
“B”
1
I5JB0A9A0012-01
Hood / Fenders / Doors: 9J-8
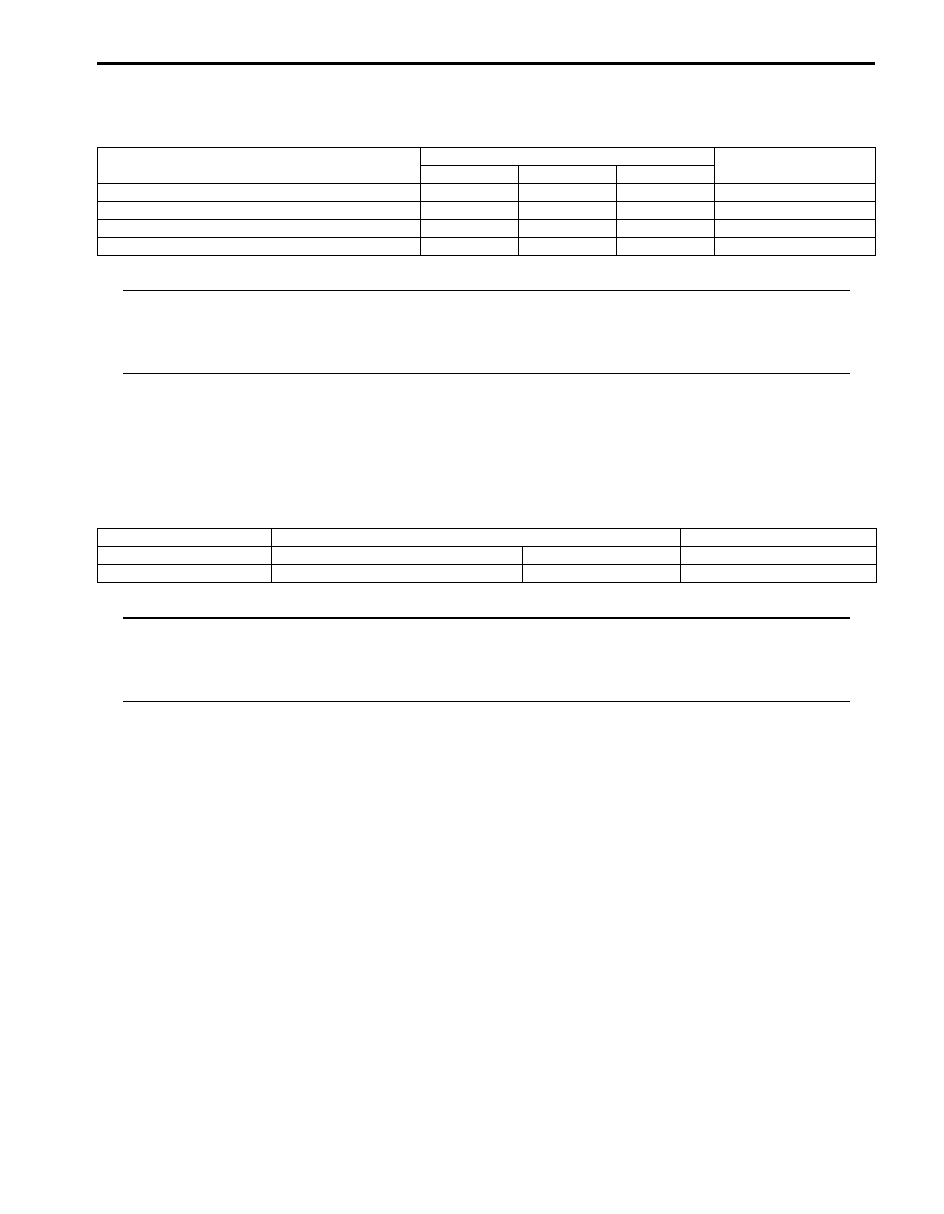
Specifications
Tightening Torque Specifications
S5JB0A9A07001
NOTE
The specified tightening torque is also described in the following.
“Front Door Assembly Components”
“Rear Door Assembly Components”
“Rear End Door Assembly Components”
Reference:
For the tightening torque of fastener not specified in this section, refer to “Fastener Information in Section 0A”.
Special Tools and Equipment
Recommended Service Material
S5JB0A9A08001
NOTE
Required service material is also described in the following.
“Front Door Assembly Components”
“Rear Door Assembly Components”
“Rear End Door Assembly Components”
Fastening part
Tightening torque
Note
N
⋅m
kgf-m
lb-ft
Hood latch bolt
10
1.0
7.5
Door hinge mounting bolt (body side)
27
2.7
19.5
Door hinge mounting bolt (door side)
23
2.3
17.0
Door open stopper bolt
27
2.7
19.5
Material
SUZUKI recommended product or Specification
Note
Grease
SUZUKI Super Grease A
P/No.: 99000–25010
Sealant
SUZUKI Bond No.1215
P/No.: 99000–31110
Нет комментариевНе стесняйтесь поделиться с нами вашим ценным мнением.
Текст