Suzuki Grand Vitara JB416 / JB420. Manual — part 106

1D-92 Engine Mechanical: For J20 Engine
1st Timing Chain and Chain Tensioner Removal
and Installation
S5JB0A1426027
CAUTION
!
After timing chain is removed, never turn
crankshaft and camshafts independently
more than its allowable turning range
described referring to “2nd Timing Chain and
Chain Tensioner Removal and Installation:
For J20 Engine”.
If turned, interference may occur between
piston and valves and valves themselves,
and parts related to piston and valves may be
damaged.
Removal
1) Remove 2nd timing chain. Refer to “2nd Timing
Chain and Chain Tensioner Removal and
Installation: For J20 Engine” for removal.
2) Remove timing chain guide No.1 (1).
3) Remove timing chain tensioner adjuster No.1 (2).
4) Remove timing chain tensioner (3).
5) Remove idler sprocket (4) and 1st timing chain (5).
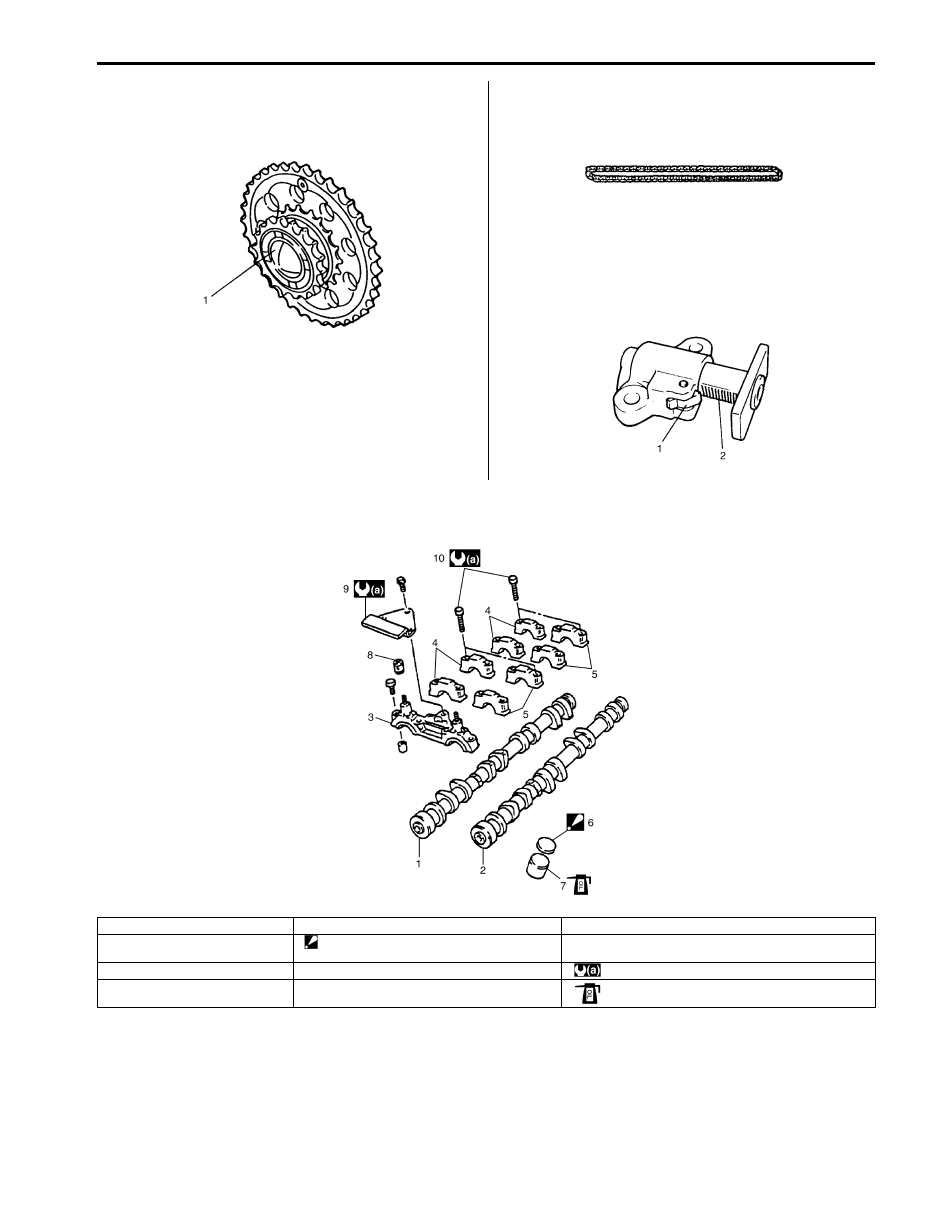
6) Remove crankshaft timing sprocket (6).
Installation
1) Install crankshaft timing sprocket (2) as shown in
figure.
2) Check that match mark (1) on crankshaft timing
sprocket is in match with timing mark (2) on lower
crankcase.
3) Apply oil to bush of idler sprocket (1).
4) Install idler sprocket and sprocket shaft.
5) Install 1st timing chain by aligning dark blue plate (4)
of 1st timing chain (3) and match mark (2) on idler
sprocket (1).
3. Idler sprocket shaft
8. Timing chain tensioner nut
: 11 N
⋅m (1.1 kgf-m, 8.0 lb-ft)
4. Crankshaft timing sprocket
9. Timing chain guide No.1 bolt
: Apply engine oil to sliding surface.
5. Timing chain tensioner
10. Timing chain tensioner adjuster No.1 bolt
I4RH01140029-01
1. Crankshaft
3. Cylinder block
I2RH01140083-01
I2RH01140082-01
I2RH01140084-01

Engine Mechanical: For J20 Engine 1D-93
6) Bring gold plate (4) of 1st timing chain (3) into match
with match mark (2) on crankshaft timing sprocket
(1).
7) Apply engine oil to sliding surface of timing chain
tensioner (1) and then install it as shown in figure.
Tighten tensioner nut to specified torque.
Tightening torque
Timing chain tensioner nut (a): 25 N·m (2.5 kgf-
m, 18.0 lb-ft)
8) With latch of tensioner adjuster No.1 returned and
plunger (1) pushed back into body, insert stopper (4)
into latch (2) and body (3).
After inserting it, check to make sure that plunger will
not come out.
9) Install timing chain tensioner (2) adjuster No.1 (1).
Tightening torque
Timing chain tensioner adjuster No.1 bolt (a): 11
N·m (1.1 kgf-m, 8.0 lb-ft)
10) Pull out stopper (3) from adjuster No.1.
11) Apply engine oil to sliding surface of timing chain
guide No.1 (1) and then install it.
Tighten guide bolts to specified torque.
Tightening torque
Timing chain guide No.1 bolt (a): 9 N·m (0.9 kgf-
m, 6.5 lb-ft)
2. Spacer
I2RH01140085-01
I2RH01140086-01
I2RH01140087-01
I2RH01140088-01
I2RH01140089-01

1D-94 Engine Mechanical: For J20 Engine
12) Check that dark blue and yellow plates of 1st timing
chain are in match with match marks on sprockets
respectively.
13) Install 2nd timing chain. Refer to “2nd Timing Chain
and Chain Tensioner Removal and Installation: For
J20 Engine” for installation.
14) Install timing chain cover. Refer to “Timing Chain
Cover Removal and Installation: For J20 Engine” for
installation.
15) Install cylinder head cover. Refer to “Cylinder Head
Cover Removal and Installation: For J20 Engine” for
installation.
16) Install oil pan. Refer to “Oil Pan and Oil Pump
Strainer Removal and Installation: For J20 Engine in
Section 1E” for installation.
17) Install engine assembly to vehicle referring to
“Engine Assembly Removal and Installation: For J20
Engine”.
1st Timing Chain and Chain Tensioner
Inspection
S5JB0A1426028
Timing Chain Guide No.1
Check shoe for wear or damage.
Timing Chain Tensioner
Check shoe (1) for wear or damage.
Crankshaft Timing Sprocket
Check teeth of sprocket for wear or damage.
1. Match mark on idler sprocket
2. Dark blue plate
3. Match mark on crank timing sprocket
4. Yellow plate
I2RH01140090-01
1. Timing chain guide No.1
I2RH01140091-01
I2RH01140092-01
I2RH01140093-01
Engine Mechanical: For J20 Engine 1D-95
Idler Sprocket
Check teeth and bush (1) of sprocket for wear or
damage.
1st Timing Chain
Check timing chain for wear or damage.
Timing Chain Tensioner Adjuster No.1
Check that latch (1) and tooth surface (2) are free from
damage and latch functions properly.
Camshafts, Tappet and Shim Components
S5JB0A1426029
I2RH01140094-01
I2RH01140077-01
I2RH01140095-01
I5JB0A142028-01
1. Intake camshaft
5. Exhaust camshaft housing
9. Timing chain guide No.2
2. Exhaust camshaft
6. Shim
: Direct shim No. side toward tappet.
10. Camshaft housing bolt
3. Camshaft housing
7. Tappet
: 11 N
⋅m (1.1 kgf-m, 8.0 lb-ft)
4. Intake camshaft housing
8. Oil relief valve
: Apply engine oil to sliding surface of each part.
Нет комментариевНе стесняйтесь поделиться с нами вашим ценным мнением.
Текст