Hummer H1 (1992-1998). Manual — part 47

2-40. FAN DRIVE REPAIR (Cont’d)
2-151
2-40. FAN DRIVE REPAIR (Cont’d)
1.
2.
3.
4.
5.
6.
7.
8.
NOTE
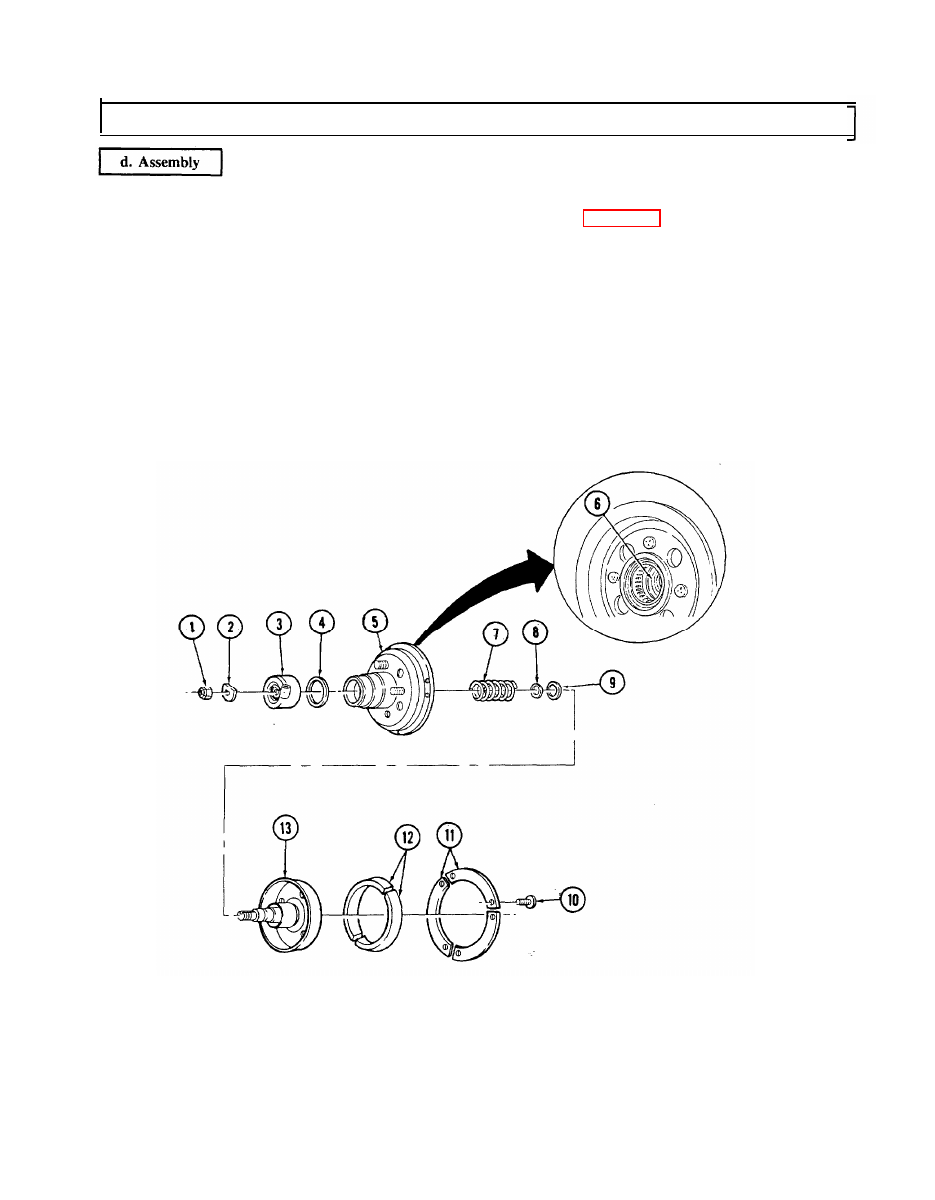
For general assembly instructions, refer to para. 2-12.
Install O-ring (4) in groove inside cylinder assembly (3).
Install cylinder assembly (3) on housing (5).
Install large O-ring (9) and small O-ring (8) on shaft assembly (13).
Lubricate roller bearing (6) with lithium grease,
Install shaft assembly (13) and spring (7) in housing (5).
Install shaft assembly (13) on cylinder assembly (3) with tabwasher (2) and locknut (1). Tighten
locknut (1) to 96 lb-in. (11 N•m).
Install friction lining (12) in housing (5).
Install three retaining plates (11) on housing (5) with six screws (10). Tighten screws (10) to
22 lb-in. (3 N•m),
2-152
Change 1
2-153
2 - 4 1 . ENGINE ASSEMBLY FROM SUBASSEMBLIES
This task covers:
a.
Crankshaft and Main Bearings
q.
Fuel Injection Nozzles
b.
Flywheel
r.
Rocker Arm Shafts and Pushrods
c.
Pistons and Connecting Rods
s.
Rocker Arm Covers
d.
Oil Pump
t.
Modulator Link
e.
Camshaft
u.
Fuel Supply and Return Lines
f.
Timing Chain and Drive Sprockets
v.
Fuel Injection Lines
g.
Timing Gear Cover
w. Water Crossover
h.
Oil Pan
x.
Intake Manifold
i.
Oil Filter and Adapter
y.
Exhaust Manifold
j.
Fuel Pump
y.1. Turbocharger
k.
Oil Pump Drive
y.2. Manifold-to-Turbocharger Exhaust Pipe
l.
Fuel Injection Pump
y.3. Wastegate Housing
m. Water Pump and Adapter Plate
y.4. Wastegate Actuator
n.
Valve Lifters
z.
Torsional Damper
o.
Cylinder Heads
aa. Crankshaft Pulley
p.
Glow Plugs
bb. Fan Drive and Water Pump Pulley
Materials/Parts (Cont’d)
Water pump gasket (Appendix D, Item 22)
Injection pump gasket (Appendix D, Item 15)
Two cylinder head gaskets (Appendix D, Item 11)
Two water crossover gaskets (Appendix D, Item 20)
Eight injector nozzle gaskets (Appendix D, Item 16)
Two exhaust manifold gaskets (Appendix D, Item 12)
Front cover oil seal (Appendix D, Item 43)
Rear oil pan seal (Appendix D, Item 46)
Oil filter (Appendix D, Item 6)
Eight rod bearings (Appendix D, Item 1)
Oil filter adapter bolt gasket (Appendix D, Item 7)
Three woodruff keys (Appendix D, Item 54)
Oil pan gasket set (Appendix D, Item 9)
Two rocker arm cover gaskets
(Appendix D, Item 18)
Rear main oil seal (Appendix D, Items 44 or 45)
O-ring (Appendix D, Item 28)
Adhesive (Appendix B, Item 1)
Bearing clearance gauge (Appendix B, Item 9)
Sealer, anaerobic gasket (Appendix B, Item 10)
Lubricating oil OE/HDO (Appendix B, Item 13)
Silicone sealant (Appendix B, Item 16)
Pipe sealing compound (Appendix B, Item 17)
Sealing compound (Appendix B, Item 18)
General Safety Instructions
• Crankshaft must be supported during
removal and installation.
• Do not perform this procedure near fire,
flame, or sparks.
INITIAL SETUP:
Tools
General mechanic’s tool kit:
automotive (Appendix E, Item 1)
Feeler gauge (Appendix E, Item 13)
Piston ring compressor (Appendix E, Item 35)
Special Tools
Rear main seal installer
(Appendix E, Items 33 or 34)
Injector nozzle socket (Appendix E, Item 5)
Glow plug socket (Appendix E, Item 6)
Hex-head driver, 6 mm (Appendix E, Item 7)
Hex-head driver, 8 mm (Appendix E, Item 8)
Hex-head driver, 5/16-in. (Appendix E, Item 9)
Crowfoot, 16 mm (Appendix E, Item 36)
Crowfoot, 19 mm (Appendix E, Item 37)
Personnel Required
One mechanic
One assistant
Manual References
Materials/Parts
Turbocharger oil gasket (Appendix D, Item 19)
Intake manifold gasket kit (Appendix D, Item 8)
Two center intake manifold gaskets,
turbocharged engine (Appendix D, Item 8.1)
Two O-rings (Appendix D, Item 31)
Fuel pump gasket (Appendix D, Item 13)
Adapter plate gasket (Appendix D, Item 10)
Oil pump drive gasket (Appendix D, Item 17)

2-41. ENGINE ASSEMBLY FROM SUBASSEMBLIES (Cont’d)
NOTE
●
During assembly operations, it is important to closely inspect each unit
to make sure nothing has been overlooked during inspection and repair.
Plugs should be checked for tightness, parts kept clean, openings
covered, and machined surfaces protected. Application of lubricant
should be performed from covered containers.
●
Work area should be clean, well-ventilated, and free of blowing dirt
and dust.
●
In some cases, flanged head fasteners may be present instead of
standard fasteners and washers. In all cases, washers should be used
when replacing a flanged head fastener with a standard fastener.
●
For general assembly instructions, refer to para. 2-12.
●
Assembly procedures for pre-1990, 1990 and above 6.2L and 6.5L
engines are basically the same. Any differences in procedures are noted.
Some replacement parts are different. Refer to para. 1-10 to determine
engine model before ordering replacement parts.
a. Crankshaft and Main Bearings
NOTE
●
Measure outside diameter of crankshaft main bearing journals to
determine what thickness main bearings to install.
●
Main bearings are of the precision insert type and do not utilize shims for
adjustment. If clearances are found to be excessive, a new bearing, both
upper and lower halves, will be required. Service bearings are available in
standard size and undersize.
●
Selective fitting of both rod and main bearing inserts is necessary in
production in order to obtain close tolerances. For this reason you may find
one-half of a standard insert with one half of a 0.001 in. (0.025 mm)
undersize insert, which will decrease the clearance 0.0005 in. (0.013 mm)
from using a full standard bearing.
1. Remove all capscrews (1) and (2) and bearing caps (3) and install upper halves of main bearings (7)
in cylinder block (6).
2. Install lower halves of main bearings (4) in bearing caps (3).
Crankshaft must be supported during removal and installation. Failure to
support crankshaft may cause injury to personnel or damage to equipment.
3. Install crankshaft (8) in cylinder block (6).
NOTE
The gaging plastic shall be positioned the full width of the bearing and
centered on the bearing journal when the bearing cap is installed.
4. Position gauging plastic on bearing journal (5) the full width of the bearing (4) and parallel to the
center line of the crankshaft (8).
2-154
Нет комментариевНе стесняйтесь поделиться с нами вашим ценным мнением.
Текст