Hummer H1 (2002+). Manual — part 172
_____________________________________________________________________
Body 10-59
®
05745159
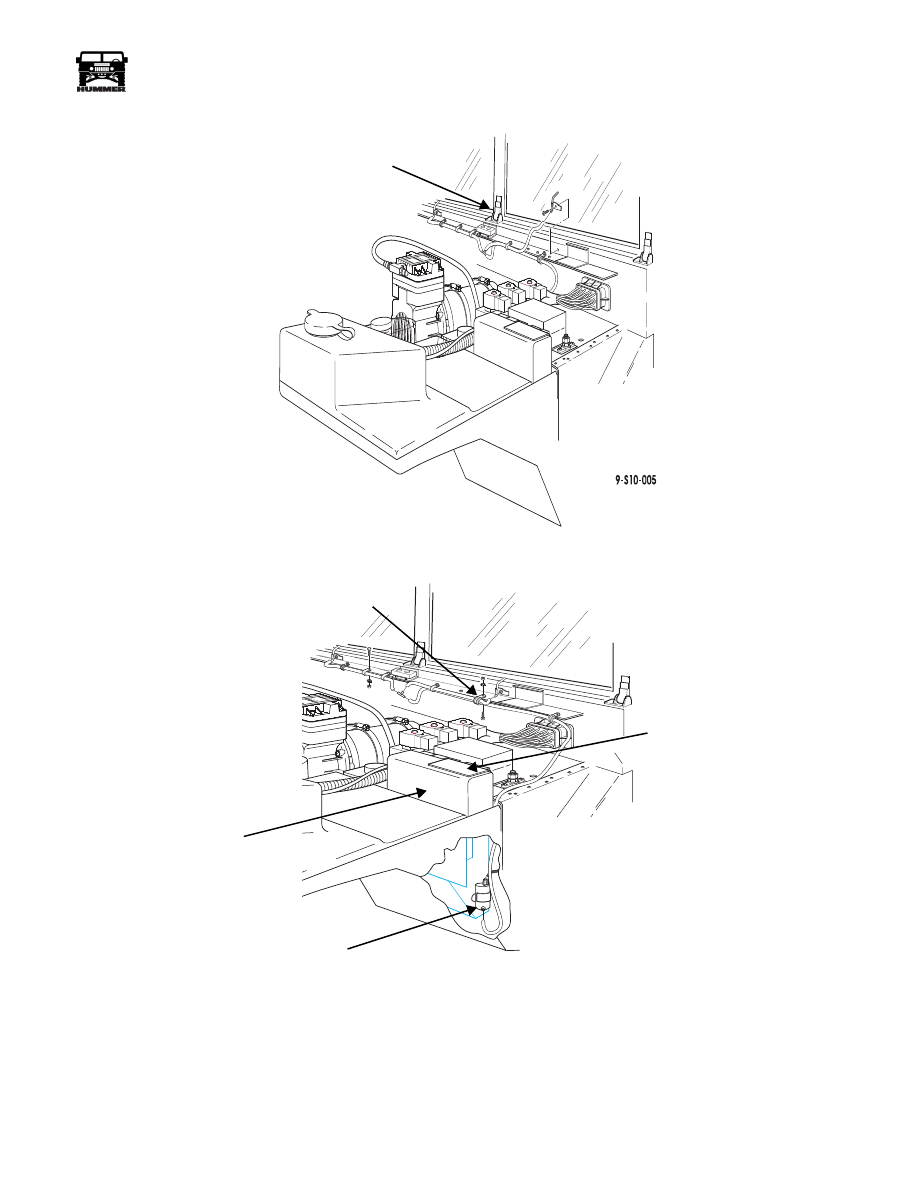
Figure 10-112: Windshield Washer Nozzle Replacement
Figure 10-113: Windshield Washer Hose Replacement
NOZZLE
9-S10-004
ECU ENCLOSURE
PUMP ASSEMBLY
ECU RETAINING BRACKET
CLAMPS

10-60
Body
______________________________________________________________________
®
A-PILLAR FORMER ASSEMBLY REPLACEMENT
(SOFT TOP ONLY)
Removal
1.
Remove soft top.
2.
Remove 12 screws and A-pillar former from A-pillar
(Figure 10-114).
3.
Clean mounting surface on A-pillar.
Cleaning and Inspection
NOTE:
Clean all components, examine for wear or damage,
and replace if necessary.
Inspect wellnuts. Replace if defective or damaged.
Installation
1.
Peel backing paper from A-pillar former and secure former
to A-pillar with 12 screws (Figure 10-114).
2.
Install soft top.
Figure 10-114: A-Pillar Former Assembly Replacement
A-PILLAR
FORMER
A-PILLAR
WELLNUT

_____________________________________________________________________
Body 10-61
®
05745159
REAR SUPPORT BOW BRACKET REPLACEMENT
Removal
1.
Remove rear support bow assembly.
2.
Remove two screws and support bow bracket from body
(Figure 10-115).
Figure 10-115: Rear Support Bow Bracket
Replacement
Installation
1.
Secure bracket to body with two screws (Figure 10-115).
2.
Install rear support bow assembly.
FRONT STRIKER REPLACEMENT
Removal
Remove locknut, washer, striker guard, and striker from front
door pillar (Figure 10-116).
Installation
Secure striker and striker guard to front door pillar with washer
and locknut (Figure 10-116). Tighten locknut to 41 lb-ft (56 N•m).
Figure 10-116: Front Striker Assembly Replacement
REAR STRIKER ASSEMBLY REPLACEMENT
Removal
Remove two screws, washers, backing plate, and rear striker
assembly from rear door pillar (Figure 10-117).
Installation
Secure rear striker assembly to rear door pillar with backing
plate, two washers, and screws (Figure 10-117). Tighten
screws to 12 lb-ft (16 N•m).
Figure 10-117: Rear Striker Assembly Replacement
BODY MOUNT REPLACEMENT
Removal
NOTE:
Removal and installation procedures for intermediate
and rear body mounts are the same. This procedure covers the
left intermediate body mount.
1.
Remove locknut, washer, bolt, washer, and two spacers
securing sleeve, upper cushion, and lower cushion to body
bracket and frame bracket (Figure 10-119).
2.
Raise the vehicle at the body reinforcement adjacent to
body mount to be removed (Figure 10-118).
3.
Raise the body far enough to separate the upper cushion
from lower cushion and remove spacer, sleeve, upper
cushion, and lower cushion (Figure 10-119).
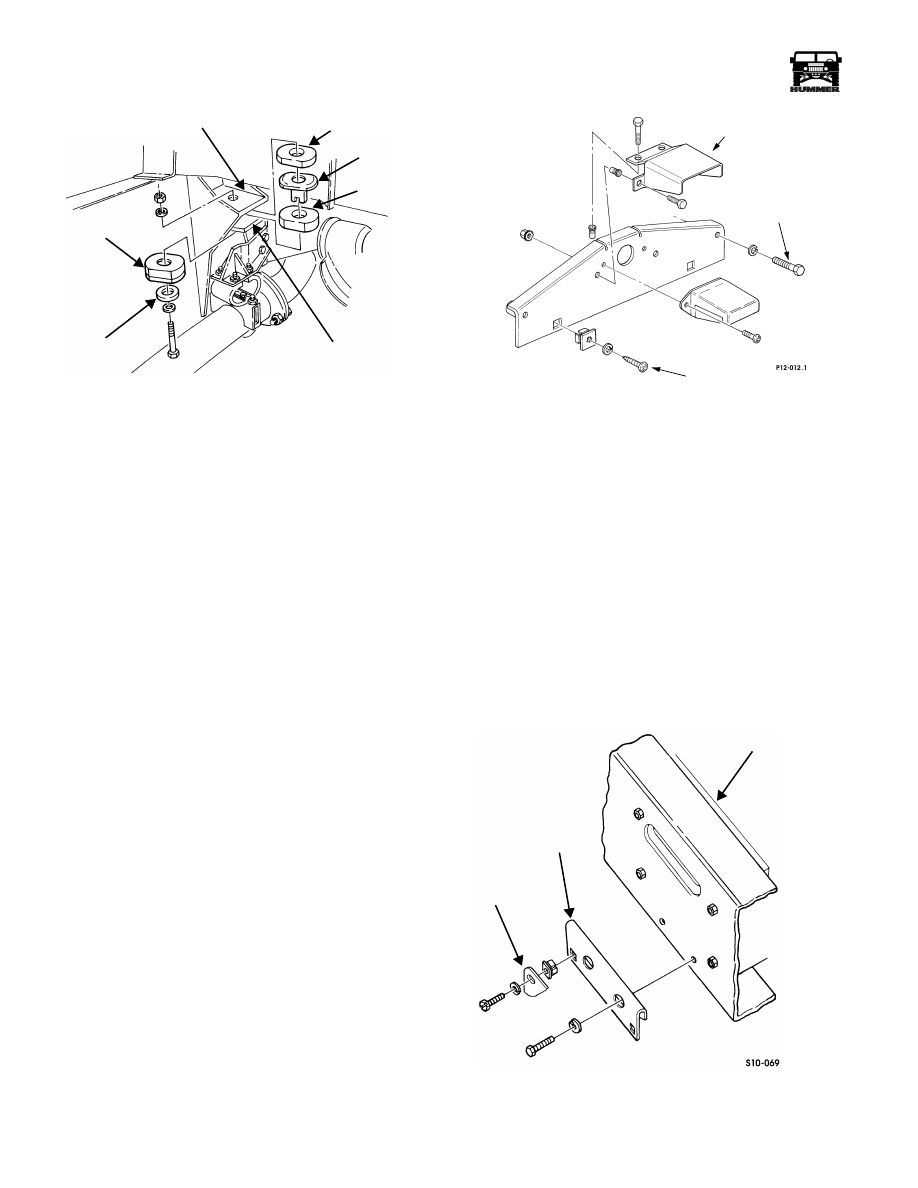
Figure 10-118: Left Side Body Mount Locations
REAR
SUPPORT BOW
BRACKET
FRONT
DOOR
PILLAR
STRIKER
STRIKER
GUARD
WASHER
LOCKNUT
REAR DOOR PILLAR
REAR
STRIKER
ASSEMBLY
BACKING
PLATE
FRONT MOUNT
INTERMEDIATE
REAR MOUNT
MOUNT
10-62
Body
______________________________________________________________________
®
Figure 10-119: Body Mount Cushions Replacement
Installation
1.
Position lower cushion, upper cushion, sleeve, and spacer
between body bracket and frame bracket (Figure 10-119).
2.
Lower body and ensure lower cushion, sleeve, upper
cushion, spacer and body bracket align. Secure with
spacer, washer, bolt, washer, and locknut. Tighten locknut
to 90 lb-ft (122 N•m).
LICENSE PLATE BRACKETS
Rear License Plate Bracket Replacement
Removal
1.
Remove four bolts and washers securing the protective
light shield to the bumper.
2.
Remove two screws, lockwashers, license plate, and two
grommets from bracket (Figure 10-120).
3.
Remove two bolts and lockwashers securing bracket to
bumper.
4.
Disconnect two leads from light bracket, and remove
bracket.
5.
Remove two nut and lockwasher assemblies, screws,
and light bracket from bracket.
Installation
1.
Secure light bracket to bracket with two screws and nut
and lockwasher assemblies (Figure 10-120).
2.
Connect two leads to light bracket.
3.
Secure bracket to bumper with two lockwashers and bolts.
4.
Secure license plate to bracket with two grommets,
lockwashers, and screws.
5.
Install protective light shield with four bolts and washers.
Figure 10-120: Rear License Plate Bracket
Front License Plate Bracket Replacement
Removal
1.
Remove two capscrews, lockwashers, license plate, and
two grommets from bracket. Discard lockwashers
(Figure 10-121).
2.
Remove two screws, lockwashers, and bracket from
bumper. Discard lockwashers.
Installation
1.
Install bracket on bumper with two lockwashers and
screws (Figure 10-121).
2.
Install license plate on bracket with two grommets,
lockwashers, and capscrews.
Figure 10-121: Front License Plate Bracket
BODY BRACKET
SLEEVE
UPPER
FRAME BRACKET
SPACER
LOWER
CUSHION
CUSHION
SPACER
PROTECTIVE SHIELD
LICENSE PLATE SCREWS
ATTACHMENT
BOLTS
BUMPER
BRACKET
LICENSE
PLATE
Нет комментариевНе стесняйтесь поделиться с нами вашим ценным мнением.
Текст