Jaguar S-Type. Manual — part 16
69
Child Safety
R
CHILD SEATS
Choosing a suitable child seat
Before you buy a child seat, it is important
to note that your child’s weight, rather
than age, determines the type of seat that
is required.
Jaguar recommends that a rear-facing
seat with a harness, properly installed
in a rear seat, is used for as long as
your infant’s development allows.
Avoid travelling with your infant
forward-facing until they are between 9 to
18 kg (20 to 40 lb) and able to sit up
unaided. Up to the age of two, a child’s
spine and neck are not sufficiently
developed to avoid injury in a frontal
impact.
Always use the top tether to secure a
forward-facing child seat where
possible. (See page 73.)
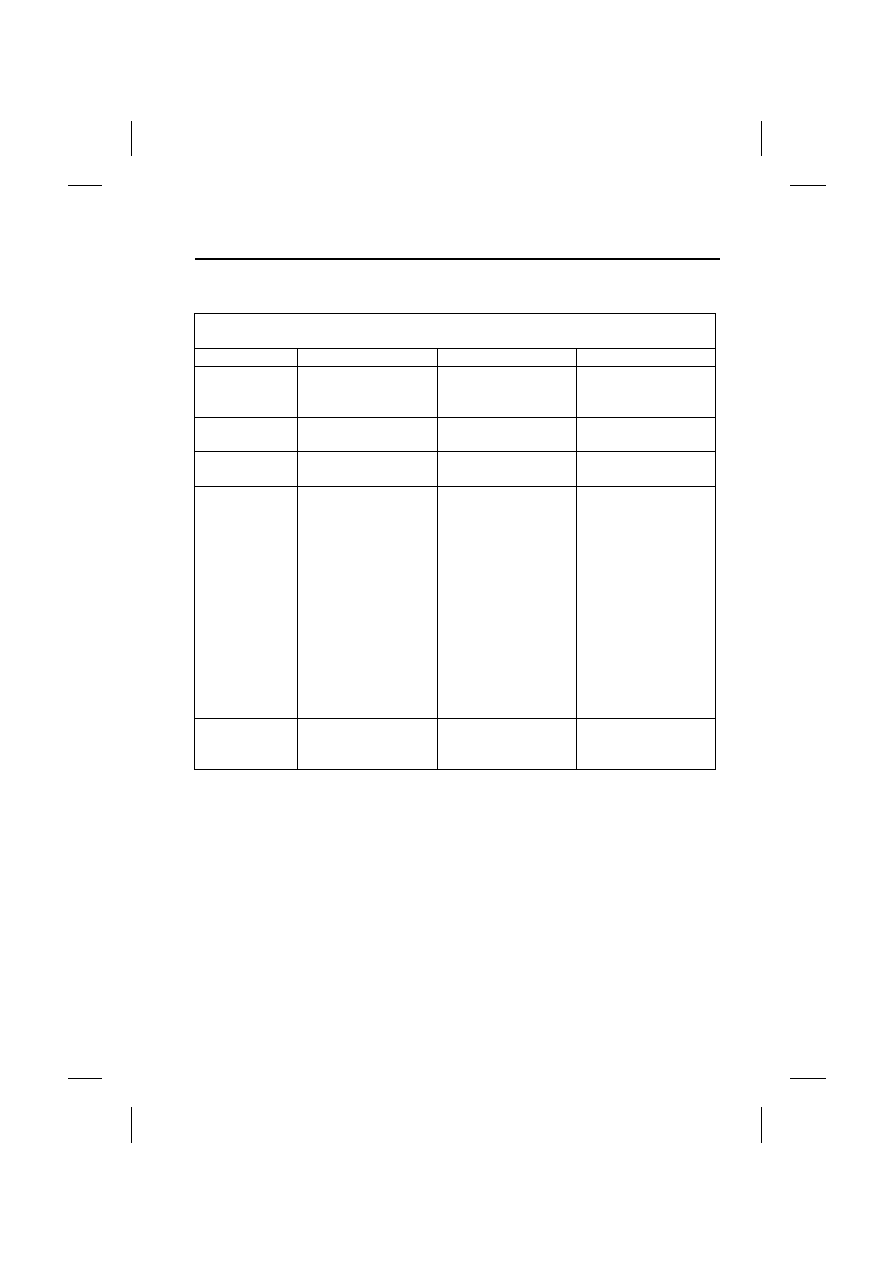
PROPER CHILD SAFETY SEAT USE CHART
Buckle Everyone. Children Age 12 and Under in Back.
INFANTS
TODDLER
YOUNG CHILDREN
WEIGHT
Birth to 1 year at
least 9 to10 kg (20 to
22 lb).
Over 1 year and Over
9 to 18 kg (20 - 40
lb).
Over 18 kg (40 lb)
Ages 4 - 8, unless
145 cm (4’9”).
TYPE of SEAT
Infant only or rear
facing, convertible.
Convertible /
Forward-facing.
Belt positioning
booster seat.
SEAT
POSITION
Rear-facing only.
Forward-facing.
Forward-facing.
ALWAYS
MAKE SURE
Children to 1 year
and at least 9 kg (20
lb) in rear-facing
seats.
Harness straps at or
below shoulder level.
Harness straps
should be at or
above shoulders.
Most seats require
top slot for
forward-facing.
Belt positioning
booster seats must
be used with both
lap and shoulder
belt.
Make sure the
lapbelt fits low and
tight across the
lap/upper thigh area
and the shoulder belt
fits snug crossing
the chest and
shoulder to avoid
abdominal injuries.
WARNING
All children age 12
and under should
ride in the back seat.
All children age 12
and under should
ride in the back seat.
All children age 12
and under should
ride in the back seat.
Child Safety
70
L
It is also important to consider how you
plan to use the child seat. For longer
journeys, a reclining seat may offer added
comfort and support for a sleeping child,
while a lightweight design may be easier
to lift in and out of the vehicle.
It is also worth noting that some children
are more suited to a harness-style seat
than a booster seat during their toddler
years.
We strongly advise that you do not buy or
use a second-hand child seat. The seat
may have been used inappropriately, or
involved in an accident. In such
circumstances, the seat may not protect
your child.
Because child seats vary in shape, certain
designs may be more stable when
mounted on the outer rear seating
positions, rather than in the center.
Always check that the child seat can be
mounted securely in the required
position: if in doubt, speak to your Jaguar
Dealer.
Automatic locking reel (ALR)
The passenger seat belts (not the driver’s)
have a special locking mechanism which
aids the retention of child seats. The
procedure to install a child seat is as
follows:
1. Place the child seat in the vehicle,
attach the seat belt and secure the
buckle in accordance with the
manufacturer’s fitting instructions.
2. Pull on the shoulder section of the
seat belt to unreel all of the remaining
webbing to the limit of travel. This will
engage the automatic locking feature,
which then acts as a ratchet, allowing
the webbing ONLY to retract.
3. Allow the seat belt to retract onto the
child seat (a clicking sound will
confirm that the ratchet has engaged),
while firmly pushing the child seat into
the vehicle seat.
4. Make sure that there is no slack in the
seat belt by pulling upwards on the
shoulder belt immediately above the
child restraint. This seat belt should
be now be locked and the child seat
held firmly in position.
When the child seat is removed and all of
the seat belt webbing is allowed to
retract, the seat belt locking mechanism
reverts to normal operation.
Booster seats
If a booster seat is used, position the lap
section of the adult seat belt over the
child’s pelvis. The diagonal seat belt
should rest on the child’s shoulder, not
the neck.
CHILD RESTRAINTS
Safe use of child restraints
Make sure there is no slack in the
webbing and the restraint fits the child
snugly across the rib cage and hips.
These are the parts of the body most able
to take the force of an impact.
• make sure that the path and position
of an integral harness across the
shoulders is appropriate for your
child’s development – consult the
manufacturer’s instructions.
• The lap strap should pass across the
top of the child’s thighs, bearing on
the pelvis, not the abdominal area.

71
Child Safety
R
• Adjust the harness every time, so that
one or two fingers only can be
inserted between the child and
harness. Different clothing on a child
can make a difference to the correct
fitting of the harness.
• Make sure the harness webbing is not
twisted.
• Never modify the seat harness or
buckles, as this may affect the quick
release mechanism.
• Always secure your child correctly,
even for the shortest journey.
• Follow the seat manufacturer’s
instructions for harness adjustments.
Make sure the child seat is securely fitted,
and follow the check list on page 73.
LATCH child restraint system
(Lower Anchors and Tethers for CHildren)
Your vehicle is fitted with a set of LATCH
brackets that allow the LATCH child seat
to be secured directly and easily to the
vehicle body without the use of adult seat
belts.
Many injuries to children in accidents are
caused by the incorrect fitting and
tensioning of the adult seat belts, which
are normally used to secure child seats.
The LATCH system reduces the likelihood
of incorrect fitting and is also quicker and
simpler to use.
The LATCH system uses two anchorage
loops and a top tether bracket fixed to the
vehicle body. The LATCH child seat has
two retractable lower catches that lock
onto the anchorage loops and a strap that
clips onto the top tether bracket. The
child seat has a quick release mechanism
to allow it to be removed easily.
The anchorage loop locations
are highlighted by the small
labels with a child seat graphic.
They are located approximately
6.0 cm (2.5 inches) below each label. Pull
back the side panel of the trim as
indicated, see illustration above, to reveal
the aperture and the loops.
To make sure that the LATCH child seat is
installed safely, read all the information
provided in this section.
Installing the LATCH seat
Caution: Always follow the
manufacturer’s instructions supplied
with the LATCH child seat. The
following is to be considered only as a
guide.

Child Safety
72
L
LATCH seats can only be installed in the
rear outboard seating positions. If
necessary, remove the head restraint.
LATCH seat with anchorage legs (1)
(See illustration on previous page.)
Fit the seat as follows:
1. Push the adult seat belt buckles into
their stowage recesses, to make sure
they do not interfere with the fitment
of the child seat.
2. Make sure there is nothing
obstructing the seat mounting
mechanism at the anchorage points.
3. Release the lever on the rear of the
seat and fully extend the two
attachment legs on the child seat.
Make sure that the hook at the end of
each leg is open.
4. Position the attachment legs just in
front of the trimmed apertures for the
LATCH anchorage loops (see
previous illustration). Push the
anchorage leg through the trimmed
aperture to engage with the vehicle’s
anchorage loop. There should be an
audible click.
5. Repeat Step 4 for the seat’s second
anchorage leg.
6. Using firm and even pressure on both
sides, push the child seat rearwards
until it is secured firmly against the
seat back. Make sure you do NOT
trap the top tether strap behind the
child seat.
7. Attach the top tether, refer to child
restraint top tether anchorages on
page 73.
8. As a final check, firmly pull both sides
of the seat to confirm that it is
correctly locked into position.
Нет комментариевНе стесняйтесь поделиться с нами вашим ценным мнением.
Текст