Jaguar S-Type. Manual — part 17

73
Child Safety
R
LATCH seat with tether straps (2)
(See illustration on previous page.)
Clip the flexible lower straps to the two
LATCH loops. Adjust the length of each
strap until the seat is held firmly against
the vehicle back.
Child restraint top tether anchorages
and brackets
!
WARNING:
The top tether must always be used to
secure the child seat.
The top of the child seat is connected by
a short strap to the top tether bracket to
prevent the seat from rotating about the
lower anchorages. The top tether
brackets are positioned on the rear parcel
shelf, under access covers, at the
center-line of each rear seating position.
Pass the top tether strap under the
vehicle rear head restraint to connect to
the top tether bracket on the parcel shelf.
Adjust the length of the top tether strap to
hold the top of the child seat against the
vehicle seat back.
Make sure the child seat is securely fitted,
and follow the additional check list on
page 74.
!
WARNING:
Child restraint anchorages are
designed to withstand only those loads
imposed by correctly fitted child seats.
Under no circumstances are they to be
used for adult seat belts, harnesses or
for attaching other items or equipment
to the vehicle.
CHILD RESTRAINT CHECK
LIST
Follow the check list each time your child
travels in the vehicle:
• Carefully follow the instructions
provided by the manufacturer of the
restraint system.
• Make sure your child falls into the
correct weight range for the seat.
• Always use the appropriate child
restraints and adjust harnesses for
every child, every trip.
Child Safety
74
L
• Avoid dressing your child in bulky
clothing and do not place any objects
between the child and the restraint
system.
• Regularly check the fit of your child
seat and replace seats or harnesses
that show signs of wear.
• No child seat is completely
child-proof. Encourage your child not
to play with the buckle or harness.
• Never leave a child unsupervised in
the vehicle.
• Activate the rear door child safety
locks, refer to page 42.
• Make sure your child does not exit the
vehicle from the side where there is
traffic.
• Set your child a good example –
always wear your seat belt.
• Make sure that you have removed all
slack from the adult seat belt (non-
LATCH restraint only).
Additional checks for LATCH child
restraints:
• Always attach the top tether when
installing the LATCH seat.
• Always give the LATCH seat a final
pull to make sure the lower anchors
are secure, even if the green buttons
indicate that the seat connectors are
latched.

75
Seats
R
Seats
SEAT ADJUSTMENT
!
WARNING:
• Do not make adjustments when the
vehicle is moving.
• Front passengers must not ride
with the seat fully reclined.
Front seat adjustment
The front seats are adjusted electrically by
switches on the side of the seat cushion.
Adjustment can be made with or without
the ignition key inserted.
The number of seat adjustments varies
with the vehicle specification, but all
options are described in this section. If a
seat movement is not specified for your
vehicle, the control switch will either not
be fitted or will not include that seat
function (switch movement will be
inhibited).
Seat adjustments for two people may be
stored and recalled by the driver position
memory system. Refer to Memory Setting
on page 86.
The full range of seat adjustments are:
Back restraint angle (recline) and, if
specified, head restraint height (A):
Seat forwards and rearwards position
and, if specified, cushion height and
front tilt (B):
• Move the switch forwards or
rearwards to change the seat
forewards and rearwards position.
• Move the center or rear of the switch
up or down to adjust cushion height.
• Move the front of the switch up or
down to tilt the front of the cushion.
If specified, varies the cushion length
(C):
Moving the control will change the
distance between the front of the cushion
and the back restraint.
Seats
76
L
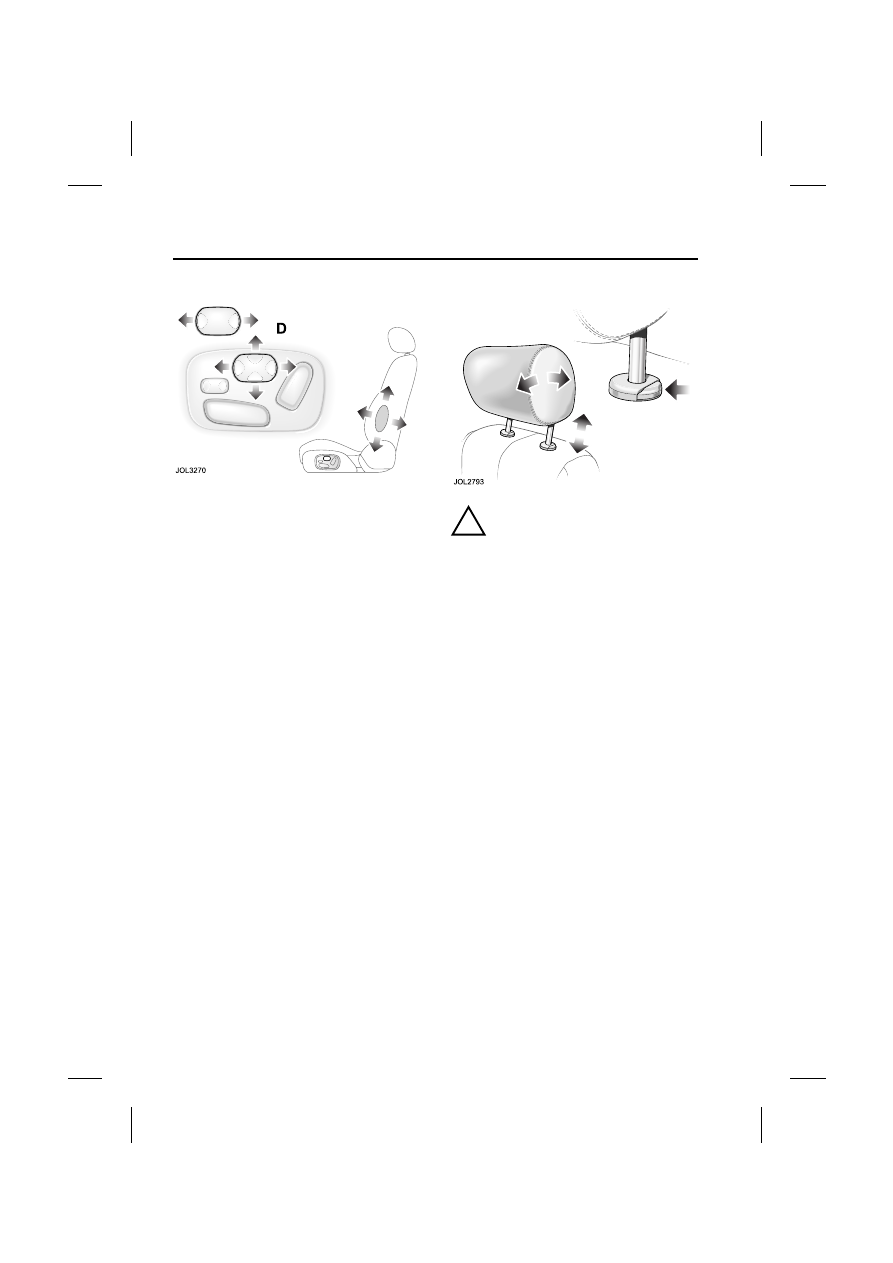
Lumbar (D):
If specified, provides adjustable lumbar
support in the lower back restraint. Either
of two options may be fitted:
• 2-way or 4-way switch: Press the
front or back of the switch to increase
or decrease lumbar support.
• 4-way switch only: Press the top or
bottom of the switch to adjust lumbar
support upwards or downwards.
Manual head restraint adjustment
!
WARNING:
Adjust the head restraint so that it is
just behind your head and never behind
your neck.
All head restraints may be removed e.g. to
fit a large child seat. Hold the button down
and pull out the head restraint.
Where electrically adjusted head
restraints, refer to Seat Adjustment on
page 75, are not fitted, the front head
restraints are manually adjustable:
• To lower: Press the button and push
the head restraint into the seat back to
the required height.
• To raise: Pull the head restraint
upwards.
• Swivel the head restraint forwards or
backwards until it is comfortably
positioned behind your head.
Rear head restraints – All rear head
restraints are adjustable for height only.
Нет комментариевНе стесняйтесь поделиться с нами вашим ценным мнением.
Текст