Loader Bobcat 773. Manual — part 24
CONTROL VALVE (S/N 509640660 & Above, S/N
509616542 & Above) (Cont’d)
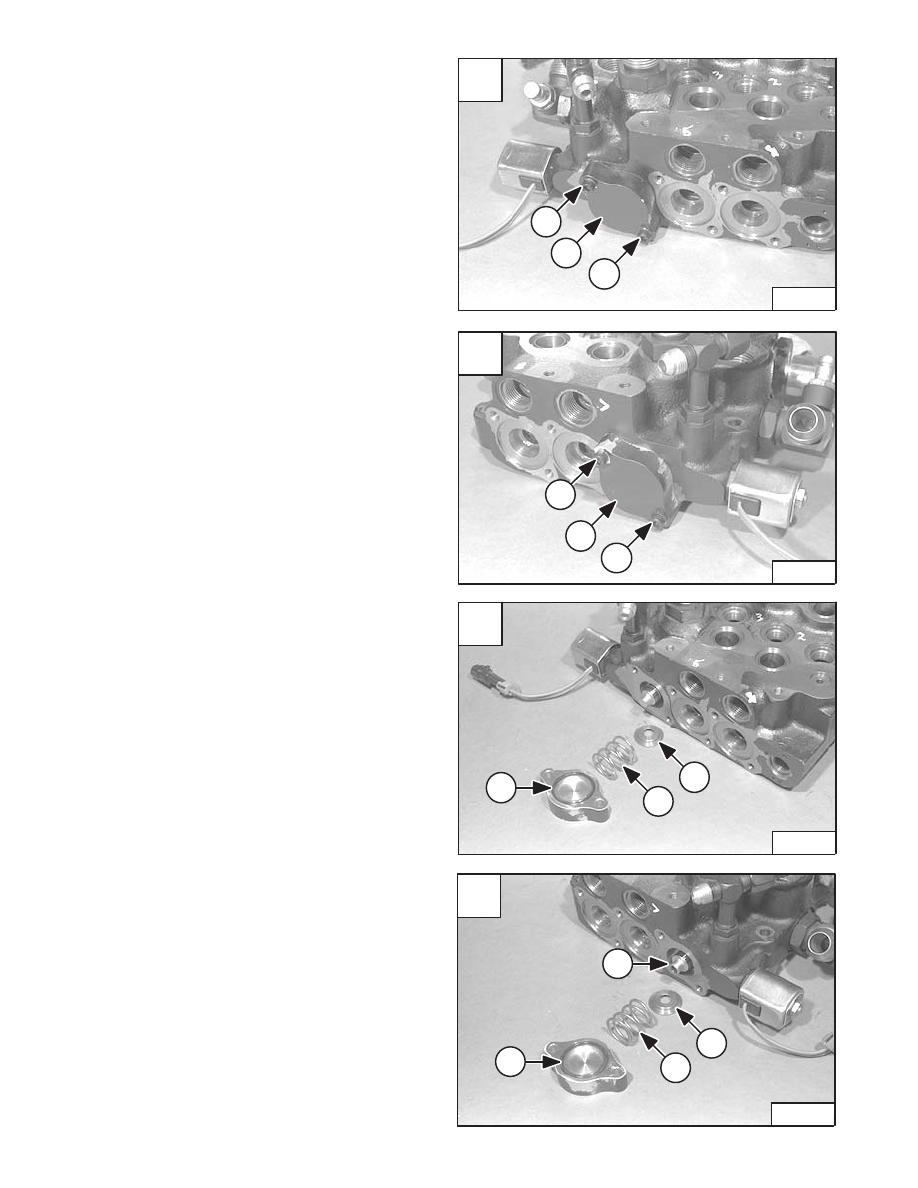
Auxiliary Spool
Disassembly
Remove the two bolts (Item 1) [A] & [B] from both
auxiliary spool covers.
Remove both of the auxiliary spool covers (Item 2) [A] &
[B].
Remove the O–ring (Item 1) [C] & [D], spring (Item 2) [C]
& [D] and spring seat (Item 3) [C] & [D].
Remove the auxiliary spool (Item 4) [D].
A
P–11000
1
1
2
C
P–11002
3
2
1
D
P–11003
3
2
1
4
–2–42–
773 BICS Loader
Service Manual
B
P–11001
1
1
2

CONTROL VALVE (S/N 509640660 & Above, S/N
509616542 & Above) (Cont’d)
Auxiliary Electric Solenoid
Disassembly
Remove the nut (Item 1) [A] from both solenoids.
Remove the end plate (Item 1) [B] and housing (Item 2)
[B].
Remove the coil (Item 1) [C] and end plate (Item 2) [C].
Remove the solenoid valve (Item 3) [C].
Remove the O–rings (Item 1) [D] from the solenoid
valves.
A
P–11004
1
1
C
P–11008
2
1
3
D
P–11006
1
773 BICS Loader
–2–43–
Service Manual
B
P–11005
2
1

CONTROL VALVE (S/N 509640660 & Above, S/N
509616542 & Above) (Cont’d)
Port–Auxiliary Section
Disassembly
Remove the plug (Item 1) [A] or optional port relief valve
from the control valve.
Remove the O–rings (Item 1) [B] & [C] and back–up ring
(Item 2) [B] & [C] from the plug.
Cleaning And Inspection
Clean all components with clean solvent and dry with
compressed air.
Check the spools for wear or scratches.
Check that the spools are not loose in their bore.
Check that the centering springs are not broken.
Check that the load check valve seats are not worn.
Check the load check poppets for damage.
Check the rubber boots and retainers.
Replace the parts as needed.
Use new O–rings and back–up rings.
Apply oil to all new O–rings and back–up rings before
installation.
NOTE: Optional port relief (Item 1) [A] is either 2500
PSI or 3000 PSI depending on the option
used.
A
P–11007
1
C
P–08973
Port Relief (Optional)
1
1
2
–2–44–
773 BICS Loader
Service Manual
B
P–08968
2
1
1
Plug

CONTROL VALVE (S/N 509640660 & Above, S/N
509616542 & Above) (Cont’d)
Port–Auxiliary Section (Cont’d)
Assembly
Install new O–rings (Item 1) [A] and back–up ring (Item
2) [A] on the plug.
Install the plug (Item 1) [B] in the control valve.
Tighten the plug to 35–40 ft.–lbs. (47–54 Nm) torque.
Auxiliary Electric Solenoid
Assembly
Install new O–rings (Item 1) [C] on both of the solenoid
valves.
Install the solenoid valve (Item 1) [D] in the control valve.
Tighten the valve to 8–12 ft.–lbs. (11–16 Nm) torque.
Install the end plate (Item 2) [D] and coil (Item 3) [A].
A
P–08968
2
1
C
P–11006
1
D
P–11008
1
2
3
773 BICS Loader
–2–45–
Service Manual
B
P–11007
1
Нет комментариевНе стесняйтесь поделиться с нами вашим ценным мнением.
Текст