Loader Bobcat 773. Manual — part 103

A
P–04702
1
P–04701
Disconnect the seat bar sensor connector (Item 1) [A].
Connect Sensor Tester (Item 1) [B] inline as shown to the
seat bar sensor connectors. See inset [A].
Turn the key to the ON position. DO NOT START THE
ENGINE.
No power light on the sensor tester check the tester or
wiring harness.
Power light illuminated, move the toggle switch (Item 2)
[B] on the sensor tester (Item 1) [B] to the Present
position.
The seat bar light (Item 1) [C] on the BICS controller
should illuminate.
Move the toggle switch (Item 1) [D] on the sensor tester
to the Absent position.
The Seat Bar light (Item 1) [C] should go off.
If the tests above fail, there is a problem with the BICS
™
system controller or the wiring harness.
Revised Jan. 99
SEAT BAR SENSOR (Cont’d)
BICS
™
Controller Seat Bar Sensor Circuit Test
Use Sensor Tester (MEL1428) for the following
procedure:
Disconnect the short adatper test leads if connected.
NOTE: The sensor test light (Item 3) [B] is only
activated by the seat bar. It will be off with the
seat bar up or on with the seat bar down.
B
P–04703
2
1
3
C
P–04704
1
D
P–04699
1
–8–18–
773 BICS Loader
Service Manual
TRACTION LOCK
Removal And Installation
Raise the loader operator cab. (See Page 1–1.)
NOTE: The loader control panel is removed for
clarity purpose only. The traction lock can be
removed without removing the control panel.
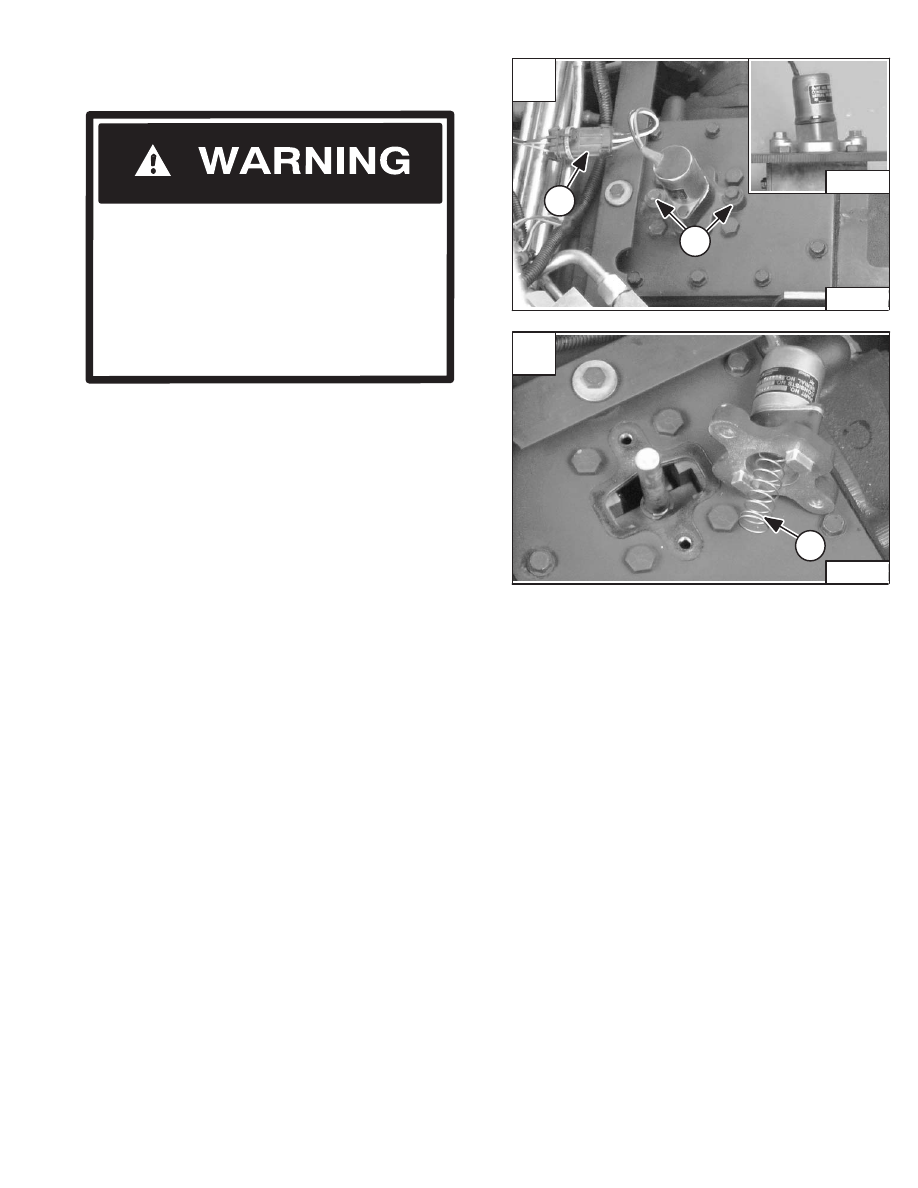
Remove the Do Not Modify sta–strap (P/N 6665527) from
the electric solenoid connector (Item 1) [A].
Installation: Install a new Do Not Modify sta–strap (P/N
6665527) on the electric solenoid connector.
Remove the two mounting bolts (Item 2) [A] from the
electric solenoid mounting bracket.
Installation: Tighten the mounting bolts to 25–28 ft.–lbs.
(34–38 Nm) torque. Be sure the solenoid mounting
bracket is installed in the same position. The solenoid
mounting surface has a slight angle which tips the top of
the solenoid toward the rear of the loader when installed
correctly. See inset photo [A].
Remove the electric solenoid and bracket assembly from
the chaincase cover [B].
Remove and inspect the compression spring (Item 1) [B]
for wear or damage. Replace if necessary. The spring
may also stay with the shaft when the electric solenoid
and bracket are removed from the chaincase.
Installation: Install the compression spring (Item 1) [B]
on the collar located on the electric solenoid.
Revised June 01
Do not modify the electrical wiring connected
to the traction lock solenoid or any part of the
traction lock system. The traction lock
provides the locking function of the parking
brake. Service work on the traction lock system
should only be performed by a qualified
technician. Use only genuine Bobcat parts if
repair is necessary.
W–2165–0100
AVOID INJURY OR DEATH
A
P–04135
1
2
P–04712
773 BICS Loader
–8–19–
Service Manual
B
P–04138
1
Refer to Page 8–3 for the traction lock inspection
procedure.
Failure to use LOCTITE may allow the traction
lock assembly to loosen up which can cause
damage to the traction lock system.
I–2090–1095
TRACTION LOCK (Cont’d)
Removal And Installation (Cont’d)
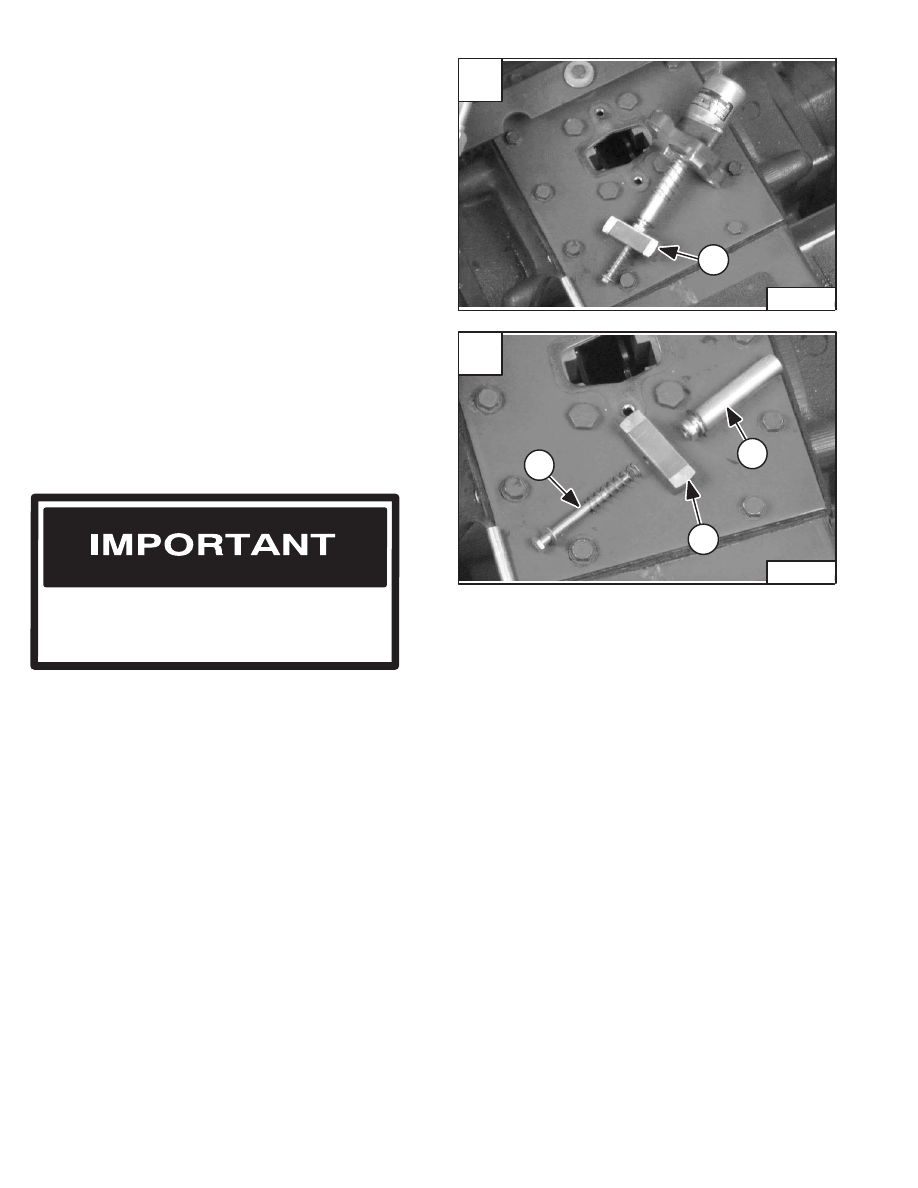
Remove the traction lock assembly (Item 1) [A] from the
chaincase.
Remove the shaft mounting bolt (Item 1) [B], washer and
spring from the assembly shaft (Item 2) [B]. Remove the
wedge (Item 3) [B] and inspect all parts for damage or
wear. Replace if necessary.
Installation: Thoroughly clean and dry the shaft
mounting bolt (Item 1) [B], the shaft (Item 2) [B] and
wedge (Item 3) [B]. Use LOCTITE #242 when
assembling these parts to the traction lock assembly.
Revised Jan. 99
A
P–04134
1
–8–20–
773 BICS Loader
Service Manual
B
P–04139
2
1
3

BOSS
®
DIAGNOSTIC TOOL
Procedure
The tool listed will be needed to do the following
procedure:
MEL1400 – Diagnostic Tool
Stop the engine.
Lift and block the loader. (See Page 1–1.)
Remove the dust cap from the diagnostic connector plug.
Connect the diagnostic tool plug (Item 1) [A] into the
loader connector.
Use the instructions from the BOSS
®
Operation &
Maintenance Manual to make service checks of BOSS
®
system operating unit and other components [A].
SENDER AND SENSOR
Service Checks
Use the following information when checking the senders
and sensor with a volt/ohmmeter.
Component
Value
TEMPERATURE SENDER
70 degrees F. (21 degrees C.)
970 ohms
. . . . . . . . . . .
80 degrees F. (27 degrees C.)
1013 ohms
. . . . . . . . . .
ENGINE OIL PRESSURE SENDER
0 PSI
3 ohms Max.
. . . . . . . . . . . . . . . . . . . . . . . . . . . . . .
6 PSI (41 kPa)
7 ohms Min.
. . . . . . . . . . . . . . . . . . . . . . .
50 PSI (345 kPa)
49 ohms
. . . . . . . . . . . . . . . . . . . . . . . .
70 PSI (483 kPa)
59 ohms
. . . . . . . . . . . . . . . . . . . . . . . .
TRANSMISSION CHARGE PRESSURE SENDER
0 PSI
0–5 ohms
. . . . . . . . . . . . . . . . . . . . . . . . . . . . . . . . .
100 PSI (690 kPa)
58 ohms
. . . . . . . . . . . . . . . . . . . . . . .
130 PSI (896 kPa)
75 ohms
. . . . . . . . . . . . . . . . . . . . . . .
150 PSI (1034 kPa)
87 ohms
. . . . . . . . . . . . . . . . . . . . .
FUEL SENDER
Full
30 ohms
. . . . . . . . . . . . . . . . . . . . . . . . . . . . . . . . . . . .
Empty
270 ohms
. . . . . . . . . . . . . . . . . . . . . . . . . . . . . . . .
RPM SENSOR
Adjustment
Continuity Resistance of 3000–3500 ohms.
Disconnect the connector (Item 1) [B] from the engine
harness.
Loosen the jam nut (Item 2) [B] on the RPM sensor.
Turn the RPM sensor (Item 1) [C] in until it makes contact
with the engine flywheel.
Turn the jam nut until it contacts the flywheel housing. The
jam nut should not be tightened, it needs to turn with the
RPM sensor when the sensor is turned back out for
adjustment.
Turn the RPM sensor and the jam nut out from the
flywheel. Set a clearance of 0.050 inch (1,27 mm)
between the jam nut and the housing with a feeler gauge
[C].
Retighten the jam nut.
NOTE: The plastic tip is used as a gauge to set a new
RPM SENSOR, the plastic tip is designed to
come off after the engine is started.
Revised Jan. 99
A
P–03871
1
C
P–04317
1
773 BICS Loader
–8–21–
Service Manual
B
P–04313
1
2
Нет комментариевНе стесняйтесь поделиться с нами вашим ценным мнением.
Текст