DAF LF45, LF55 Series. Manual — part 320

©
200416
5-15
Removal and installation
CE ENGINE FUEL SYSTEM
ΛΦ45/55 series
4
5
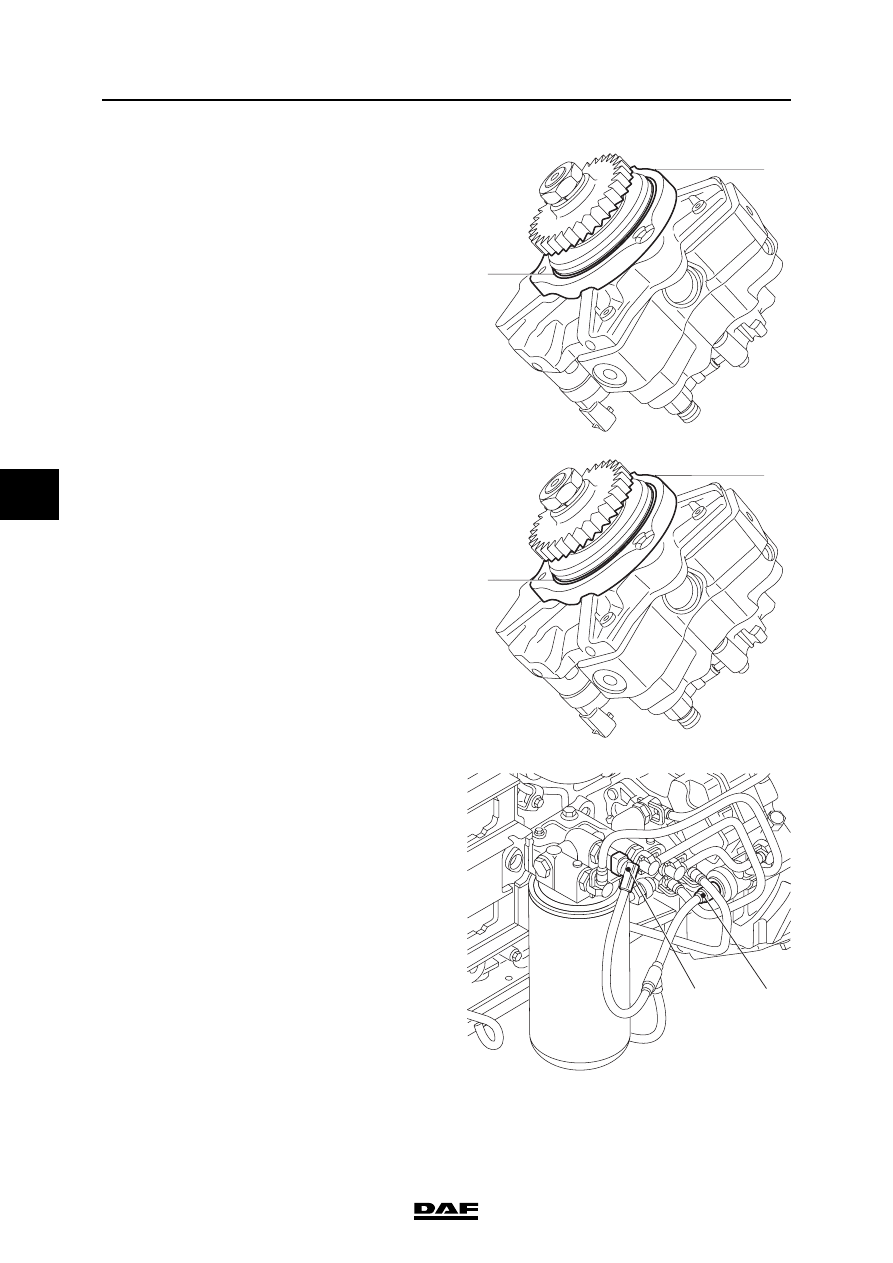
5.6 REMOVAL AND INSTALLATION, HIGH-PRESSURE PUMP
When removing the high-pressure
pump, fuel will escape. Collect the
fuel and avoid the risk of fire.
Dirt in the fuel system can lead to
significant damage to parts of the
system. Prevent this by cleaning the
parts before disassembly and then
sealing all open connections.
Removing the high-pressure pump
1.
Clean the high-pressure pump and that part
of the engine around it thoroughly with, for
example, a steam cleaner. Cover the places
at which leaks have been detected to
prevent dirt getting into the fuel system.
2.
Disconnect the fuel pipes from the high-
pressure pump. Loosen the return pipe only
on the high-pressure pump.
3.
If fitted, uncouple the connector of the fuel
temperature sensor (1) on the fuel fine filter
head and the connector of the fuel pump
control solenoid valve (2).
4.
Remove the fuel fine filter together with the
filter head.
5.
Loosen both unions from the high-pressure
pipe to the fuel rail as well as the pipe
clamps. Remove the high-pressure pipe.
Plug all openings.
6.
Remove the three high-pressure pump
attachment nuts and then the high-pressure
pump.
}
}
i400818
1
2
CE ENGINE FUEL SYSTEM
5-16
©
200416
Removal and installation
5
ΛΦ45/55 series
4
Note:
The high-pressure pump is fitted on the gear side
with an adapter ring (1) and an O-ring (2) in the
timing gear case. If the removal of the high-
pressure pump is particularly difficult, it may be
necessary to press the adapter ring (1) carefully
out of the timing gear case using a small pry bar.
Installing the high-pressure pump
1.
Clean the high-pressure pump. Make sure
that no dirt or cleaner can get into the high-
pressure pump ducts.
2.
Check the high-pressure pump and the drive
gear (externally) for wear and damage.
3.
Fit a new O-ring (2) on the adapter ring (1)
and apply a thin layer of engine oil to the O-
ring.
4.
Fit the high-pressure pump and press it into
the timing gear case by means of the
attachment nuts.
5.
Tighten the attachment nuts to the specified
torque. See "Technical data".
6.
Fit the filter head and the fuel fine filter.
7.
Fit the high-pressure pump to the fuel rail
and tighten the unions. See "Technical data"
for the specified tightening torques.
8.
Tighten the pipe clamps.
9.
If fitted, connect the connector of the fuel
temperature sensor (1) on the fuel fine filter
head and the connector of the fuel pump
control solenoid valve (2).
10. Fit the fuel pipes to the high-pressure pump.
11. Bleed the fuel system. See "Inspection and
adjustment".
12. Start the engine and check the fuel system
for leaks.
2
1
i400817
2
1
i400817
i400818
1
2

©
200416
5-17
Removal and installation
CE ENGINE FUEL SYSTEM
ΛΦ45/55 series
4
5
5.7 REMOVAL AND INSTALLATION, FUEL FINE FILTER
When removing the fuel fine filter, a
quantity of fuel will escape. Collect
the fuel and avoid the risk of fire.
Removing the fuel fine filter
1.
Place a container beneath the fuel fine filter
and remove the filter.
Note:
The fuel fine filter is a disposable filter and
must therefore not be cleaned and re-used.
Installing the fuel fine filter
Note:
Do not fill the fine filter with fuel until it has
been fitted. The fine filter is filled with fuel by
the primer pump after it has been fitted. This
considerably reduces the risk of dirt getting
into the fuel system.
1.
Check by hand whether the coupling piece
for the filter attachment is securely attached.
2.
Lightly lubricate the filter sealing ring with
clean engine oil.
3.
Fit the filter element onto the housing.
Tighten the filter element until the sealing
ring abuts. Tighten the filter element a further
∂ to • turn by hand.
4.
Bleed the fuel system. See "Inspection and
adjustment".
5.
Start the engine and check the fuel system
for leaks. If necessary, retighten the filter by
hand.
}
G0 00 201

CE ENGINE FUEL SYSTEM
5-18
©
200416
Removal and installation
5
ΛΦ45/55 series
4
5.8 REMOVAL AND INSTALLATION, FUEL PREFILTER/WATER SEPARATOR
When removing the fuel prefilter/
water separator, a quantity of fuel
will escape. Collect the fuel and
avoid the risk of fire.
Removing the fuel prefilter/water separator
filter element
1.
Place a container under the filter.
2.
Remove the plug (3) from the water
sensor (2).
3.
Remove the fuel prefilter/water separator
filter element (1) by turning it anti-clockwise.
4.
Remove the water sensor (2) from the filter
element (1).
Installing the fuel prefilter/water separator
filter element
1.
Check by hand whether the coupling piece
for the filter attachment is securely attached.
2.
Lightly lubricate the sealing ring with engine
oil.
3.
Fit the fuel prefilter/water separator filter
element (1) until the sealing ring abuts.
Tighten the filter element a further
∂ to •
turn by hand.
4.
Turn the water sensor (2) onto the filter
element until it abuts. Tighten the water
sensor by about a further
- turn.
Note:
Over-tightening the water sensor (2) may
damage the sensor and/or cause leakage.
5.
Fit the plug (3) on the water sensor (2).
6.
Bleed the fuel system. See "Inspection and
adjustment".
7.
Start the engine and check for leaks. If
necessary, retighten the fuel prefilter/water
separator filter element (1) by hand.
}
G0 00 220
1
2
3
Нет комментариевНе стесняйтесь поделиться с нами вашим ценным мнением.
Текст