DAF LF45, LF55 Series. Manual — part 646
©
200515
3-13
Inspection and adjustment
EXPLANATORY NOTES ON THE MAINTENANCE ACTIVITIES
ΛΦ45/55 series
5
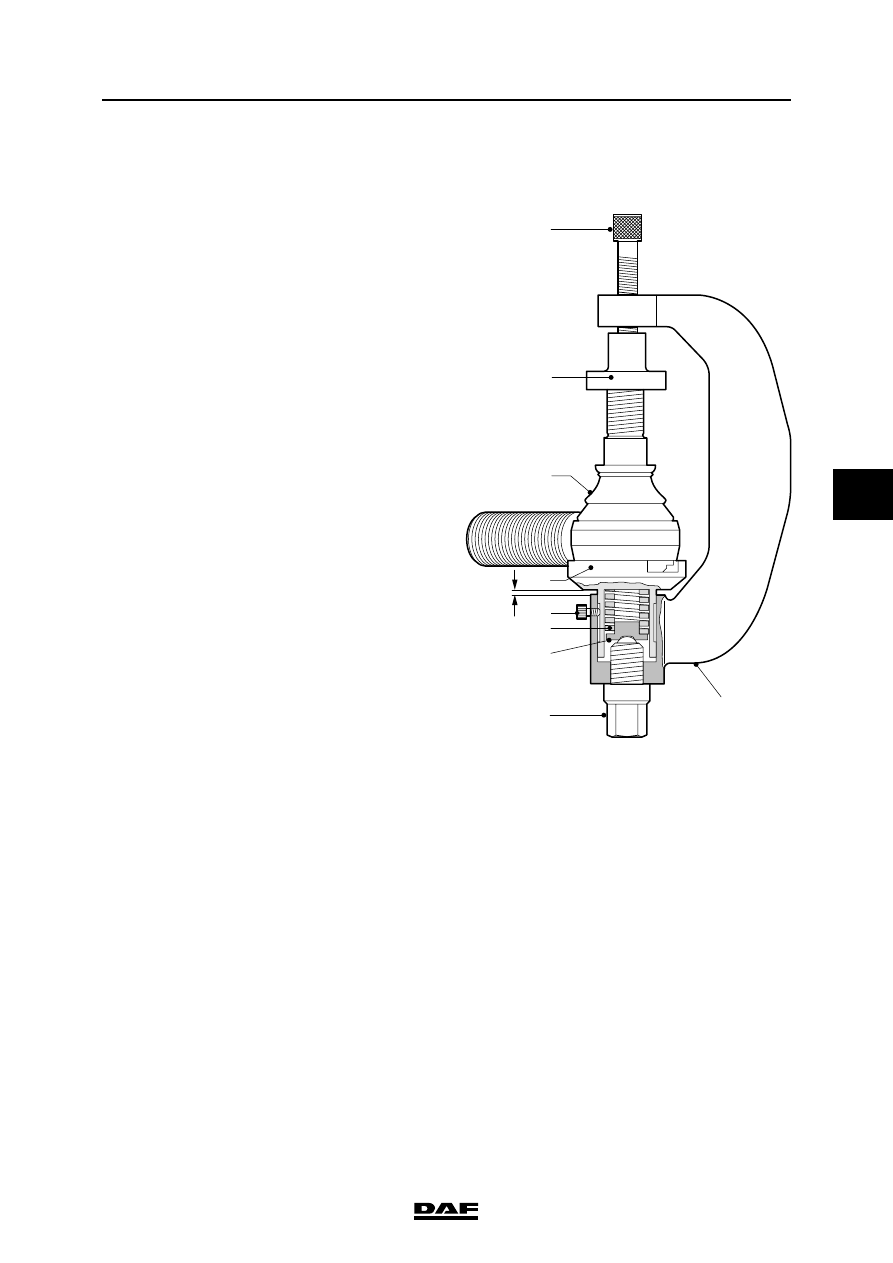
3.19 CHECKING THE STEERING BALL JOINTS
Checking axial steering ball joint play
1.
Check the axial steering-ball joint play using
special tool (DAF no. 1329426)
2.
First jack up the axle until the wheels come
off the ground and put the axle on stands.
3.
Make sure that the castle nut split pin (if
fitted) at the nut does not come into contact
with the head of the threaded end.
4.
Screw the thrust washer (8) on to the
threaded spindle.
5.
Fit the spring retainer (3), spring (4) and
pressure sleeve (6) into bracket (1). Fit the
locking screw (5). It should be possible to
move the pressure sleeve (6) freely.
Note:
Fit the correct pressure sleeve (6).
The pressure sleeve (6) must abut the outer
edge of the steering ball joint (7).
6.
Loosen thrust bolt (2) until the pressure
sleeve (6) with the flange abuts the bracket
(A = 0 mm).
7.
Fit the special tool over the steering ball joint
(7) and turn the threaded spindle (9) by hand
until the special tool is tight around the
steering ball joint (7).
8.
Tighten thrust bolt (2) until its head abuts
bracket (1).
9.
Measure play "A" between the pressure
sleeve and the bracket using a feeler gauge.
Compare the reading with the maximum
permissible steering ball joint play, see
"Technical data".
If necessary, replace the steering ball joint.
9
8
7
6
5
4
3
2
A
1
S700426

EXPLANATORY NOTES ON THE MAINTENANCE ACTIVITIES
3-14
©
200515
Inspection and adjustment
5
ΛΦ45/55 series
3.20 CHECKING THE STEERING OIL LEVEL
1.
Check the steering oil level when the engine
is not running.
2.
Tilt the cab.
3.
Clean the dipstick and its surroundings so
that absolutely no dirt can get into the
reservoir.
4.
Check the fluid level in the reservoir using
the dipstick.
5.
The fluid level should be between the marks
when the steering oil is "cold".
Note:
When the steering oil is at operating
temperature, the level may be above the top
mark.
G0 00 214
©
200515
3-15
Inspection and adjustment
EXPLANATORY NOTES ON THE MAINTENANCE ACTIVITIES
ΛΦ45/55 series
5
3.21 CHECKING THE STEERING GEAR LINES AND CONNECTIONS
1.
Condition of the pipes
-
Check all pipes for tightness and wear.
Where supply pipes are subject to
negative pressure, it is particularly likely
that porous pipes will give rise to
problems (air in the system).
-
If in doubt, always replace the line.
2.
Pipe connections
-
Check every pipe connection for leaks.
3.
Line route
-
Pipes must not be twisted during
assembly. To facilitate checking this,
a mark may have been provided on the
hose (sometimes in the form of text).
-
Pipes should not touch other parts (to
prevent chafing).
-
The course pipes follow should not
include any sharp bends; this applies
especially to the flexible suction and
return pipes.
-
Pipes should not be pinched off by other
components.
EXPLANATORY NOTES ON THE MAINTENANCE ACTIVITIES
3-16
©
200515
Inspection and adjustment
5
ΛΦ45/55 series
3.22 CHECKING THE BRAKE COMPONENTS AND BRAKE SYSTEM FOR LEAKS
1.
While operating the service brake, check
whether any leaks occur in the brake system.
If the brake system of a vehicle has been
charged to the maximum pressure, it should
generally be possible to drive the vehicle
after a period of 16 hours of uninterrupted
standstill, without having to first charge the
brake system to adequate operating
pressure. This implies a maximum pressure
drop of approx. 0.4 bar per hour at normal
system pressure.
Note:
Always connect auxiliary consumers and
accessories to circuit 4.
3.23 CHECKING THE BRAKE CYLINDER FASTENING
1.
Check that the brake cylinders do not move
during operation of the service brake.
Нет комментариевНе стесняйтесь поделиться с нами вашим ценным мнением.
Текст