DAF LF45, LF55 Series. Manual — part 271
©
200508
5-7
Removal and installation
CLUTCH
ΛΦ45/55 series
3
9
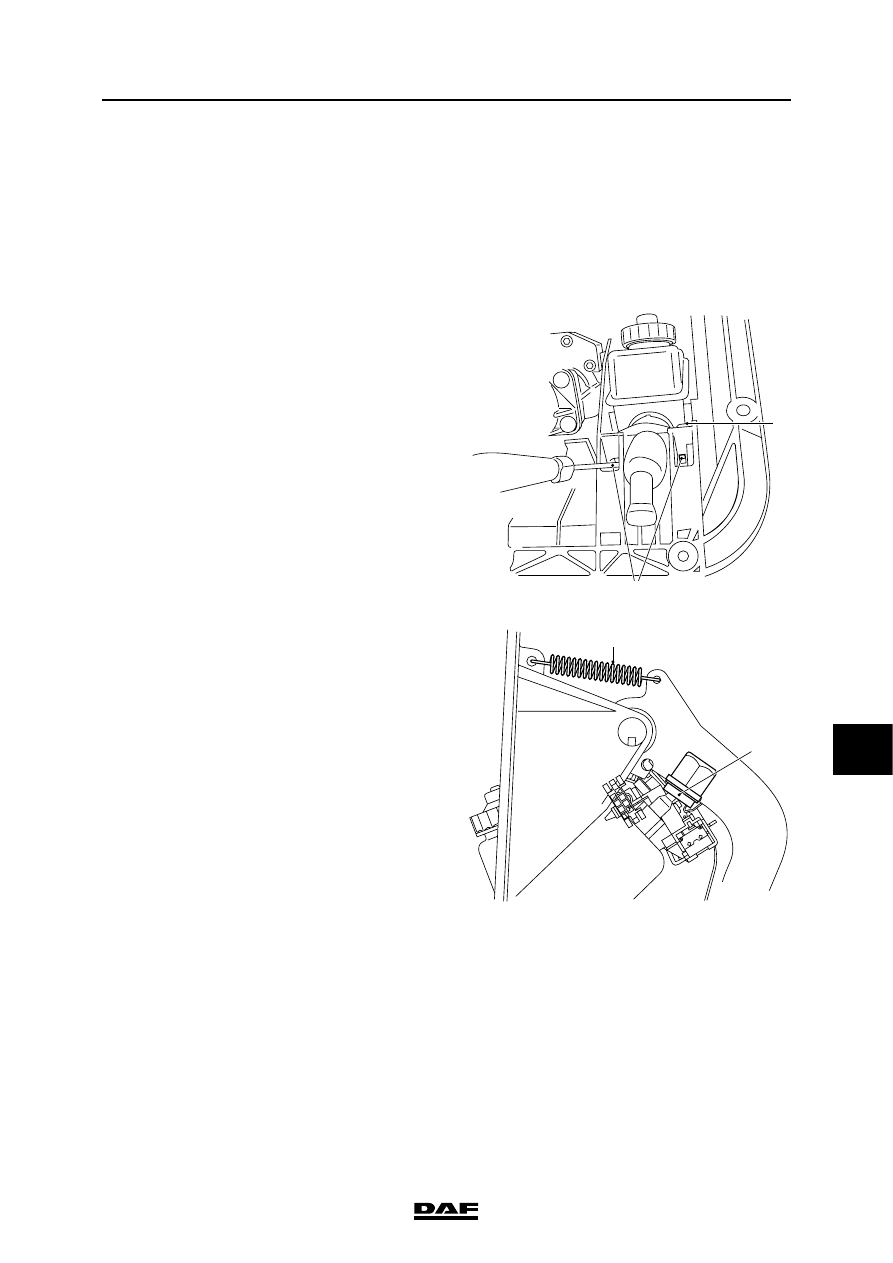
5.6 REMOVING AND INSTALLING CLUTCH CYLINDER
Removing the clutch cylinder
1.
Drain the clutch system; see "Draining and
filling".
2.
Remove the retainer clip and the hydraulic
pipe.
3.
Remove the attachment screw from the
fastening bridge (1).
4.
Using a screwdriver, press the lock levers (2)
back and remove the fastening bridge (1).
5.
Screw the plastic fastening jig (1) out of
the clutch pedal. If necessary, detach the
spring (2).
6.
Remove the clutch cylinder.
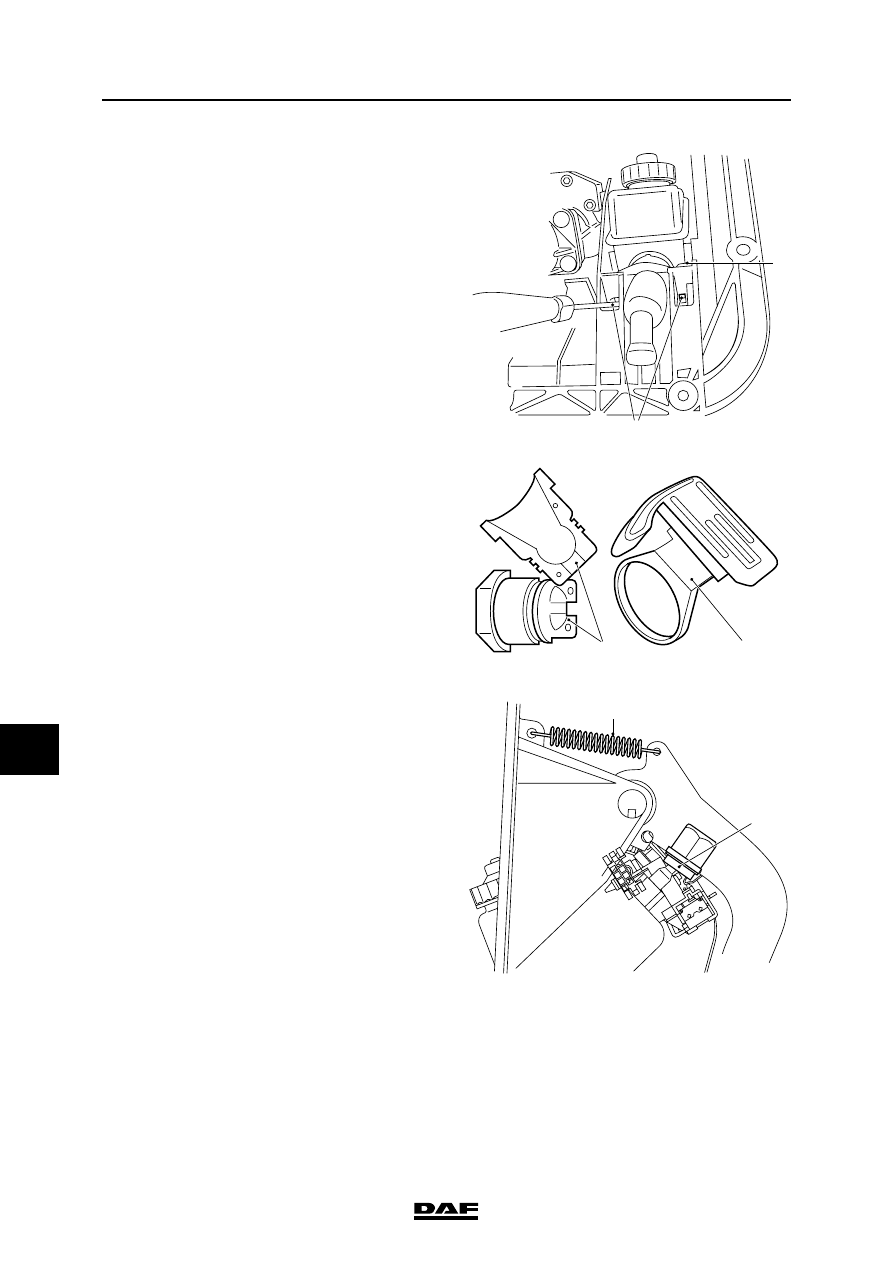
Fitting clutch cylinder
1.
Reposition the clutch cylinder in the holder.
2
1
V3 00 577
2
1
V3 00 579
CLUTCH
5-8
©
200508
Removal and installation
9
ΛΦ45/55 series
3
2.
Fit the fastening bridge (1) and tighten the
attachment screw.
3.
Clip the plastic fastening jig (1) around the
clutch cylinder push rod and fit the switch
control (2) over the jig.
4.
Screw the plastic fastening jig (1) into the
pedal.
5.
Fit the spring (2) if it has been removed.
6.
Fill the clutch system; see "Draining and
filling".
2
1
V3 00 577
2
1
V3 00 576
2
1
V3 00 579
©
200508
6-1
Draining and filling
CLUTCH
ΛΦ45/55 series
3
9
6. DRAINING AND FILLING
6.1 DRAINING AND FILLING CLUTCH SYSTEM
Hydraulic fluid is toxic and can
therefore have a damaging effect on
your health. Any direct or indirect
physical contact should therefore be
avoided. As hydraulic fluid is also
corrosive it may damage the
paintwork of the vehicle. Any
contact between hydraulic fluid and
paintwork should therefore be
avoided.
Always use new and clean hydraulic
fluid which has been kept in a sealed
container that meets the
specifications. Hydraulic fluid which
has absorbed water (from the
ambient air) may have an adverse
effect on the operation of the clutch
system. Avoid any contact with
mineral oil. Even one drop of mineral
oil in the system will damage the
seals.
Draining clutch system
1.
Place a container beneath the clutch servo.
2.
Disconnect the supply pipe from the clutch
servo and drain the oil from the reservoir by
moving the pedal up and down.
3.
Reinstall the supply pipe.
Filling clutch system
1.
Fill the reservoir with the specified fluid and
bleed the system.
}
}
CLUTCH
6-2
©
200508
Draining and filling
9
ΛΦ45/55 series
3
6.2 BLEEDING CLUTCH SYSTEM
Hydraulic fluid is toxic and can
therefore have a damaging effect on
your health. Any direct or indirect
physical contact should therefore be
avoided. As hydraulic fluid is also
corrosive it may damage the
paintwork of the vehicle. Any
contact between hydraulic fluid and
paintwork should therefore be
avoided.
Always use new and clean hydraulic
fluid which has been kept in a sealed
container that meets the
specifications. Hydraulic fluid which
has absorbed water (from the
ambient air) may have an adverse
effect on the operation of the clutch
system. Avoid any contact with
mineral oil. Even one drop of mineral
oil in the system will damage the
seals.
Bleeding the clutch system using the "servo"
bleed tank
1.
Connect the "servo" bleed tank to the
reservoir.
Note:
Filling too quickly causes foaming, which makes
bleeding virtually impossible.
2.
Fill the system via the "servo" bleed tank.
3.
Connect a transparent pipe to the clutch
servo's bleed nipple. Ensure that the
hydraulic fluid is collected.
4.
Open the bleed nipple two full turns.
5.
As soon as no more air bubbles escape from
the transparent pipe, the bleed nipple can be
closed again.
6.
Check the fluid level. See "Inspection and
adjustment".
}
}
Нет комментариевНе стесняйтесь поделиться с нами вашим ценным мнением.
Текст