Dodge Dakota (ND). Manual — part 308
8. Reconnect the battery negative cable.
LAMP-HIGH MOUNTED STOP
REMOVAL
BULB
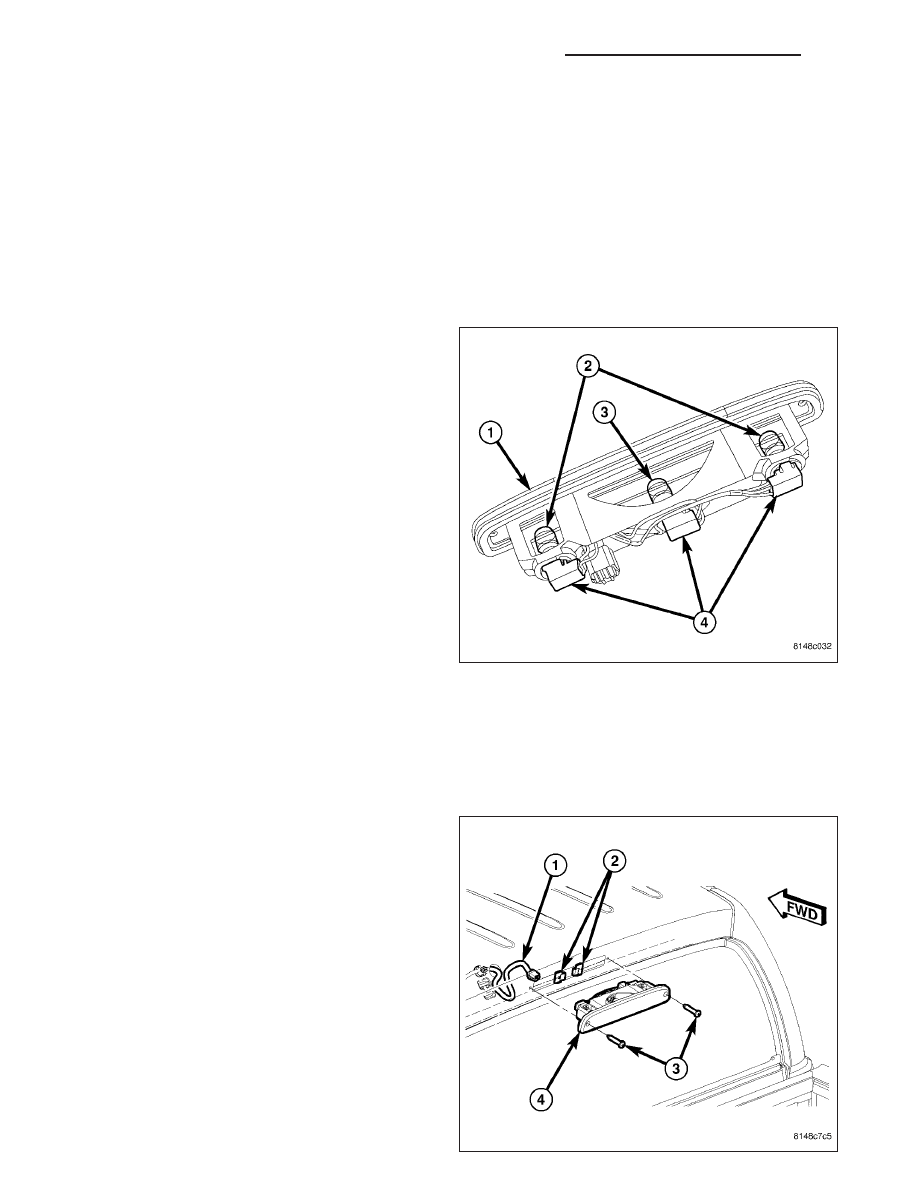
NOTE: The Center High Mounted Stop Lamp (CHMSL) houses three bulbs. The center bulb is the CHMSL
bulb and illuminates through a red lens, while the two outboard bulbs are for the cargo lamps and illumi-
nate through clear lenses. The bulb types and service procedures are identical for all three of these bulbs.
1. Disconnect and isolate the battery negative cable.
2. Remove the two screws that secure the CHMSL to
the rear cab roof header panel.
3. Pull the CHMSL lens and housing (1) away from
the header panel far enough to access the lamp
wiring and bulb sockets (4) on the back of the
lamp.
4. Firmly grasp the center socket on the back of the
lamp housing and rotate it counterclockwise about
30 degrees to unlock it.
5. Pull the socket and bulb straight out from the
keyed opening in the housing.
6. Pull the base of the bulb (3) straight out of the
socket.
LAMP
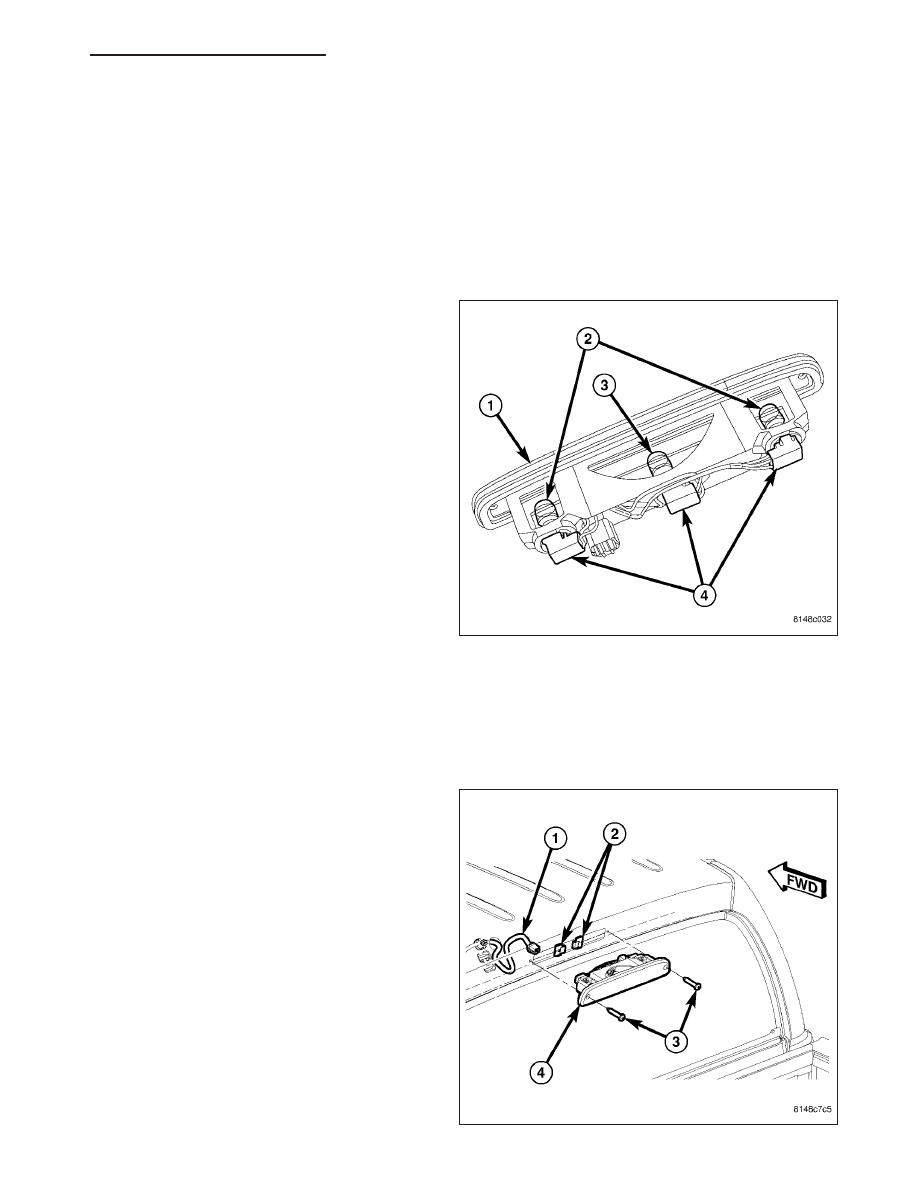
NOTE: The Center High Mounted Stop Lamp (CHMSL) for this model incorporates two integral cargo lamps.
The center bulb is the CHMSL bulb and illuminates through a red lens, while the two outboard bulbs are for
the cargo lamps and illuminate through clear lenses.
1. Disconnect and isolate the battery negative cable.
2. Remove the two screws (3) that secure the Center
High Mounted Stop Lamp (CHMSL) (4) to the rear
roof header panel.
3. Pull the CHMSL away from the opening in the roof
header far enough to access and disconnect the
wire harness connector (1) from the pigtail connec-
tor on the back of the lamp housing.
4. Remove the CHMSL from the roof header.
8L - 94
LAMPS/LIGHTING - EXTERIOR - SERVICE INFORMATION
ND
INSTALLATION
BULB
CAUTION: Always use the correct bulb size and type for replacement. An incorrect bulb size or type may
overheat and cause damage to the lamp, the socket and/or the lamp wiring.
NOTE: The Center High Mounted Stop Lamp (CHMSL) houses three bulbs. The center bulb is the CHMSL
bulb and illuminates through a red lens, while the two outboard bulbs are for the cargo lamps and illumi-
nate through clear lenses. The bulb types and service procedures are identical for all three of these bulbs.
1. Align the base of the CHMSL bulb (3) with the
socket (4).
2. Push the bulb straight into the socket until the base
is firmly seated.
3. Align the socket and bulb with the keyed opening
on the back of CHMSL housing (1).
4. Insert the socket and bulb into the housing until the
socket is firmly seated.
5. Rotate the socket clockwise about 30 degrees to
lock it into place.
6. Position the CHMSL into the opening in the rear
cab roof header panel.
7. Install and tighten the two screws that secure the
CHMSL to the header panel. Tighten the screws to
2 N·m (20 in. lbs.).
8. Reconnect the battery negative cable.
LAMP
NOTE: The Center High Mounted Stop Lamp (CHMSL) for this model incorporates two integral cargo lamps.
The center bulb is the CHMSL bulb and illuminates through a red lens, while the two outboard bulbs are for
the cargo lamps and illuminate through clear lenses.
1. Check to be certain that the two J-nuts (2) are
properly positioned on the rear roof header inner
panel.
2. Position the Center High Mounted Stop Lamp
(CHMSL) (4) near the rear roof header panel open-
ing.
3. Reconnect the wire harness connector (1) to the
pigtail connector on the back of the CHMSL hous-
ing.
4. Install and tighten the two screws (3) that secure
the CHMSL to the rear roof header inner panel.
Tighten the screws to 2 N·m (20 in. lbs.).
5. Reconnect the battery negative cable.
ND
LAMPS/LIGHTING - EXTERIOR - SERVICE INFORMATION
8L - 95
FRONT FOG LAMP
REMOVAL
BULB
CAUTION: Do not contaminate the bulb glass by touching it with your fingers or by allowing it to contact
other oily surfaces. Shortened bulb life will result.
1. Disconnect and isolate the battery negative cable.
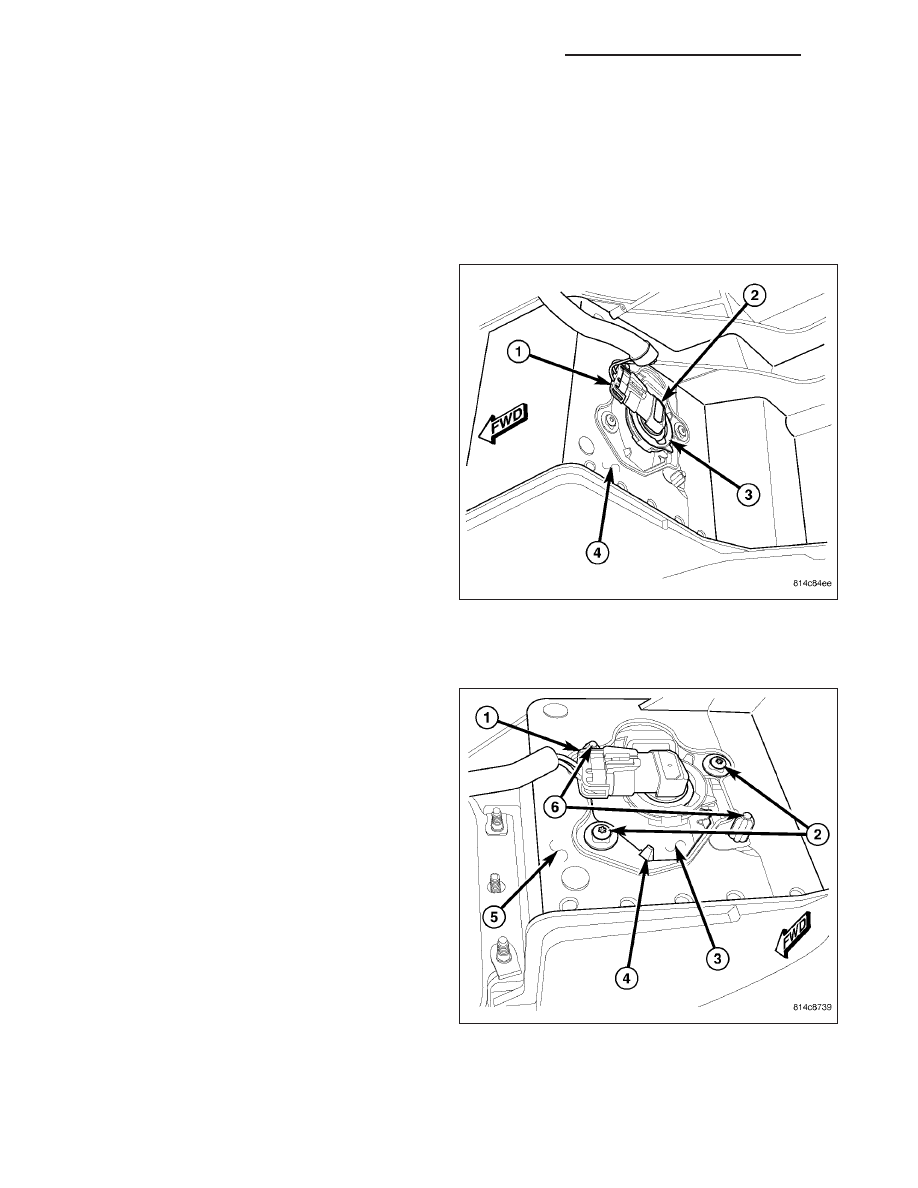
2. Reach under and behind the front fascia to access
the front fog lamp housing (3) on the back of the
front bumper support (4).
3. Disconnect the wire harness connector (1) from the
fog lamp socket (2).
4. Firmly grasp the socket on the back of the housing
and rotate it counterclockwise about 30 degrees to
unlock it.
5. Pull the socket and bulb straight out from the
keyed opening in the housing.
6. Pull the base of the bulb straight out of the socket.
LAMP
1. Disconnect and isolate the battery negative cable.
2. Remove the front fascia from the front bumper sup-
port.
(Refer
to
13
-
FRAME
&
BUMPERS/
BUMPERS/FRONT FASCIA - REMOVAL).
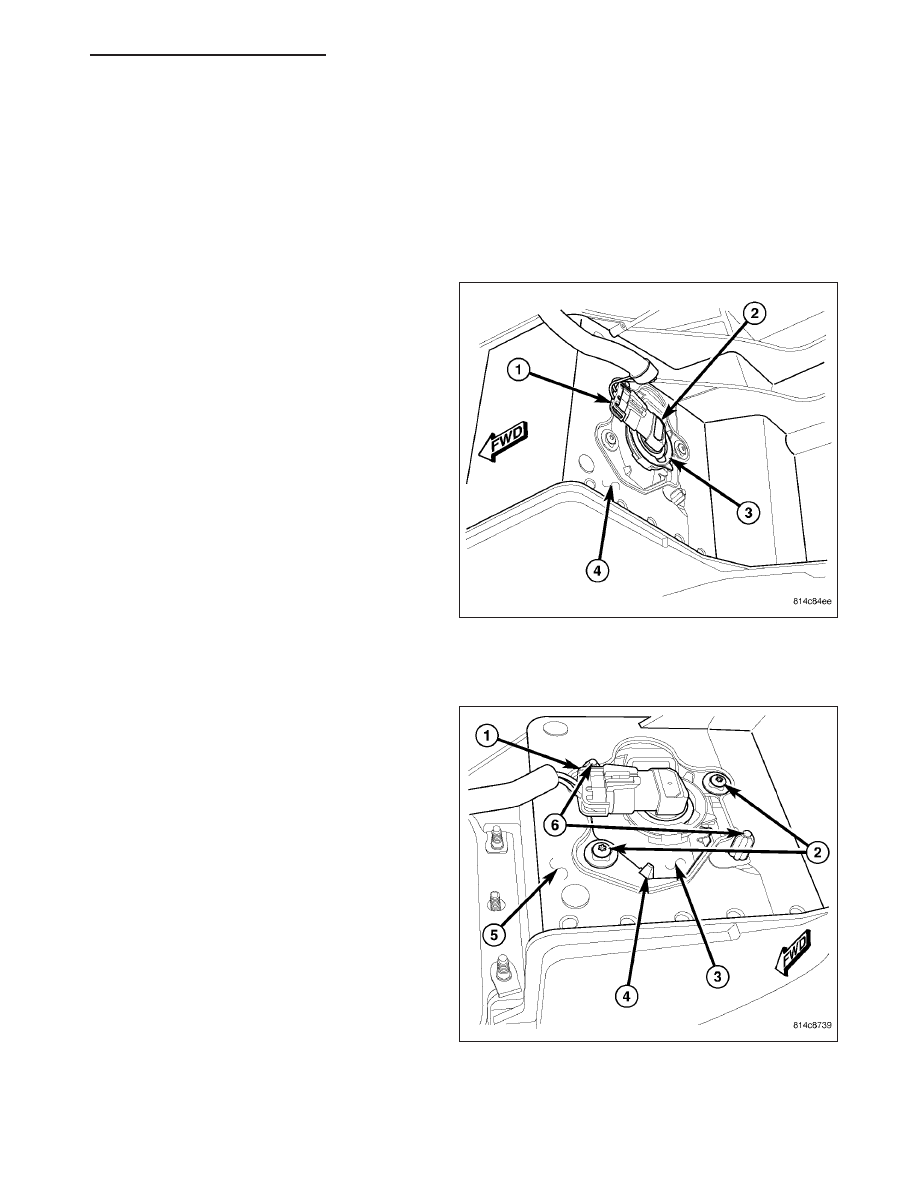
3. Reach under and behind the front of the vehicle to
access the front fog lamp housing (3) on the back
of the front bumper support (5).
4. Disconnect the wire harness connector (1) from the
fog lamp bulb socket.
5. Remove the two screws (2) that secure the fog
lamp mounting bracket to the bumper support.
6. Release the three integral latch clips (4) that
secure the fog lamp mounting bracket to the open-
ing in the bumper support.
7. Remove the lamp and mounting bracket as a unit
from the seat in the face of the bumper support.
8L - 96
LAMPS/LIGHTING - EXTERIOR - SERVICE INFORMATION
ND
INSTALLATION
BULB
CAUTION: Always use the correct bulb size and type for replacement. An incorrect bulb size or type may
overheat and cause damage to the lamp, the socket and/or the lamp wiring.
CAUTION: Do not contaminate the bulb glass by touching it with your fingers or by allowing it to contact
other oily surfaces. Shortened bulb life will result.
1. Align the base of the bulb with the front fog lamp
socket (2).
2. Push the bulb straight into the socket until the base
is firmly seated.
3. Align the socket and bulb with the keyed opening
on the back of the front fog lamp housing (3).
4. Insert the socket and bulb into the housing until the
socket is firmly seated.
5. Rotate the socket clockwise about 30 degrees to
lock it into place. The socket connector receptacle
should be in a horizontal orientation.
6. Reconnect the wire harness connector (1) to the
socket.
7. Reconnect the battery negative cable.
LAMP
1. Position the front fog lamp (3) and mounting
bracket as a unit into the seat on the face of the
front bumper support (5).
2. Be certain that the alignment pins (6) on the back
of the lamp mounting bracket are inserted through
the alignment holes in the back of the seat, then
press on the front of the lamp using hand pressure
until the three latch clips (4) on the mounting
bracket are fully engaged in the opening in the
bumper support.
3. From the back of the bumper support, install and
tighten the two screws (2) that secure the lamp
mounting bracket to the bumper support. Tighten
the screws to 2 N·m (14 in. lbs.).
4. Reconnect the wire harness connector (1) to the
fog lamp bulb socket.
5. Reinstall the front fascia onto the bumper support.
(Refer to 13 - FRAME & BUMPERS/BUMPERS/
FRONT FASCIA - INSTALLATION).
6. Reconnect the battery negative cable.
7. Confirm proper front fog lamp alignment. (Refer to 8 - ELECTRICAL/LAMPS/LIGHTING - EXTERIOR - STAN-
DARD PROCEDURE - FRONT LAMP AIMING).
ND
LAMPS/LIGHTING - EXTERIOR - SERVICE INFORMATION
8L - 97
Нет комментариевНе стесняйтесь поделиться с нами вашим ценным мнением.
Текст